Progress Lighting P5015-09 Transitional Four Light Pendant User Manual
Model: P5015-09
Introduction
Thank you for choosing the Progress Lighting P5015-09 Transitional Four Light Pendant. This fixture features a sleek metal frame supporting a white linen drum shade, designed to complement various interior styles. This manual provides essential information for safe installation, operation, and maintenance of your new pendant light.
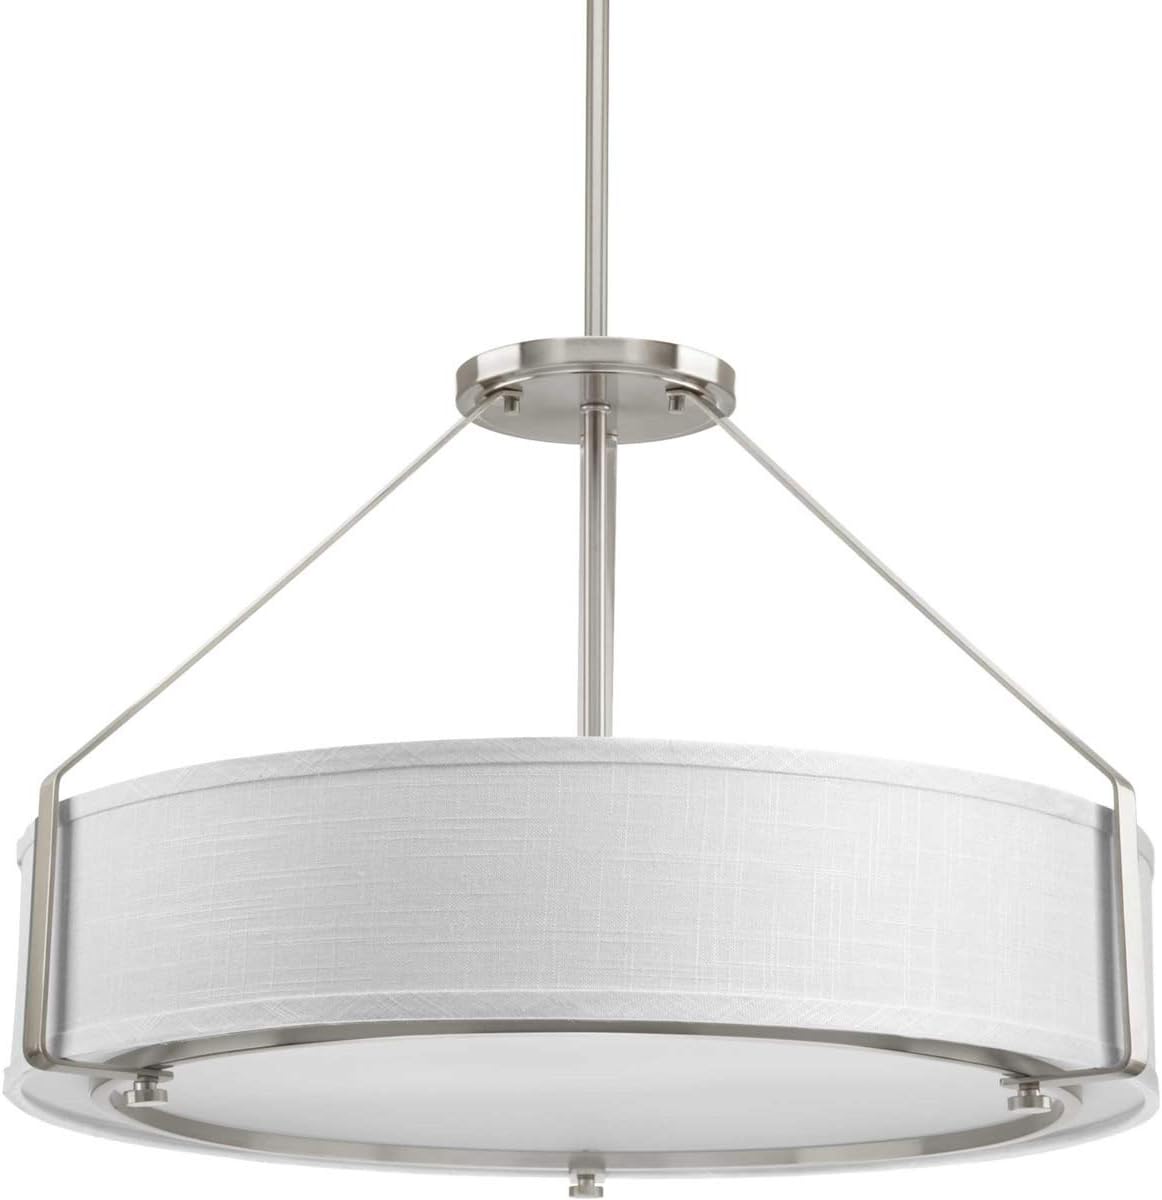
This image displays the Progress Lighting P5015-09 pendant light, featuring a brushed nickel finish frame and a white linen drum shade. The fixture is suspended by a central rod and supported by thin cables.
Important Safety Information
Please read all instructions carefully before beginning installation. Failure to do so may result in electric shock, fire, or other injuries that could be fatal or cause property damage.
- WARNING: To avoid electric shock, disconnect power at the circuit breaker or fuse box before installation.
- All wiring must be in accordance with national and local electrical codes. If you are unsure about wiring, consult a qualified electrician.
- Ensure the fixture is properly grounded.
- Do not exceed the maximum wattage specified for the bulbs.
- Handle glass components with care to prevent breakage.
- Keep flammable materials away from the light fixture.
Package Contents
Verify that all components are present before beginning installation. If any parts are missing or damaged, do not attempt to assemble or install the fixture.
- Pendant Light Fixture Assembly (Metal Frame, Shade, Diffuser)
- Mounting Hardware Kit (Canopy, Mounting Plate, Screws, Wire Nuts)
- Hanging Stems: One (1) 6-inch stem, Four (4) 12-inch stems
- Chain: Six (6) links for sloped ceiling applications
- Instruction Manual

This diagram illustrates the various stem lengths (one 6-inch, four 12-inch) and six chain links provided for adjustable hanging heights and sloped ceiling installations.
Setup and Installation
Professional installation is recommended for optimal safety and performance. Ensure power is disconnected at the circuit breaker before proceeding.
1. Prepare for Installation
- Turn off power at the main circuit breaker.
- Carefully unpack all components and inspect for damage.
- Determine the desired hanging height and assemble the appropriate combination of stems. For sloped ceilings, use the provided chain links.
2. Mount the Fixture
- Attach the mounting plate to the junction box in the ceiling using the provided screws.
- Thread the fixture wires through the center hole of the mounting plate and canopy.
3. Wiring Connections
- Connect the fixture's bare copper ground wire to the house's ground wire (usually bare copper or green) using a wire nut.
- Connect the fixture's white wire to the house's white (neutral) wire using a wire nut.
- Connect the fixture's black wire to the house's black (hot) wire using a wire nut.
- Carefully tuck all wires into the junction box.
4. Final Assembly
- Secure the canopy to the mounting plate.
- Install the light bulbs (not included) into the sockets. Refer to the 'Operating Instructions' section for bulb type.
- Attach the glass diffuser and linen shade to the fixture according to the assembly diagram (if applicable).

The pendant light is shown installed above a dining table in a modern room, illustrating its scale and aesthetic integration within a living space.
Operating Instructions
Bulb Information
- This fixture uses an E26 (Medium Base) bulb.
- We recommend a frosted A19 light bulb with this fixture for optimal light diffusion.
- For cost and energy saving benefits, choose LED bulbs.
- Do not exceed the maximum wattage rating for the fixture.
Dimming Information
This fixture is dimmable when used with compatible wall dimmers and dimmable light bulbs. Ensure both the dimmer switch and the bulbs are rated for dimming functionality.

This graphic specifies that the fixture uses an E26 (Medium Base) bulb, recommends frosted A19 bulbs, and confirms dimmable functionality with compatible wall dimmers and bulbs.
Powering On
Once installation is complete and all connections are secure, restore power at the circuit breaker. Operate the light using a standard wall switch or compatible dimmer switch.
Maintenance
Regular maintenance ensures the longevity and appearance of your pendant light.
- Cleaning: Turn off power and allow the fixture to cool before cleaning. Wipe the metal surfaces with a soft, dry cloth. For the linen shade, use a soft brush or vacuum with a brush attachment to remove dust. The glass diffuser can be cleaned with a mild glass cleaner. Avoid abrasive cleaners or solvents.
- Bulb Replacement: Ensure power is off and bulbs are cool before replacing. Screw in new bulbs firmly but do not overtighten.
- Inspection: Periodically check for loose connections or signs of wear. If any issues are found, consult a qualified electrician.

A detailed view highlighting the quality and finish of the metal components that form the structure of the pendant light.
Troubleshooting
If you experience issues with your pendant light, refer to the following common problems and solutions:
| Problem | Possible Cause | Solution |
|---|---|---|
| Light does not turn on. | No power to the fixture. Loose wiring connection. Faulty bulb. | Check circuit breaker. Verify all wire connections are secure (with power off). Replace bulb. |
| Light flickers. | Loose bulb. Incompatible dimmer switch or bulb. Loose wiring. | Tighten bulb. Ensure dimmer and bulbs are compatible. Check wiring connections (with power off). |
| Humming sound. | Incompatible dimmer switch. | Replace dimmer with one compatible with your bulb type (e.g., LED dimmer for LED bulbs). |
If the problem persists after attempting these solutions, contact a qualified electrician or Progress Lighting customer support.
Specifications
| Feature | Detail |
|---|---|
| Model Number | P5015-09 |
| Brand | Progress Lighting |
| Product Dimensions | 24 x 44.37 x 15.88 inches (Diameter x Max Height x Fixture Height) |
| Fixture Height | 15-7/8 inches |
| Item Weight | 10 pounds |
| Material | Alloy Steel, Glass, Linen |
| Finish Type | Brushed (Pewter, Nickel, Silver) |
| Number of Light Sources | 4 |
| Light Source Type | Incandescent, Compact Fluorescent (CFL), LED compatible |
| Bulb Base | E26 (Medium Base) |
| Voltage | 120 Volts |
| Control Method | Wall Switch, App (if compatible with smart bulbs) |
| Mounting Type | Ceiling Mount |
| Assembly Required | Yes |
| UPC | 785247200955 |
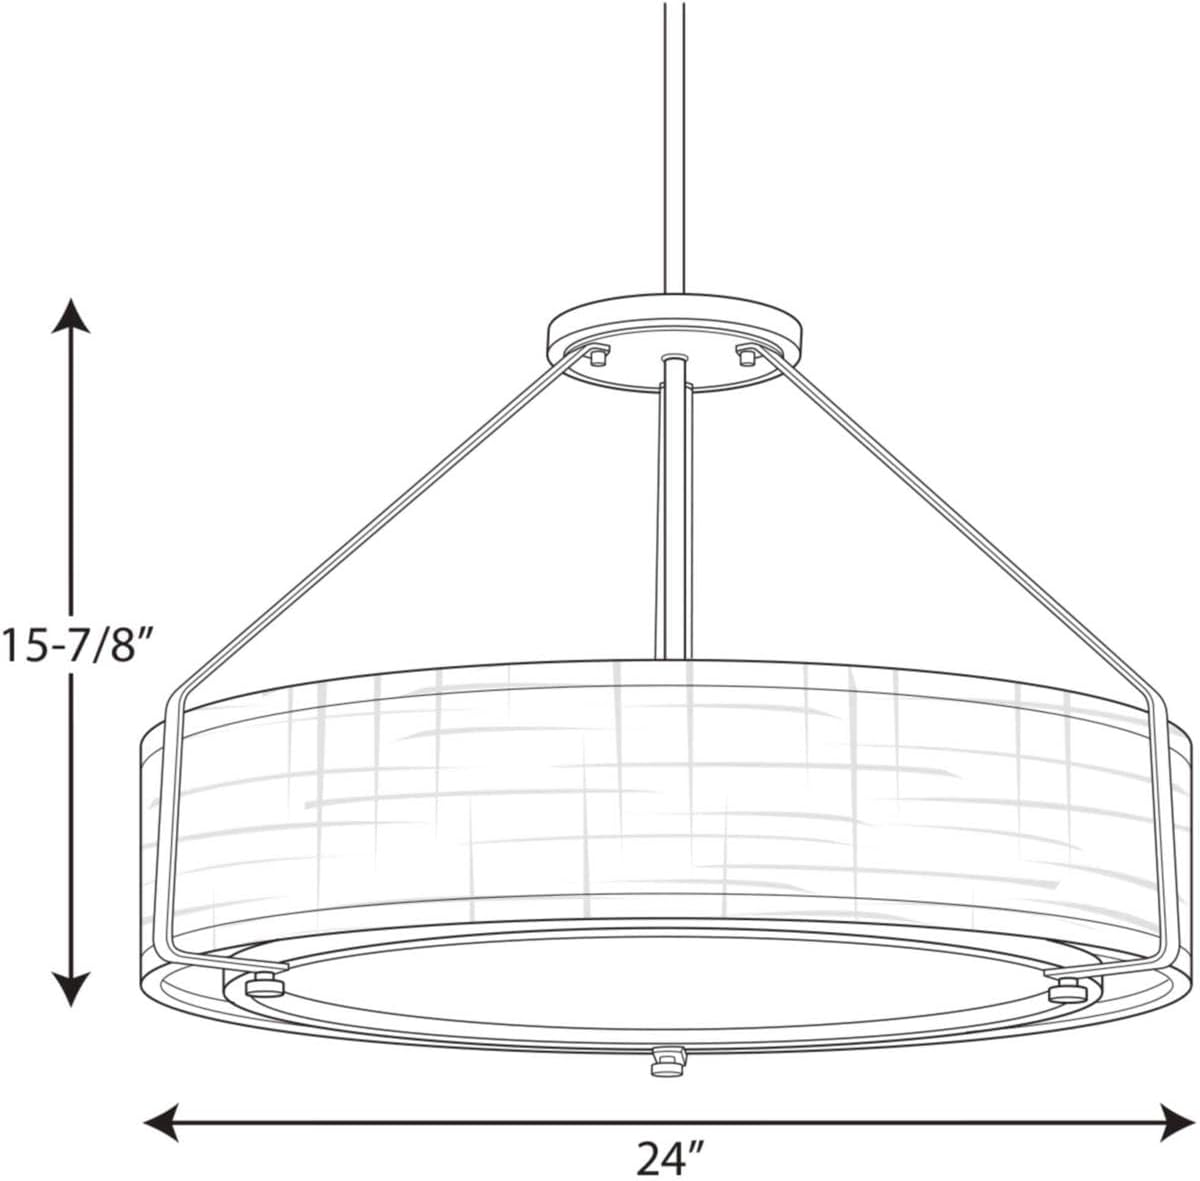
A technical drawing indicating the overall height of 15-7/8 inches and a diameter of 24 inches for the pendant light fixture.
Warranty and Support
Warranty Information
This Progress Lighting fixture comes with a 1-year warranty from the date of purchase, covering defects in materials and workmanship. Please retain your proof of purchase for warranty claims.
Customer Support
For technical assistance, missing parts, or warranty inquiries, please contact Progress Lighting customer service. Refer to the official Progress Lighting website for current contact information.


