
1. Introduction
This manual provides essential information for the safe and efficient installation, operation, and maintenance of the Schneider RM22TR31 3 Phase Voltage Control Relay. Please read this manual thoroughly before using the device.
The RM22TR31 is designed to monitor 3-phase supply voltage, detecting phase sequence, phase failure, undervoltage, and overvoltage conditions. It is suitable for various industrial and commercial applications requiring reliable voltage monitoring.
2. Safety Information
WARNING:
- Always disconnect power before installation, maintenance, or troubleshooting.
- Installation and servicing must be performed by qualified personnel only.
- Ensure proper grounding to prevent electrical shock.
- Do not operate the device if it is damaged.
- Adhere to all local and national electrical codes.
Failure to follow these instructions can result in death, serious injury, or equipment damage.
3. Product Overview
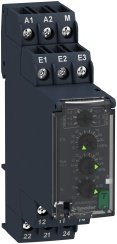
Figure 1: Front view of the Schneider RM22TR31 3 Phase Voltage Control Relay, showing terminal connections for A1, A2, M, E1, E2, E3, and control dials.
The RM22TR31 relay features a compact design for DIN rail mounting. Key components include:
- Input Terminals: For connecting the 3-phase supply voltage (A1, A2, M, E1, E2, E3).
- Output Relays: Two changeover (C/O) contacts for control circuits.
- Adjustment Dials: For setting voltage thresholds and time delays.
- LED Indicators: To display operational status and fault conditions.
4. Setup and Installation
4.1 Mounting
The RM22TR31 is designed for mounting on a 35mm DIN rail. Ensure adequate ventilation around the device.
- Hook the top edge of the relay onto the DIN rail.
- Push the bottom edge firmly until it clicks into place.
- Verify that the relay is securely fastened.
4.2 Wiring
Refer to the wiring diagram provided with the product for specific connection details. Ensure all connections are tight and secure.
- Connect the 3-phase supply voltage (L1, L2, L3) to the corresponding input terminals (e.g., A1, A2, M or E1, E2, E3 depending on configuration).
- Connect the control circuit to the output relay contacts (12, 17, 21, 22, 24).
- Use appropriate wire gauges for the current and voltage ratings.
5. Operating Instructions
5.1 Initial Power-Up
After installation and wiring are complete, apply power to the system. The relay will perform a self-test. Observe the LED indicators for proper operation.
5.2 Setting Parameters
The RM22TR31 allows adjustment of several parameters using the front-panel dials:
- Undervoltage Threshold: Set the minimum acceptable voltage level.
- Overvoltage Threshold: Set the maximum acceptable voltage level.
- Time Delay (On/Off): Adjust the delay (0.1-30 seconds) before the relay trips or resets after a voltage anomaly is detected. This prevents nuisance tripping from momentary fluctuations.
Use a small screwdriver to carefully adjust the dials to the desired settings according to your application requirements.
6. Maintenance
The Schneider RM22TR31 is designed for minimal maintenance. However, periodic checks are recommended to ensure optimal performance and longevity.
- Visual Inspection: Regularly inspect the relay for any signs of physical damage, discoloration, or loose connections.
- Terminal Tightness: Periodically check and re-tighten terminal screws to ensure good electrical contact.
- Environmental Conditions: Ensure the operating environment remains within the specified temperature and humidity ranges. Keep the device free from dust and moisture.
No user-serviceable parts inside. Do not attempt to open or repair the unit.
7. Troubleshooting
This section provides guidance for common issues. For problems not listed here, contact Schneider Electric technical support.
| Problem | Possible Cause | Solution |
|---|---|---|
| Relay not powering on | No input voltage; Incorrect wiring; Blown fuse in supply line. | Verify input voltage at terminals; Check wiring against diagram; Inspect and replace fuses if necessary. |
| Relay trips unexpectedly | Voltage fluctuations; Incorrect threshold settings; External interference. | Adjust time delay to filter momentary fluctuations; Re-evaluate and adjust voltage thresholds; Check for sources of electrical noise. |
| Relay does not trip on fault | Incorrect threshold settings; Fault condition not severe enough; Internal malfunction. | Verify threshold settings are appropriate for the fault; Confirm actual voltage levels; Contact support if problem persists. |
8. Specifications
| Parameter | Value |
|---|---|
| Model Number | RM22TR31 |
| Functions | Phase sequence, Phase failure, Undervoltage, Overvoltage |
| Rated 3-phase Supply Voltage | 200-240VAC |
| Measurement Range | 200-240VAC |
| Time Delay | On/Off delay (0.1-30s) |
| Output | 2 C/O 8 A |
| Manufacturer | Schneider Electric |
| Package Dimensions | 3.93 x 3.34 x 1.18 inches |
| Weight | 8.8 ounces |
9. Warranty and Support
Schneider Electric products are manufactured to high quality standards. For information regarding warranty terms and conditions, please refer to the official Schneider Electric website or contact your local distributor.
For technical assistance, product inquiries, or troubleshooting support, please visit the Schneider Electric official website or contact their customer service department.


