Introduction
The myTouchSmart Simple Set 7-Day Digital Timer is designed to help you save energy, save money, and enhance security by automating your indoor lighting and appliances. This versatile plug-in timer features blue LED indicators for active programs and a large LCD screen for clear viewing and effortless programming. It is compatible with a wide range of light sources, including CFL, LED, incandescent, and halogen bulbs, and also works with dimmable LED and CFL bulbs.
With its advanced features, including SunSmart technology that automatically adjusts to sunrise/sunset times, and a reliable backup battery, this timer offers convenience and peace of mind.
Product Overview

Figure 1: Angled view of the myTouchSmart Simple Set Digital Timer.
The timer features a compact design with a single grounded outlet. Its intuitive interface allows for easy setup and programming of daily or weekly schedules.

Figure 2: Product dimensions and key features including backup battery, daily/weekly settings, grounded outlet, SunSmart technology, and 8 custom ON/OFF times.
Key features include:
- Backup Battery: Saves settings in case of power outage or if unplugged.
- Daily or Weekly Settings: Program schedules for individual days or entire weeks.
- Grounded Outlet: Provides a secure connection for your devices.
- SunSmart Technology: Automatically adjusts ON/OFF times based on local sunrise/sunset.
- Custom ON/OFF Times: Up to 8 programmable ON/OFF events.
Setup Instructions
Follow these steps for initial setup of your myTouchSmart Digital Timer:
- Plug In the Timer: Insert the timer into a standard 125V grounded wall outlet. Ensure it is firmly seated.
- Set Current Date & Time:
- Press the CLOCK button.
- Use the UP (▲) and DOWN (▼) buttons to adjust the current time.
- Press SET to confirm.
- Repeat for setting the current day of the week.
- Select Your Region for SunSmart:
The built-in SunSmart technology requires you to select your geographical region for accurate sunrise/sunset adjustments. Refer to the timer's display and instructions for regional code selection.
- Initial Charge: Allow the timer to charge for at least 30 minutes when first plugged in to ensure the backup battery is sufficiently charged.

Figure 3: Timer plugged into a wall outlet, showing the top view.
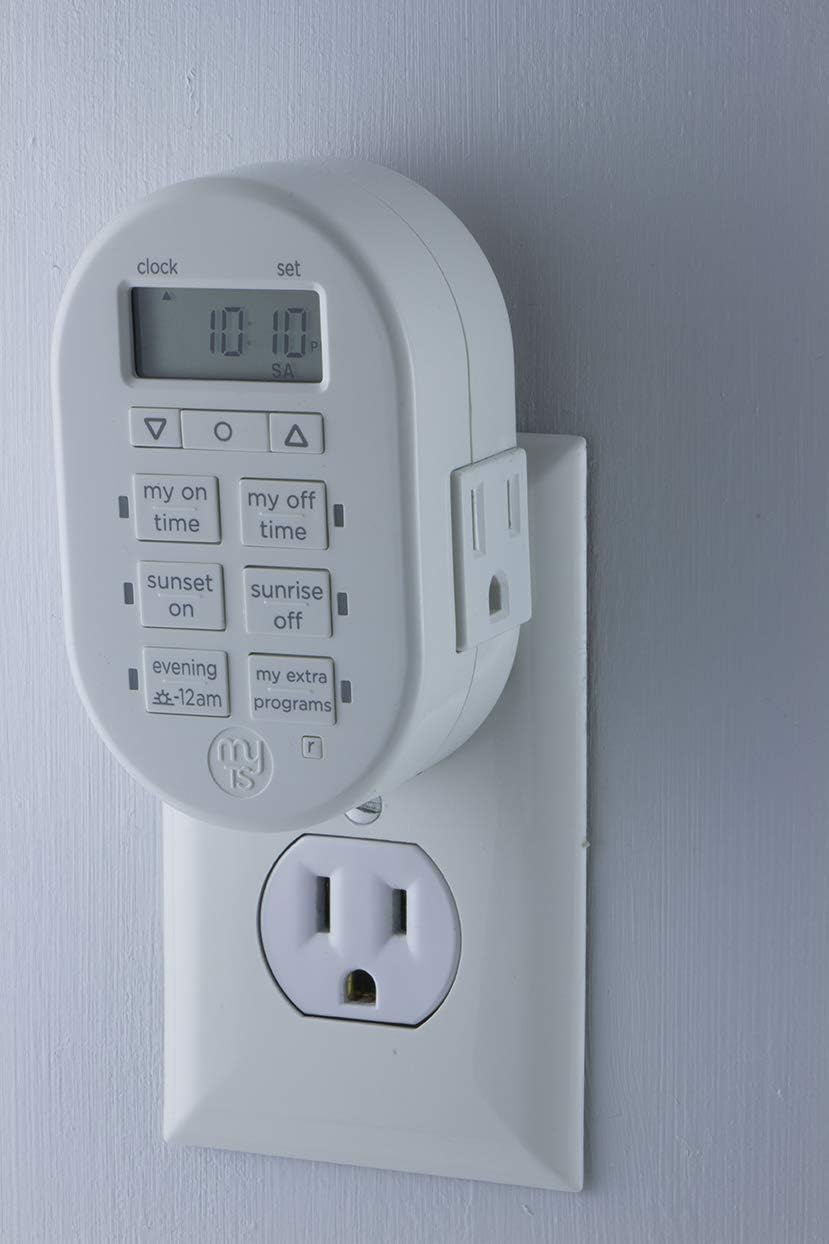
Figure 4: Timer plugged into a wall outlet, showing the side view.

Figure 5: Visual guide for simple setup, showing steps to set time, select region, and choose programs.
Operating Instructions
The myTouchSmart timer offers various programming options to suit your needs. The control panel features a clear LCD display and dedicated buttons for easy navigation.

Figure 6: Detailed view of the timer's control panel, indicating Clock vs. Set mode, AM/PM indicator, Custom ON/OFF time buttons, Sunset/Sunrise ON/OFF buttons, and Evening presets.
Programming Options:
- Custom ON/OFF Times:
Use the MY ON TIME and MY OFF TIME buttons to set specific times for your device to turn on and off. You can program up to 8 custom ON/OFF events per day or week.
To set: Press MY ON TIME or MY OFF TIME, use ▲/▼ to adjust time, then SET to confirm. Repeat for desired days.
- SunSmart Technology (Sunrise/Sunset):
Leverage the SUNSET ON and SUNRISE OFF buttons for automatic adjustments. Once your region is set during initial setup, the timer will automatically turn devices ON at sunset and OFF at sunrise, adapting to seasonal changes.
To activate: Press SUNSET ON or SUNRISE OFF. The timer will use its internal calculations based on your set region.
- Evening Presets:
The EVENING -12AM button provides a convenient preset for evening operation, typically turning on at dusk and off at midnight. Consult the full manual for specific timing of this preset.
- My Extra Programs:
The MY EXTRA PROGRAMS button allows access to additional pre-programmed or user-defined schedules. Refer to the detailed user guide for instructions on configuring these advanced programs.
Applications:
This timer is ideal for a variety of indoor applications, helping to automate your home and deter crime by giving the appearance of occupancy.

Figure 7: The timer can be used to schedule indoor lights, lamps, small appliances, electronics, and seasonal lighting.

Figure 8: The timer helps deter crime by automatically turning lamps or other devices ON/OFF at programmable daily settings, simulating occupancy.
Maintenance
The myTouchSmart Digital Timer requires minimal maintenance. Follow these guidelines to ensure optimal performance:
- Cleaning: Disconnect the timer from the power outlet before cleaning. Wipe the exterior with a soft, dry cloth. Do not use abrasive cleaners or immerse the timer in water.
- Backup Battery: The timer includes a built-in backup battery that saves your programmed settings in the event of a power outage or if the timer is unplugged. This battery is designed for long-term use and typically does not require replacement.
- Storage: If storing the timer for an extended period, ensure it is unplugged and kept in a cool, dry place.
Troubleshooting
If you encounter issues with your myTouchSmart Digital Timer, refer to the following common problems and solutions:
| Problem | Possible Cause / Solution |
|---|---|
| Device does not turn ON/OFF at programmed time. |
|
| Timer display is blank or unresponsive. |
|
| Blue LED indicator lights are not visible during programming. |
|
Specifications
| Feature | Detail |
|---|---|
| Model Number | 33860 |
| Brand | myTouchSmart |
| Color | White |
| Material | Plastic |
| Product Dimensions (D x W x H) | 2"D x 2.13"W x 2.63"H |
| Item Weight | 0.01 Ounces |
| Electrical Rating | 125V, 50/60Hz, 15A 1875W General Purpose/Resistive, 10A 1250W Tungsten, 1/2HP |
| Programmable Events | Up to 8 custom ON/OFF events |
| Mounting Type | Plug In Mount |
| Switch Style | Touch Switch |
| UPC | 030878338608 |
| Manufacturer | Jasco |

Figure 9: Detailed dimensions of the myTouchSmart Digital Timer.
Warranty Information
This myTouchSmart product is backed by a limited warranty. For specific details regarding warranty coverage, duration, and terms, please refer to the warranty card included with your product or visit the official myTouchSmart website. Keep your purchase receipt as proof of purchase for any warranty claims.
Customer Support
For further assistance, technical support, or to view the complete user manual, please visit the official myTouchSmart website or contact their customer service department. Contact information can typically be found on the product packaging or the brand's official website.
Online Resources: www.mytouchsmart.com
User Manual (PDF): Download PDF Manual


