1. Introduction and Overview
The Orbit 1 Dial 4 Outlet Hose Faucet Timer is designed to transform your standard hose faucet into a programmed sprinkler system quickly and efficiently. This system allows for easy setup and operation, enabling automated watering for up to four distinct areas. It is ideal for managing multiple watering zones in your garden or lawn without the need for complex installations.

Image 1.1: The Orbit 1 Dial 4 Outlet Hose Faucet Timer shown in its retail packaging, highlighting its four outlets and water conservation features.
2. Product Features
- Four Independent Outlets: Control up to four separate watering zones from a single faucet.
- Easy-to-Read Display and Dial: Features a large, clear digital display and an intuitive rotary dial for simplified programming.
- Detachable Timer Unit: The main timer unit can be easily detached from the manifold for convenient programming away from the faucet.
- Over-Molded Brass Swivel Connection: Ensures a quick, secure, and leak-resistant attachment to your outdoor faucet.
- Dedicated Rain Delay Button: Allows you to pause your watering schedule for 24, 48, or 72 hours to conserve water during rainfall.
- Quick Installation: Installs in minutes without the need for any digging or complex plumbing.

Image 2.1: A detailed view of the Orbit timer, illustrating its key features such as the brass swivel, large display, four outlets, and rain delay button.
3. Setup
Follow these steps to set up your Orbit Hose Faucet Timer:
- Install Batteries: Open the battery compartment (usually on the back or side of the detachable unit) and insert two AA alkaline batteries (not included). Ensure correct polarity.
- Attach Manifold: Screw the timer manifold securely onto your outdoor hose faucet. Hand-tighten only to prevent damage. Ensure the connection is snug to prevent leaks.
- Connect Hoses: Attach your garden hoses to the desired outlets on the timer manifold.
- Program Timer: Detach the timer unit from the manifold for easier programming. Use the dial and buttons to set your watering schedule (refer to Section 4 for detailed programming).
- Reattach Timer Unit: Once programmed, reattach the timer unit to the manifold.
- Turn Faucet On: Turn on your outdoor faucet completely. The timer will now control the water flow according to your programmed schedule.
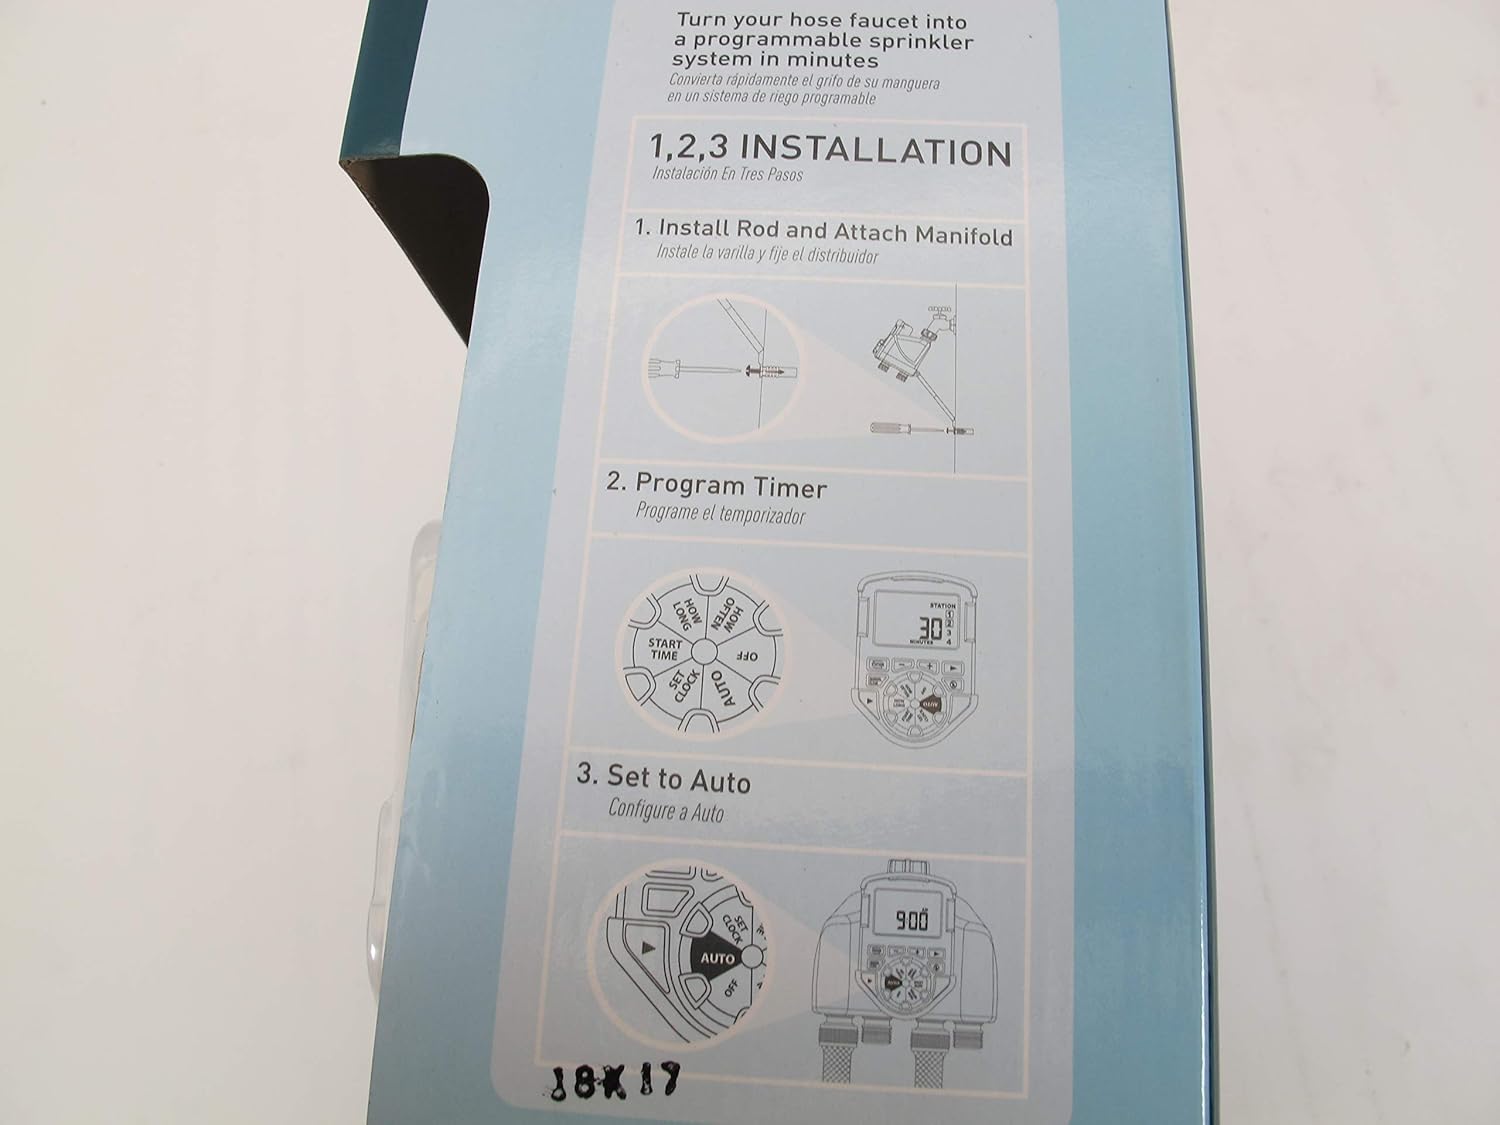
Image 3.1: A visual guide demonstrating the three primary installation steps: attaching the manifold, programming the timer, and setting it to auto mode.
4. Operating Instructions
The Orbit timer features a central dial and several buttons for easy operation. Rotate the dial to select the desired function, then use the + and - buttons to adjust settings. The STATION button allows you to cycle through the four outlets for individual programming.

Image 4.1: A close-up view of the timer's control dial and digital display, showing the various programming options.
4.1. Setting Current Time (SET CLOCK)
- Turn the dial to SET CLOCK.
- Use the + and - buttons to set the current time. Press and hold for faster adjustment.
- Press STATION to confirm and move to the next setting (e.g., AM/PM).
4.2. Setting Start Times (START TIME)
You can set multiple start times for each station.
- Turn the dial to START TIME.
- Press STATION to select the desired outlet (1, 2, 3, or 4).
- Use the + and - buttons to set the first start time.
- Press STATION again to set additional start times for the selected outlet, or rotate the dial to move to the next setting.
4.3. Setting Watering Duration (HOW LONG)
- Turn the dial to HOW LONG.
- Press STATION to select the desired outlet.
- Use the + and - buttons to set the watering duration in minutes or hours.
4.4. Setting Watering Frequency (HOW OFTEN)
- Turn the dial to HOW OFTEN.
- Press STATION to select the desired outlet.
- Use the + and - buttons to set the watering frequency (e.g., every 12 hours, every 2 days, specific days of the week).
4.5. Activating Program (AUTO)
After programming, turn the dial to AUTO. The timer will now operate according to your set schedule.
4.6. Manual Watering (MANUAL/CLEAR)
To manually water without affecting your program:
- Press the MANUAL/CLEAR button.
- Use the STATION button to select the desired outlet.
- Use the + and - buttons to set the manual watering duration.
- The timer will begin watering immediately and stop after the set duration.
4.7. Rain Delay
To pause your watering schedule due to rain:
- Press the Rain Delay button (often depicted with a cloud and raindrop icon).
- Each press will typically cycle through delay options (e.g., 24 hours, 48 hours, 72 hours).
- The timer will resume its schedule automatically after the delay period ends.
4.8. Turning Off (OFF)
To stop all watering, turn the dial to OFF. This will suspend all programmed and manual watering.
5. Maintenance
- Battery Replacement: Replace batteries annually or when the low battery indicator appears on the display. Always use fresh alkaline batteries.
- Cleaning: Periodically clean the timer's exterior with a damp cloth. Do not use abrasive cleaners or submerge the unit in water.
- Winterization: Before the first frost, disconnect the timer from the faucet and drain any remaining water. Store the timer indoors in a dry, protected area to prevent freezing damage.
- Check for Leaks: Regularly inspect all connections for leaks. Tighten connections as needed, but do not overtighten. Replace worn washers if necessary.
6. Troubleshooting
- Timer Not Watering:
- Ensure the dial is set to AUTO.
- Check battery levels and replace if low.
- Verify that the faucet is fully open.
- Confirm that start times, durations, and frequencies are correctly programmed.
- Check if Rain Delay is active.
- Continuous Water Flow:
- This often indicates a valve malfunction. Try turning the dial to OFF and then back to AUTO.
- Remove the timer, check for debris in the valve mechanism, and reinstall.
- If the issue persists, the internal valve may be damaged.
- Leaking Connections:
- Ensure all connections are hand-tight.
- Check the rubber washers inside the connections. Replace if cracked or worn.
- Use plumber's tape on threaded connections if necessary.
- Display Not Working:
- Check battery installation and ensure correct polarity.
- Replace batteries with new ones.
7. Specifications
| Product Dimensions | 3.5 x 11.25 x 13.12 inches |
| Item Weight | 2.15 pounds |
| Manufacturer | Orbit |
| Model Number | 56545 |
| ASIN | B01CT6VKJ2 |
8. Warranty and Support
Specific warranty details for the Orbit 56545 1 Dial 4 Outlet Hose Faucet Timer are not available in the provided product information. For warranty claims, technical support, or further assistance, please contact Orbit customer service directly. Refer to the product packaging or the official Orbit website for the most current contact information.
No official product videos were available in the provided data for inclusion in this manual.


