
1. Introduction
Thank you for choosing the Retevis RT5 Dual Band Walkie Talkie. This professional two-way radio is designed for reliable and clear communication across various environments. Featuring dual-band operation, 128 channels, and a robust design, the RT5 is an ideal communication tool for both personal and professional use. This manual provides detailed instructions for setup, operation, and maintenance to ensure optimal performance and longevity of your device.

Figure 1.1: Retevis RT5 Walkie Talkie Kit
This image displays two Retevis RT5 walkie-talkies, each placed in its charging base, accompanied by their power adapters and included earphones. The walkie-talkies are black and red, highlighting their compact and ergonomic design.
2. Safety Information
- Do not operate the radio in explosive atmospheres (e.g., flammable gases, dust particles, metallic powders).
- Do not charge the battery in wet environments.
- Use only Retevis approved batteries and chargers.
- Do not disassemble or modify the radio. Repairs should only be performed by qualified technicians.
- Keep the radio away from strong magnetic fields.
- Avoid prolonged exposure to direct sunlight or extreme temperatures.
- Maintain a safe distance from medical devices like pacemakers when operating the radio.
3. Package Contents
Upon opening the package, please verify that all items listed below are present and in good condition:
- Retevis RT5 Walkie Talkie Unit(s)
- 1400mAh Li-ion Battery Pack(s)
- Antenna(s)
- Desktop Charger(s)
- Power Adapter(s) (European Standard)
- Belt Clip(s)
- Hand Strap(s)
- Earphone(s)
- User Manual (this document)
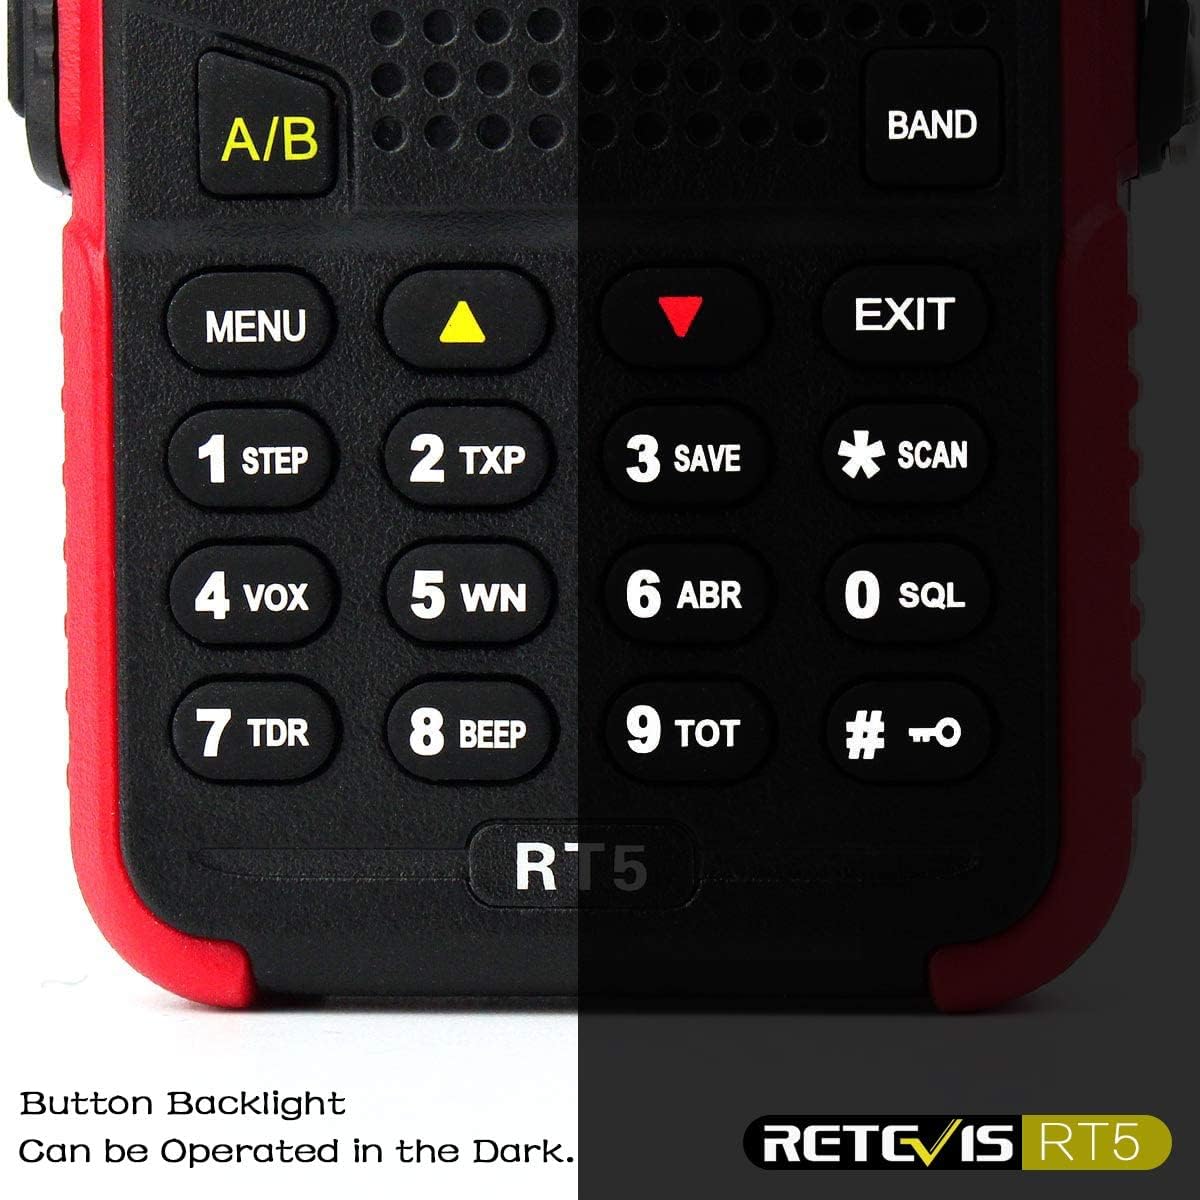
Figure 3.1: Included Accessories
This image displays all components typically included in the Retevis RT5 package: the walkie-talkie unit, battery, antenna, belt clip, desktop charger, power adapter, hand strap, and an earphone.
4. Product Overview
Familiarize yourself with the various parts of your Retevis RT5 walkie talkie:

Figure 4.1: RT5 Component Diagram
This detailed diagram labels the key components of the Retevis RT5 walkie-talkie, including the antenna, flashlight, ON/OFF/Volume knob, LCD display, speaker, frequency/channel switch, LED indicator light, side keys (Side key 1 for FM radio/Alarm, Side key 2 for Monitor/Flashlight), PTT button, microphone, A/B band switch, keypad, VHF/UHF band switch, 2.5mm charge jack, speaker/mic programming port, and battery pack.
- Antenna: For transmitting and receiving signals.
- Flashlight: Integrated LED light for illumination.
- Knob (ON/OFF/Volume): Rotates to turn the radio on/off and adjust volume.
- LCD Display: Shows frequency, channel, battery status, and other indicators.
- Speaker: Outputs received audio.
- Frequency/Channel Switch: Button to toggle between frequency and channel modes.
- LED Indicator Light: Illuminates for transmission (red) or reception (green).
- Side Key 1 (FM radio/Alarm): Programmable shortcut key.
- PTT (Push-to-Talk) Button: Press and hold to transmit, release to receive.
- Side Key 2 (Monitor/Flashlight): Programmable shortcut key.
- Mic: Microphone for voice input.
- A/B Band Switch: Toggles between upper and lower display bands.
- Keypad: For entering frequencies, channels, and menu navigation.
- VHF/UHF Band Switch: Selects between VHF and UHF frequency bands.
- 2.5mm Charge Jack: For direct charging or car charger connection.
- Speaker/Mic Programming Port: For connecting external audio accessories or programming cable.
- Battery Pack: Removable Li-ion battery.
5. Setup
5.1 Battery Installation
- Align the battery pack with the grooves on the back of the radio.
- Slide the battery upwards until it clicks into place securely.
- To remove, push the battery release latch (usually at the bottom of the battery) and slide the battery downwards.
5.2 Antenna Attachment
- Screw the antenna into the connector on the top of the radio by turning it clockwise until it is firmly seated.
- Do not overtighten.

Figure 5.1: High Quality Antenna Connector
This image provides a close-up view of the top of the Retevis RT5 walkie-talkie, highlighting the high-quality antenna connector and the dual-frequency segment antenna. This ensures a secure and efficient connection for optimal signal transmission and reception.
5.3 Charging the Battery
Before first use, fully charge the battery. The battery can be charged while attached to the radio or separately in the desktop charger.
- Connect the power adapter to the desktop charger.
- Plug the power adapter into a standard European wall outlet.
- Place the radio with the battery installed (or just the battery pack) into the charging slot.
- The charger's LED indicator will typically show red during charging and green when fully charged.
- Charging time is approximately 4-5 hours for a full charge.
The RT5 also supports charging via a car charger using the 2.5mm charge jack.

Figure 5.2: Car Charger Support
This image shows the Retevis RT5 walkie-talkie connected to a car charger via its 2.5mm charge jack, demonstrating its versatility for charging on the go.
5.4 Earphone Connection
Connect the included earphone to the speaker/mic programming port on the side of the radio for private listening and hands-free operation.
6. Operating Instructions
6.1 Power On/Off and Volume Adjustment
Rotate the ON/OFF/Volume knob clockwise to turn on the radio. Continue rotating clockwise to increase the volume. Rotate counter-clockwise to decrease volume and turn off the radio.
6.2 Channel and Frequency Selection
- Channel Mode: Use the UP/DOWN arrow keys on the keypad to select from the 128 pre-programmed channels.
- Frequency Mode (VFO): Press the VFO/MR button (often labeled A/B or BAND) to switch to Frequency Mode. Use the keypad to directly input frequencies.
- Dual Band / Dual Standby: The RT5 supports dual band operation (VHF and UHF) and dual standby, allowing you to monitor two different frequencies or channels simultaneously. Use the A/B button to switch between the upper and lower display bands.
6.3 Transmitting and Receiving
- Receiving: When a signal is received on the active channel/frequency, the LED indicator will glow green, and audio will be heard from the speaker.
- Transmitting: Press and hold the PTT (Push-to-Talk) button on the left side of the radio. The LED indicator will glow red. Speak clearly into the microphone. Release the PTT button to return to receive mode.
6.4 CTCSS/DCS Tones
CTCSS (Continuous Tone Coded Squelch System) and DCS (Digital Coded Squelch) tones are used to filter out unwanted signals and allow you to hear only calls from users who are using the same tone. Refer to the full manual for detailed programming instructions for these features.
6.5 VOX Function (Voice Operated Transmit)
The VOX function allows for hands-free transmission. When activated, the radio will automatically transmit when it detects your voice, and stop transmitting when you stop speaking. This feature can be enabled and adjusted via the radio's menu.
6.6 FM Radio
The RT5 includes an FM radio function. Press Side Key 1 (if programmed for FM radio) to activate it. You can scan for stations and listen to broadcasts.
6.7 Flashlight
The integrated LED flashlight can be activated by pressing Side Key 2 (if programmed for flashlight). This provides convenient illumination in low-light conditions.

Figure 6.1: Integrated Flashlight
This image shows a close-up of the top of the Retevis RT5 walkie-talkie, highlighting its integrated LED flashlight, which provides convenient illumination.
6.8 Power Level Selection
The RT5 offers 3 selectable power levels (High, Medium, Low) to optimize battery life and communication range based on your needs. This setting can be adjusted through the radio's menu.
6.9 Keypad Backlight
The keypad features a backlight, allowing for easy operation in dark environments.

Figure 6.2: Keypad Backlight
This image illustrates the Retevis RT5's keypad with its backlight activated, demonstrating that the buttons are clearly visible and operable even in low-light conditions.
7. Maintenance
- Cleaning: Use a soft, damp cloth to clean the radio's surface. Do not use harsh chemicals or abrasive cleaners.
- Battery Care: To maximize battery life, avoid overcharging or completely discharging the battery. Store the battery in a cool, dry place when not in use for extended periods.
- Storage: Store the radio in a dry, dust-free environment, away from direct sunlight and extreme temperatures.
- Antenna: Ensure the antenna is securely attached but do not overtighten. Avoid bending or damaging the antenna.
8. Troubleshooting
| Problem | Possible Cause | Solution |
|---|---|---|
| Radio does not turn on. | Battery is low or not installed correctly. | Charge the battery or re-install it correctly. |
| Cannot transmit or receive. | Incorrect frequency/channel; out of range; antenna loose. | Verify frequency/channel settings; move closer to other radios; check antenna connection. |
| Poor audio quality / Static. | Weak signal; interference; squelch level too low. | Adjust squelch level; move to an open area; check for interference sources. |
| Battery life is short. | Battery not fully charged; old battery; high power transmission. | Ensure full charge; consider replacing old battery; use lower power setting when possible. |
9. Specifications
| Feature | Detail |
|---|---|
| Model | RT5 |
| Brand | Retevis |
| Frequency Range | Dual Band (VHF/UHF) |
| Number of Channels | 128 |
| Battery Capacity | 1400mAh Li-ion |
| Operating Voltage | 7.4 Volts |
| Dimensions (Product) | 18.5 x 11.5 x 10 cm |
| Weight (Product) | 480 g |
| Special Features | DTMF, 50 CTCSS/105 DCS, VOX, FM Radio, LED Flashlight, LCD Display |
| Water Resistance Level | Not water resistant |
10. Warranty and Support
Retevis products are manufactured to high-quality standards. For warranty information, please refer to the warranty card included with your purchase or visit the official Retevis website. For technical support, troubleshooting assistance, or spare parts, please contact Retevis customer service through their official channels.
Official Retevis Website: www.retevis.com


