1. Important Safety Instructions
Always observe basic safety precautions when using electric tools to reduce the risk of fire, electric shock, and personal injury. Read all instructions before operating this product.
- Work Area Safety: Keep your work area clean and well-lit. Cluttered or dark areas invite accidents. Do not operate power tools in explosive atmospheres, such as in the presence of flammable liquids, gases, or dust.
- Electrical Safety: Power tool plugs must match the outlet. Never modify the plug in any way. Avoid body contact with earthed or grounded surfaces.
- Personal Safety: Always wear eye protection. Use hearing protection when operating for extended periods. Dress properly; avoid loose clothing or jewelry.
- Tool Use and Care: Do not force the power tool. Use the correct power tool for your application. Disconnect the plug from the power source and/or the battery pack from the power tool before making any adjustments, changing accessories, or storing power tools.
- Battery Tool Use and Care: Recharge only with the charger specified by the manufacturer. Use power tools only with specifically designated battery packs.
2. Product Overview
The WORX H3 Rotary Hammer WX390.1 is a versatile 3-in-1 tool designed for hammer drilling, rotary drilling, and screwdriving tasks. It features a compact and lightweight design, making it suitable for various applications in masonry, concrete, wood, and metal.
This tool is part of the WORX PowerShare platform, allowing its 20V battery to be interchangeable with other WORX 20V tools. Key features include variable speed control, an integrated LED light for improved visibility, and compatibility with SDS plus bits.

Figure 2.1: WORX H3 Rotary Hammer WX390.1 with its full set of accessories, including various drill bits, screwdriver bits, and the chuck adapter.

Figure 2.2: Detailed diagram illustrating the 3-in-1 functionality (hammer, drill, screwdriver) and the PowerShare battery system of the WORX H3 Rotary Hammer.
3. Components Included
The WORX H3 Rotary Hammer WX390.1 package typically includes the following items:
- WORX H3 Rotary Hammer WX390.1
- 2 x 20V Lithium Ion Batteries
- 1 x Battery Charger (1-hour quick charger)
- 1 x Drill Chuck
- 2 x SDS Drill Bits
- 2 x HSS Drill Bits
- 4 x Screwdriver Bits
- 1 x Carrying Case

Figure 3.1: The WORX H3 Rotary Hammer and its accessories neatly stored within the durable carrying case.
4. Setup
4.1 Battery Charging and Installation
- Charging the Battery: Connect the charger to a power outlet. Insert the 20V Lithium Ion battery into the charger. The charger indicator light will show the charging status. A full charge typically takes approximately 1 hour.
- Installing the Battery: Align the charged battery with the battery port at the base of the tool handle. Slide the battery into place until it clicks securely.
- Removing the Battery: Press the battery release button (usually located on the battery pack) and slide the battery out of the tool.

Figure 4.1: The WORX H3 Rotary Hammer with a 20V PowerShare battery installed, ready for use.
4.2 Bit Installation
The WX390.1 is compatible with SDS plus bits for hammer drilling and rotary drilling, and includes a chuck adapter for standard HSS drill bits and screwdriver bits.
- Installing SDS Plus Bits: Pull back the chuck collar, insert the SDS plus bit into the chuck until it locks, then release the collar. Tug on the bit to ensure it is securely seated.
- Installing Standard Bits (with Chuck Adapter): Attach the included drill chuck adapter to the SDS chuck as you would an SDS bit. Then, insert the desired HSS drill bit or screwdriver bit into the chuck adapter and tighten it securely.
5. Operating Instructions
5.1 Mode Selection
The WORX H3 Rotary Hammer offers three operating modes:
- Hammer Drilling Mode: For drilling into masonry and concrete. Select this mode using the mode selector switch on the side of the tool.
- Rotary Drilling Mode: For drilling into wood, metal, and plastics. Select this mode using the mode selector switch.
- Screwdriving Mode: For driving and removing screws. Use the chuck adapter with appropriate screwdriver bits. Select this mode using the mode selector switch.
5.2 Variable Speed Control
The tool features a variable speed trigger. The speed of operation is controlled by the amount of pressure applied to the trigger. Light pressure results in lower speed, while increased pressure increases the speed. This allows for precise control during various tasks and helps conserve battery life.
5.3 Integrated LED Light
The integrated LED light illuminates the work area, providing better visibility in dimly lit spaces or corners. The light activates automatically when the trigger is pressed.
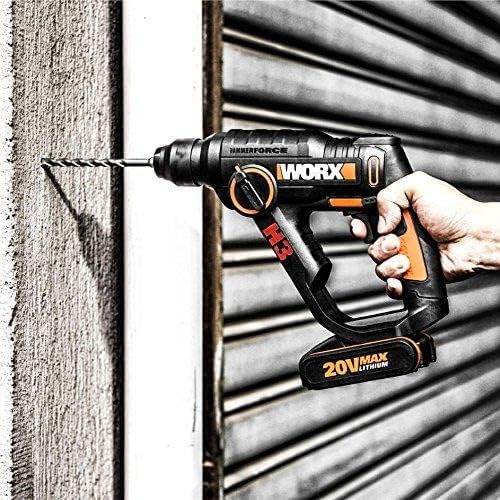
Figure 5.1: An individual demonstrating the use of the WORX H3 Rotary Hammer for drilling into a wall surface.
6. Maintenance
Regular maintenance ensures the longevity and optimal performance of your WORX H3 Rotary Hammer.
- Cleaning: After each use, clean the tool with a soft, damp cloth. Do not use harsh chemicals or abrasive cleaners. Ensure ventilation openings are free from dust and debris.
- Storage: Store the tool, batteries, and charger in the provided carrying case in a dry, secure location, away from direct sunlight and extreme temperatures.
- Battery Care: Store batteries in a cool, dry place. Do not store fully discharged batteries for extended periods. Charge them periodically if not in use.
- Chuck Maintenance: Periodically clean the SDS chuck to ensure smooth bit insertion and removal.
7. Troubleshooting
If you encounter issues with your WORX H3 Rotary Hammer, refer to the following common troubleshooting steps:
- Tool Not Starting:
- Ensure the battery is fully charged and securely installed.
- Check if the mode selector is set correctly.
- Reduced Performance:
- The battery may be low; recharge it.
- The bit may be dull or incorrect for the material; replace or use the appropriate bit.
- Ensure the chuck is clean and the bit is properly seated.
- Battery Not Charging:
- Verify the charger is properly plugged into a working outlet.
- Ensure the battery is correctly inserted into the charger.
- Check for any damage to the battery or charger.
For further assistance, contact WORX customer support.
8. Specifications
| Feature | Specification |
|---|---|
| Brand | WORX |
| Model Number | WX390.1 |
| Power Source | Battery Powered |
| Voltage | 20 Volts |
| Amperage | 2 Amps |
| Battery Capacity | 2 Amp Hours (Lithium Ion) |
| Maximum Power | 40 Watts |
| Maximum Rotational Speed | 1100 RPM |
| Maximum Torque | 30 Newton Meters |
| Drill Type | Hammer Drill |
| Drilling Capacity Wood | 13 Millimeters |
| Drilling Capacity Metal | 13 Millimeters |
| Product Dimensions (L x W x H) | 10.2" x 2.99" x 8.74" |
| Item Weight | 1.6 Kilograms (3.52 pounds) |
| Special Feature | Lightweight, Integrated LED Light |
9. Warranty and Support
WORX products are manufactured to high-quality standards. For detailed warranty information, please refer to the warranty card included with your product or visit the official WORX website. For technical support, spare parts, or service inquiries, please contact WORX customer service.
Additional information and resources may be available at: http://goo.gl/WsuLxF


