1. Introduction
The Claber 87315 COMETA EVO8016 is a sophisticated 6-zone control unit designed for automated irrigation systems. This unit provides precise control over watering schedules, ensuring efficient water usage for your garden or landscape. It features a large liquid crystal display (LCD) and a user-friendly three-button programming system for easy setup and adjustment. The unit allows for flexible watering times ranging from one minute to four hours per line, and includes a manual start button for immediate watering needs. Power is supplied via an external transformer, with a 9V buffer battery for memory retention during power outages. The unit is equipped with a screw terminal block for secure and reliable connections to your irrigation valves.
2. Safety Information
- Read all instructions carefully before installation and operation.
- Ensure the power supply is disconnected before performing any wiring or maintenance.
- Do not immerse the control unit in water. It is designed for outdoor use but should be protected from direct heavy rain and extreme weather conditions.
- Use only the specified external transformer and battery type (9V buffer battery).
- Keep out of reach of children.
- If the unit appears damaged, do not use it. Contact qualified personnel for repair.
3. Package Contents
Verify that all components are present in the package:
- 1 x Claber 87315 COMETA EVO8016 6-Zone Control Unit
- 1 x External Power Transformer
- 1 x 9V Buffer Battery (may be pre-installed or included separately)
- Instruction Manual (this document)
4. Product Overview
Familiarize yourself with the main components of the control unit:
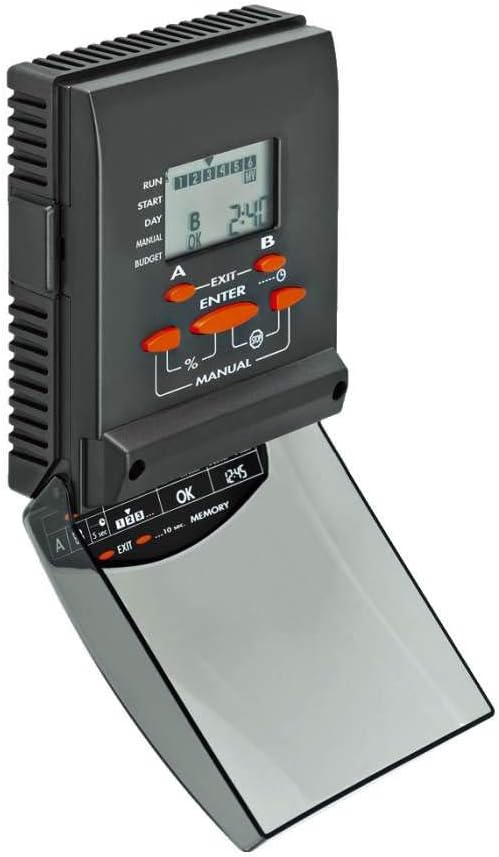
Figure 1: Front view of the Claber 87315 COMETA EVO8016 control unit, showing the LCD screen, programming buttons (A, B, ENTER, EXIT, %, MANUAL), and the hinged cover for the lower controls.
- LCD Screen: Large display showing current time, program status, and programming parameters.
- Programming Buttons (A, B, ENTER, EXIT): Used for navigating menus and setting program parameters.
- Manual Button: Initiates immediate watering.
- Percentage (%) Button: Adjusts watering duration by a percentage.
- Battery Compartment: Located at the back or side for the 9V buffer battery.
- Terminal Block: Screw terminals for connecting irrigation valves and common wire.
5. Setup
5.1 Mounting
Choose a suitable location for mounting the control unit. It should be protected from direct sunlight and heavy precipitation, yet accessible for programming and maintenance. Use appropriate screws and anchors to secure the unit to a wall or sturdy surface.
5.2 Wiring
Before wiring, ensure the external transformer is unplugged from the power outlet.
- Connect the common wire from your irrigation valves to the terminal labeled "COMMON" or "C" on the control unit's terminal block.
- Connect each zone wire from your irrigation valves to the corresponding zone terminals (e.g., 1, 2, 3, 4, 5, 6).
- Ensure all connections are secure and free from exposed wires.
5.3 Power Connection
- Insert the 9V buffer battery into its designated compartment. This battery maintains program memory during power outages.
- Connect the external transformer to the power input port on the control unit.
- Plug the external transformer into a suitable electrical outlet. The LCD screen should illuminate, indicating power is supplied.
6. Operating
6.1 Initial Setup and Time Setting
Upon first power-up or after a prolonged power loss without the buffer battery, you may need to set the current time and day.
- Use the A and B buttons to navigate through the initial setup menu.
- Press ENTER to select an option or confirm a setting.
- Adjust the time and day using the A and B buttons, then press ENTER to confirm each setting.
6.2 Programming Watering Schedules
The COMETA EVO8016 allows for flexible programming across its 6 zones.
- Press the PROGRAM or MENU button (if available, otherwise use A/B to navigate to programming mode).
- Select the desired program (e.g., Program 1, Program 2).
- For each program, set the following:
- Start Times: Define up to multiple start times per day. Use A and B to adjust, ENTER to confirm.
- Watering Duration: For each zone (1-6), set the watering duration from 1 minute to 4 hours. Use A and B to adjust, ENTER to confirm.
- Watering Days: Select specific days of the week or an interval (e.g., every 2 days). Use A and B to select, ENTER to confirm.
- Repeat for all desired zones and programs.
- Press EXIT to save settings and return to the main display.
6.3 Manual Operation
To initiate watering immediately, independent of the programmed schedule:
- Press the MANUAL button.
- Use A or B to select the zone you wish to water manually.
- Press ENTER to start watering. The zone will water for its last programmed duration or a default manual duration.
- To stop manual watering, press MANUAL again or EXIT.
6.4 Seasonal Adjustment (Budget)
The percentage (%) button allows for seasonal adjustment of watering durations without reprogramming each zone individually.
- Press the % button.
- Use A or B to adjust the watering duration percentage (e.g., 50% for half duration, 120% for increased duration).
- Press ENTER to confirm. All programmed watering times will be adjusted by this percentage.
7. Maintenance
7.1 Battery Replacement
The 9V buffer battery should be checked annually and replaced as needed to ensure program memory retention during power outages.
- Disconnect the external transformer from the power outlet.
- Locate the battery compartment (usually on the back or side of the unit).
- Remove the old 9V battery and insert a new one, observing polarity.
- Close the battery compartment and reconnect the external transformer.
7.2 Cleaning
Wipe the exterior of the control unit with a soft, damp cloth. Do not use abrasive cleaners or solvents. Ensure no water enters the internal components.
8. Troubleshooting
| Problem | Possible Cause | Solution |
|---|---|---|
| Display is blank. | No power from transformer; faulty transformer; dead buffer battery. | Check power outlet and transformer connection. Replace buffer battery. |
| Zones not watering. | Master valve off; wiring issues; low water pressure; solenoid malfunction; program not set correctly. | Check master valve. Verify wiring connections. Check water supply. Test solenoids. Review programming. |
| Incorrect watering times. | Programming error; seasonal adjustment active. | Review and correct program settings. Check seasonal adjustment percentage. |
| Unit not responding to buttons. | Unit frozen; internal fault. | Disconnect power for 30 seconds, then reconnect. If problem persists, contact support. |
9. Specifications
| Feature | Detail |
|---|---|
| Model Number | 87315 |
| Brand | Claber |
| Number of Zones | 6 |
| Watering Duration | 1 minute to 4 hours per line |
| Display Type | Large Liquid Crystal Display (LCD) |
| Programming System | Three-button interface |
| Power Supply | External Transformer |
| Buffer Battery | 9V (for memory retention) |
| Dimensions (L x W x H) | 25.5 x 26 x 8 cm |
| Weight | 400 grams |
| Material | Plastic |
10. Warranty and Support
Specific warranty information for the Claber 87315 COMETA EVO8016 control unit is not available in this document. Please refer to the warranty card included with your product or visit the official Claber website for detailed warranty terms and conditions.
For technical support, troubleshooting assistance, or spare parts, please contact Claber customer service through their official website or the contact information provided in your product packaging. When contacting support, please have your model number (87315) and purchase details ready.
Claber Official Website: www.claber.com


