
1. Introduction
This instruction manual provides essential information for the proper installation, operation, and maintenance of your Cooler Master DK9-7E52A-0L-GP CPU Cooler. Please read this manual thoroughly before installation to ensure correct usage and optimal performance.
The Cooler Master DK9-7E52A-0L-GP is designed to provide efficient cooling for CPUs with a thermal design power (TDP) of up to 65 watts, specifically compatible with AMD Socket AM2 and AM3 platforms. Its compact design makes it suitable for systems with height restrictions, such as MITX and MATX cases.
2. Safety Information
Observe the following safety precautions during installation and operation:
- Ensure your computer system is powered off and unplugged from the wall outlet before beginning installation.
- Handle the CPU cooler and other components with care to prevent damage.
- Avoid touching the fan blades while the system is powered on.
- Keep the cooler away from liquids and excessive moisture.
- This product contains small parts; keep out of reach of children.
3. Package Contents
Verify that all items are present in your package:
- Cooler Master DK9-7E52A-0L-GP CPU Cooler (Heatsink with integrated 80mm fan)
- Pre-applied thermal paste on the heatsink base.
If any components are missing or damaged, contact your retailer or Cooler Master support.
4. Setup and Installation
Follow these steps to install the CPU cooler:
- Prepare the Motherboard: Ensure your motherboard is compatible with AMD Socket AM2 or AM3. If an old cooler is present, carefully remove it. Clean any existing thermal paste from the CPU surface using isopropyl alcohol and a lint-free cloth.
- Position the Cooler: Align the cooler's retention clips with the mounting brackets on your motherboard. The heatsink base, with pre-applied thermal paste, should be centered over the CPU.
- Secure the Cooler: Attach one side of the retention clip to the motherboard bracket. Apply firm, even pressure to the top of the cooler while pushing down the lever on the opposite side of the retention clip until it locks into place on the motherboard bracket. Ensure the cooler is securely seated and does not wobble.
- Connect the Fan: Locate the 3-pin fan header on your motherboard (typically labeled "CPU_FAN"). Connect the cooler's 3-pin power cable to this header.
- Final Check: Double-check all connections and ensure no cables are obstructing the fan blades or other components.
Refer to the image below for product dimensions, which may be helpful for clearance checks within your PC case.
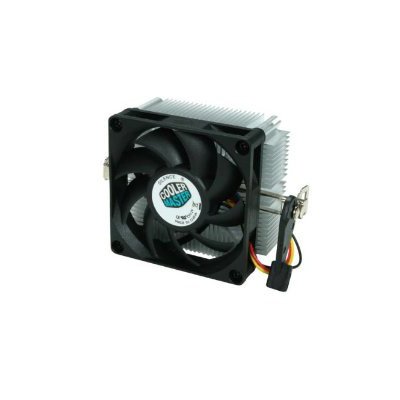
Image: Cooler Master DK9-7E52A-0L-GP CPU Cooler with indicated dimensions (3.03"L x 1.61"W x 2.68"H). This image illustrates the physical size of the cooler, including the fan and heatsink, and the mounting mechanism.
5. Operating Instructions
Once installed, the Cooler Master DK9-7E52A-0L-GP operates automatically. The fan speed is typically controlled by the motherboard based on CPU temperature, ensuring optimal cooling performance while minimizing noise.
- Upon system startup, the fan should begin spinning.
- Monitor CPU temperatures using system monitoring software to ensure effective cooling.
- The cooler is designed for continuous operation within specified environmental conditions.
6. Maintenance
Regular maintenance helps ensure the longevity and performance of your CPU cooler:
- Dust Removal: Periodically (e.g., every 3-6 months), power off and unplug your computer. Use compressed air to gently blow dust out of the heatsink fins and fan blades. Hold the fan blades to prevent them from spinning rapidly during cleaning, which can damage the fan motor.
- Thermal Paste: The pre-applied thermal paste is designed for long-term use. Reapplication is generally not necessary unless the cooler is removed and reinstalled. If reapplication is required, clean both the CPU and heatsink surfaces thoroughly before applying a new, thin, even layer of high-quality thermal paste.
7. Troubleshooting
If you encounter issues with your CPU cooler, refer to the following common problems and solutions:
| Problem | Possible Cause | Solution |
|---|---|---|
| CPU Overheating |
|
|
| Fan Not Spinning |
|
|
| Excessive Fan Noise |
|
|
If problems persist after attempting these solutions, contact Cooler Master customer support or your retailer.
8. Specifications
| Model Number | DK9-7E52A-0L-GP |
| Brand | Cooler Master |
| Compatible Sockets | AMD Socket AM2/AM3 |
| Maximum Wattage (TDP) | 65 Watts |
| Cooling Method | Air |
| Fan Size | 80mm (Slim) |
| Maximum Rotational Speed | 3200 RPM |
| Noise Level | 25.17 Decibels |
| Power Connector Type | 3-Pin |
| Voltage | 12 Volts |
| Product Dimensions (L x W x H) | 3.03" x 1.61" x 2.68" |
| Item Weight | 3.2 ounces |
| Material | Metal, Plastic |
| Certifications | RoHS, UL Certified |
9. Warranty and Support
Cooler Master products are manufactured to high quality standards. For warranty information, technical support, or service inquiries, please visit the official Cooler Master website or contact your local retailer.
Keep your proof of purchase for warranty claims.


