1. Introduction
This manual provides detailed instructions for the safe installation, operation, and maintenance of your Progress Lighting Wisten Collection Two-Light 14-inch Close-to-Ceiling Fixture (Model P3290-09). This fixture is designed to provide ambient lighting in various indoor settings such as bedrooms, bathrooms, and hallways. Its minimalist design with etched glass and brushed nickel details offers a modern aesthetic suitable for rooms with standard or low ceiling heights.
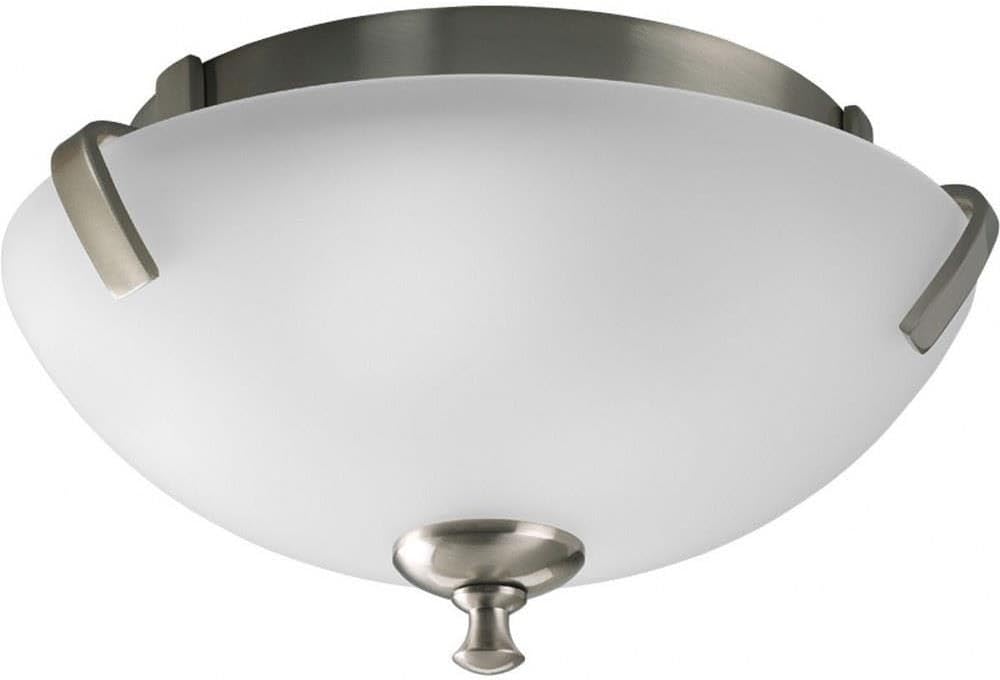
Figure 1: Progress Lighting Wisten Collection P3290-09 Close-to-Ceiling Fixture.
2. Safety Information
WARNING: Risk of Electric Shock. Disconnect power at the fuse box or circuit breaker before installation or servicing.
- Always consult a qualified electrician if you are unsure about the installation process.
- Ensure all electrical connections comply with local codes and ordinances, as well as the National Electric Code (NEC).
- This fixture is intended for indoor use only and is suitable for damp locations. Do not install in areas exposed to direct water spray.
- Use only the specified bulb type and wattage to avoid overheating and potential fire hazards.
- Handle glass components with care to prevent breakage and injury.
- Proposition 65 Warning: This product may contain chemicals known to the State of California to cause cancer and birth defects or other reproductive harm. Wash hands after handling.
3. Package Contents
Verify that all components are present before beginning installation. If any parts are missing or damaged, do not proceed with installation and contact customer service.
- Wisten Collection Two-Light 14" Close-to-Ceiling Fixture (P3290-09)
- Mounting Hardware Kit (screws, wire nuts, mounting strap)
- Etched Glass Shade
- Installation Sheet
4. Specifications
| Feature | Detail |
|---|---|
| Brand | Progress Lighting |
| Model Number | P3290-09 |
| Dimensions | 14" Diameter x 7" Height |
| Color/Finish | Brushed Nickel |
| Material | Alloy Steel, Glass |
| Light Source Type | Incandescent (compatible with LED/CFL) |
| Number of Lights | 2 |
| Bulb Base | E26 (Medium Base) |
| Max Wattage per Bulb | 100 Watts |
| Voltage | 120 Volts |
| Installation Type | Flush Mount |
| Room Type | Bathroom, Bedroom, Hallway |
| Special Feature | Damp Location Listed, UL Listed |

Figure 2: Dimensional drawing of the P3290-09 fixture, showing a 14-inch diameter and 7-1/8-inch height.
5. Setup and Installation
Before you begin: Turn off power at the circuit breaker or fuse box. It is recommended to have a second person assist with installation.
- Prepare the Mounting Surface: Ensure the electrical box is securely mounted and capable of supporting the fixture's weight.
- Attach Mounting Strap: Secure the mounting strap to the electrical box using the screws provided. Ensure the strap is level and firm.
- Electrical Connections:
- Connect the bare copper ground wire from the fixture to the ground wire from the electrical box (usually bare copper or green) using a wire nut.
- Connect the white wire from the fixture to the white (neutral) wire from the electrical box using a wire nut.
- Connect the black wire from the fixture to the black (hot) wire from the electrical box using a wire nut.
- Carefully tuck all wires into the electrical box.
- Mount the Fixture: Align the fixture base with the mounting strap and secure it using the provided screws. Ensure the fixture is flush against the ceiling.
- Install Bulbs: Insert two E26 medium base bulbs (max 100W each) into the sockets. LED or CFL equivalent bulbs are recommended for energy efficiency.
- Attach Glass Shade: Carefully place the etched glass shade onto the fixture. Secure it by attaching the decorative screws and brackets. Note that this step may require careful alignment and dexterity.
Refer to the included "Installation Sheet" for detailed diagrams and specific instructions. If you encounter difficulties, consider consulting a professional electrician.
6. Operating Instructions
Once installed and power is restored, the fixture operates via a standard wall switch (not included). Ensure the switch is in the "ON" position for the lights to illuminate.
- Bulb Type: Uses two E26 medium base bulbs. Incandescent, LED, or CFL bulbs can be used, provided they do not exceed 100 watts per socket.
- Dimming: If using dimmable bulbs and a compatible dimmer switch (sold separately), the light output can be adjusted.
7. Maintenance
- Cleaning:
- Always turn off power to the fixture before cleaning.
- Wipe the metal parts with a soft, dry cloth. Do not use abrasive cleaners or polishes, as they may damage the finish.
- Clean the glass shade with a mild glass cleaner and a soft cloth. Ensure the glass is completely dry before reassembling.
- Bulb Replacement:
- Turn off power at the circuit breaker.
- Carefully unscrew the decorative finial at the bottom of the glass shade.
- Loosen the two side screws that secure the glass shade brackets.
- Gently lower and remove the glass shade.
- Unscrew the old bulbs and replace them with new E26 medium base bulbs (max 100W each).
- Reattach the glass shade by reversing the removal steps, ensuring it is securely fastened.
8. Troubleshooting
| Problem | Possible Cause | Solution |
|---|---|---|
| Light does not turn on. |
|
|
| Light flickers. |
|
|
| Glass shade appears cracked. |
|
|
9. Warranty and Support
Warranty: This Progress Lighting fixture is covered by a 1-year Limited Warranty. This warranty guarantees your satisfaction with the purchase and includes professional after-sales customer service support. Please retain your proof of purchase for warranty claims.
Customer Support: For technical assistance, missing parts, or warranty inquiries, please contact Progress Lighting customer service. Refer to the contact information provided on the original packaging or the official Progress Lighting website.
For more information, you may visit the Progress Lighting Store on Amazon.


