TOSHIBA TCB-SIR33UP-E Occupancy sensor kit

Specifications
- Model: TCB-SIR33UP-E
- Type: Occupancy Sensor Kit for 4-Way Cassette Type
- Compatibility: Designed for use with 4-way cassette-type air conditioners
Product Usage Instructions
- Installation:
- Remove the air inlet grille and adjust the corner cap at the corner where the Occupancy sensor is to be installed.
- Install the Occupancy sensor in the correct orientation, as shown in the manual.
- Pass the occupancy sensor lead wire through the ceiling panel hole and fix it securely using screws and cord clamps.
- Attach the sensor to the panel ensuring that the claws fit securely without causing water leakage.
- Wiring:
- Remove mounting screw A and loosen screw B on the electric control box cover to access the connector 9P (CN214: white) on the P.C. Board of the indoor unit.
- Connect the wiring from the Occupancy sensor to the connector9P using the cord clamp provided.
- Secure excess wiring using the cord clamp and reattach the electric control box cover and air inlet grille.
FAQs
- Q: Can the Occupancy sensor be installed at any corner?
- A: No, the Occupancy sensor can only be installed at one specific corner as indicated in the installation manual.
- Q: How do I ensure a secure installation without causing water leakage?
- A: Make sure to firmly push and fit the claws of the Occupancy sensor unit into the designated places on the panel to prevent water leakage.
PRODUCT INFORMATION
- Thank you for purchasing an Occupancy sensor kit for TOSHIBA air conditioners.
- Read this manual carefully for the correct installation of the Occupancy sensor before starting work.
- After the installation is completed, execute a test run to check for normal operation and explain how to use and maintain the Occupancy sensor to the customer according to the Operations Manual.
- Ask the customer to keep this manual with the Operations Manual.
- Observe the safety precautions described in the Operation Manual of the Occupancy Sensor, Installation Manual, and Operation Manual of the 4-way cassette type air conditioner (indoor unit) or the installation manual supplied with the ceiling panel.
ACCESSORIES

HOW TO INSTALL
HOW TO INSTALL THE OCCUPANCY SENSOR
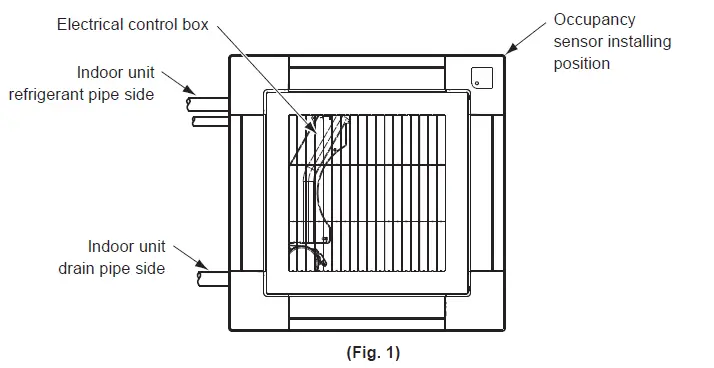
Install the Occupancy sensor in the correct orientation, since the Occupancy sensor can be installed at only one corner as shown in (Fig. 1).
- Remove the air inlet grille.
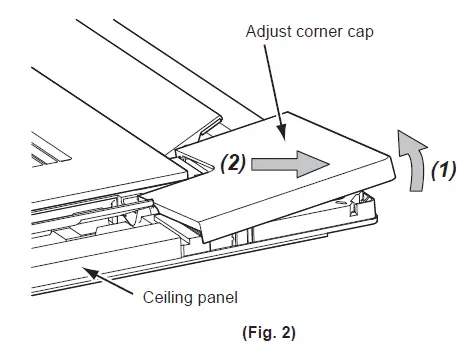
- Remove the adjusted corner cap at the corner where the Occupancy sensor is to be installed (Fig. 2).
- Pull the adjusted corner cap in the direction of (1) and slide it in the direction of (2) to remove it.
- Remove the strap from the pin and detach the adjusted corner cap from the ceiling panel.
- The insulation pad is packed in two rectangular holes for ceiling panel wires. Remove the insulation pad, and pass the wires from the occupancy sensor unit through the rectangular holes (Fig. 3).
- Make sure that the black sponge wrapped around the wiring is about 20 mm out of the rectangular hole on the indoor unit side, and fix it with 2 CORD CLAMP by 3 SCREW (Fig. 3).
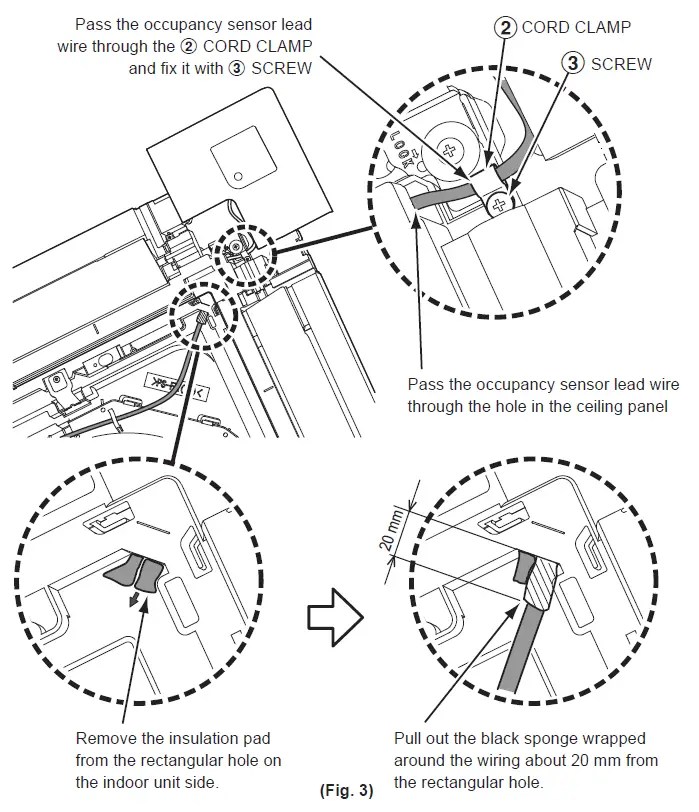
- CAUTION: If the black sponge is not properly positioned, water leakage, dew condensation, and dew condensation on the wiring may occur, so be sure to do so.
- Attach the sensor to the panel. At this time, be careful not to pinch the wiring (Fig. 4). If there is a part where the claws of the occupancy sensor unit are not fitted, it may cause water leakage, so push claws A (2 places) and claws B (3 places) firmly and firmly to make sure that the sensor part does not float please confirm.

- CAUTION
- Press the two claws B of the adjusted corner cap firmly as far as they will go and then check that the adjusted corner cap is closely attached.
- Failure to do so may result in water leakage.
- CAUTION
HOW TO WIRE THE OCCUPANCY SENSOR
- Remove the mounting screw A on the electric control box cover and loosen screw B. Slide the cover inward to remove the hook (the electric control box cover remains hooked on the hinge).

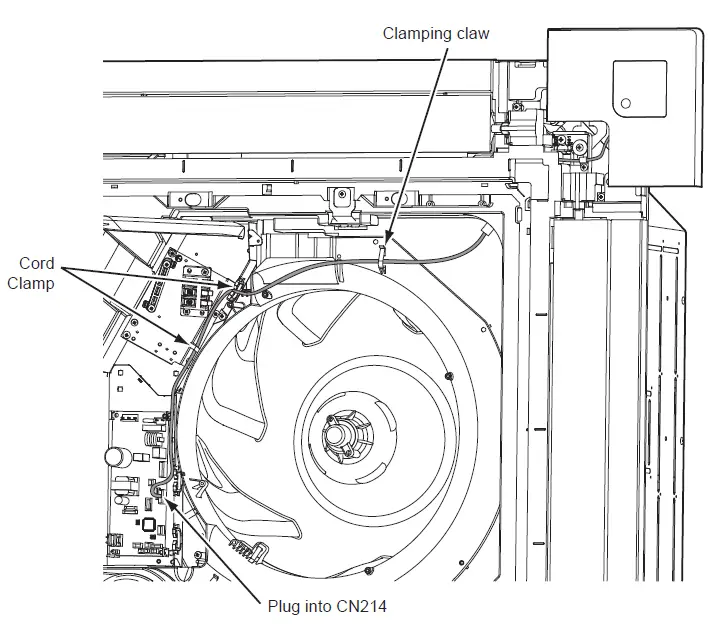
- Connect the wiring from the Occupancy sensor to the connector 9P (CN214: white) on the P.C. Board of the indoor unit. Use the cord clamp inside the electrical parts box to process the excess wiring and then attach the electric control box cover and air inlet grille.
- NOTE
- If you do not connect the connector, the Occupancy sensor will not operate, so be sure to connect it securely.
- Do not bundle these control signal wires with the power wire to avoid malfunction.
- NOTE
Wired remote controller
CODE NO. (DN) SETTING Wired remote controller (RBC-AMS5✽E*)
Perform the advanced settings for the air conditioner. Carry out the setting operation while the indoor unit is stopped. (Turn off the air conditioning unit before starting the setting operation.)

- Press the [
 MENU] button to display the menu screen.
 - Press and hold the [ MENU] button and the [
 ] button at the same time to display the “Field setting menu”. Press and hold the buttons for more than 4 seconds.
- Press the [
 ] / [] button to select “7. DN setting” on the “Field setting menu” screen, then press the “
 Set” [
 F2] button. The fan and louver of the indoor unit operate. When the group control is used, the fan and louver of the selected indoor unit operate. Move the cursor to select “DN code” with the “
 <” [
<” [ F1] button, then set “B5” with the [] / [] button. Move the cursor to select “data” with the “
 >” [ F2] button, then set “0001” with the [] / [] button.
- Press the [ MENU] button to set the other DN codes. After “Continue?” is displayed on the screen.
- Press the “
 No” [ F2] button to finish the setting operation. “
 ” appears on the screen for a while, then the screen returns to the “Field setting menu” screen. Pressing the “ No” [ F2] button displays the unit selection screen when the group control is used. Press the [
 CANCEL] button on the unit selection screen to finish the setting operation. “” appears on the screen for a while, then the screen returns to the “Field setting menu” screen.
 - Press the [ CANCEL] button to return.
Wired remote controller (RBC-ASCU1*E)
Perform the advanced settings for the air conditioner. Carry out the setting operation while the indoor unit is stopped. (Turn off the air conditioning unit before starting the setting operation.)

- Press and hold the [
 ] menu button and [
 ] setting button simultaneously for 10 seconds or more.
 - Each time [] [
 ] setting button is Pressed, indoor unit numbers in the group control change cyclically. Select the indoor unit to change settings.
 - Press the [
 ] OFF timer button to confirm the selected indoor unit.
- Press the menu button to make Code No. [
 ] fl ash. Change Code No. [ DN Table ] with [] [] setting button.
 - Press the menu button to make Set data [] flash. Change Set data [ DN Table ] with [] [] setting button.
- Press the OFF timer button by doing so, the setup is completed.
- To change other settings of the selected indoor unit, repeat Procedure 4.
- When all the settings have been completed, press [
 ] ON/OFF button to determine the settings. “
 ” flashes and then the display content disappears and the air conditioner enters the normal stop mode. (The remote controller is unavailable while “” is flashing.)
DN Code Table
| DN | Item | Description | Factory setting | |
| B5 | Occupancy sensor | 0000: None | 0001: Occupancy
sensor provided |
0000: None |
| B6 | Occupancy sensor setting (Cycle period) | 0000: Not Activate 0002: 60 min 0004: 120 min | 0001: 30 min
0003: 90 min 0005: 150 min |
0002: Enable 60 min |
| B7 | Occupancy sensor operation at the absent time | 0000: Standby | 0001: Operation stop | 0000: Standby |
ABOUT THE OCCUPANCY SENSOR
- Sometimes the sensor may not detect people even when they are present if their movements are small.
- If something having a difference in temperature with the surroundings moves, the sensor may detect people as present even if they are not present.
- A wired remote controller (RBC-AMS5✽E*) is required to use an Occupancy sensor.
- Be sure to install an Occupancy sensor in all indoor units if using a group operation.
LIST OF SEPARATELY AVAILABLE PRODUCTS THAT CAN NOT BE USED WITH THE OCCUPANCY SENSOR
The following separately available products cannot be used together with the Occupancy sensor.
| Product name | Model |
| Wireless receiver kit | RBC-AXU33UP-E |
| Air purifier kit | TCB-EAPC1UHP-E, TCB-EAPC1UCP-E |
Documents / Resources
 |
TOSHIBA TCB-SIR33UP-E Occupancy sensor kit [pdf] Installation Guide TCB-SIR33UP-E Occupancy sensor kit, TCB-SIR33UP-E, Occupancy sensor kit, sensor kit, kit |


