![]() Function Drone
Function Drone
Instruction Manual
NO. A6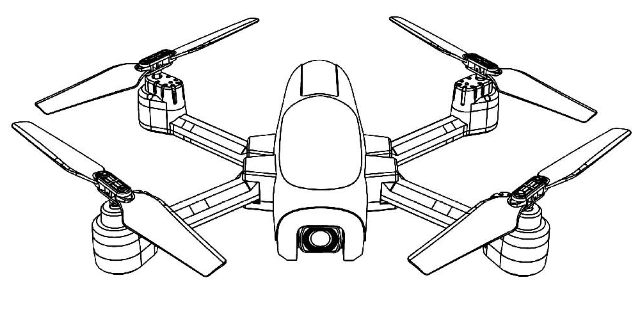 — GPS FUNCTION —
AGES 14+
A6 GPS Function Drone
NOTE: THIS EQUIPMENT HAS BEEN TESTED AND FOUND TO COMPLY WITH THE LIMITS FOR A CLASS B DIGITAL DEVICE, PURSUANT TO PART 15 OF THE FCC RULES. THESE LIMITS ARE DESIGNED TO PROVIDE REASONABLE PROTECTION AGAINST HARMFUL INTERFERENCE IN A RESIDENTIAL INSTALLATION. THIS EQUIPMENT GENERATES USES AND CAN RADIATE RADIO FREQUENCY ENERGY AND, IF NOT INSTALLED AND USED IN ACCORDANCE WITH THE INSTRUCTIONS, MAY CAUSE HARMFUL INTERFERENCE TO RADIO COMMUNICATIONS. HOWEVER, THERE IS NO GUARANTEE THAT INTERFERENCE WILL NOT OCCUR IN A PARTICULAR INSTALLATION. IF THIS EQUIPMENT DOES CAUSE HARMFUL INTERFERENCE TO RADIO OR TELEVISION RECEPTION, WHICH CAN BE DETERMINED BY TURNING THE EQUIPMENT OFF AND ON, THE USER IS ENCOURAGED TO TRY TO CORRECT THE INTERFERENCE BY ONE OR MORE OF THE FOLLOWING MEASURES:
– REORIENT OR RELOCATE THE RECEIVING ANTENNA.
– INCREASE THE SEPARATION BETWEEN THE EQUIPMENT AND RECEIVER.
– CONNECT THE EQUIPMENT INTO AN OUTLET ON A CIRCUIT DIFFERENT FROM THAT TO WCH THE RECEIVER IS CONNECTED.
– CONSULT THE DEALER OR AN EXPERIENCED RADIO/TV TECHNICIAN FOR HELP.
CHANGES OR MODIFICATIONS NOT EXPRESSLY APPROVED BY THE PARTY RESPONSIBLE FOR COMPLIANCE COULD.
VOID THE USER’S AUTHORITY TO OPERATE THE EQUIPMENT.
![]() THE WARNING MESSAGE
THE WARNING MESSAGE
In order to ensure the electromagnetic environment of aviation radio station, it is forbidden to use all kinds of model remote control in the area with the center of the airport runway and the radius of 5000 meters. During the period of radio control order issued by the relevant state department, the use of the model remote control shall be stopped as required in the area.
DISCLAIMER AND SAFETY NOTES
In order to make it easier and safer for you to use this product, please read all the contents of this manual carefully before using this product, and keep this manual for future reference.
DISCLAIMER AND SAFETY NOTES
- To protect the legitimate rights and interests of users, please read carefully the instructions, disclaimers and safety instructions we provide with this product before using this product.
- This product is not suitable for persons under the age of 14. Persons under the age of 14 must use it under the supervision and guidance of an adult with UAV flying experience.
- Once you start using the product, it is deemed that you have read, understood, approved and accepted all the terms and contents of the instruction manual, disclaimer and safety notice of the product.
- When using this product, please strictly comply with and follow the requirements in the instructions and safety instructions, including but not limited to. For all personal injury, accident, property loss, legal dispute and other adverse events resulting from the violation of the safety instructions or irresistible factors, the user shall bear the relevant responsibilities and losses, and our company and the agent shall not bear any responsibility.
- Our company and the agent shall not be responsible for any violation of laws and regulations directly or indirectly caused by users using this product.
SAFETY INSTRUCTIONS
- This product is not suitable for persons under the age of 14 and others who do not have full capacity for civil conduct.
- This product has the high speed rotating propeller and the powerful flight power, has the certain danger in the operation. Do not approach or touch the product while it is in operation.
- When usingthis product, please stay away from airports, railways, highways, high-rise buildings, power lines and other dangerous environment.
- When usingthis product, please keep away from the mobile phone base station, high-power transmission equipment and other high electromagnetic interference environment.
- When usingthis product, please stay away from all kinds of manned aircraft.
- Do not use this product in rain, lightning, sand, fog, snow, wi nd, low temperature and other harsh environment.
- This product is not waterproof design, do not operate this product near water.
- When operating this product, always maintain a .fedist nce of about 10 meters between the drone and humans or animals.
- Keep the drone within visual range of the operator at all times.
- Do not hover or fly this product over people. Do not startle others for fun.
- Do not operate this product near children’s playingareas.
- Do not use this product to chasevehicles or affect the normal operation of vehicles.
- Do not turn off the motor when the product is flying in the air unless emergency.
- This product can not be used in the.. of alcohol, tobacco, fatigue, taking drugs, physical discomfort, etc.
- Please check this product before each u., including but not limited to parts firm ness, cracks and wear of the body and propeller, battery power, validity of the indicator light, etc. If an anomaly occurs, stop using the component and replace the component immediately.
- Accidents may happen to drones in abnormal working conditions. Do not start the propeller or force the fight.
- Do not attempt to prevent any moving part of the product from working.
- Do not modify this product, or use this product for purposes other than the original design.
- Do not operate this product in the no-fly zone of laws and regulations.
- Due to the wide variety of materials used in airaaft, high temperatures can damage the internal structure of the UAV and lead to unpredictable consequences. Therefore, keep the UAV equipment away from heat sources and avoid exposing the UAVto direct sunlight for a long time.
- Please operate accordi ng to the product instructions.
- Use the original parts for maintenance and replacement.
- Lend to other personnel, please ensure that the operator understand and follow the safety instructions.
- Do not mix different types of batteries.
- Do not use batteries that are swollen, leaked, or damaged.
- Keep the battery away from flammable objects (such as carpets, solid wood furniture and wood floors) while charging.
- Please use the original charging cable. Do not use other brands or damaged charging cables.
- Please keep a safe distance from the high speed rotating propeller to avoid the risk of being twisted or cut.
- Do not use the model near you r ear! Misuse may cause hearingdamage.
- The aircraftshould be used as far away as possible from other electrica I equipment and magnetic objects, which may interfere with each other.
- Pleased° not short circ uit or squeeze the battery to avoid explosion.
- The motor is a hot component Please do not touch it to avoid the risk of scalding.
INCLUDED IN PACKAGE

INTRODUCTION TO FLYERS

INTRODUCTION TO REMOTE CONTROL
OPERATION MODE SWITCHING
MODE 2 (DEFAULT MODE)
MODE 1
YOU CAN ENTER MODE 1 BY HOLDING DOWN THE “PHOTO” BUTTON AND TURNING ON THE POWER OF THE REMOTE CONTROL.
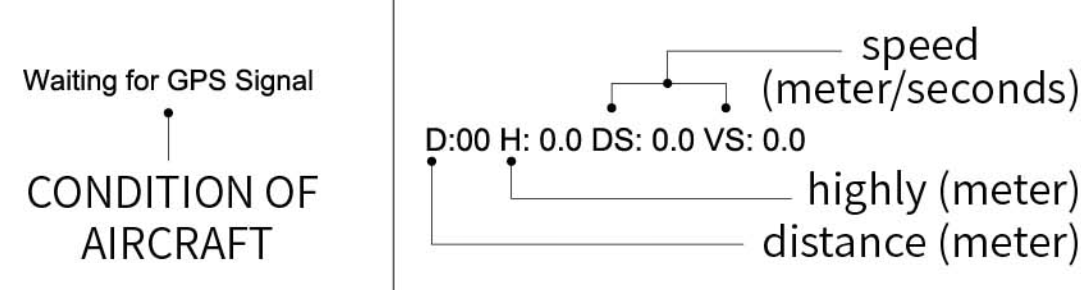
FLIGHT INFORMATION
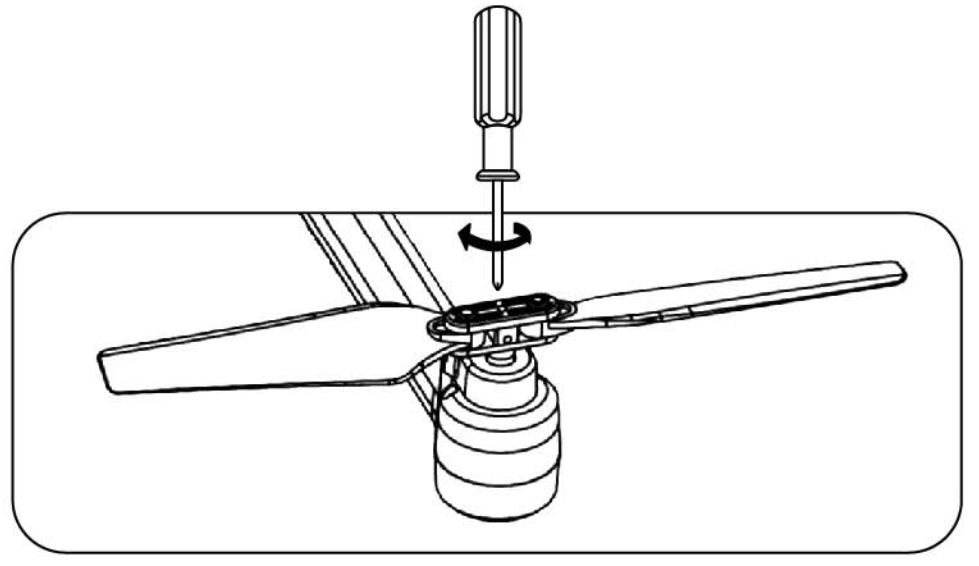
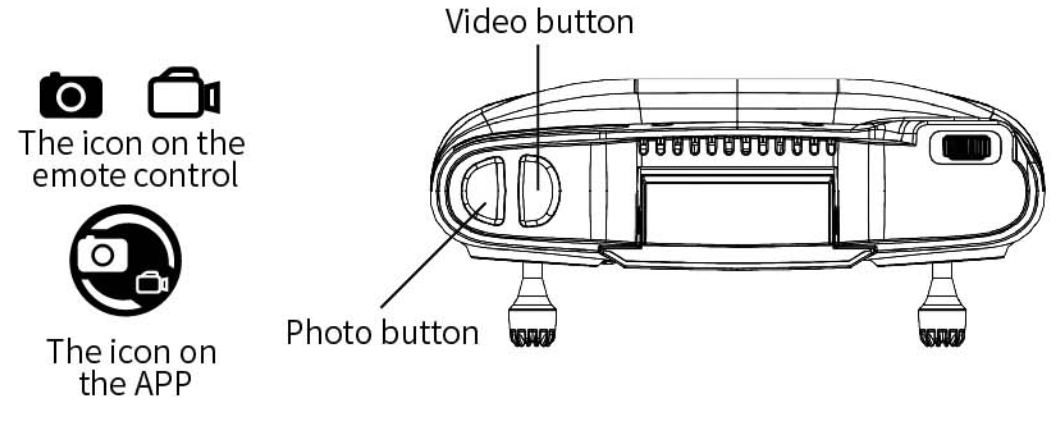
- PROPELLER
 Please ensure that all propellers are installed in the correct orientation according to the diagram. If the installation is wrong, the aircraft will not fly normally.
- CAMERA
 1, Tap the
 button on the remote control, or tap thebutton on the APP interface. When you hear the sound prompt, the APP will make a “click” sound, indicating that the camera will take a photo.
2, Long press the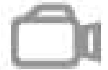 button on the remote control or tap thebutton on the APP, and you will hear a sound prompt. At the same time, the APP will display the timing of recording, indicating that the camera is recording.
3, Long presson the remote control again or click on the APP to stop recording and save the video to the APP and TF card.
(Please do not take pictures when recording)
Note:
When using the TSRC APP, raw images and videos captured by the camera are compressed and saved to the phone.
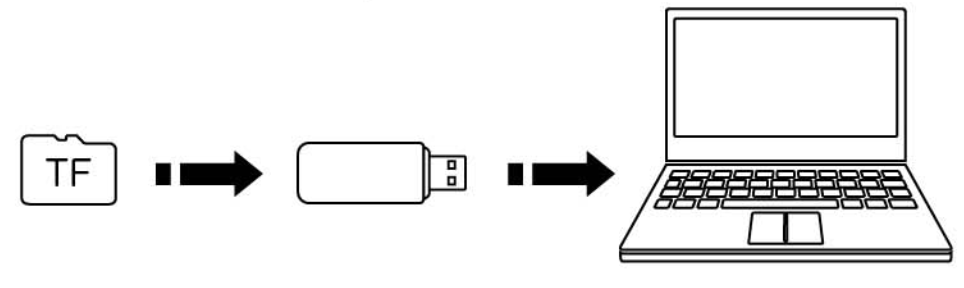 4, The original pictures and videos captured by the camera will be saved on the TF card. Tap the TF card on the camera to remove the TF card. After loading the TF card into the card reader, connect the card reader to the USB interface on the computer to read the data on the TF card. You can click the (
 ) on the APP to read the pictures and videos captured.
BATTERY CHARGING GUIDE
- AIRCRAFT BATTERY CHARGING
Charging time:about 180 minutes
(depending on charging power source)Adapter for mobile phone:
5V 1A/2A (purchased separately)
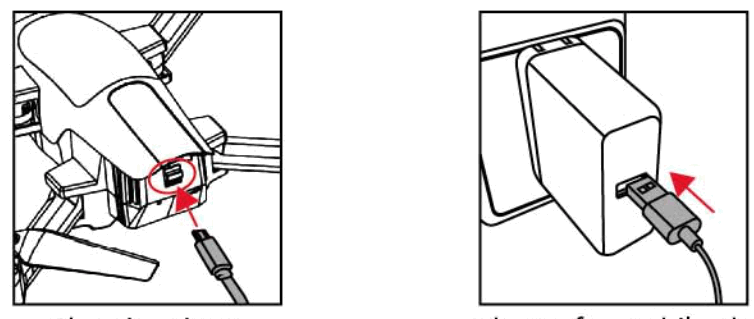
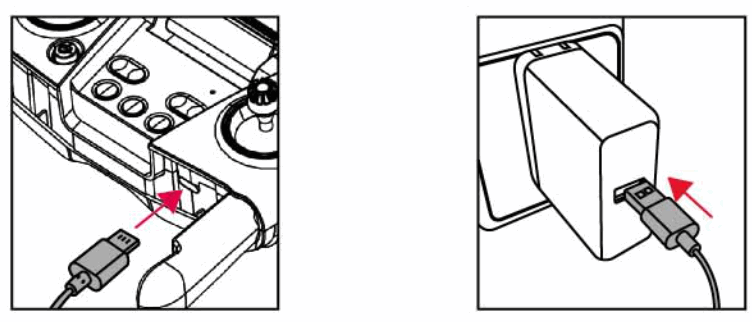
Put the battery into the battery compartment of the body, connect it to the charging port on the back of the body using USB charging cable, and then connect it to the computer USB port or USB adapter (5V/2A) for charging. When charging, the body of the red indicator is steady on; When fully charged, the green light on the fuselage is steady on.
- REMOTE CONTROL CHARGING
Charging time of remote control: about 60 minutes
(when charging) (light goes out after full charge)
AAdapter for mobile phone: 5V= 1A/2A
(purchased separately)
As shown in the figure above, after connecting the remote control and USB charging cable, connect the USB charging cable to the computer USB interface or USB adapter (5V/2A) for charging.
Note: When the remote control is under low power, the “power indicator” on the remote control will start to blink, accompanied by “drip” “drip” sound, please stop flying as soon as possible to charge the remote control.
APP INSTALLATION AND OPERATION
- DOWNLOAD/INSTALL THE APP
Please scan the QR code below to download the “TSRC” application to use the relevant features.
 http://www.vison-st.com/app/download/tsrc
Applicable mobile phone system version. IOS 7.0 or later/Android 4.4 or later - WI-Fl CONNECTION
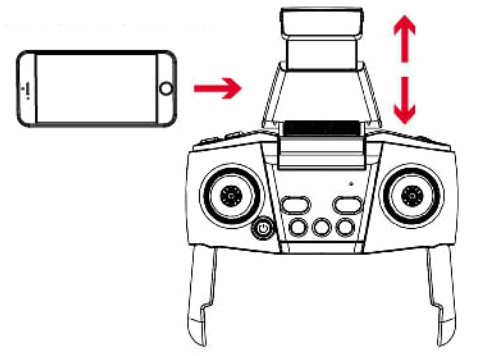 As shown in the image above, stretch the phone holder until you can clamp the phone tightly for subsequent manipulation on the phone. Then tum on the aircraft, then turn on your smartphone, and enterthe Settings screen of your phone to start a search for available VVi-Fi networks:
-If you use an iPhone choose Settin >WLAN
-If you are usi ng And roid, choose Settings >Vireleu and Networks>
Wi-Fi
Elect the Wi-Fi signal named “TSRC-….”
After theVVi-Fi signal is successfully connected, the connection between the aircraft and the phone will be automatically established. At this point, exit the setup menu and enter the installed “TSRC” APP application. You can see the current state of the aircraft in the APP operation interface and carry out correspondin g operations.
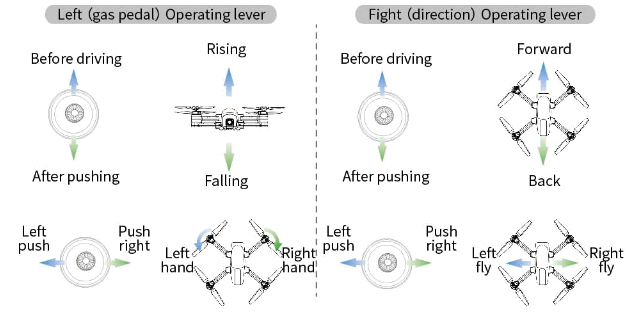
Note: All instructions below use mode 2(left hand throttle lever) as an example! - FREQUENCY
1.After loadingthe battery into the aircraft, press the power switch at the bottom of the aircraft to open the aircraft.
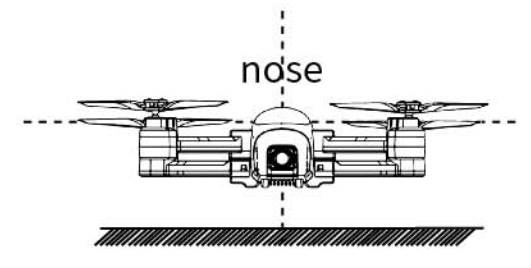
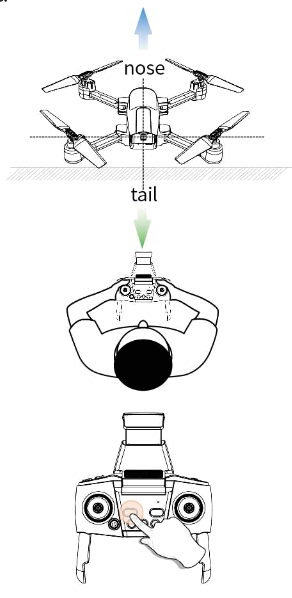
 2.Place the aircraft on a flat surface with the nose facing straight ahead and the tail facing stra i ght behind (i.e. the operator);
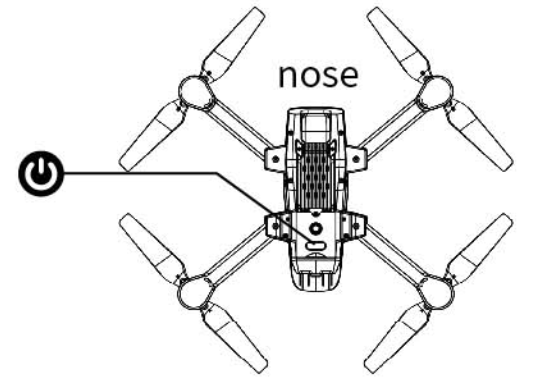
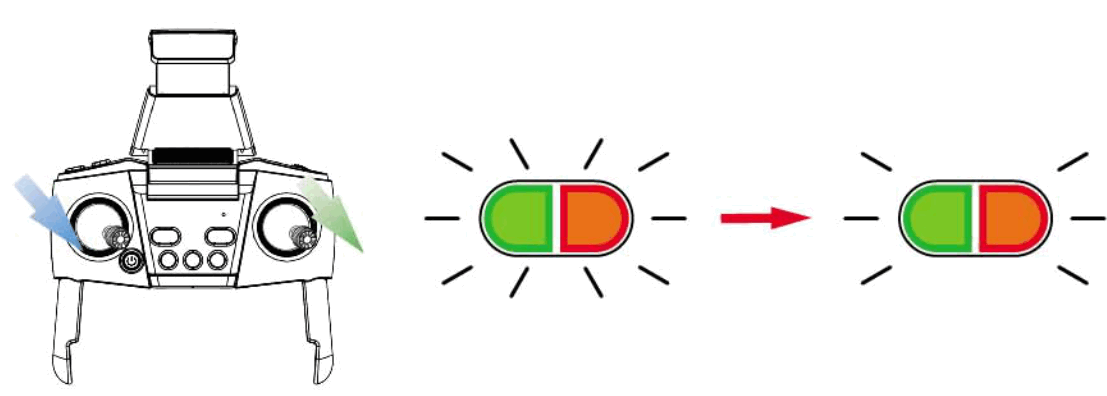
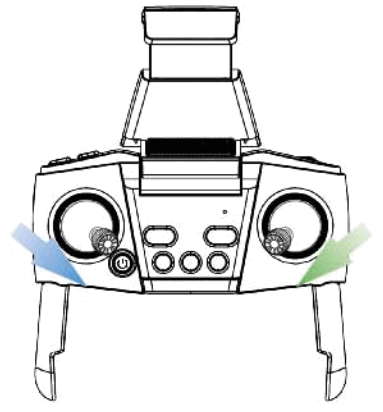
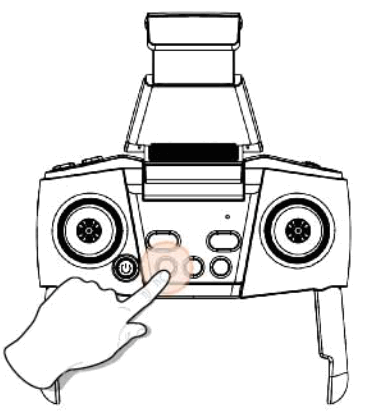
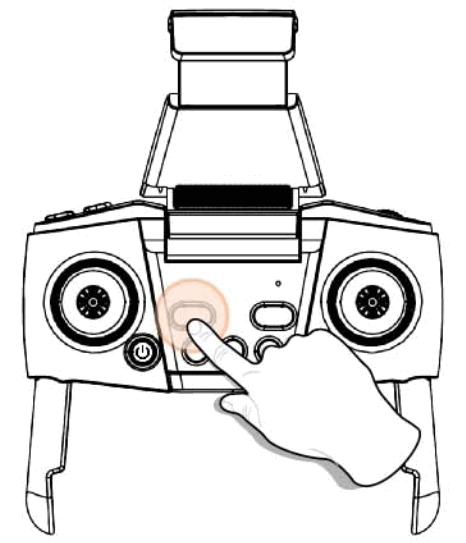
 3.As shown in the picture on the right, press the power switch button
  to turn on the power of the remote control.
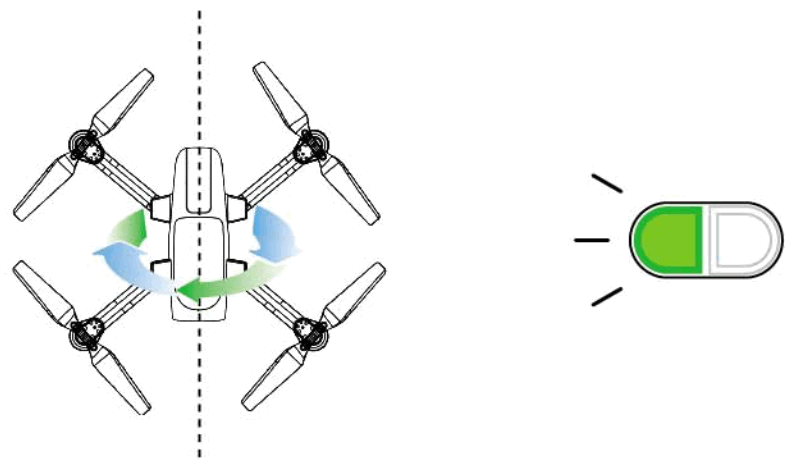
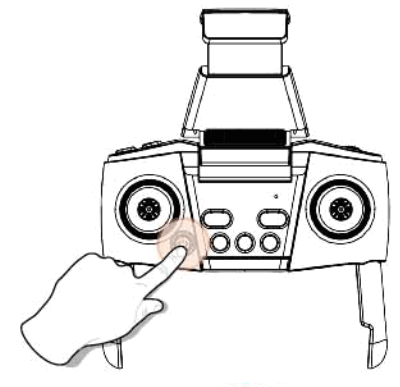 4.After turning on the power of the remote control, the indicator light of the remote control flickers, and after hearing the sound of “drip” and “drip”, the indicator light is steady on, and the frequency is successful.
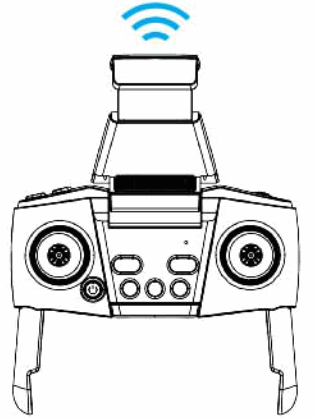
- GEOMAGNETIC CALIBRATION
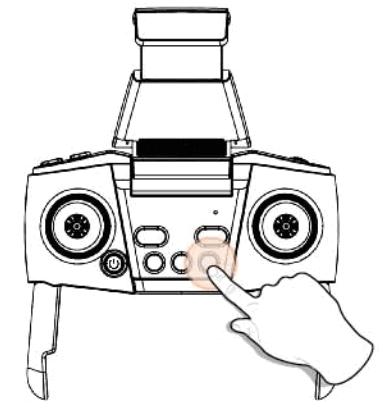
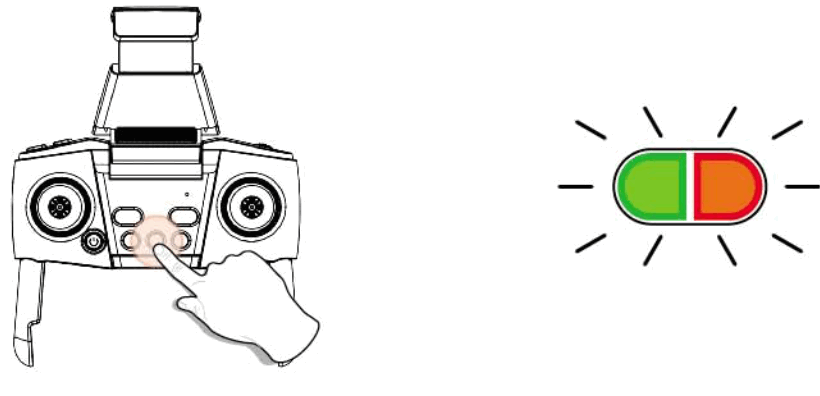 STEP 1: As shown in the figure above, long press the ”
  ” button on the remote control. When the front indicator light of the aircraft shows green quick flash and the rear indicator light shows red quickflash, step 2 can be performed.
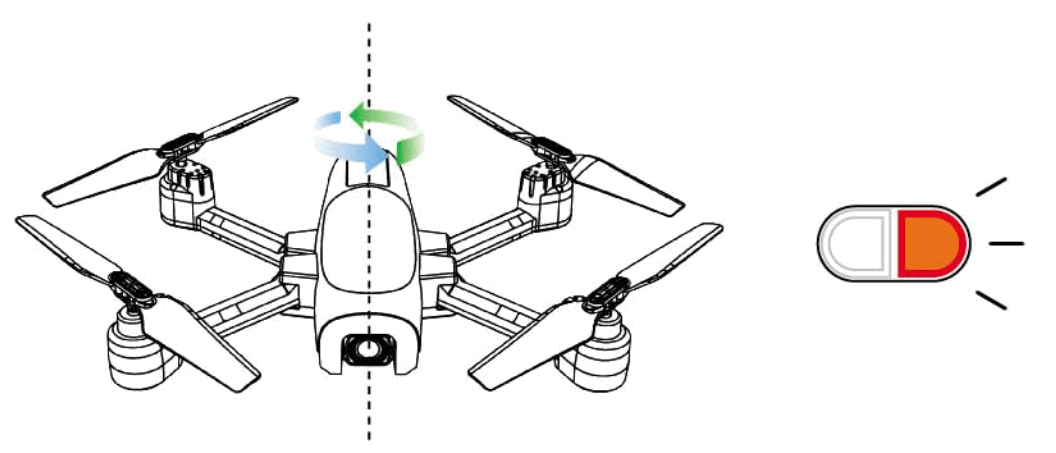 STEP 2: As shown in the figure above, rotate the fuselage of the aircraft horizontally (3601. When the “drip” sound from the remote control is heard, the rear indicator light of the aircraft turns red, and step 3 can be carried out.
 STEP 3: As shown in the figure above, after making the aircraft nose down (or up), rotate the fuselage vertically (3601. When the remote control makes a “drip” sound and the front indicator light of the aircraft is on, the geomagnetic calibration is completed.
 - GYROSCOPE CALIBRATION
Afterfrequency alignment, push the left and right operating rods to the direction of “5 o’clock” at the same time as shown in the figure above. When the front and rear indicators of the aircraft tum from quick flashing to steady on, and make a “drip” sound, it means that the gyroscope calibration is completed.
 • When performing gyroscope calibration, be sure to put the aircraft on the horizontal plane, otherwise it will affect the flight!
• Operators are advised to perform geomagnetic calibration before each flight! - GPS/ OPTICAL FLOW MODE
• GPS SIGNAL SEARCH
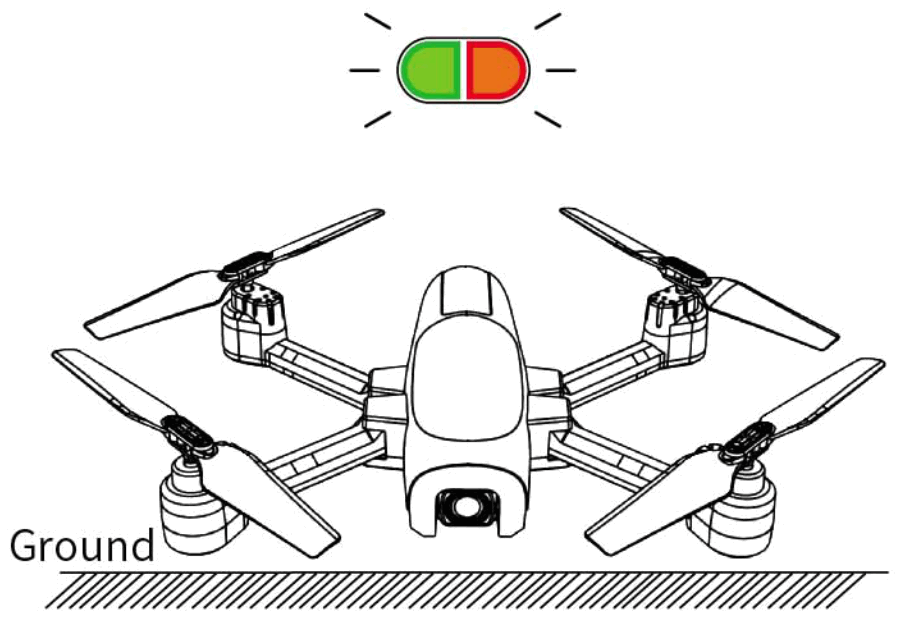 As shown in the figure above, after the geomagnetic calibration is completed, please place the aircraft on a flat horizontal surface without external signal interference sources. At this time, the rear indicator light on the aircraft flashes, indicating that the aircraft is searching for GPS signals; The GPS signal search process takes about 3 minutes, when the four indicators on the aircraft turn to be steady on; The remote control issued a “drip” prompt tone, indicating that the GPS signal search is complete. (In GPS mode, you need to wait for the GPS signal to complete the search before takeoff).
• GPS MODE
It is suitable for outdoor open places without signal interference. After frequency matching between the UAV and the remote control and calibrating the geomagnetic field and gyroscope, short press the ” GPS ” button on the remote control, and then the UAV will enter the GPS mode.
 • OPTICAL FLOW MODE
If you are flying in an indoor and open place, long press the” GPS ” button on the remote control for 3 seconds, the remote control will emit a “drip’) indicating that the GPS mode has been turned off, and the optical flow mode will be switched.
- MOTOR TO UNLOCK
 As shown in the picture on the right, push the left and right lever down at the same time to form the “inner eight”. The motor starts, the propeller turns, and the aircraft is unlocked.
 - TAKE OFF/LAND WITH ONE CLICK
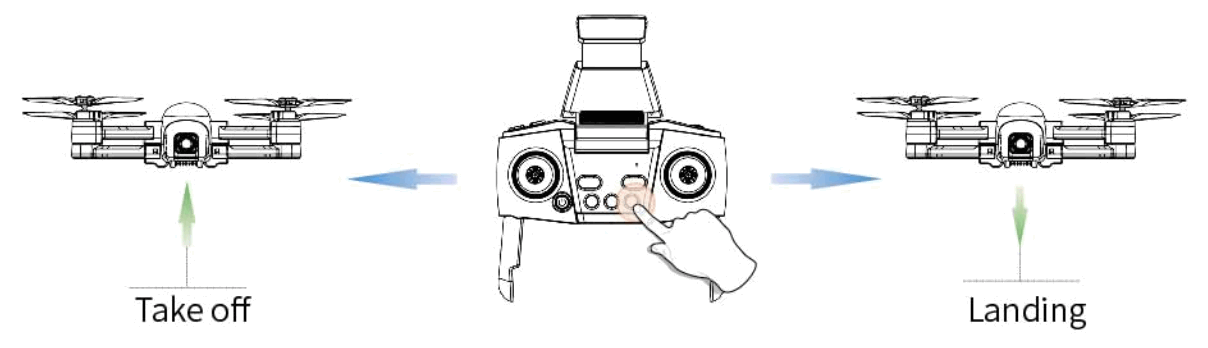
- A KEY TO TAKE OFF
Press the one-button take off/land button “ ” on the remote control, and the aircraft will take off to a height of about 1.5 meters above the ground. At this time, the aircraft can be controlled by the let and right operating levers.
 - A KEY TO LAND
During the flight, press the “” button on the remote control again, and the aircraft will land slowly until it touches the ground.
PRODUCT FUNCTION ANALYSIS
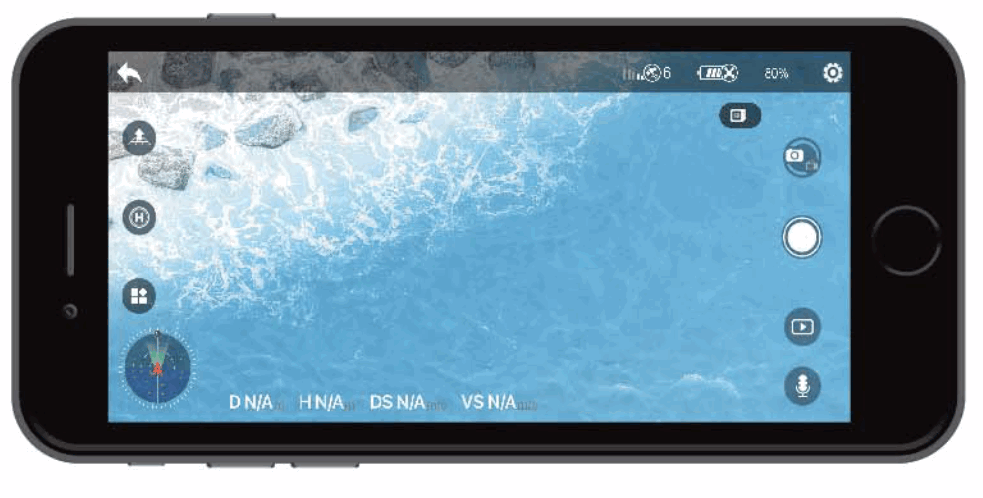
1. APP APPLICATION
 |
RETURN: returns to the main screen |
 |
GPS SIGNAL: displays the current GPS signal strength |
 |
AIRCRAFT POWER: real-time display of the current remaining aircratt power |
 |
ONE-CLICK TAKEOFF: the aircraft will automatically take off to an altitude of 1.5 meters |
 |
ONE-CLICK TURN BACK: the aircraft will descend slowly to the ground |
 |
MENU: there are many functions to choose from after opening |
 |
FLIGHT SETTINGS: click to enter the Settings interface, you can set the flight mode, flight altitude/distance, return altitude and view the flight path, etc. |
 |
TAKE PHOTOS: Click to take one photo at a time |
| VIDEO RECORDING: click once to start recording; Click again to stop the ecard’ | |
 |
MEDIA LIBRARY: you can view or share photos or videos that have been taken |
 |
RECORDING: the device can record the operator’s voice while the camera is recording, and the audio is synch- ronized with the image |
 |
IMAGE FOLLOWING: after locking the following target, the aircraft will automatically control the steering in place to make the camera always face the following target (this function is only available in GPS mode, and the following target shold not move too fast to avoid losing the following) |
 |
GPS FOLLOWING: the aircraft keeps a certain distance from the controller, and the follower moves with the GPS positioning on the mobile phone |
 |
VR SPLIT SCREEN: use with VR glasses (purchased separately) to viel 3D imees i n real ime |
 |
FLY AROUND: after clicking this function, the aircraft will fly around one circle |
 |
GESTURE PHOTOGRAPHY: this feature will be able to use gestures to take pictures |
 |
ROUTE PLANNING: able to plan your own route |
 |
ZOOM: click this feature to change the focal length of the camera |
 |
LENS REVERSAL: flip the APP interface 180° |
2. NEW MODEL
NOVICE MODE IS THE DEFAULT OPERATION MODE OF THIS PRODUCT. IN NOVICE MODE:
- The flight distance is limited to.
- Flight altitude is limited to.
- Intelligent return at 20M.

After entering the APP operation setting interface (as shown in the figure above), users can enter the advanced mode after closing the “novice mode” and modify the operation parameters.
Note:
The modification of operation parameters can only be performed in the APP operation setting interface after the geomagnetic calibration operation is completed.
The modification of operation parameters can only be performed in the APP operation setting interface after the aircraft is connected to the mobile phone.
3. SPEED SWITCH
The a rcraft i s equipped with two speed gears, namely low speed and high speed.
Press the speed adjustment button of the remote control” “7 “the remote control will emit a” drip “sound, and the” low speed “mode will open; Press again , “drip”, “drip” sound, speed switches to “high speed”.
Tip:
The bootis in low gear by default.
4. EMERGENCY STOP
![]() This functionis onlya plicable to the aircraft in the process of flight emergency, and the flight height within 10 meters to operate, otherwise it is easy to cause unnecessary damage!
This functionis onlya plicable to the aircraft in the process of flight emergency, and the flight height within 10 meters to operate, otherwise it is easy to cause unnecessary damage!
If the![]() button of the remote control is pressed for about 3 seconds, it will be” emergency stop “. At this time , all motors will stop rotating immediately and the aircraft will immediately fall.
button of the remote control is pressed for about 3 seconds, it will be” emergency stop “. At this time , all motors will stop rotating immediately and the aircraft will immediately fall.
5. HEADLESS MODE
![]() Please use this function after you are fully familiar with the “headless mode” function. Otherwise, the aircraft may be lost easily and cause unnecessary losses.
Please use this function after you are fully familiar with the “headless mode” function. Otherwise, the aircraft may be lost easily and cause unnecessary losses.
- Short press the headless mode button “
 “, the remote control” drops”, the “headless mode indicator” on the remote control lights up, the remote control continuously makes a “beep” sound, and the front and rear indicators of the aircraft flash , indicating that the aircraft has entered the “headless mode”.
 - Press the headless mode button “” again , the” beeping “sound of the remote control disappears, and the” headless mode indicator light “on the remote control goes out, indicating that the aircraft exits the” headless mode”.
(Itis recommended that the orientation of the operator be consistent with the orientation of the head of the vehicle at the time of takeoff)
In headless mode, the forward direction of the aircraft is subject to the head orientation of the aircraft at the takeoff time. We recommend that the orientation of the operator b e consistent with the orientation of the nose of the vehicle at take off . The flight direction of the aircraft is completely controlled ae right (directional) lever. Push the right (direction) lever forward/back/left/right and the aircraft will fly forward/back/left/right.
Since the operator’s operation direction is very important to the realization of “headless mode” danng take off , please keep your operation direction consistent with the head orientation of the aircraft at the takeoff time after entering the “headless mode”, so as to avoid the confusion of operation direction and unnecessary loss and damage.
6. AKEY TO RETURN
IMPLEMENTED IN GPS MODE ONLY
The one-touch turn back (RTH) function returns the aircraft to the last recorded takeoff point.
There are three forms of return to flight (RTH): Intelligent return / low power return/lost contact return
INTELLIGENT RETURN
Short press the one-key return button “![]() ” to start the intelligent return function, and the remote control will start to beep. The aircraft will automatically return to the vertical altitude of the take-off point and then slowly descend to the take-off point. Press the”
” to start the intelligent return function, and the remote control will start to beep. The aircraft will automatically return to the vertical altitude of the take-off point and then slowly descend to the take-off point. Press the”![]() ” button again to exit the return program, and pull down the throttle lever to lower the aircraft to a safe area.
” button again to exit the return program, and pull down the throttle lever to lower the aircraft to a safe area.
LOW ELECTRICITY RETURN
When the battery is low, it will trigger alow charge return, and at this time, the front white indicator light and the rear blue indicator light of the aircraft will flash quickly. When the low current return is activated, the aircraft will fly back to the sky more than 30 meters away from the operator, at this time, the operator can still operate and control the aircraft . At this point , pull down the throttle lever to land the aircraft in a positive and safe place. When the battery runs out , the aircraft will automatically return to the set take-off point.
Note: Please do not push the direction lever when entering the low-current return course. If you push it, the return course will take effect and there is a risk of the aircraft losing right.
LOST IN RETURN
If the connection between the aircraft and the remote control is lost, the aircraft will automatically enter the return mode, and the four indicators on the aircraft will flash. The aircraft will automatically return to the take-off site. If the aircraft and the remote control are connected again during the process of retum, the operator can regain control of the aircraft .
Note: This aircraft is not equipped with obstacle avoidance function.
BASIC PARAMETER INFORMATION
Aircraft
Type: A6
Weight: 223g
Operating temperature: 0° C~ 40° C
Remote control
Operating frequency: 2.4GHz
Capacity:500mAh
Voltage:3.7V
Battery type: Lithium battery
Operating temperature: 0° C~ 40° C
Flight vehicle battery
Capacity: 1200mAh
Voltage : 7.6V
Battery type: Lithium battery
Power: 3.70Wh
Charging time: about 180 minutes
(depending on the rechargeable power source and the amount of power left in the battery)
Charging temperature: 5° C~ 40°C
APP/ real-time image transfer
Application: TSRC
Real – time graph transmission frequency: 5GHz ISM
Real – time image transmission quality: 1080P @ 25fps
Latency: Low latency (depending on condition and mobile device)
Operating system: IOS 7.0 or later/Android 4.4 or later
Camera
Camera Angle: FOV 120° f / 2.0
Photo Format: JPEG
Photo resolution: HD1920 x 1080p (Stored in TF card/mobile phone)
Video Format: MP4
Video resolution: HD1920 x 1080p (Stored in TF card)
HD1280 x 720p (Stored on the mobile phone)
Maximum bit rate: 25Mbps
Supported file formats: FAT32
Operating temperature: 0° C~ 40° C
USB charging line
Voltage : 5V
Rated power: <10W
Documents / Resources
 |
TSRC A6 GPS Function Drone [pdf] Instruction Manual A6, 2A8JCA6, A6 Drone, Drone, A6 GPS Function Drone, GPS Function Drone |


