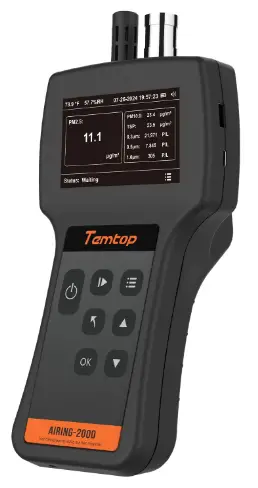
TEMTOP AIRING-2000 Handheld Particle Counter Particulate Monitor
Specifications:
- Model: AIRING-2000
- Dimensions: 228x115x70mm (9×4.5×2.8 in)
- Battery Capacity: 3500mAh
- Battery Life: 4 hours
- Charging Output: DC5V, 2A
- PM2.5 Detection Range: 0-999 μg/m³
- PM10 Detection Range: 0-999 μg/m³
- Humidity Detection Range: 0-100%
Product Usage Instructions
- Power ON
Press and hold the power button for 2 seconds to turn on the detector. After initialization, the instrument enters the default interface without starting the measurement to save power. - Start Detection
Press the measure/wait button to start detection, displaying real-time data of all parameters. The instrument defaults to continuous sampling. Press the same button to pause sampling. - Switch Measurement Items
The default PM2.5 data is displayed in the main view box. Use the up or down buttons to switch between measurement items displayed in the main view box. - Setting Menu
Press the menu button to enter the menu screen. Use the up or down buttons to toggle between options, and then press the OK button to confirm your choice for viewing or changing settings. - System Setting
In the system setting interface, navigate to MENU->Setting to set time, sample, backlight adjustment, and language preferences. Use the up or down buttons to switch options and press OK to enter.”- Time Setting
In the time setting interface, use the buttons to adjust time settings. Press OK to save the settings when finished. - Sample Setting
In the sample setting interface, set Temperature Unit, Storage Interval, and Warning Settings as needed.
- Time Setting
Introduction
The AIRING-2000 is a small, lightweight, battery-powered, multi-functional handheld particulate mass monitor. Three channels output counts of 0.3µm, 0.5µm, and 1.0µm, particulate matter. It also features PM2.5, PM10, TSP, temperature and humidity, and historical data.
The large screen display and seven-button operation are simple and efficient, making it suitable for quick tests in various scenarios. The built-in high-performance lithium battery allows the instrument to run continuously for at least 4 hours. Meanwhile, the AIRING-2000 has 32GB of built-in storage so that test data can be viewed directly on the display or use a USB stick to export to a PC via the USB port for viewing and analysis.
Important!
- Do not expose the detector to heavily contaminated environments for long periods, as this can damage the sensor.
- Do not come into contact with organic solvents, whichinclude silica gel and other adhesives, paintings, drugs, oil and high-concentration gases.
- Do not use the detector in a humid environment to maintain detection accuracy.
- Do not cover the air inlet/outlet when using the detector.
- Do not dismantle the unit yourself. In the event of a defect, contact your dealer instead, who will liaise with the service center and, if necessary, send the device in for repair.
- Children should only use this device under adult supervision. Keep packaging materials, such as plastic bags and plastic wrap, out of the reach of children as they present a choking hazard.
Overview

- Temperature & Humidity Detection Channel
- LCD Screen
- Power Button
- Back Button
- OK Button
- Intake Duct
- USB Port
- TYPE-C Port
- Measure/Wait Button
- Menu Button
- Up Button
- Down Button
- Air Outlet
- Bracket Hooks
Specifications
| Model | AIRING-2000 |
| Dimensions | 228x115x70mm(9×4.5×2.8 in) |
| Battery Capacity | 3500mAh |
| Battery Life | >4h |
| Charging Output | DC5V, 2A |
|
PM2.5 |
Range: 0-9999.9µg/m3 Resolution: 0.1µg/m3 Accuracy: ±10µg/m3 (0-100µg/m3),
±10% (>100µg/m3) |
|
PM10 |
Range: 0-9999.9µg/m3 Resolution: 0.1µg/m3 Accuracy: ±10µg/m3 (0-100µg/m3),
±10% (>100µg/m3) |
|
TSP |
Range: 0-9999.9µg/m3 Resolution: 0.1µg/m3 Accuracy: ±10µg/m3 (0-100µg/m3),
±10% (>100µg/m3) |
| 0.3µm, 0.5µm, 1.0µm | Range: 0-999999 P/L
Resolution: 1 P/L Accuracy: ±30% |
| Temperature | Range: 0-50°C (32-122°F)
Resolution: 0.1°C Accuracy: ±0.5°C (±0.9°F) |
| Humidity | Range: 0-90%RH
Resolution: 0.1% Accuracy: ±5%RH |
Note: The above data are from Temtop Laboratory.
- Range: 0-9999.9μg/m3 Resolution: 0.1μg/m3
- Accuracy: ±10μg/m3 (0-100μg/m3), ±10% (>100μg/m3)
- Range: 0-9999.9μg/m3 Resolution: 0.1μg/m3
- Accuracy: ±10μg/m3 (0-100μg/m3), ±10% (>100μg/m3)
Warning!
- Indoor use: Keep the room/area airtight for 10 minutes to obtain more accurate results.
- If battery level shows , please charge the detector promptly to avoid effects during use (also chargeable when turned off). 76.5 °F 54.4%RH
Power ON
- Press and hold
 button for 2 seconds to turn on the detector.
 - After initialization, the instrument enters the default interface.
- lt will not start the measurement by default to save the power (Fig.2).

- Press
 to start detection, and it will display the real-time data of all parameters. The instrument defaults to continuous sampling. During the sampling process, you can press to pause sampling (Fig.3).
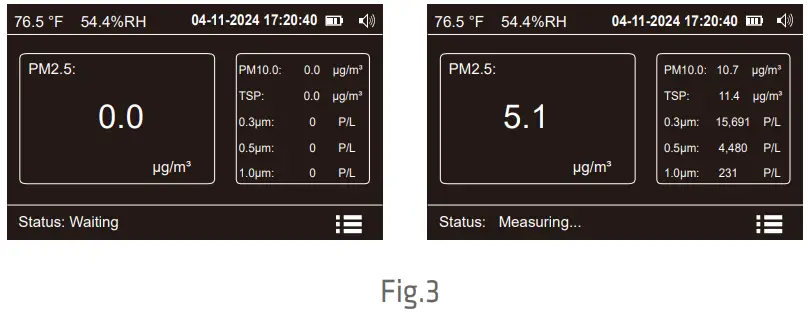
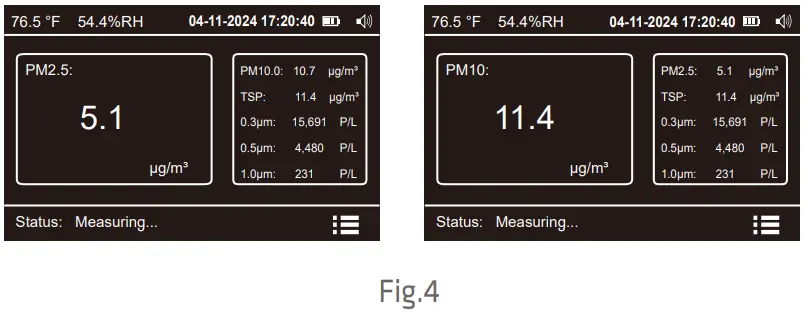
- The instrument default PM2.5 data is displayed in the main view box, press
 or
or to switch the measurement items displayed in the main view box (Fig.4).
Setting Menu
- Press
 to enter the menu screen, then press or to toggle between options.
 - Press
 to confirm your choice to view or change settings (Fig.5).
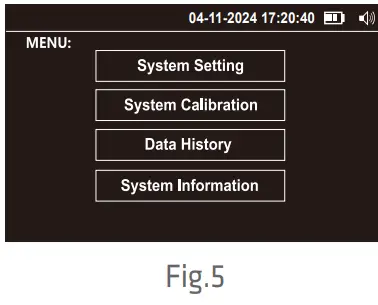
MENU options are as follows:
| Menu | Display as… | Description |
| System Setting | Setting | Set system time, sampling, backlight, and language. |
| System Calibration | Calibration | Calibrate zero, and k-Factor. |
| Data History | History | Query, download and delete the data. |
| System Information | Information | Display system information. |
System Setting
In the system setting interface MENU->Setting, you can set time, sample, backlight adjustment, and language. Press ![]() or
or![]() to switch the options (Fig.6) and press
to switch the options (Fig.6) and press![]() to enter.
to enter.

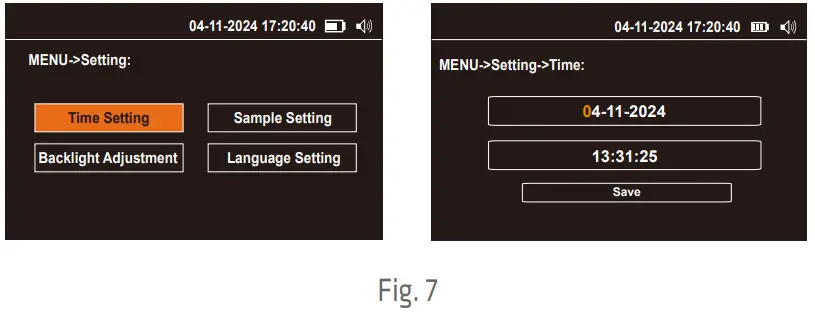
Time Setting
Press the ![]() key to enter the time setting interface, press the
key to enter the time setting interface, press the![]() key to switch the option, press the
key to switch the option, press the ![]() or
or![]() key to increase or decrease the value, switch to the Save option when the setting is completed, press the
key to increase or decrease the value, switch to the Save option when the setting is completed, press the![]() key to save the setting (Fig. 7).
key to save the setting (Fig. 7).
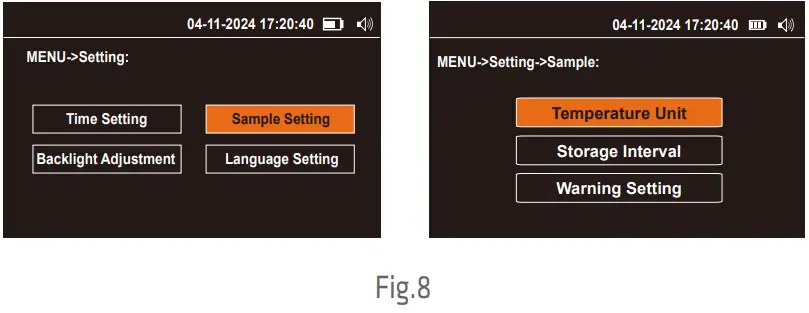
Sample Setting
In the system setting interface MENU->Setting, press or to switch to the Sample Setting, and then press![]() to
to![]() enter the sample setting interface (Fig.8). In the sample setting interface you can set the Temperature Unit, Storage Interval and Warning Setting.
enter the sample setting interface (Fig.8). In the sample setting interface you can set the Temperature Unit, Storage Interval and Warning Setting.
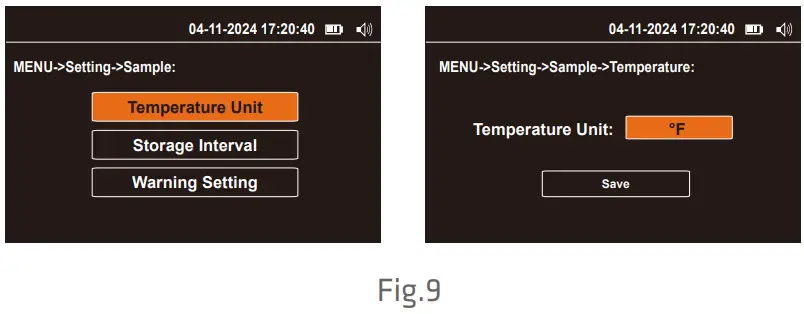
Temperature Unit
- In the system setting interface MENU->Setting->Sample.
- Press to enter the Temperature Unit interface.
- Press or to select °C or °F.
- Then press to switch to Save and pressto save (Fig.9).
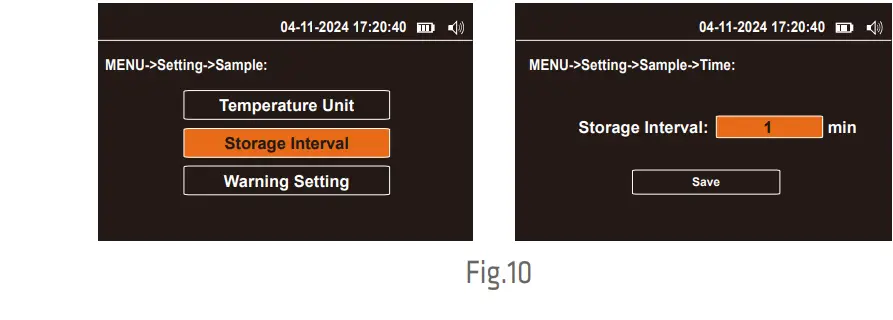
Storage Interval
- In the system setting interface MENU->Setting->Sample.
- Press or to switch to the Storage Interval, and Press to enter.
- The storage interval 1min, 2min, 5min, 10min, 15min, 30min and 60min is optional.
- Press or key to switch the storage interval.
- Then press to switch to Save and press to save (Fig.10).
Warning Setting
- In the system setting interface MENU->Setting->Sample.
- Press or to switch to the Warning Setting, and Press to enter. Press to select the on or off alarm switch.
- Press or to select PM2.5, PM10, TSP, 0.3μm, 0.5μm, and 1.0μm, press to select the modification item and press to toggle the modified value, then press or to modify the alarm threshold.
- Press or to switch to Save when the setting is complete and press to save (Fig.11).
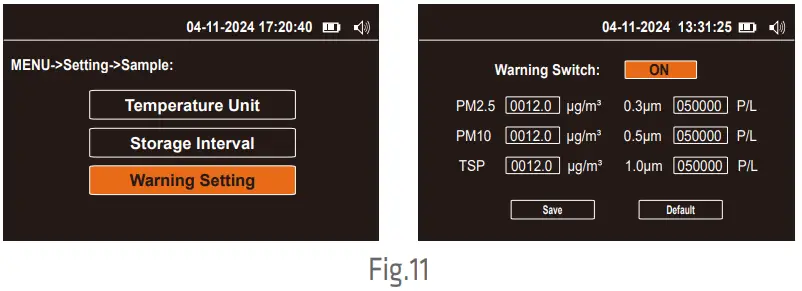
Note: The product factory default settings will be restored when the default settings are made.
Backlight Adjustment
- In the system setting interface MENU->Setting.
- Press or to switch to the Backlight Adjustment, and press to enter.
- Press or to select 1, 2 and 3.
- Then press to switch to Save and press to save (Fig.12).
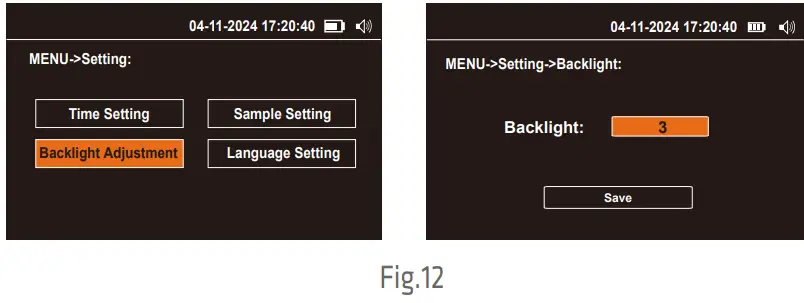
Note: The factory default screen backlight level is 3.
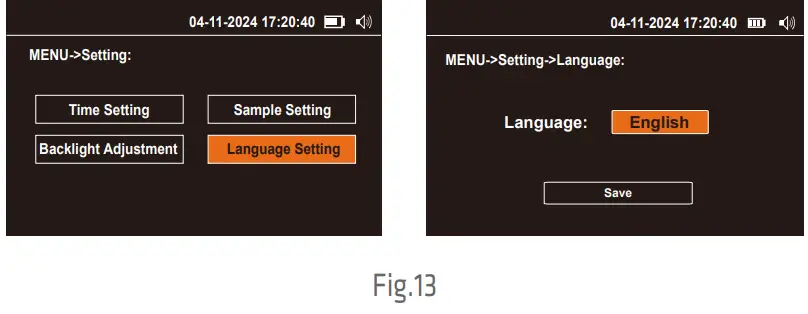
Language Setting
- In the system setting interface MENU->Setting.
- Press or to switch to the Language Setting, and press to enter.
- Press or to select English or 中文.
- Then press to switch to Save and press to save (Fig.13).
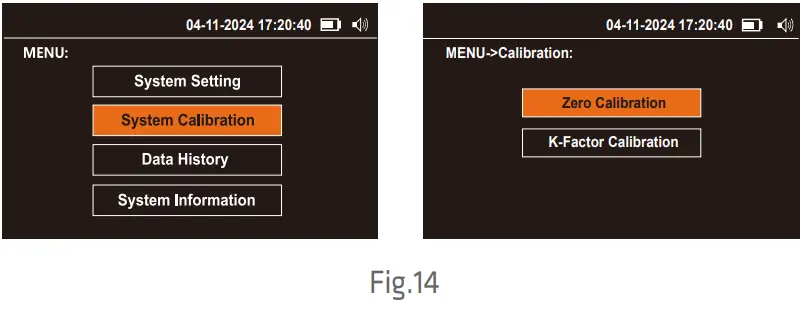
System Calibration
- In the system calibration interface MENU->Calibration, you can operate Zero Calibration and K-Factor Calibration.
- Press or to switch the option and press to enter (Fig.14).
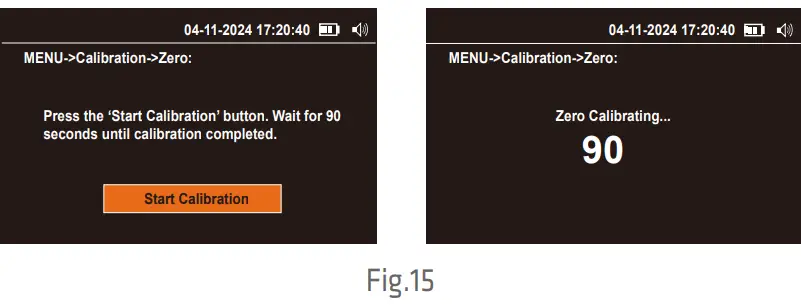
Zero Calibration
- Under the Zero Calibration interface, press to start calibrating.
- It takes about 90 seconds countdown. After the countdown finishes, the display prompts a reminder to confirm the calibration finishes successfully and will return to the MENU-Calibration interface automatically (Fig. 15).
K-Factor Calibration
- Make sure the instrument is in a stable environment.
- Press to perform a K-factor mass concentration calibration. The product will turn on the pump and collect data for 60 seconds, then proceed to the K Factor Mass Concentration Calibration screen.
- Press or to switch the cursor, press to select the modification item, and press to toggle the modified value, then press or to increase or decrease the value.
- Press or to switch to calibrate after the setting is completed, press to calibrate (Fig.16).

Note: The product factory default settings will be restored when the default settings are made.
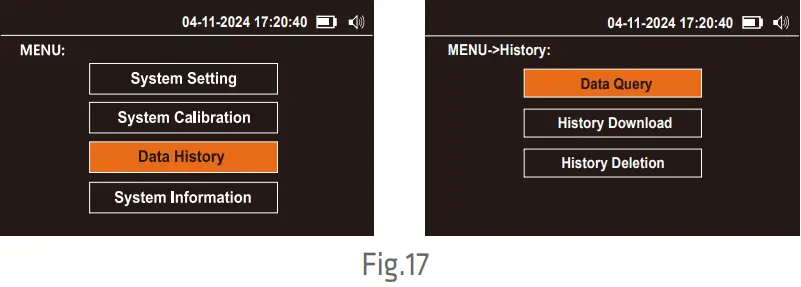
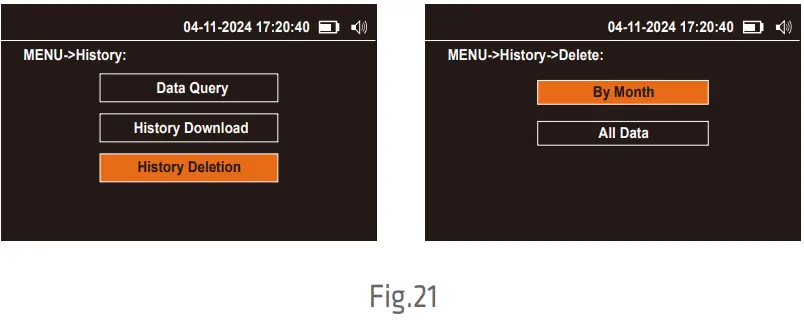
Data History
- In the data history interface MENU->History, you can operate Data Query, History Download and History Deletion.
- Press or to switch the option and press to enter (Fig.17).
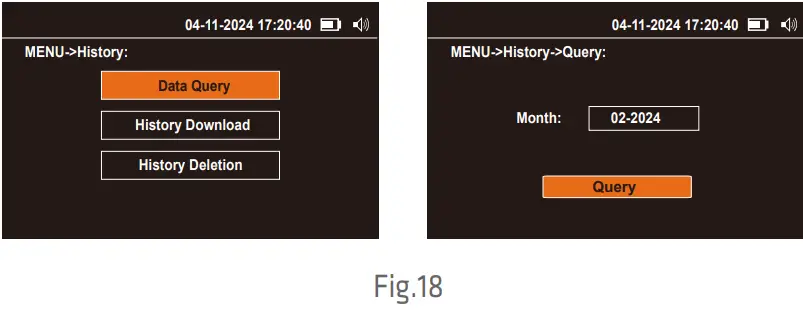
Data Query
- In the query interface, you can press month data. Press to enter the month selection interface, by default the system will automatically recommend the current month.
- If you need data for other months, you can press or to increase or decrease the value. When finished, press to switch to the query and press to enter the query (Fig.18).
History Download
In the History Download interface, insert a USB device such as a USB flash drive or card reader into the USB port of the monitor, If the USB device is successfully connected, press![]() to download the data (Fig. 19).
to download the data (Fig. 19).
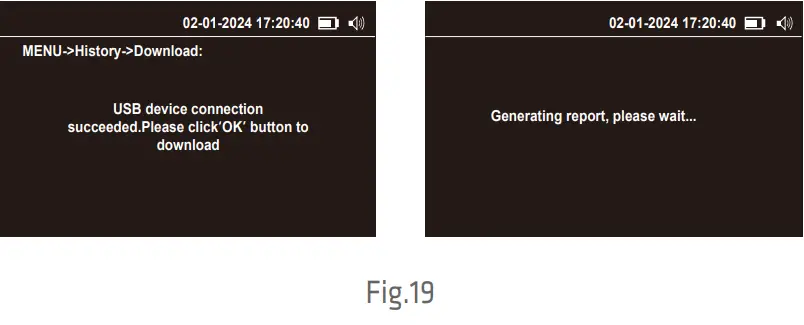
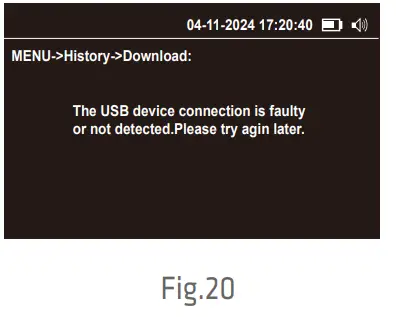
After downloading the data, unplug the USB device and insert it into the computer to find a folder prefixed with the product serial number, for example, “TT1246070001-062120241754”. You can view and analyze the data now. If the USB device fails to connect or there is no USB device connected, the display will prompt a reminder. Please reconnect it or try again later (Fig. 20).
History Deletion
In the History Deletion interface, data can be deleted by month or all. Press ![]() or
or![]() to switch options and press
to switch options and press ![]() to enter (Fig. 21).
to enter (Fig. 21).
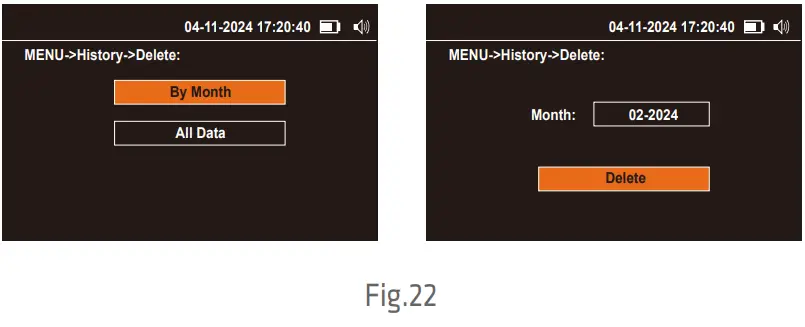
By Month
For the Monthly Data interface, the current month will auto display by default. lf you need to delete other months, please press![]() switching to the year and month options, then press
switching to the year and month options, then press![]() or
or![]() to increase or decrease the value. After complete, press
to increase or decrease the value. After complete, press![]() to switch to Delete and press
to switch to Delete and press![]() to complete the delete(Fig.22).
to complete the delete(Fig.22).
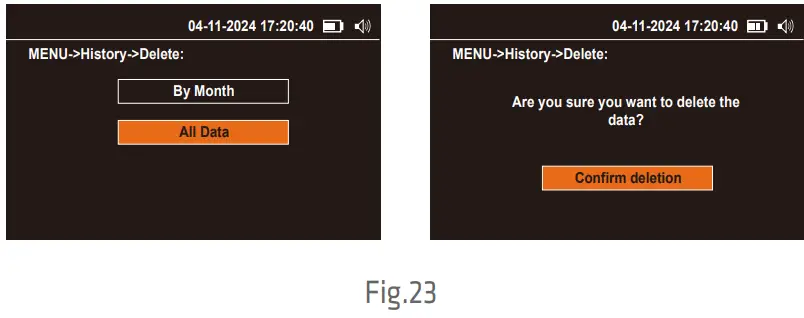
 All Data
For the All Data screen, the display will prompt ‘Are you sure you want to delete the data?’ Press![]() to confirm the deletion (Fig. 23). Wait for the deletion to complete, if the data has been successfully deleted the display will prompt a reminder and automatically return to the Menu-History screen.
to confirm the deletion (Fig. 23). Wait for the deletion to complete, if the data has been successfully deleted the display will prompt a reminder and automatically return to the Menu-History screen.
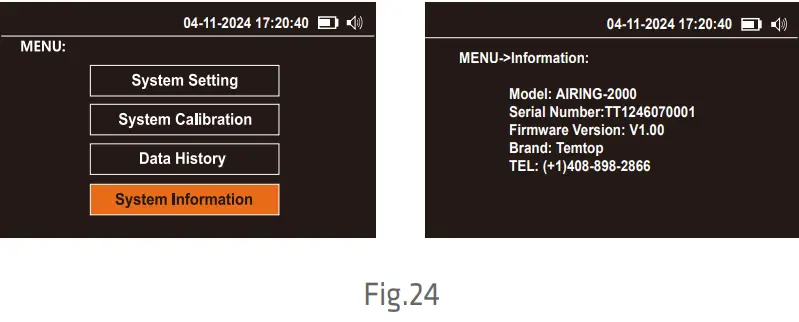
System Infomation
The System Infomation interface shows the following information (Fig.24)
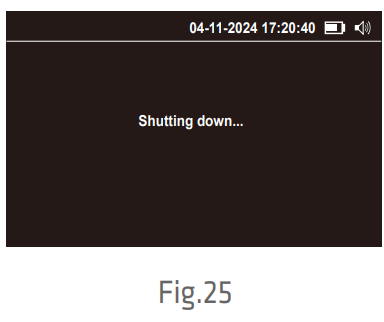
Power OFF
Press and hold![]() for 2 seconds to turn off the monitor (Fig.25).
for 2 seconds to turn off the monitor (Fig.25).
What’s Included
- Detector x 1
- USB Cable x 1
- User Manual x 1
- Calibration Certificate x 1
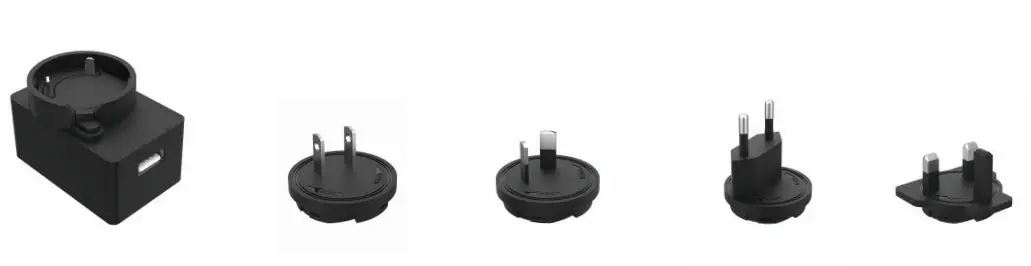
- Battery Charger (Includes 4 adapters)* x 1
Battery Charger Schematic and Operation Example:
Example:
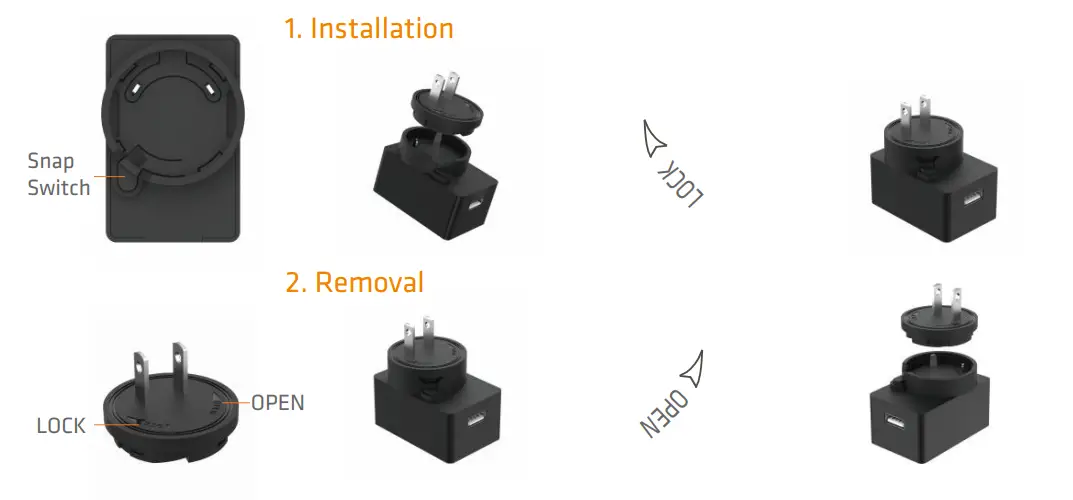
- Installation:
Hold the “Snap Switch” in your left hand and turn it in the “LOCK” direction with your right hand. - Removal:
Hold the “Snap Switch” in your left hand and turn it in the “OPEN” direction with your right hand.
Troubleshooting
| Failure | Possible Causes | Solution |
|
Noise |
The flow is excessive | Flow calibration |
| The pump is faulty | Send to the service center | |
| Cannot be turned on, no display | Battery discharged | Charge the battery for 3.5 h |
| The battery is faulty | Send to the service center | |
| Display is on, but pump does not run | Low battery level | Charge the battery for 3.5 h |
| The pump is faulty | Send to the service center | |
|
Detected value is not reliable |
Flow deviation | Flow calibration |
| Inlet screen clogged | Check the inlet screen | |
|
Contamination inside the monitor |
Replace the filter element | |
| Send to the service center | ||
| Unable to charge the battery | The battery is faulty | Send to the service center |
| Charger failure | Contact the service center |
Warranty
Temtop warrants the included detector for 1 year from the date of original purchase. The item can be exchanged or returned within 30 days if the defect is not caused by artificial damage.
| Item | Warranty Period |
| Detector | 1 year included |
| Accessories | N/A |
Before return or delivery for repair, please check if the following √ items are ready:
| Detector &
Accessories |
Complete Package | Proof of Purchase* | Gift (if any) | |
| Return | √ | √ | √ | √ |
| Exchange | √ | √ | √ | |
| Repair | √ | √ |
* Including invoice, order number and etc.
Temtop warranty does NOT include:
- Malfunction or damages caused by artificial damage or modification.
- Other deliberate damages.
- Damage caused by natural events.
Elitech Technology, Inc
- 2528 Qume Dr, Ste 2 San Jose, CA 95131 USA
- Tel: (+1) 408-898-2866
- Facebook: www.facebook.com/temtopus
- Instagram: www.instagram.com/temtopaqm/
- youtube: www.youtube.com/
- @Temtopus linkedin: www.linkedin.com/company/temtop-us/X:x.com/temtopus48285
- Sales: sales@temtopus.com
- Website: www.temtopus.com
Elitech Brazil Ltda
- R.Dona Rosalina,90-Lgara, Canoas-RS 92410-695,Brazil
- Tel: (+55)51-3939-8634
- Sales: brasil@e-elitech.com
- Website: www.elitechbrasil.com.br
Elitech (UK) Limited
- Unit 13 Greenwich Business Park, 53 Norman Road,London, SE10 9QF Tel: (+44)208-858-1888
- Youtube: @elitech_uk
- Instagram: @elitechuk_
- Facebook: @hvaccontrol
- Sales: sales@elitecheu.com
- Website: www.temtop.co.uk
Made In China
FAQ
Q: How do I charge the AIRING-2000?
A: The AIRING-2000 can be charged when turned off using a DC5V, 2A charger via the TYPE-C port.
Q: What is the battery life of the AIRING-2000?
A: The battery capacity of AIRING-2000 is 3500mAh, providing a battery life of approximately 4 hours.
Documents / Resources
 |
TEMTOP AIRING-2000 Handheld Particle Counter Particulate Monitor [pdf] Instruction Manual AIRING-2000 Handheld Particle Counter Particulate Monitor, AIRING-2000, Handheld Particle Counter Particulate Monitor, Particle Counter Particulate Monitor, Counter Particulate Monitor, Particulate Monitor, Monitor |