Insta360 Pro Live Streaming with Mantis Sub Instruction Manual
Please read these instructions carefully before using this product, and save this manual for future use. For questions, email info@mantis-sub.com or visit https://www.mantis-sub.com/
Please note that the actual controls and components, menu items, etc. of your camera and software may look somewhat different from those shown in the illustrations in this manual.
Mantis offers two live-streaming setups
- Ethernet only (no power)
https://www.mantis-sub.com/products/p/mantis-tether

- Ethernet + power (‘hybrid’)
https://www.mantis-sub.com/products/p/mantis-hybrid-tether

The images in this guide show the Ethernet only option. The installation for the hybrid option is similar.
Attention: When using the hybrid cable, do not connect the power lead from the hybrid bulkhead directly to the camera. The voltage from the hybrid cable is too high and will permanently destroy the camera!
PARTS LIST
Required parts
- Mantis Sub housing with stand
- The housing ships with a folding stand.
- The pictures in this guide feature the desktop stand. Files for 3D printing are available from https://www.thingiverse.com/thing:4835046
- 18650 Batteries (3x) with Ethernet-only cable, or Mantis DC adapter for hybrid cable. The Mantis DC adapter replaces the original battery shuttle in the electronics tray.
- Insta360 Pro2 with cards
- Insta360 recommends “SanDisk Extreme Pro MicroSDXC UHS-I U3 A2 V30” 128GB or more.
- Underwater ethernet or hybrid tether cable with M16x1 bulkhead connector.
- Available from Mantis Sub
- The thread of the bulkhead adapter should not be longer than 6mm or it could be too long to fit.
- Ethernet cables of Category 5 and higher have a maximum length of 100m.
- Unshielded ROV-type tether cables have a maximum length of 50-70m.
- The hybrid cable requires the DC adapter (included) which replaces the original battery shuttle in the electronics tray.
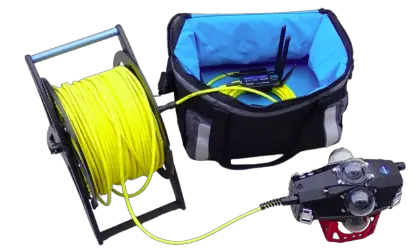
Optional parts
- Tether spool to hold cable
- The pictures show the BlueRobotics Fathom Spool.
- WiFi router to connect surface devices.
- The pictures show the Teltonika RUT240 4G/LTE WiFi Router.
- Waterproof bag or box for WiFi router.
- The pictures show the CineBags CB70 Square Grouper bag.
Required tools
- 50 cent coin or similar tool with round edges for removing the port plug
- 4mm hex key or driver for removing the tray bolt.
- Ethernet only: 22mm wrench or no-scratch pliers for tightening the bulkhead connector.
- Air blower/rocket for cleaning domes.
- Microfibre cloth for cleaning domes.
- Lens cleaner fluid or Isopropyl alcohol for cleaning domes and lenses.
- Silicone grease for lubricating o-rings
ETHERNET BULKHEAD CONNECTOR INSTALLATION
This installation shows one type of cable and bulkhead connector. Other types of cables and connectors are available, including hybrid Ethernet + Power cables. The installation procedure is the same.
- Remove the M16x1 port plug from the base of the housing with a coin or other tool with rounded edges.

- Remove the bolt securing the tray to the housing with a 4mm hex key or driver. You do not need to remove the bolt from the tray.

- Place the tray slightly to the side in the housing. Keep it upright so that the bolt doesn’t fall out.

- Inspect the Ethernet bulkhead connector and ensure the bulkhead o-ring is fitted, clean, and lubricated.
- Before feeding the Ethernet connector through the port, turn the connector 5 rotations counter-clockwise. This ensures that the cable does not end up twisted after installation.
- Feed the cable through the port plug and screw the bulkhead connector into the port. If your bulkhead connector has two cables, feed the cable with the larger connector through the port first.


- Tighten the bulkhead connector with a 22mm wrench of non-scratch pliers.

Notes for hybrid cable installation: The hybrid cable features a waterproof connector, which can be detached from the bulkhead. Please make sure the cable is detached from the bulkhead during installation. - Return the tray to its original position at the base of the housing.
- Make sure that the cables leading from the buttons and status LED are not trapped between the housing and tray, and that the sides of the tray are flush with the housing.

- Tighten the bolt holding the tray with a 4mm hex key or driver.

- Before installing the camera, make sure that the inside of the domes are free from smudges and dust. Dust or dried drops of water show up very large in the 360 recording.
- Attach the camera slide to the camera and insert the camera into the housing. The battery cover should face towards you.

- Now connect the newly installed cable to the camera. Fold the flat housing ethernet cable that comes with the internal tray away, it is not used in this configuration.

- Hybrid cable only: Replace the original battery tray with the DC converter tray and connect the power lead from the hybrid bulkhead.
Do not connect the power lead from the hybrid bulkhead directly with the camera! The voltage from the hybrid cable is too high and will permanently destroy the camera

CONFIGURATION
Insta360 Pro
- Prerequisites
- Lenses free from smudges and dust.
- Battery charged and installed.
- Camera turned on.
- Configuration
- Main Screen:
- WiFi: On
- Settings Screen:
- Ethernet:
- Ethernet can be configured as “Direct” or “DHCP”
- Direct: Required when plugging directly into a computer.
- DHCP: Recommended when plugging into an Ethernet/WiFi router.
- Main Screen:
- Setting “Direct”:
- The camera has a fixed IP of 192.168.1.188
- The computer’s network interface has to be configured with a manual IPv4 address
- IP Address: 192.168.1.xxx (not 192.168.1.188)
- Subnet mask: 255.255.255.0
- Setting “DHCP”:
- The camera retrieves its IP address from an Ethernet/WiFi router. It is shown on the camera’s display.
- Connection through an Ethernet/WiFi router is required.
- The computer’s network interface has to be configured to use DHCP.
- Storage:
- All cards formatted.
- Speed test completed.
Ethernet/WiFi router
- Prerequisites
- 100MBit or 1000MBit Router
- Device turned on.
- Ethernet/WiFi Routers use little power and can often be powered from a USB powerbank with a USB/DC adapter cable.
- Most Ethernet/WiFi Routers use 12V and a 5.5×2.1mm barrel connector.
- The Teltonik RUT240 uses 9V and a customer power connector. Soldering
required.
- Configuration
- If the camera’s Ethernet is set to “Direct”:
- The router has to be configured to use the same subnet as the camera.
- The subnet is 192.168.1.0/255.255.255.0
- The camera’s IP address is 192.168.1.188
- If the camera’s Ethernet is set to “DHCP”:
- The standard router configuration should work.
- The camera’s IP address is shown on the camera display.
- If the camera’s Ethernet is set to “Direct”:
Computer / Device
- Ethernet configured:
- If the camera’s Ethernet is set to “Direct”:
- The camera has a fixed IP of 192.168.1.188
- The computer’s network interface has to be configured with a manual IPv4 address
- IP Address: 192.168.1.xxx (not 192.168.1.188)
- Subnet mask: 255.255.255.0
- If the camera’s Ethernet is set to “DHCP”:
- An Ethernet/WiFi router is required.
- The camera retrieves its IP address from an Ethernet/WiFi router. It is shown on the camera’s display.
- The computer’s network interface has to be configured to use DHCP
- If the camera’s Ethernet is set to “Direct”:
- Computer connected to same network as the camera.
- Insta360 Pro camera control app installed.
- Available from https://www.insta360.com/download/insta360-pro2
Mantis Sub
- Prerequisites
- 3x 18650 batteries charged and installed or Mantis DC adapter for hybrid cable.
Do not connect the power lead from the hybrid bulkhead directly with the camera! The voltage from the hybrid cable is too high and will permanently destroy the camera! - Main o-ring cleaned and lubricated.
- Domes free from smudges and dust.
Watch out for dust or dried drops of water on the inside of domes, they show up very large on the final video.
Blow out interior of domes (with inside of domes facing down) every time. - Insta360 Pro installed
Lenses centered.
Surface Ethernet cable plugged into camera.
Mantis Ethernet cable folded away.
Optional: Mantis Power lead plugged into camera. - Housing and camera turned on.
- Housing firmware 2.7.0 or higher installed.
Download firmware from https://www.mantis-sub.com/support/ - Housing closed.
- Vacuum test success.
- 3x 18650 batteries charged and installed or Mantis DC adapter for hybrid cable.
- Configuration
- Because the Mantis Sub housing is not plugged into Ethernet, the WebApp is only available through the cameras’s WiFi connection or through a special proxy mode that can be set up from within the Configuration tab of the Mantis WebApp.
- Connect your device or computer to the camera’s WiFi network
SSID: Insta360-Pro-xxxx.OSC
Password: 88888888 - Open browser and navigate to http://192.168.43.2/ to open the Mantis Sub WebApp
Please make sure the browser accepted “http”. Some browser automatically change it to “https”, which won’t connect.
Alternatively: scan the barcode on the quick start guide)
Some mobile phones can only connect if mobile data is turned off. - Make sure the Control page shows “Ready to Dive”
- Confirm Configuration settings for surface Ethernet deployment:
Camera charge threshold: 30%
Charging heats up the camera. Only charge when necessary.
Automatically connect to camera: OFF
Stay connected to camera between commands: OFF
Prefer WiFi connection over Ethernet: ON
CONTROL AND MONITORING THROUGH INSTA360 APP
- Prerequisites
- Insta360 Pro camera control app installed.
Available from https://www.insta360.com/download/insta360-pro2 - Computer or device connected to same network as camera.
- Insta360 Pro camera control app installed.
- Operation
Start the Insta360 Pro camera control app.
Enter the IP Address shown on the camera’s display.- Click “Connect”
You can control the camera like you were connected through it’s WiFi connection with the Insta360 Pro camera control App. - Because the Mantis Sub housing is not plugged into Ethernet, the Mantis Sub WebApp is only available through the cameras’s WiFi connection and not through Ethernet.
- Click “Connect”
ACCESSING THE MANTIS WEBAPP THROUGH PROXY MODE
The Mantis Sub controller can install a network service on the Insta360 Pro2 camera that can forward web traffic from the camera to the controller. This is called a ‘reverse proxy’, as it allows computers on the camera’s network to access the controller which is on the isolated WiFi network.
The proxy service installation is automated and can be started from the Mantis Sub WebApp in the configuration tab, if the controller is connected to a Pro2 camera.
After that the Mantis Sub WebApp can be reached in two ways
- WiFi: http://192.168.32.2/
- Ethernet: http://192.168.1.188:8082/

LOCAL LIVESTREAM
The camera can stream a pre-stitched 4K 360-2D and 360-3D video via HLS, RTMP, and RTSP that can be watched without requiring a powerful computer to stitch.
- Prerequisites
- Insta360 Pro camera control app installed.
Available from https://www.insta360.com/download/insta360-pro2
- Insta360 Pro camera control app installed.
- Computer or device connected to same network as camera.
- 360 live-stream viewer installed. Options include:
VLC
OBS Studio (also for re-broadcasting)
Mantis Sub Livestream VR App for Oculus Quest
- 360 live-stream viewer installed. Options include:
- Operation
- Start the Insta360 Pro camera control app.
- Enter the IP Address shown on the camera’s display.
- Click “Connect”
- Click on the Live-stream tab
- Configure the livestream based on the capabilities of your viewer
- Mantis Sub Livestream VR App for Oculus Quest:
- Mode: 360 or 360 3D
- Projection Type: Equirectangular
- Live-stream Format: HLS
- Resolution: Up to 4K
- VLC
- Mode: 360 or 360 3D
- Projection Type: Equirectangular
- Live-stream Format: HLS, RTMP, or
- Resolution: Up to 4K, depends on the viewing device.
- You can control the camera like you were connected through it’s WiFi connection with the Insta360 Pro camera control App
- Mantis Sub Livestream VR App for Oculus Quest:
- Because the Mantis Sub housing is not plugged into Ethernet, the Mantis Sub WebApp is only available through the cameras’s WiFi connection and not through Ethernet.
INTERNET LIVESTREAM
If the Ethernet/WiFi router has an active internet connection, the camera can be set up to stream straight to YouTube or Facebook.
- Prerequisites
- Insta360 Pro camera control app installed.
Available from https://www.insta360.com/download/insta360-pro2 - Computer or device connected to same network as camera.
- Ethernet router has internet connection.
This can be through 4G/LTE. At least 5 MBit upstream bandwidth is recommended.
- Insta360 Pro camera control app installed.
- Operation
- Start the Insta360 Pro camera control app.
- Enter the IP Address shown on the camera’s display.
- Click “Connect”
- Follow the instructions of Insta360’s livestream tutorial:
https://www.insta360.com/support/supportcourse?post_id=19130
FARSIGHT LIVESTREAM
The Ethernet connection can be extended wirelessly via Insta360 Farsight.
- Prepare Farsight, Camera, and Computer for Farsight streaming
- Farsight Transmitter and Receiver
- Ensure both Transmitter and Receiver are fully charged before use. When the charge is low on transmitter or receiver the connection becomes unstable.
- Turn Receiver and Transmitter OFF
- Insta360 Pro 2 Camera:
- Disable the WiFi Connection
- Set the Ethernet Connection mode to DHCP
- Turn the camera OFF
- Computer
- Configure the Computer’s Ethernet Adapter to use DHCP
- Connect Computer and Farsight Receiver with an Ethernet cable
- Farsight Transmitter and Receiver
- Turn on Farsight Transmitter
- Hold the button for 3 seconds to turn the unit on.
- The power LEDs on the left will light up green.
- Wait 15 seconds before proceeding.
- Turn on Farsight Receiver
- Hold the button for 3 seconds to turn the unit on.
- The power LEDs on the left will light up green.
- After about 30 seconds blue lights on the right should light up solid blue
- When the blue light indicator lights solid blue it means the two devices have successfully paired.
- Verify Computer network settings
- Check the Ethernet adapter settings for a connection.
- The Address should be in the range 192.168.100.x / 25
- Turn on the Insta360 Pro2 Camera
- Wait for the camera to boot, then an additional 15-30 seconds.
- The IP Address should change from 0.0.0.0 to one assigned by the Farsight Receiver.
- The IP Address should be in the range 192.168.100.x / 255.255.255.0
- Write down the IP Address, we’ll need it for the camera control software.
- The IP Address will remain the same next time the camera boots.
- Open the Insta360 Pro App
- Enter the IP address displayed on the camera screen and click connect.
- You can now monitor and control the camera
Online Resources
- https://onlinemanual.insta360.com/pro2/en-us/basic/prepare/connection
- https://www.insta360.com/support/supportcourse?post_id=19140
TRADEMARKS
- Insta360 and Pro/Pro2 are trademarks or registered trademarks of Shenzhen ARASHI VISION INC.in the United States and/or other countries.
- All product names, logos, brands, trademarks and registered trademarks are property of their respective owners. All company, product and service names used in this manual are for identification purposes only. Use of these names, trademarks and brands does not imply endorsement.
CONTACT
Global Dive Limited
52 Remuera Road
Auckland, 1050
New Zealand
Web: https://www.mantis-sub.com/
Email: info@mantis-sub.com
Tel: +64 (0) 9 920 5200
Documents / Resources
 |
MANTIS Insta360 Pro Live Streaming with Mantis Sub [pdf] Instruction Manual Insta360 Pro, Insta360 Pro2, Insta360 Pro Live Streaming with Mantis Sub, Insta360 Pro, Live Streaming with Mantis Sub, Streaming with Mantis Sub, Mantis Sub |


