![]() EKE 347 Liquid Level Controller
EKE 347 Liquid Level Controller
Installation Guide 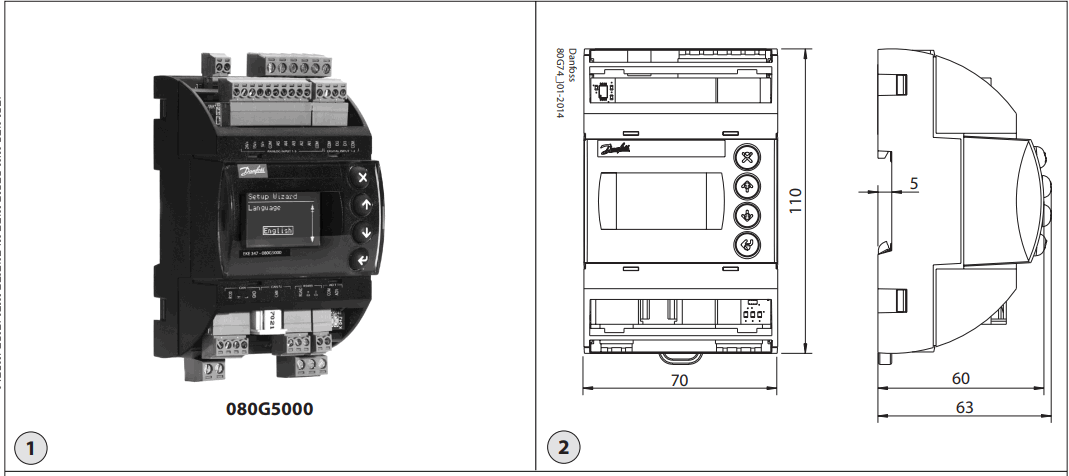
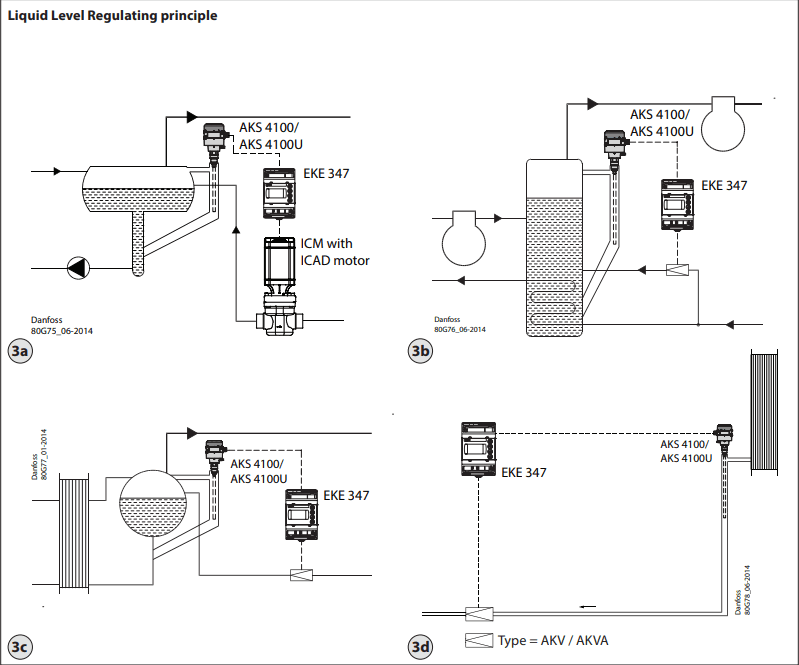


Liquid Level Regulating principle
Fig. 3a:
LOW
| System configuration | ICAD |
| Regulating principle | Low |
| Level Signal setup | AKS 4100 |
Fig. 3b:
LOW
| System configuration | AKV/A |
| Regulating principle | Low |
| Level Signal setup | AKS 4100 |
Fig. 3c:
LOW
| System configuration | AKV/A |
| Regulating principle | Low |
| Level Signal setup | AKS 4100 |
Fig. 3d:
HIGH
| System configuration | AKV/A |
| Regulating principle | High |
| Level Signal setup | AKS 4100 |
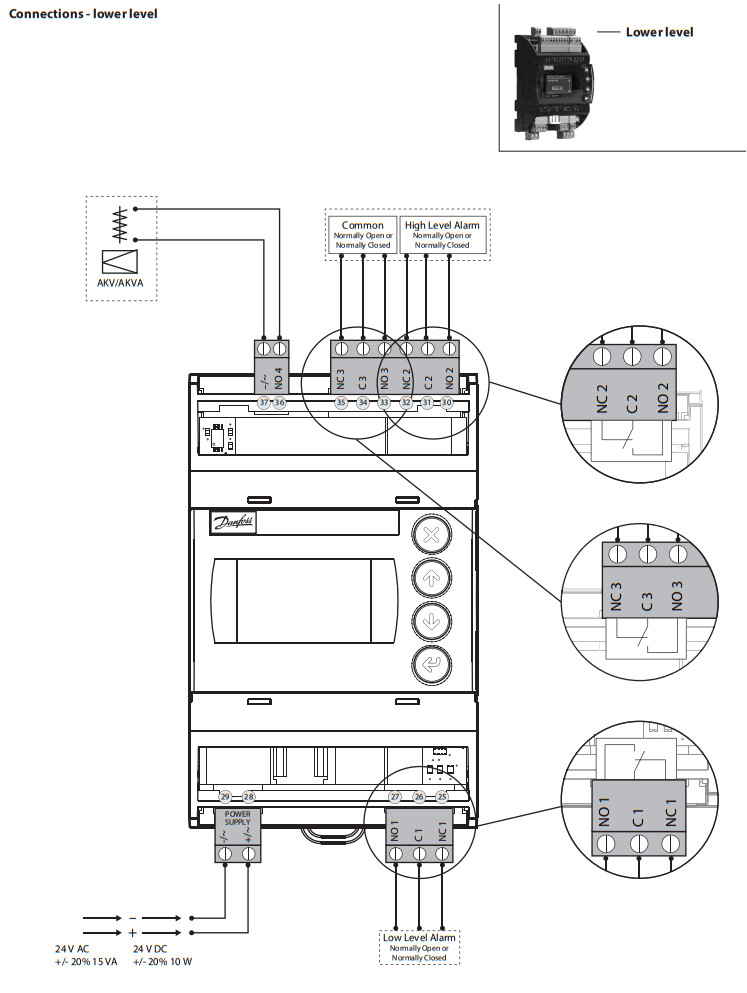
Necessary connections (fig. 4, 5 and 6)
Terminals:
28-29 Supply voltage 24 V a.c. or d.c. 1-7 Signal from level transmitter type AKS 4100/4100U or 7-10 Signal from level transmitter type AKS 41
36-37 Expansion valve type AKV or AKVA (see note to the right) or
23-24 Expansion valve type: ICM with ICAD 13-14 Switch function for start/stop of the controller. If a switch is not connected, terminals 13 and 14 must be shortcircuited.
Application-dependent connections (fig. 4, 5 and 6)
Terminals:
33-35 Relay for common alarm. The installer can choose between Normally Open (33-34) or Normally Closed (34-35) circuits. The relay will switch according to the programmed setting.
25-27 Relay for low-level limit. The installer can choose between Normally Open (26-27) or Normally Closed (25-26) circuits. The relay will switch when the set value is passed.
30-32 Relay for upper-level limit. The installer can choose between Normally Open (30-31) or Normally Closed (31-32) circuits. The relay will switch when the set value is passed.
6-10 ICM valve feedback signal from ICAD 0/4-20 mA
Note!
![]() If AKV(A) is used, the power supply must cover the AKV(A) coil wattage additionally (see fig. 5). AKV(A) Coil voltage must be the same as controller supply voltage AC or DC.
If AKV(A) is used, the power supply must cover the AKV(A) coil wattage additionally (see fig. 5). AKV(A) Coil voltage must be the same as controller supply voltage AC or DC.
MASTER/SLAVE and I/O configuration (fig. 7b and 7c) When more controllers are connected via CAN bus each end of the bus must be terminated with a jumper between 15 and 16.
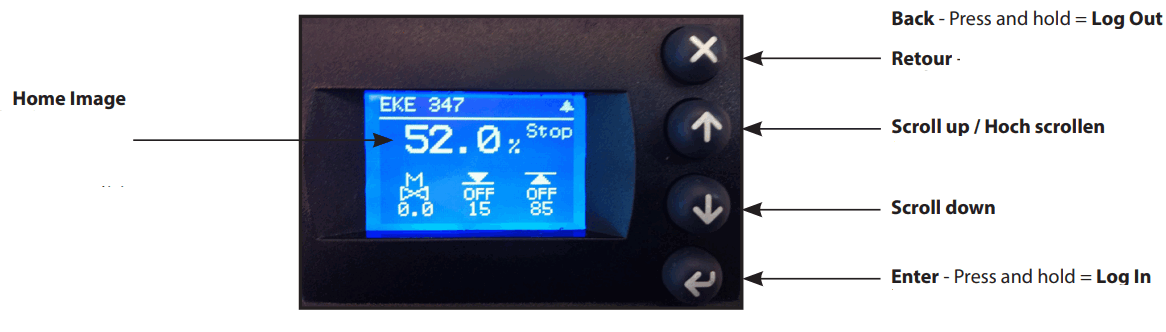
Control Panel (fig. 8)
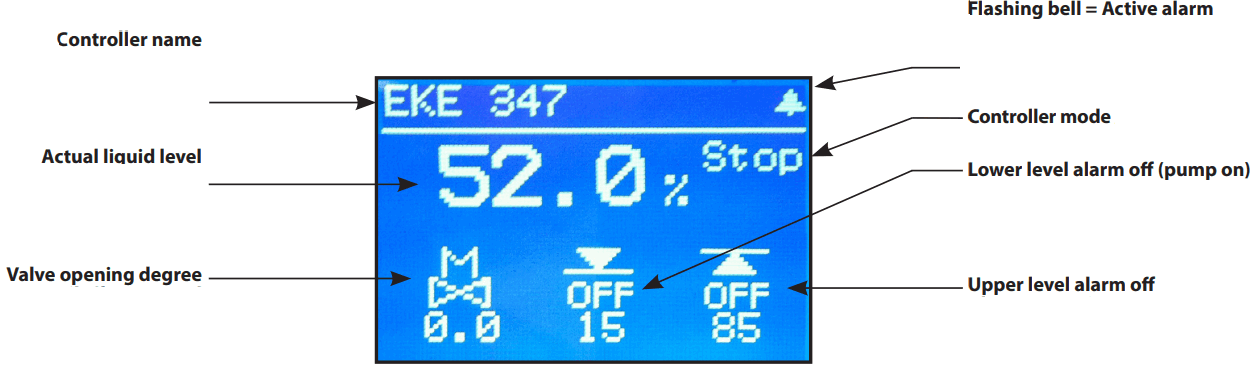
The user interface of the control panel consists of a multiline display and 4 individual push buttons: Enter button, Page up button, Page down button, and Back button.
Fig. 8 shows the Home display image, which gives the actual overview. This is the starting point for entering into menus, and you will revert to this image by pushing ![]() 1 – 3 times depending on the actual position).
1 – 3 times depending on the actual position).
Display (fig. 9)
The display itself shows the state of Liquid level, Controller Mode (controller On/ Off), Valve opening degree, Lower level alarm (on = no alarm present) and Upper
level alarm (off = no alarm present).
Additional to the external connected alarm audio/video sources, a Bell symbol will flash in the upper right corner in case of an alarm.
To see more details on system performance and setting of parameters, 2 different main menu levels can be reached by operation of the push buttons.
Menu’s
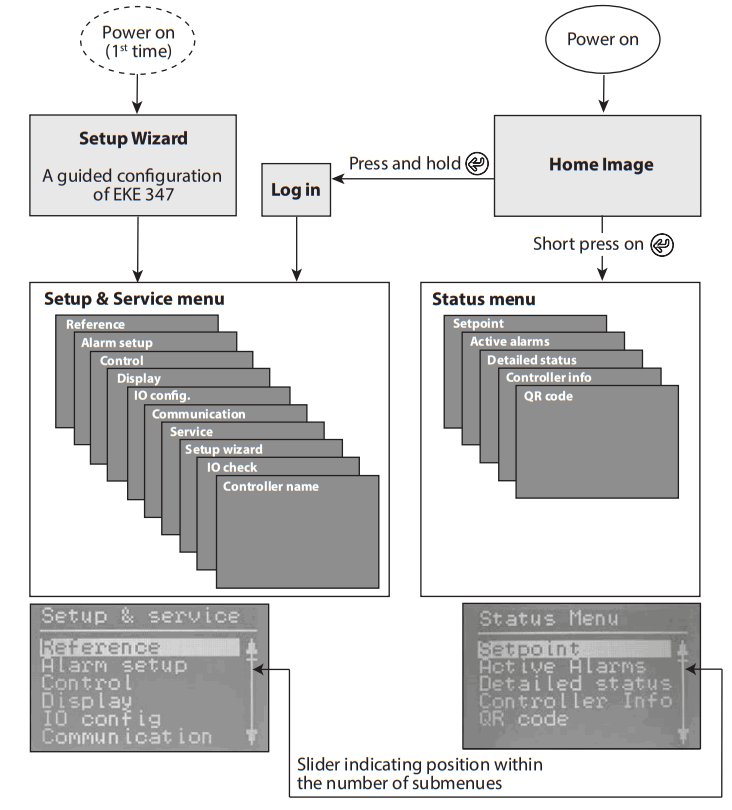
Entrance to menus (see fig. 10) From Home Image the status menu can be reached by one push-on![]() . From Home Image the Setup & service menu can be reached by one push and hold on
. From Home Image the Setup & service menu can be reached by one push and hold on![]() . For entrance, a Login is required by the password given during commissioning.
. For entrance, a Login is required by the password given during commissioning.
Parameter mode (read/write mode) When maneuvering in Setup & service menu or Status menu there is an overall logic of showing possible actions for each parameter. Plain text: Read-only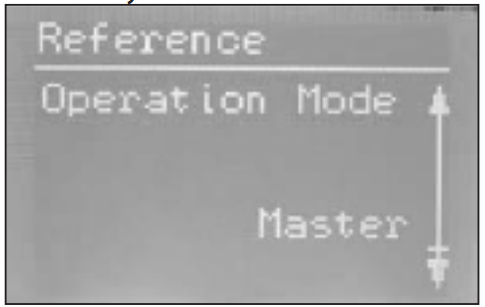
Framed text:
Parameter can be changed – push ![]() to highlight.
to highlight. 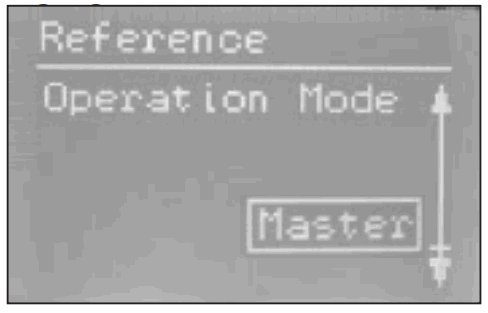
Highlighted text:
Scroll with![]() /
/ ![]() to the desired selection and push
to the desired selection and push![]() to enter the selection. Once entered the parameter is valid and the text changes to framed text.
to enter the selection. Once entered the parameter is valid and the text changes to framed text.
Status menu
To enter Status menu from Home image:
Push ![]() once.
once.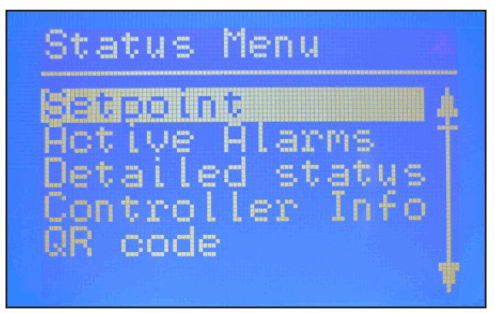
The Status menu is an open menu accessible for all. Therefore only 1 parameter can be changed from here. A selection of other parameters can be seen from the status menu:
Status menu ( Open menu )
| Options | |
| Setpoint | |
| Liquid level setpoint | 0 – 100% |
| Active alarms Example of alarm content. The list will be empty in normal operation as no alarm is active. |
|
| Level signal out of range | hours minutes |
| Standby mode | hours minutes |
| Detailed status | |
| Controller state | Stop, Manual, Auto, Slave, IO |
| Actual level | 0.0 – 100% |
| Actual reference | 0.0 – 100% |
| Actual OD | 0.0 – 100% |
| Digital input status | On / Off |
| Actual level signal current | mA |
| Oscillation amplitude | 0.0 – 100% |
| Oscillation period | sec |
| Controller Info | |
| Type | |
| Name (Controller name) | |
| SW (Software version) | |
| Bios (Bios version) | |
| Adr (Controller address) | |
| SN (Serial Number) | |
| PV (Product version) | |
| Site (Production site) | |
| QR code | |
| Code | |
| Read & Write |
| Read-only |
(Requires log-in password assigned inCommisioning menu)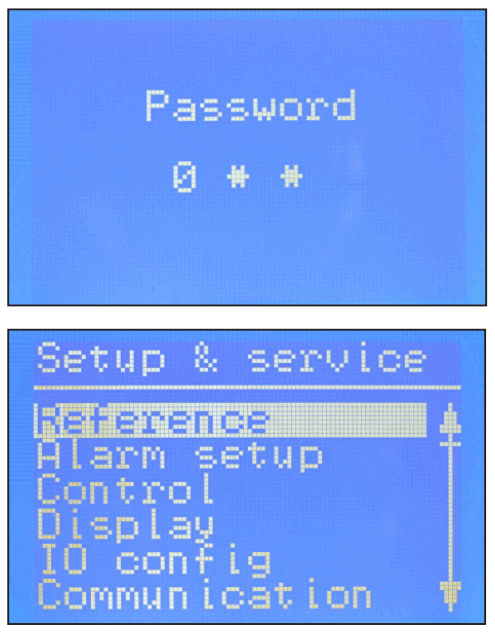
To enter the Setup and service menu from the Home image: Push and hold![]() .
.
Maneuvering in the Status menu and the Setup and service menu’s are done by use of the 4 push buttons shown in fig. 8.
The Setup & service menu is divided into 3 access levels, where personnel have individual authority.
The most advanced level is Commissioning, where you have access to change all allowable parameters, including password issuing and a re-run of Setup wizard. The default password for commissioning is 300.
Service level is for service personnel and has fewer rights than commissioning. The default password is 200. The lowest level is for Daily use and allows only a few changes. The default password is 100.
Below table shows the authority given to the 3 levels.
Setup & service menu (Requires Log-In. Password to be assigned in Commissioning menu)
| Parameter | Options | User level – access | Default values | |||
| Daily | Service | Commissioning | ||||
| Reference | Main switch | On, Off | RW | RW | RW | Off |
| Liquid level setpoint | 0 – 100% | RW | RW | RW | 50.0% | |
| Operation mode | Master, IO, Slave | R | R | RW (L) | Master | |
| Alarm setup | Lower level limit | 0 – 100% | RW | RW | RW | 15% |
| Upper level limit | 0 – 100% | RW | RW | RW | 85% | |
| Level alarm mode | Time, Hysteresis | R | R | RW | Time | |
| Lower delay | 0 – 999 sec | R | RW | RW (D) | 10 sec | |
| Upper delay | 0 – 999 sec | R | RW | RW (D) | 50 sec | |
| Lower level hysteresis | 0-20 % | R | RW | RW (D) | 3% | |
| Upper level hysteresis | 0-20 % | R | RW | RW (D) | 5% | |
| Function common alarm | Not follow; Follow up; Follow low; Follow all | R | R | RW | Not follow | |
| Oscillation detect band | 0 – 100% | R | RW | RW (D) | 100% | |
| Oscillation detect timeout | 2 – 30 min | R | RW | RW (D) | 20 min | |
| Force pump OFF in stop mode | Yes / No | R | RW | RW | No | |
| IO Lower level limit | 0 – 100% | RW | RW | RW (D) | 5% | |
| IO Upper level limit | 0 – 100% | RW | RW | RW (D) | 95% | |
| IO Lower level hysteresis | 0-20 % | R | RW | RW (D) | 3% | |
| IO Upper level hysteresis | 0-20 % | R | RW | RW (D) | 3% | |
| IO Lower delay | 0 – 999 sec | R | RW | RW (D) | 10 sec | |
| IO Upper delay | 0 – 999 sec | R | RW | RW (D) | 50 sec | |
| IO Level limit | 0 – 100% | R | RW | RW (D) | 50% | |
| IO Level delay | 0 – 999 sec | R | RW | RW (D) | 10 sec | |
| IO Level hysteresis | 0-20 % | R | RW | RW (D) | 3% | |
| IO Level action | Falling,Rising | R | RW | RW (D) | Falling | |
| Control | Control Method | On/Off ,P, PI | R | RW | RW | PI |
| Regulating principle | Low, High | R | RW | RW | Low | |
| P-band | 5 – 200% | R | RW | RW (D) | 30.0% | |
| Integration time Tn | 60 – 600 sec | R | RW | RW (D) | 400 sec | |
| Neutral zone | 0 – 25% | R | RW | RW (D) | 2.0% | |
| Difference | 0,5-25% | R | RW | RW (D) | 2% | |
| Period time for AKV/AKVA | 3-15 sec | R | RW | RW (D) | 6 sec | |
| Minimum OD | 0 – 99% | R | RW | RW (D) | 0% | |
| Maximum OD | 1 – 100% | R | RW | RW (D) | 100% | |
| Display | Language | EN,CN,PT,RU,SP,FR,IT, GER, ARAB | R | RW (L) | RW (L) (D) | EN |
| Output indication | level, OD | R | RW | RW (D) | Level | |
| Login timeout | 0 – 120 min | R | RW | RW | 10 min | |
| Backlight timeout | 0 – 120 min | RW | RW | RW | 2 min | |
| Password daily | 3 -digit, 0 – 999 | N/A | N/A | RW | 100 | |
| Password service | 3 -digit, 0 – 999 | N/A | N/A | RW | 200 | |
| Password commission | 3 -digit, 0 – 999 | N/A | N/A | RW | 300 | |
| IO config | System configuration | ICAD+NC, ICAD, AKV/A+NC, AKV/A, NC only | R | R | RW (L) | ICAD + NC |
| Level signal setup | AKS 4100, AKS 41, Current, Voltage | R | R | RW (L) | AKS4100 | |
| Voltage at low liquid level | 0-10V | R | RW | RW (D) | 0 V | |
| Voltage at high liquid level | 0-10V | R | RW | RW (D) | 10 V | |
| Current at low liquid level | 0-20 mA | R | RW | RW (D) | 4 mA | |
| Current at high liquid level | 0-20 mA | R | RW | RW (D) | 20 mA | |
| Valve position setup | Not used, Current, Voltage | R | R | RW (L) | Not used | |
| Voltage at closed valve position | 0-10V | R | RW | RW (D) | 0 V | |
| Voltage at open valve position | 0-10V | R | RW | RW (D) | 10 V | |
| Current at closed valve position | 0-20 mA | R | RW | RW (D) | 4 mA | |
| Current at open valve position | 0-20 mA | R | RW | RW (D) | 20 mA | |
| Common alarm setup | D04, High alarm, D03, Disp only | R | R | RW (L) | High alarm | |
| Multiple valve setup | Not used, 2 same cap, 2 dif cap, 3 same cap, 3 dif cap | R | R | RW (L) | Not used | |
| Multiple valve pattern | Parallel,Sequence | R | R | RW (D) | Parallel | |
| Valve A capacity | 0-100 % | R | R | RW (L) (D) | 50% | |
| Valve B capacity | 0-100 % | R | R | RW (L) (D) | 50% | |
| Valve C capacity | 0-100 % | R | R | RW (L) (D) | 30% | |
| ICAD takeover OD | 0-100% | R | RW | RW (D) | 80% | |
| IO module setup | Used, Not used | R | R | RW (L) (D) | Not used | |
| Communication | CAN ID | 1 – 127 | R | R | RW | 1 |
| CAN baudrate | 20k, 50k, 125k, 250k, 500k, 1M | R | R | RW | 500k | |
| Modbus ID | 0 – 120 | R | R | RW | 1 | |
| Modbus baud rate | 0, 1200, 2400, 4800, 9600, 14400, 19200, 28800, 38400 | R | R | RW | 19200 | |
| Modbus mode | 8N1, 8E1, 8N2 | R | R | RW | 8N1 | |
| Modbus mapping | Operation, Setup | R | R | RW | Operation | |
| Valve B CAN ID | 1 – 127 | R | R | RW (D) | 2 | |
| Valve C CAN ID | 1 – 127 | R | R | RW (D) | 3 | |
| IO Mod. CAN ID | 1 – 127 | R | R | RW (D) | 4 | |
| Parameter | Options | User level – access | Default values | |||
| Daily | Service | Commissioning | ||||
| Service | Controller state | R | R | R | – | |
| Actual level | R | R | R (D) | – | ||
| Actual referrence | R | R | R (D) | – | ||
| Actual OD | R | R | R (D) | – | ||
| Actual valve position | R | R | R (D) | |||
| Digital input status | R | R | R (D) | – | ||
| Actual level signal voltage | R | R | R (D) | |||
| The actual level signal current | R | R | R (D) | – | ||
| Actual position signal voltage | R | R | R (D) | |||
| Actual position signal current | R | R | R (D) | |||
| Actual OD A | R | R | R (D) | |||
| Actual OD B | R | R | R (D) | |||
| Actual OD C | R | R | R (D) | |||
| Manual Mode | On, Off | R | RW | RW (D) | Off | |
| Manual OD | 0 – 100% | R | RW | RW (D) | 50.0% | |
| Manual low alarm | Off-On | R | RW | RW (D) | Off | |
| Manual high alarm | Off-On | R | RW | RW (D) | Off | |
| Manual common alarm | Off-On | R | RW | RW (D) | On | |
| Apply defaults | None, Factory | N/A | N/A | RW (D) | None | |
| Setup wizard | Setup wizard | Re-run Setup wizard | N/A | N/A | RW | – |
| I/O check | Main switch EKE act: | Off – On | R | R | R | Off |
| AKS 4100 EKE act: | 0 – 20 mA | R | R | R (D) | – | |
| ICAD EKE act: | 4 – 20 mA | R | R | R (D) | – | |
| Nor. Close (NC) EKE act: | Off – On | R | R | R (D) | – | |
| Upper lvl (alarm) EKE act: | Off – On | R | R | R (D) | – | |
| Lower lvl (alarm) EKE act: | Off – On | R | R | R (D) | – | |
| Controller name | Controller name | Type in controller name | RW | RW | RW | – |
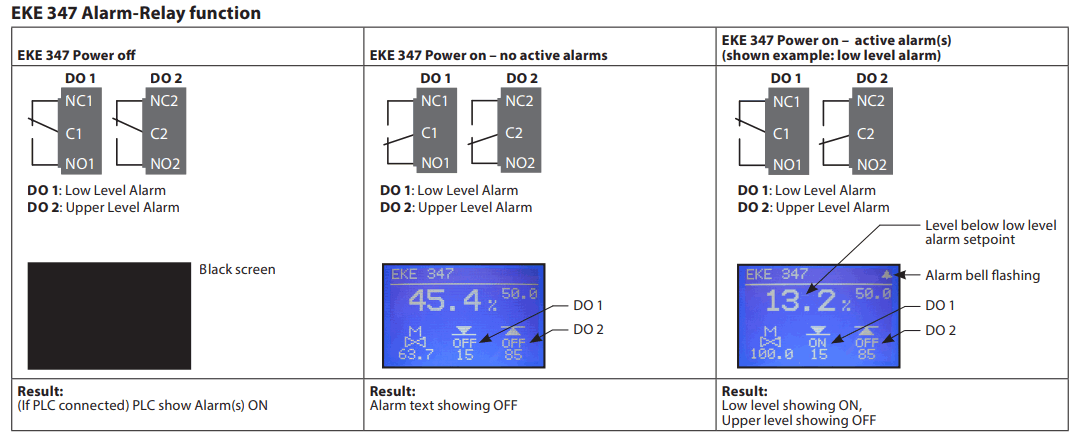
EKE 347 Alarm-Relay function
First-time start-up
(Setup wizard)
When all connections to the controller have been made, the first-time start-up can be performed.
After switching power on, the Danfoss logo will appear for 5 seconds The setup wizard will start.
During the setup wizard following sequence must be repeated for all parameter settings:
a) Parameter name + 1 st option
b) Press![]() to highlight 1 option
to highlight 1 option
c) Scroll with/to your desired option.
d) Press![]() to set your choice xxxxxx
to set your choice xxxxxx
e) Scroll with to next parameter repeat sequence a to e)
- Language
You can select any of these 9 languages: English, Chinese, Portuguese, Russian, Spanish, French, Italian, German, Arabic - System configuration Select any of these 5 predefined configurations:
ICAD + NC(solenoid) NC(solenoid) AKV/A AKV/A + NC(solenoid) ICAD - Operation mode
Select any of these 3 predefined modes: Master (EKE 347 as Master controller) IO (EKE 347 as In/Out module) Slave (EKE 347 as slave for another Master - Regulating principle
Select one of these 2 principles Low High - Liquid level setpoint
Type in any level setpoint from 0% to 100% (default is 50.0%) 50.0% - Lower level limit
Type in any limit from 0% to 100% (default is 15%) 15% - Upper level limit
Type in any limit from 0% to 100% (default is 85%) 85% - Level signal setup
Select one of these 4 predefined signal setup:
AKS 4100
Voltage
Current
AKS 41 - Valve feedback setup
Select one of these 3 predefined feedback setup (valve feedback is only possible with ICAD):
Not used
Voltage
Current - Common alarm setup
Select one of these 4 predefined methods:
High Alarm
D04
Disp only (only Bell symbol flashing)
D03 - Apply wizard settings
Press to confirm all inputs or Press
  to return to last menu
Once data entry has been confirmed, the controller has sufficient data to do a qualified regulation of your system.
You are now asked to select one of these
menus. Main menu Main switch I/O check
Press![]() for reaching the Setup & service menu or press
for reaching the Setup & service menu or press![]() 2 times for reaching the Home display image. If for some reason it is needed to un the setup wizard again, this is possible by log in to the setup & service menu with the commissioning authority.
2 times for reaching the Home display image. If for some reason it is needed to un the setup wizard again, this is possible by log in to the setup & service menu with the commissioning authority.
Alarm and error codes:
When detecting an alarm from external sources or the flashing bell in the display, the alarm description can be found as a text message in the Status menu under Active
alarms.
Both alarms and errors will be shown here. If more alarms/errors occur simultaneously, they will be shown as subsequent text lines.
| Alarms: |
| Upper level |
| Lower level |
| Standby mode |
| Valve B CAN ID conflict |
| Valve C CAN ID conflict |
| IO module CAN ID conflict |
| IO module communication |
| Communication to master lost |
| Min/max OD conflict |
| Common alarm HW conflict |
| Control method conflict |
| Multiple valve setup conflict |
| Valve C alarm |
| Valve B alarm |
| Oscillation in level signal |
| Valve position |
| Multiple valve capacity |
| Valve C communication |
| Valve B communication |
| Errors: |
| Internal error |
| Level signal out of range |
| Valve position signal out of range |
| Sensor supply overload |
| AKS 4100 error |
| Too much current AI3 |
| Too much current AI4 |
| DO4 overload |
Danfoss A/S
Climate Solutions
- danfoss.com
- +45 7488 2222
Any information, including, but not limited to information on selection of product, its application or use, product design, weight, dimensions, capacity or any other technical data in product manuals, catalogs descriptions, advertisements, etc. and whether made available in writing, orally, electronically, online or via download, shall be considered informative and is only binding if and to the extent, explicit reference is made in a quotation or order confirmation. Danfoss cannot accept any responsibility for possible errors in catalogs, brochures, videos, and other material. Danfoss reserves the right to alter its products without notice. This also applies to products ordered but not delivered provided that such alterations can be made without changes to form, fit or function of the product.
All trademarks in this material are property of Danfoss A/S or Danfoss group companies. Danfoss and the Danfoss logo are trademarks of Danfoss A/S. All rights reserved.![]()

Documents / Resources
 |
Danfoss EKE 347 Liquid Level Controller [pdf] Installation Guide EKE 347, Liquid Level Controller, Level Controller, EKE 347, Controller |


