SLAMTEC Aurora Visual Laser Integrated Localization and Mapping Sensor
Specifications
- Product Name: SLAMTEC Aurora
- Type: Visual laser integrated localization and mapping sensor
- Manufacturer: Shanghai SLAMTEC Co., Ltd
- Capabilities: 3D mapping and positioning
- Mapping Speed: More than 10 times per second
- Maximum Map Data: Up to one million square meters
- Development Tools: C++ SDK, ROS1/ROS2 SDK
Product Usage Instructions
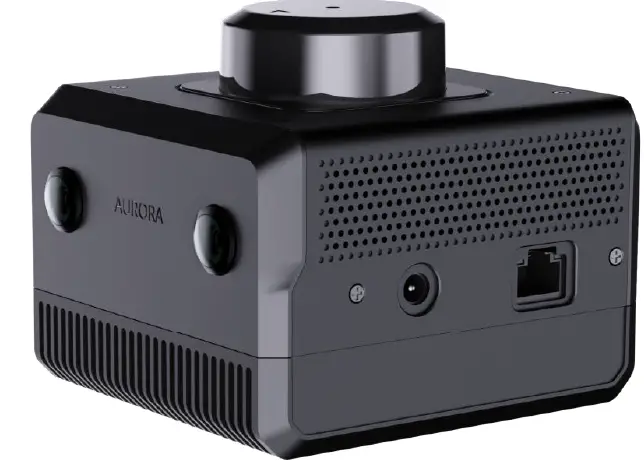
Appearance Introduction
Indicator Light
The indicator light provides status information:
- Red long bright – Booting up
- Yellow flash – Startup complete, waiting for initialization
- Yellow long bright – System initialization completed, waiting for mapping
- Green long bright – Mapping
- Red flash – Device exception
- Green flash – Pause mapping
Button
The device has a power button and a pause button:
- Power button: Press and hold for eight seconds to enter standby mode. Short press to turn on/off the device.
- Pause button: Short press to pause mapping; press again to resume mapping.
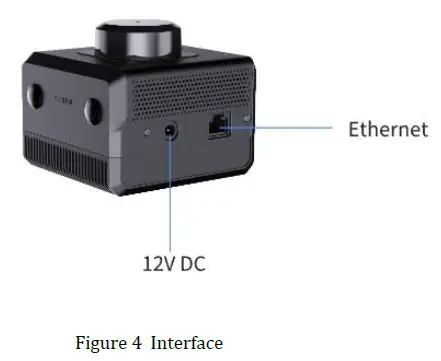
Ethernet
The default configuration is static IP mode with the IP address 192.168.11.1. Connect to a computer via Ethernet for configuration.
WiFi
Aurora has a 2.4G/5G Dual-band WiFi module configured as AP mode. Connect to the hotspot named SLAMWARE-Aurora-xxxxxx after device startup.
Mapping
Preparation Work
Prepare a laptop and install Aurora Remote.
Power On Aurora
Use a DC12V 2A power supply to turn on the device.
Connect to Aurora
Connect the device to your computer via Ethernet or the generated hotspot. Run AuroraCore Remote Visualizer, enter 192.168.11.1, and click Connect.
Product Overview
Aurora is a newly created positioning and mapping perception sensor by SLAMTEC that integrates laser, vision, inertial navigation, and deep learning technologies. The sensor does not require external dependencies and can achieve indoor and outdoor 3D high-precision mapping with six degrees of freedom positioning capability upon startup. At the same time, the product is also equipped with a complete power builder chain, including graphical interaction software AuroraCore Remote Visualizer (Hereinafter referred to as Aurora Remote), SDK for secondary development, etc., to help users quickly build personalized applications and accelerate downstream product landing. The product has the following features:
- Fusion laser + binocular vision + IMU multi-source fusion algorithm, supporting external expansion (GPS/RTK, odometer, etc.)
- Provide indoor and outdoor 3D mapping and positioning functions
- Integrating AI technology to enhance 3D perception capabilities
- With a complete toolchain, support for client-side application expansion
- Industry-leading system stability

Aurora products provide customers with 3D mapping and positioning capabilities in an integrated form. It adopts the unique SLAM algorithm of Laser-Vision-IMU fusion from SLAMTEC. Combined with visual and laser characteristics, it can perform map data fusion more than 10 times per second and draw up to one million square meters of map data. SLAMTEC provides a toolchain for secondary development, including C++ SDK, ROS1/ROS2 SDK, etc.
Appearance introduction
Indicator light

The indicator light status description is as follows:
| Indicator light status | Explanation |
| Red long bright | Booting up |
| Yellow flash | Startup complete, waiting for initialization |
| Yellow long bright | System initialization completed, waiting for mapping. |
| Green long bright | Mapping |
| Red flash | Device exception |
| Green flash | Pause mapping |
Button

Power button:
- Press and hold the power button for eight seconds, and the device enters standby mode
- In standby mode, short-press the power button to turn on the device
Pause button:
- Short-press the pause button to pause mapping; press it again to resume mapping
Ethernet
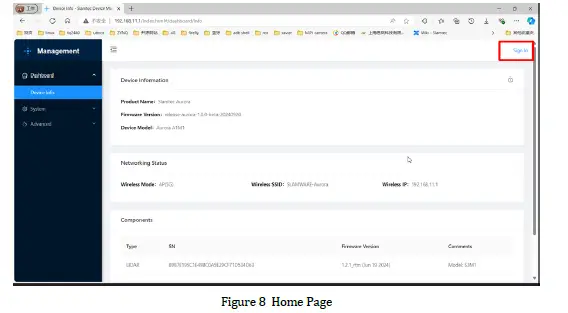
The Aurora Ethernet default configuration mode is static IP mode, and the IP address is 192.168.11.1. Connect the computer to Ethernet, access 192.168.11.1 through the browser, and you can get the device information of Aurora, and configure Aurora simply.
WIFI
Aurora comes with a 2.4G/5G Dual-band WiFi module, which is configured as AP mode by default. After Aurora is turned on, a hotspot named “SLAMWARE-Aurora-xxxxxx” is automatically generated. The specific hotspot name can be found on the device label.
Mapping
Preparation work
Prepare a laptop and install Aurora Remote.
Power On Aurora
Use a DC12V 2A power supply to power up the device.
Connect to Aurora
Connect the Aurora device to your computer via Ethernet or hotspot (SLAMWARE-Aurora-XXXXXX).
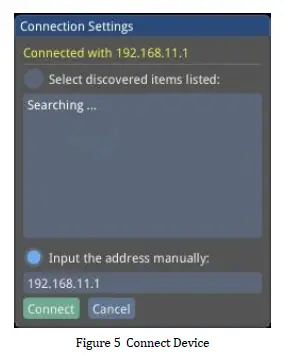
Run AuroraCore Remote Visualizer (hereinafter referred to as Aurora Remote). In the “Connection Settings” interface, select “Input the address manually”, enter “192.168.11.1” in the text box, and click the “Connect” button to connect to the device.
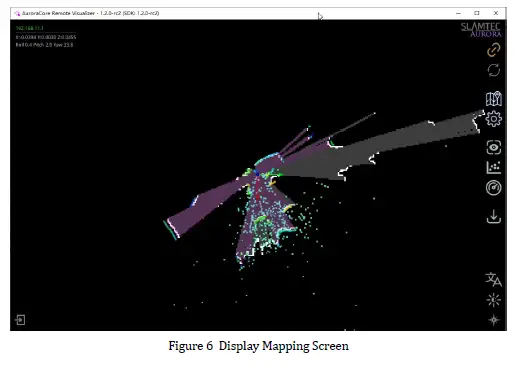
Once connected successfully, the mapping screen will be displayed.
Initialize Aurora
- Aurora should target areas with more features within 2 meters, avoiding environments with fewer features, such as open plains, refractive environments such as large areas of glass, and areas with more dynamic objects to ensure sufficient initialization features and obtain better data results. After standing still for 3 seconds and waiting for the system to successfully initialize, move the device and enter the working state.
- Ensure that the equipment is stationary.
- Click “Remote Commands” –> “Reset Maps” on the Aurora Remote main interface. The device is starting to initialize.
- After initialization is complete, the Aurora Remote mapping screen is shown in Figure 6, and the Aurora indicator light changes from red to green.
Start Mapping
After initialization is complete, you can proceed with mapping.
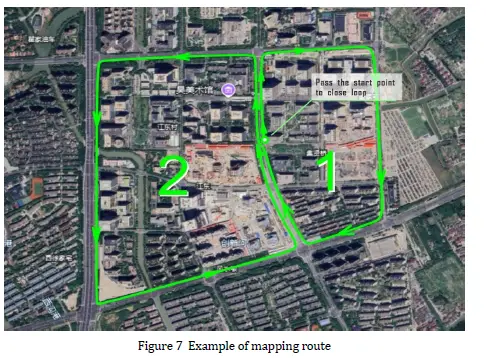
Route planning and advice:
- Ensure as many observations as possible during the scanning process.
- Try to avoid scanning new areas as much as possible, and you can take a certain loop.
- Avoid the impact of dynamic objects as much as possible.
- Walk as many closed loops as possible.
- Do not repeat the closed-loop area to reduce memory consumption.
Notes on mapping:
- Please clear the map before preparing to create a completely new map; otherwise, the map optimization engine cannot be guaranteed to take effect.
- Keep the equipment level. Generally, the equipment should not be tilted more than 20 degrees.
- Keep the equipment stable and avoid significant shaking. Sudden stops or movements will affect the accuracy and effectiveness of mapping to a certain extent.
- After the loop returns to the starting point, keep the robot moving, take more overlapping paths, and do not stop moving immediately.
- After returning to the origin of the loop, if the map is not closed, continue walking until the loop is closed.
- When creating maps with your hand, walk at a normal walking speed. When encountering spaces with fewer features or narrow spaces, or when turning, it is recommended to slow down.
- When scanning indoor scenes involving multiple rooms or floors, please open the indoor door in advance. When passing through the door, scan slowly and stay on the side of the door forsome timee to ensure that the features on both sides of the door can be scanned at the same time. If the door is not open during scanning, slowly turn around before approaching the door, turn the instrument away from the door, turn your back to open the door, and enter slowly.
In and out
- It is necessary to enter and exit sideways to ensure that the laser and vision have a common field of vision before entering, and to better connect the data.
- Entering and exiting a confined space: After scanning a confined space, it is necessary to observe whether the reference objects are sufficient and whether the structural features are obvious during the scanning process.
- If the above two conditions are not met, when exiting, try to align the perspective with areas with good, structured features as much as possible, while avoiding excessive perspective switching.
Save Ma:p Click on “Map Manager” –>”Download to File” on the Aurora Remote main interface to save the map as a file in STCMcm format.
Firmware Upgrade
- Power on the Aurora device.
- Connect the laptop to the Aurora hotspot or Ethernet.
- Visit 192.168.11.1 browser and enter the following page.
- Click “Sign in” to enter the login page.
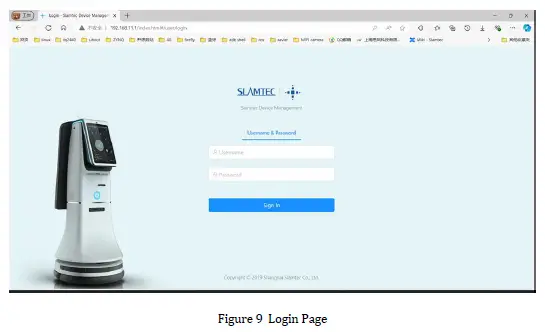
- Enter account: admin
Password:admin111 - Click “System” → “Firmware Update” → “Select File” to select the upgraded firmware.
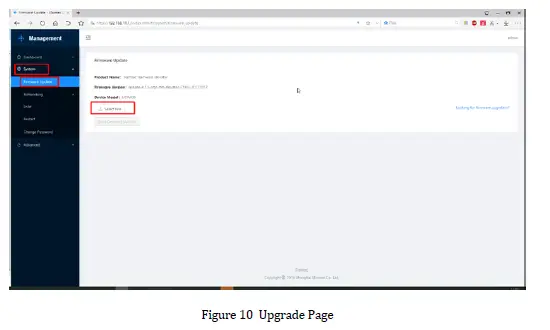
- Click “Start Firmware Update” to start upgrading the firmware.
- Wait for “success” to appear in the upgrade log, and the upgrade of CISCIS is completed.
Aurora Remote
Main Interface

Switching Views
Aurora Remote provides three view modes for users to choose from. Click the “Toggle Tracking Mode” button to switch between different views.

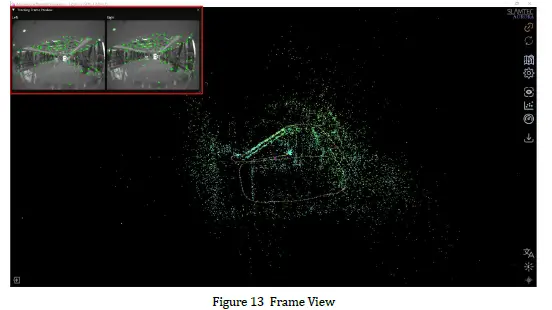
Frame View
Click the “Frame View” icon on the main interface to preview the camera feed in real-time.
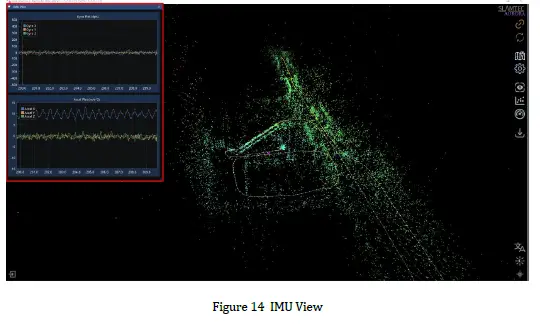
IMU View
Click the “IMU View” icon on the main interface to view real-time gyroscope and accelerometer data.
Zooming/Dragging the Map
Scroll the mouse wheel to zoom in and out of the map.
Click and hold the right mouse button, then move the mouse to drag the map.
Click and hold the left mouse button, then move the mouse to rotate the map.
Resetting the Map
To reset the map after mapping is complete or during the mapping process, use the “Remote Commands” –>” Reset Maps” function.
Resetting the map will clear the existing map and reinitialize the device.
Synchronizing the Map
The “Resync Map Data” button fully synchronizes the map updates in the background to the interface. Since global updates are time-consuming, during the mapping process, only incremental updates are made to the map near the Aurora device. A full update is performed only when a loop closure is detected.
Saving/Uploading the Map
Maps can be saved in the STM format, which includes both 2D and 3D map information. Maps can also be saved in BMP format, which only includes 2D map information.
On the main interface, click “Map Manager”. Use “Download to file” to save the map in sSTM format, and use “Export Map Data” to save the map in BMP format.
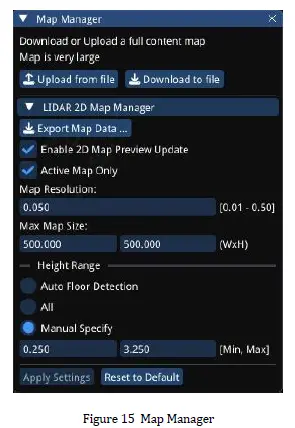
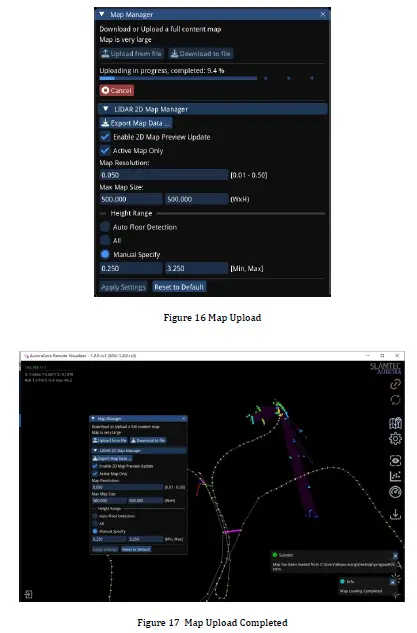
Uploading maps is only possible for STCMormatt 3D maps. Click “Upload from file” and select the map file to upload.
The upload progress will be displayed during the process, as shown in Figure 16. Once the upload is complete, a success message will appear in the bottom right corner, as shown in Figure 17.
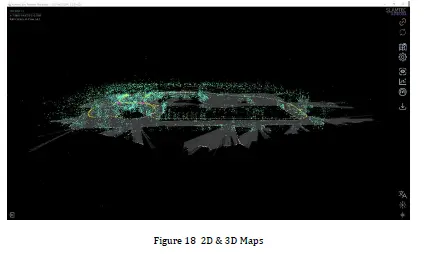
2D/3D Map Switching
Aurora Remote defaults to 3D map display mode, which shows both 3D and 2D maps simultaneously. As shown in Figure 18, the gray area represents the 2D map.
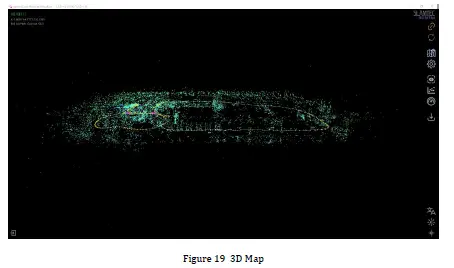
On the main interface, click “View Options” and uncheck “Show 2D LIDAR Map” to display only the 3D map, as shown in Figure 19.
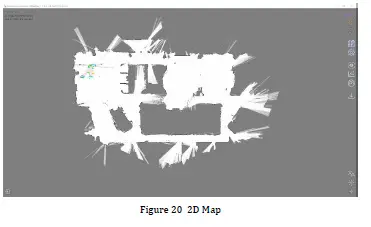
On the main interface, click “View Options” -> “Map Display Mode” -> “2D Map” to switch to 2D map display mode, as shown in Figure 20.
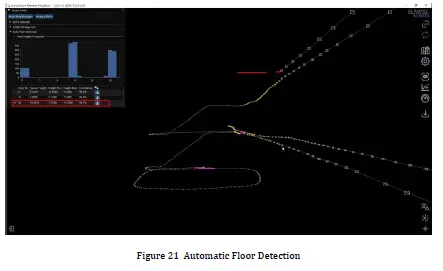
Automatic Floor Detection
Click “Status panel” -> “Auto Floor Detection” on the main interface to view the current relative floor level, as shown in Figure 21.
Figure 21: Mapping while riding an escalator, the current position is the third floor.
Pop-up Notifications
As shown in Figure 17, Aurora Remote may display some messages in the bottom right corner of the main interface during operation.
The main pop-up messages in Aurora Remote are as follows:
| Message | Description |
|
Initialize Success |
Aurora camera initialization successful, ready to start mapping. |
|
Initialize Failed |
Aurora camera initialization failed, unable to start mapping. |
| Map Optimization Completed | Loop closure condition detected, successfully closed the loop. |
| Tracking Lost | No feature points detected in the camera feed. |
| Tracking Recovered | Feature points are re-detected in the camera feed. |
| Map Loading Started |
Map loading has started. |
| Map Loading Completed |
Map loading is complete. |
| Map Saving Started | Map saving has started. |
| Map Saving Completed |
Map saving is successful. |
Notes
- Do not collide. Falling or colliding may cause device damage, resulting in abnormal operation or even complete damage to the device.
- Keep the Lidar and lens parts clean and tidy; do not touch them directly with your hands. You can use a cleaning cloth to clean the device.
- Ensure device heat dissipation. Please use a tripod during use and do not cover the heat dissipation part of the body.
Revision History
| Date | Version | Description |
| 2024-10-11 | 1.0 | Initial Version |
| 2024-11-15 | 1.1 | Refine the Document Layout |
| 2025-03-14 | 1.2 | Add Aurora Remote Description |
FAQs
- Q: How do I know if the device is in mapping mode?
A: The indicator light will be green and constantly lit when the device is in mapping mode. - Q: Can I change the default WiFi configuration?
A: Yes, you can change the WiFi configuration through the Aurora settings interface accessed via Ethernet connection.
Documents / Resources
 |
SLAMTEC Aurora Visual Laser Integrated Localization and Mapping Sensor [pdf] Instruction Manual Aurora Visual Laser Integrated Localization and Mapping Sensor, Aurora, Visual Laser Integrated Localization and Mapping Sensor, Laser Integrated Localization and Mapping Sensor, Integrated Localization and Mapping Sensor, Localization and Mapping Sensor, and Mapping Sensor, Mapping Sensor |