SLAMTEC Aurora Visual Laser Integrated Localization ug Mapping Sensor
Mga detalye
- Ngalan sa Produkto: SLAMTEC Aurora
- Type: Visual laser integrated localization and mapping sensor
- Manufacturer: Shanghai SLAMTEC Co., Ltd
- Mga Kapabilidad: 3D mapping ug positioning
- Bilis sa Pagmapa: Labaw sa 10 ka beses matag segundo
- Labing kataas nga Data sa Mapa: Hangtod sa usa ka milyon nga metro kuwadrado
- Mga Himan sa Pag-uswag: C++ SDK, ROS1/ROS2 SDK
Mga Instruksyon sa Paggamit sa Produkto
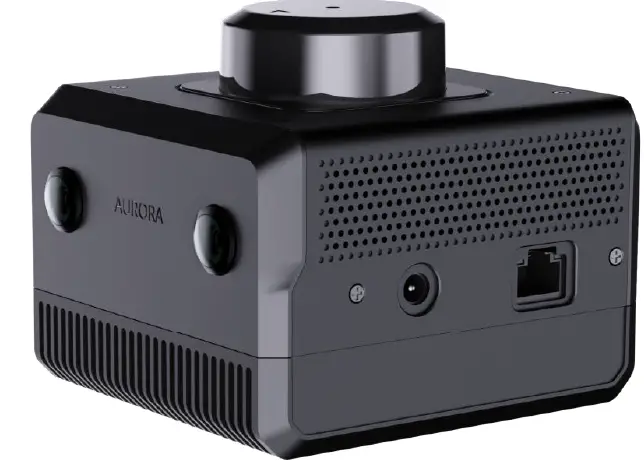
Panagway Pasiuna
Indicator nga Kahayag
Ang indikasyon nga suga naghatag kasayuran sa kahimtang:
- Pula nga taas nga hayag - Pag-boot
- Yellow flash – Startup complete, waiting for initialization
- Yellow long bright – System initialization completed, waiting for mapping
- Berde taas nga hayag – Mapping
- Pula nga flash - Eksepsiyon sa device
- Green flash – Ihunong ang pagmapa
Butang
Ang device adunay power button ug pause button:
- Power button: Press and hold for eight seconds to enter standby mode. Short press to turn on/off the device.
- Pause button: Short press to pause mapping; press again to resume mapping.
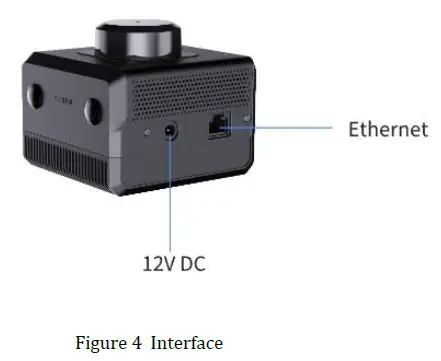
Ethernet
The default configuration is static IP mode with the IP address 192.168.11.1. Connect to a computer via Ethernet for configuration.
WiFi
Aurora has a 2.4G/5G Dual-band WiFi module configured as AP mode. Connect to the hotspot named SLAMWARE-Aurora-xxxxxx after device startup.
Pagmapa
Pagpangandam nga Trabaho
Pag-andam ug laptop ug i-install ang Aurora Remote.
Gahum sa Aurora
Use a DC12V 2A power supply to turn on the device.
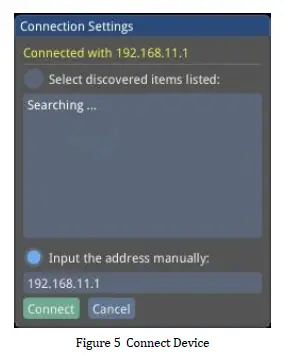
Sumpaysumpaya ang Aurora
Connect the device to your computer via Ethernet or the generated hotspot. Run AuroraCore Remote Visualizer, enter 192.168.11.1, and click Connect.
Natapos ang Produktoview
Aurora is a newly created positioning and mapping perception sensor by SLAMTEC that integrates laser, vision, inertial navigation, and deep learning technologies. The sensor does not require external dependencies and can achieve indoor and outdoor 3D high-precision mapping with six degrees of freedom positioning capability upon startup. At the same time, the product is also equipped with a complete power builder chain, including graphical interaction software AuroraCore Remote Visualizer (Hereinafter referred to as Aurora Remote), SDK for secondary development, etc., to help users quickly build personalized applications and accelerate downstream product landing. The product has the following features:
- Fusion laser + binocular vision + IMU multi-source fusion algorithm, pagsuporta sa eksternal nga pagpalapad (GPS/RTK, odometer, ug uban pa)
- Paghatag ug sulod ug gawas nga 3D mapping ug positioning functions
- Pag-integrate sa teknolohiya sa AI aron mapalambo ang mga kapabilidad sa 3D perception
- Uban sa usa ka kompleto nga toolchain, suporta alang sa pagpalapad sa aplikasyon sa kilid sa kliyente
- Kalig-on sa sistema nga nanguna sa industriya

Ang mga produkto sa Aurora naghatag sa mga kostumer og 3D mapping ug positioning nga kapabilidad sa usa ka integrated nga porma. Gisagop niini ang talagsaon nga SLAM algorithm sa Laser-Vision-IMU fusion gikan sa SLAMTEC. Inubanan sa visual ug laser nga mga kinaiya, kini makahimo sa mapa data fusion labaw pa sa 10 ka beses kada segundo ug makadrowing og hangtod sa usa ka milyon ka metro kwadrado nga data sa mapa. Naghatag ang SLAMTEC og toolchain alang sa sekondaryang kalamboan, lakip ang C++ SDK, ROS1/ROS2 SDK, ug uban pa.
Pagpaila sa panagway
Indicator nga suga

The indicator light status description is as follows:
| Status sa kahayag sa timailhan | Katin-awan |
| Pula nga taas nga hayag | Nag-boot up |
| Dilaw nga flash | Nakompleto ang pagsugod, naghulat sa pagsugod |
| Dilaw nga taas nga hayag | System initialization completed, waiting for mapping. |
| Green taas nga hayag | Pagmapa |
| Pula nga flash | Eksepsiyon sa device |
| Green flash | Ihunong ang pagmapa |
Butang

Butang sa gahum:
- Pindota ug hupti ang power button sulod sa walo ka segundo, ug ang device mosulod sa standby mode
- In standby mode, short-press the power button to turn on the device
Button sa paghunong:
- Short-press the pause button to pause mapping; press it again to resume mapping
Ethernet
The Aurora Ethernet default configuration mode is static IP mode, and the IP address is 192.168.11.1. Connect the computer to Ethernet, access 192.168.11.1 through the browser, and you can get the device information of Aurora, and configure Aurora simply.
WIFI
Ang Aurora adunay usa ka 2.4G / 5G Dual-band WiFi module, nga gi-configure ingon AP mode pinaagi sa default. Human ma-on ang Aurora, ang usa ka hotspot nga ginganlag "SLAMWARE-Aurora-xxxxxx" awtomatik nga namugna. Ang piho nga ngalan sa hotspot makita sa label sa aparato.
Pagmapa
Pagpangandam nga buluhaton
Pag-andam ug laptop ug i-install ang Aurora Remote.
Gahum sa Aurora
Gamit ug DC12V 2A nga suplay sa kuryente aron ma-power up ang device.
Sumpaysumpaya ang Aurora
Connect the Aurora device to your computer via Ethernet or hotspot (SLAMWARE-Aurora-XXXXXX).
Run AuroraCore Remote Visualizer (hereinafter referred to as Aurora Remote). In the “Connection Settings” interface, select “Input the address manually”, enter “192.168.11.1” in the text box, and click the “Connect” button to connect to the device.
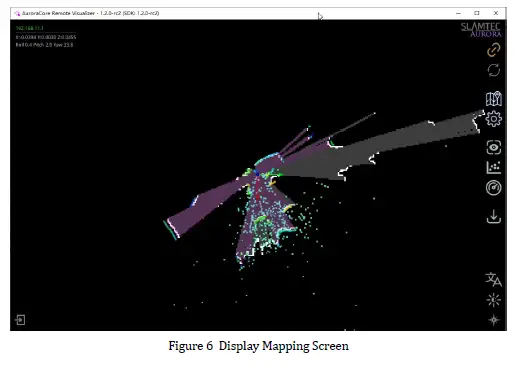
Sa higayon nga malampuson nga konektado, ang mapping screen ipakita.
Pagsugod sa Aurora
- Aurora should target areas with more features within 2 meters, avoiding environments with fewer features, such as open plains, refractive environments such as large areas of glass, and areas with more dynamic objects to ensure sufficient initialization features and obtain better data results. After standing still for 3 seconds and waiting for the system to successfully initialize, move the device and enter the working state.
- Ensure that the equipment is stationary.
- Click “Remote Commands” –> “Reset Maps” on the Aurora Remote main interface. The device is starting to initialize.
- After initialization is complete, the Aurora Remote mapping screen is shown in Figure 6, and the Aurora indicator light changes from red to green.
Pagsugod sa Mapping
Human makompleto ang pagsugod, mahimo nimong ipadayon ang pagmapa.
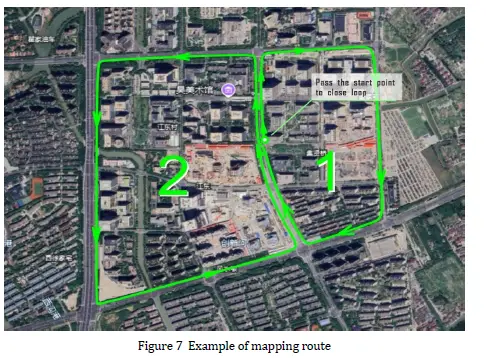
Route planning and advice:
- Siguruha ang daghang mga obserbasyon kutob sa mahimo sa panahon sa proseso sa pag-scan.
- Sulayi nga likayan ang pag-scan sa bag-ong mga lugar kutob sa mahimo, ug mahimo nimong makuha ang usa ka piho nga loop.
- Likayi ang epekto sa dinamikong mga butang kutob sa mahimo.
- Walk as many closed loops as possible.
- Ayaw usba ang closed-loop nga lugar aron makunhuran ang konsumo sa memorya.
Notes on mapping:
- Please clear the map before preparing to create a completely new map; otherwise, the map optimization engine cannot be guaranteed to take effect.
- Keep the equipment level. Generally, the equipment should not be tilted more than 20 degrees.
- Hupti ang ekipo nga lig-on ug likayi ang dakong pag-uyog. Ang kalit nga paghunong o paglihok makaapekto sa katukma ug pagkaepektibo sa pagmapa sa usa ka sukod.
- Human ang loop mobalik sa sinugdanan nga punto, ipadayon ang paglihok sa robot, pagkuha og dugang nga nagsapaw-sapaw nga mga agianan, ug ayaw paghunong sa paglihok dayon.
- Human sa pagbalik sa gigikanan sa loop, kung ang mapa dili sirado, magpadayon sa paglakaw hangtod nga sirado ang loop.
- Sa paghimo og mga mapa gamit ang imong kamot, lakaw sa normal nga katulin sa paglakaw. Kung makit-an ang mga luna nga adunay gamay nga bahin o pig-ot nga mga wanang, o kung moliko, girekomenda nga hinayhinay.
- When scanning indoor scenes involving multiple rooms or floors, please open the indoor door in advance. When passing through the door, scan slowly and stay on the side of the door forsome timee to ensure that the features on both sides of the door can be scanned at the same time. If the door is not open during scanning, slowly turn around before approaching the door, turn the instrument away from the door, turn your back to open the door, and enter slowly.
Sulod ug gawas
- It is necessary to enter and exit sideways to ensure that the laser and vision have a common field of vision before entering, and to better connect the data.
- Pagsulod ug paggawas sa usa ka limitado nga luna: Human sa pag-scan sa usa ka limitado nga luna, kinahanglan nga obserbahan kung ang mga reference nga mga butang igo ba ug kung ang mga bahin sa istruktura klaro sa panahon sa proseso sa pag-scan.
- If the above two conditions are not met, when exiting, try to align the perspective with areas with good, structured features as much as possible, while avoiding excessive perspective switching.
Save Ma:p Pag-klik sa "Map Manager" -> "Pag-download sa File” on the Aurora Remote main interface to save the map as a file in STCMcm format.
Pag-upgrade sa Firmware
- Power on the Aurora device.
- Connect the laptop to the Aurora hotspot or Ethernet.
- Visit 192.168.11.1 browser and enter the following page.
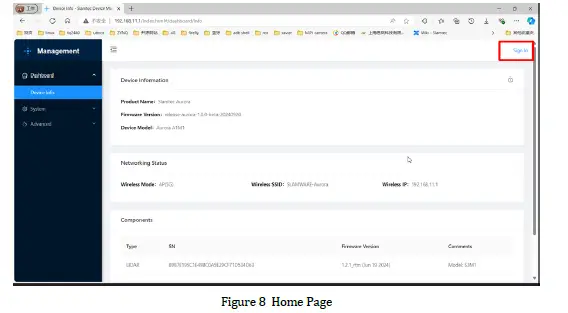
- Click “Sign in” to enter the login page.
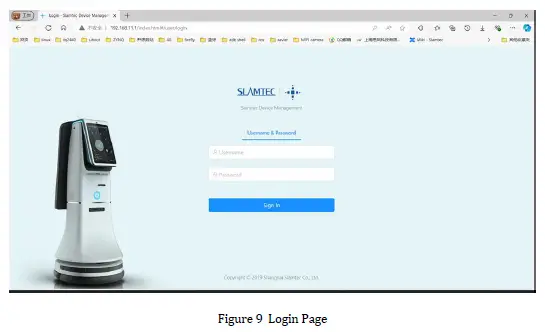
- Enter account: admin
Password:admin111 - I-klik ang “System” → “Firmware Update” → “Select File” aron mapili ang gi-upgrade nga firmware.
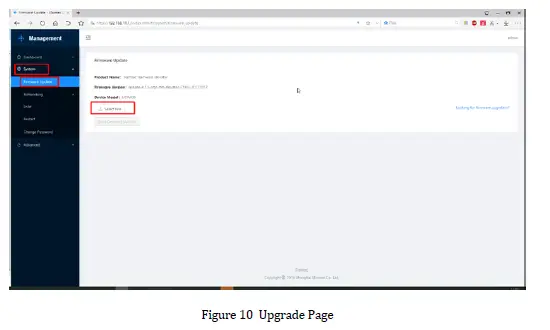
- I-klik ang "Start Firmware Update" aron masugdan ang pag-upgrade sa firmware.
- Wait for “success” to appear in the upgrade log, and the upgrade of CISCIS is completed.
Aurora Remote
Panguna nga Interface

Pagbalhin Views
Naghatag ang Aurora Remote og tulo view mga mode nga mapilian sa mga tiggamit. I-klik ang "Toggle Tracking Mode" nga buton aron magbalhinbalhin tali sa lainlain views.

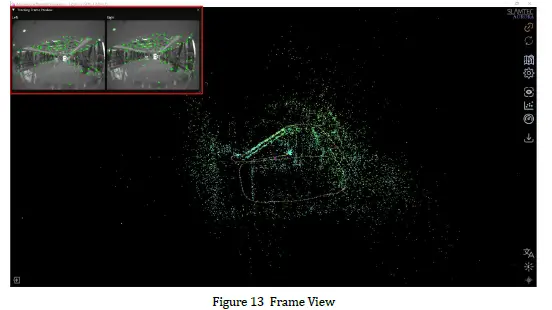
Frame View
I-klik ang "Frame View” icon sa nag-unang interface sa preview ang feed sa camera sa tinuud nga oras.
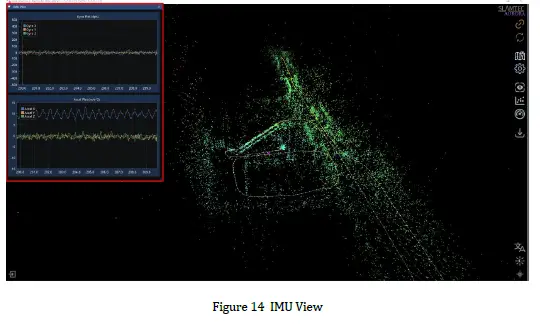
IMU View
I-klik ang “IMU View” icon sa main interface sa view real-time nga gyroscope ug accelerometer data.
Zooming/Dragging the Map
Scroll the mouse wheel to zoom in and out of the map.
Click and hold the right mouse button, then move the mouse to drag the map.
Click and hold the left mouse button, then move the mouse to rotate the map.
Resetting the Map
To reset the map after mapping is complete or during the mapping process, use the “Remote Commands” –>” Reset Maps” function.
Resetting the map will clear the existing map and reinitialize the device.
Synchronizing the Map
The “Resync Map Data” button fully synchronizes the map updates in the background to the interface. Since global updates are time-consuming, during the mapping process, only incremental updates are made to the map near the Aurora device. A full update is performed only when a loop closure is detected.
Saving/Uploading the Map
Maps can be saved in the STM format, which includes both 2D and 3D map information. Maps can also be saved in BMP format, which only includes 2D map information.
Sa main interface, i-klik ang "Map Manager". Gamita ang "Pag-download sa file” to save the map in sSTM format, and use “Export Map Data” to save the map in BMP format.
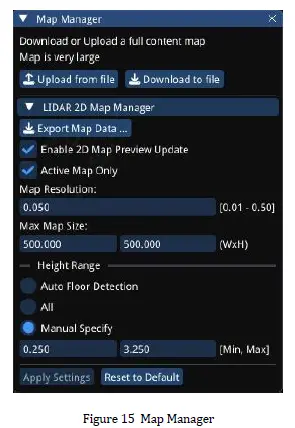
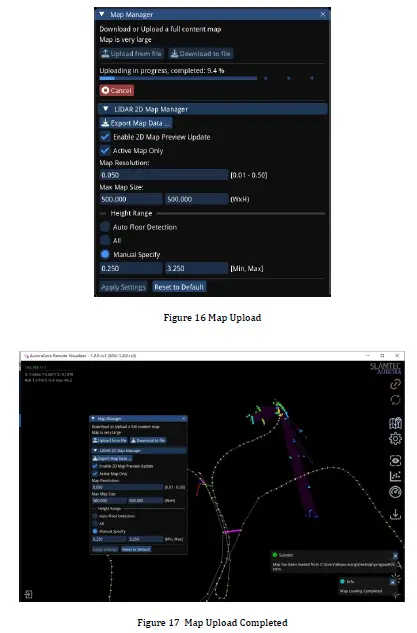
Uploading maps is only possible for STCMormatt 3D maps. Click “Upload from file” ug pilia ang mapa file sa pag-upload.
The upload progress will be displayed during the process, as shown in Figure 16. Once the upload is complete, a success message will appear in the bottom right corner, as shown in Figure 17.
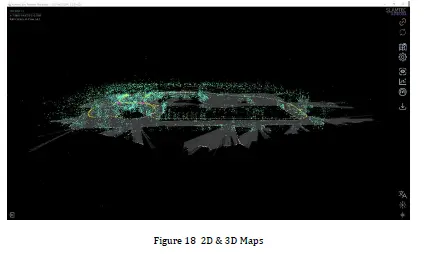
2D/3D Map Switching
Ang Aurora Remote nag-default sa 3D map display mode, nga nagpakita sa 3D ug 2D nga mga mapa nga dungan. Ingon sa gipakita sa Figure 18, ang gray nga lugar nagrepresentar sa 2D nga mapa.
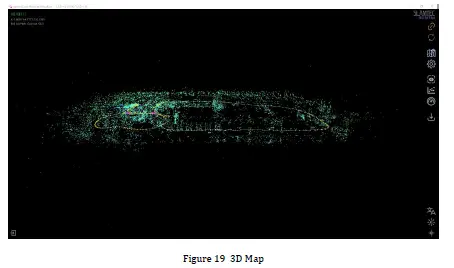
Sa main interface, i-klik ang "View Options” ug i-uncheck ang “Show 2D LIDAR Map” para ipakita lang ang 3D map, sama sa gipakita sa Figure 19.
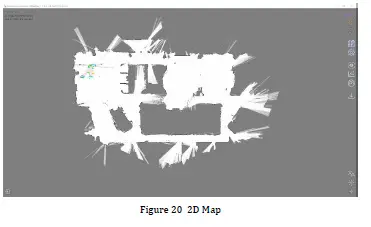
Sa main interface, i-klik ang "View Mga Opsyon" -> "Mode sa Pagpakita sa Mapa" -> "Mapa sa 2D" aron mabalhin sa mode sa pagpakita sa 2D nga mapa, ingon sa gipakita sa Figure 20.
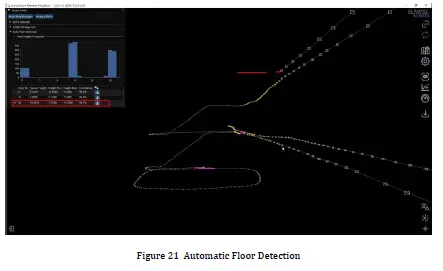
Automatic Floor Detection
I-klik ang "Status panel" -> "Auto Floor Detection" sa main interface sa view the current relative floor level, as shown in Figure 21.
Figure 21: Mapping while riding an escalator, the current position is the third floor.
Pop-up Notifications
Sama sa gipakita sa Figure 17, ang Aurora Remote mahimong magpakita sa pipila ka mga mensahe sa ubos nga tuo nga suok sa main interface sa panahon sa operasyon.
Ang nag-unang mga pop-up nga mensahe sa Aurora Remote mao ang mosunod:
| Mensahe | Deskripsyon |
|
Pagsugod sa Kalampusan |
Malampuson ang pagsugod sa Aurora camera, andam nga magsugod sa pagmapa. |
|
Napakyas ang pagsugod |
Napakyas ang pagsugod sa Aurora camera, dili makasugod sa pagmapa. |
| Nakompleto ang Map Optimization | Ang kahimtang sa pagsira sa loop nakit-an, malampuson nga nagsira sa loop. |
| Nawala ang Pagsubay | Walay feature point nga nakita sa feed sa camera. |
| Tracking Recovered | Feature points are re-detected in the camera feed. |
| Nagsugod ang Pagkarga sa Mapa |
Nagsugod na ang pagkarga sa mapa. |
| Nakompleto ang Pagkarga sa Mapa |
Kompleto na ang pagkarga sa mapa. |
| Nagsugod ang Pagtipig sa Mapa | Nagsugod na ang pagtipig sa mapa. |
| Nakompleto ang Pag-save sa Mapa |
Malampuson ang pagtipig sa mapa. |
Mga nota
- Ayaw pagbangga. Ang pagkahulog o pagkabangga mahimong hinungdan sa kadaot sa aparato, nga moresulta sa dili normal nga operasyon o bisan sa hingpit nga kadaot sa aparato.
- Keep the Lidar and lens parts clean and tidy; do not touch them directly with your hands. You can use a cleaning cloth to clean the device.
- Siguruha ang pagwagtang sa kainit sa aparato. Palihog gamit ug tripod panahon sa paggamit ug ayaw taboni ang parte sa lawas nga nagwagtang sa kainit.
Kasaysayan sa Pagbag-o
| Petsa | Bersyon | Deskripsyon |
| 2024-10-11 | 1.0 | Inisyal nga Bersyon |
| 2024-11-15 | 1.1 | Pagdalisay sa Layout sa Dokumento |
| 2025-03-14 | 1.2 | Add Aurora Remote Description |
Mga FAQ
- P: Unsaon nako pagkahibalo kon ang device anaa sa mapping mode?
A: The indicator light will be green and constantly lit when the device is in mapping mode. - P: Mahimo ba nako usbon ang default nga configuration sa WiFi?
A: Yes, you can change the WiFi configuration through the Aurora settings interface accessed via Ethernet connection.
Mga Dokumento / Mga Kapanguhaan
 |
SLAMTEC Aurora Visual Laser Integrated Localization ug Mapping Sensor [pdf] Manwal sa Instruksyon Aurora Visual Laser Integrated Localization ug Mapping Sensor, Aurora, Visual Laser Integrated Localization ug Mapping Sensor, Laser Integrated Localization ug Mapping Sensor, Integrated Localization ug Mapping Sensor, Localization ug Mapping Sensor, ug Mapping Sensor, Mapping Sensor |