RGBlink mini Streaming Switcher
Product Information
Specifications
- Power Adapter: PD 12V/2.5A
- USB 3.0 AV Capture Cable
- Type-C Power Cable
- Interface: HDMI IN, USB-C Power Port, AUDIO IN/OUT, LAN, RECORD, HDMI OUT, USB
Product Overview
Key Features
- 4 HDMI 2.0 inputs, 2 HDMI 1.3 output
- HDMI output can be set to 6-window Preview, Program or Inputs 1~4
- 2-inch TFT full color touchscreen built in for signal monitoring and menu operation
- Support MIC and LINE audio input, multi-channel mix audio
- Image scaling & cropping
- PIP function including PBP for layout setting
- USB 2.0 recording function, supporting exFAT and FAT32 formats
- T-Bar seamless transition including CUT | FADE
- 15 transition effects
- LOGO overlay
- web APP & open APl for remote control
- Air cooling design to secure 24/7 stable operation
- Integrated design, easy to carry
In the Box

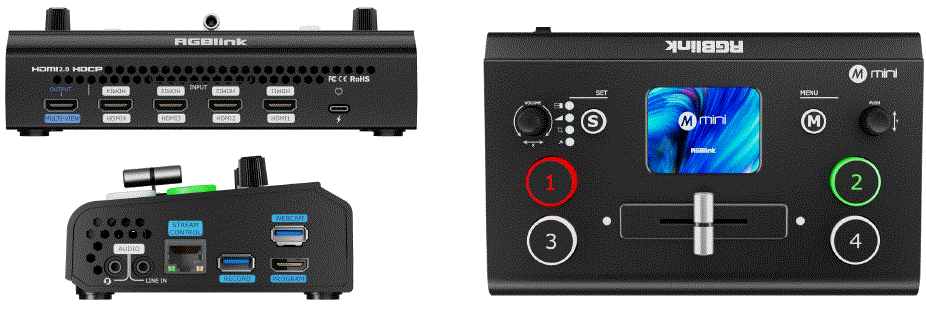
Front Panel
| ❶ | VOLUME/X Knob | Adjusts volume.
|
| ❷ | S Shortcut Key |
|
| ❸ | Touchscreen | Real-time preview of 4 video inputs or displays the menu interface for touch operation. |
| ❹ | M (Menu) Key | Menu key and return key. |
| ❺ | Y Knob |
|
| ❻ | 1, 2, 3, 4 | 4 input signals:
|
| ❼ | T-Bar |
|
Note: The mini basic version does not include HDMI output. If needed, subscribe to PGM HDMI on the TAO Cloud.
Interface Panel
| ❶ | MULTI-VIEW | Multi-screen preview output port (default). |
| ❷ | HDMI IN | 4 HDMI input ports for connecting devices like HD cameras or computers. |
| ❸ | USB-C Power Port | TYPE-C power interface. |
| ❹ | AUDIO IN/OUT |
|
| ❺ | LAN | Network connection for web App control and push streaming. |
| ❻ | RECORD | Recording port for USB drives or external hard drives to record live content. |
| ❼ | HDMI OUT | HDMI output port for multi-screen preview or main output. |
| ❽ | USB | USB 3.0 port for capturing the signals and streaming via third-party software to live platforms. |
Use Your Product
- Power on
After powering on, the device displays the startup screen on the built-in TFT touch screen.
- Main Menu
Touch icons to enter corresponding functions. Slide to switch icons.
Picture in Picture (PIP)
- Enable PIP
Press the PIP icon in the main menu or press the S button to enter PIP adjust settings.
- Select main and sub-screens
Press “Adjust” in the PIP interface and select A/B icon. If the main layer icon, A, is green, the corresponding signal button will flicker. Press another signal to change the current A layer if needed. Press the A/B icon again to switch to adjust layer B.
- Layer Adjustment
Enter the Adjustment page, select the layer (A/B), and use the X/Y knobs to adjust width/height or select a 9:16 aspect ratio. Or scale the selected layer Proportionally using the last icon. Use “Full” for
full-screen or “Reset” to restore default settings.
- Layout
Press “Layout” to choose from 10 default layouts.  Enable Blending
Enable blending to switch between A/B modes and adjust width/position.
View
Save a View
Press the “View” icon to save or switch views.
- Yellow: View being edited.
- Green: Saved view.
- Gray: No saved view.

Interface Operations
- Light press to save the current preview to a view.
- Choose manual or automatic view switching.
- Set view switch duration.

Transition Effect
Select a Transition Effect
Press the “Transition Effect” icon or press the S button to select from 15 effects (e.g., fade, wipe).
Transition Mode
- T-Bar Mode (Manual)
Tap the MODE icon on the main menu to enter. Default mode: Push the T-Bar to transition the preview to the main output.
- T-Bar Mode (Manual)
Tap the MODE icon on the main menu to enter. Default mode: Push the T-Bar to transition the preview to the main output.
Audio
Audio Support
The mini device is equipped with two audio interfaces, four HDMI inputs, and one HDMI output, supporting embedded audio. Click the audio icon on the main menu to access volume adjustment and function settings.
Volume Adjustment
- Touchscreen: for the two audio interfaces, select a channel and enable it, then click the “-” or “+” buttons to adjust the gain. For HDMI 1–4, select a channel and click “-” or “+” to adjust the volume.
- Knobs: rotate the Y knob for MIC IN, LINE IN, HDMI 1~4 embedded volume adjustments. Rotate the X knob for HDMI Output volume adjustment.

Audio-Follow-Video& Mixing
- The embedded audio from HDMI 1–4 can be mixed. When enabled, it will play simultaneously with other audio in the current preview.
- For HDMI 1–4 embedded audio, you can choose whether the audio follows the video playback and whether it switches to the main output along with the video. Adjust volume for audio inputs or HDMI embedded audio.

Binding TAO Cloud
As the streaming industry’s first video switcher offering user-customizable features, allowing users to unlock full capabilities through either a monthly subscribe or a lifetime purchase on the TAO Cloud.
| Function Type | Authorization Method | Function Details |
| Basic Functions | Free |
|
| TAO Cloud Licensed Functions | Monthly/Lifetime Subscription | ▼ Production
▼ Network Streaming
|
|
||
| Complete Functions | Unlock lifetime access to all functions |
Getting a Verification Code
If the device is unbound, use the verification code to bind it.
Login/Register TAO Cloud
- Visit https://www.tao1live.com.
- Enter your email and verification code to log in or register.

Device Binding
- Go to “All Devices” > “Bind Device.”
- Enter a custom device name and verification code, then press “Bind.”

Function Authorization
- Go to the device management interface and click “Setting”
- Select functions to authorize (monthly Plan, Separate Lifetime Plan and Complete Functions) and complete payment.

Note: These premium functions require TAO Cloud purchase for activation.The premise of viewing and using the function pages on TAO Cloud is that you must go to Settings and subscribe “TAO Remote Control” function first. Other premium functions can only be activated on TAO Cloud and mini device after subscribing to the TAO Remote Control function.
Video Output
- Select Output Signal
Configure the display and resolution for the two HDMI outputs.
- Info Display
Enable features like HDMI/DVI adaptation, audio meter display, framing guide, or LCD signal resolution info.
Stream
Users can bind the mini to the TAO Cloud Platform for efficient content production and creation. The mini device supports simultaneous streaming to up to 4 platforms.
Pre-Streaming Setup
- Connect the mini device to the network using an Ethernet cable.
- Ensure the mini is bound to TAO Cloud.
- Enable the Streaming button on the mini’s streaming interface.

Distribute Streaming Address to mini
- Go to the mini management page under “My Devices” in TAO Cloud.
- Enter the streaming addresses of the target platform(s) in the streaming section.
- Click “Distribute” to distribute the addresses.

Start the Stream
Return to the mini streaming interface, select the received streaming URL, and click to start streaming. This page also allows streaming parameter configuration.
Recording
Enable Record
- Insert a USB drive or external hard drive (formatted to EXT4) into the RECORD port.
- Press “Record” in the main menu to start. Press the Record button to start recording.

Recording Settings
Enable audio recording if needed. You can also check disk usage, set recording quality, or format the disk.
Chroma Key
- Enable Keying
Enable to remove green/blue backgrounds from sub-screens (default B layer).
- Adjust Parameters
Adjust size/position as needed; settings save to the current view.
PTZ
Switch PTZ signal to the Preview
Select the PTZ signal in the preview screen and tap the PTZ icon in the main menu.
Adjust Parameters
Use X/Y knobs to adjust position, zoom, or focus. Position:
- Rotate X to pan the camera left/right.
- Rotate Y to tilt the camera up/down Zoom:
- Rotate X clockwise to zoom in.
- Rotate X counterclockwise to zoom out. Focus:
- Rotate X to adjust focus.

PTZ Settings
On this interface, you can:
- Switch PTZ cameras and enable controls.
- Confirm PTZ port number is 01259.
- Ensure the device and PTZ are on the same LAN (first three IP digits match).
- Adjust PTZ speed with “+/-.”

Logo
Import Logo Material via TAO Cloud
- Open TAO Cloud.
- Navigate to My Collection > My Devices and access the mini device management page.
- Under Basic Settings, select a scene and add logo material in the Content Management section.

Adjust Logo
- Open the logo icon from the main menu interface. The logo interface will display the material applied from TAO Cloud.
- Once enabled, the logo will appear in the current preview.
- Use the X knob to adjust horizontal (left/right) position.
- Use the Y knob to adjust vertical (up/down) position.

Replace Logo
- Go to TAO Cloud and access the mini device management page.
- Under Basic Settings, select a new logo material for replacement.
- Return to the mini logo settings interface, tap Refresh, and the logo will update.

Xiamen RGBlink Science & Technology Co Ltd.
- Tel: +86-592-5771197
- Fax: +86-592-5788216
- Customer Hotline: 4008-592-315
- Web: http://www.rgblink.com
- Email:support@rgblink.com
- Headquarter: The 6th floor, No. 37-3 Banshang Community, Building 3, Xinke Plaza, Torch Hi-Tech Industrial Development Zone, Xiamen, China

©2025 RGBlink All rights reserved.
Frequently Asked Questions
Does the mini basic version include HDMI output?
No, the mini basic version does not include HDMI output. To obtain HDMI output, subscribe to PGM HDMI on the TAO Cloud.
Documents / Resources
 |
RGBlink mini Streaming Switcher [pdf] User Guide mini Streaming Switcher, mini, Streaming Switcher, Switcher |
 |
RGBlink mini Streaming Switcher [pdf] Instruction Manual mini Streaming Switcher, mini, Streaming Switcher, Switcher |