RGBlink mini Streaming Switcher
Taarifa ya Bidhaa
Vipimo
- Adapta ya Nguvu: PD 12V/2.5A
- USB 3.0 AV Capture Cable
- Cable Power Cable
- Kiolesura: HDMI IN, Mlango wa Nishati wa USB-C, AUDIO IN/OUT, LAN, REKODI, HDMI OUT, USB
Bidhaa Imeishaview
Sifa Muhimu
- Ingizo 4 za HDMI 2.0, pato 2 HDMI 1.3
- Utoaji wa HDMI unaweza kuwekwa kwa madirisha 6 ya awaliview, Programu au Ingizo 1~4
- Skrini kamili ya kugusa ya rangi ya TFT ya inchi 2 iliyojengwa ndani kwa ufuatiliaji wa mawimbi na uendeshaji wa menyu
- Saidia MIC na ingizo la sauti la LINE, sauti ya mchanganyiko wa vituo vingi
- Kuongeza na kupunguza picha
- Kitendaji cha PIP pamoja na PBP kwa mpangilio wa mpangilio
- Kitendaji cha kurekodi cha USB 2.0, kinachosaidia fomati za exFAT na FAT32
- Mpito usio na mshono wa T-Bar ikijumuisha CUT | FADE
- 15 athari za mpito
- Uwekeleaji wa NEMBO
- web APP na ufungue APl kwa udhibiti wa mbali
- Muundo wa kupoeza hewa ili kupata operesheni thabiti ya 24/7
- Ubunifu uliojumuishwa, rahisi kubeba
Katika Sanduku

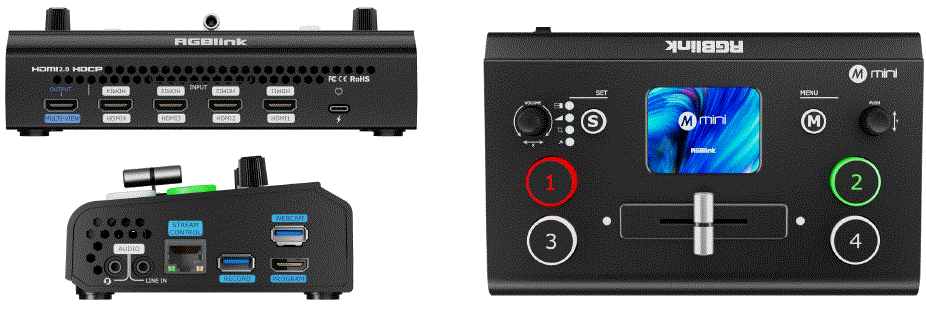
Jopo la mbele
| ❶ | VOLUME/X Knob | Inabadilisha sauti.
|
| ❷ | Ufunguo wa Njia ya mkato ya S |
|
| ❸ | Skrini ya kugusa | Kabla ya wakati halisiview ya ingizo 4 za video au huonyesha kiolesura cha menyu kwa uendeshaji wa mguso. |
| ❹ | Kitufe cha M (Menyu). | Kitufe cha menyu na ufunguo wa kurudi. |
| ❺ | Kifundo cha Y |
|
| ❻ | 1, 2, 3, 4 | 4 ishara za pembejeo:
|
| ❼ | T-Bar |
|
Kumbuka: Toleo la msingi la mini halijumuishi pato la HDMI. Ikihitajika, jiandikishe kwa PGM HDMI kwenye Wingu la TAO.
Jopo la kiolesura
| ❶ | MULTI-VIEW | Kabla ya skrini nyingiview bandari ya pato (chaguo-msingi). |
| ❷ | HDMI-IN | Milango 4 ya HDMI ya kuunganisha vifaa kama vile kamera za HD au kompyuta. |
| ❸ | USB-C Nguvu ya Nguvu | Kiolesura cha nguvu cha TYPE-C. |
| ❹ | SAUTI NDANI/NJE |
|
| ❺ | LAN | Muunganisho wa mtandao kwa web Udhibiti wa programu na utiririshaji wa kusukuma. |
| ❻ | REKODI | Hifadhi ya kurekodi kwa viendeshi vya USB au diski kuu za nje ili kurekodi maudhui ya moja kwa moja. |
| ❼ | HDMI OUT | Mlango wa kutoa wa HDMI kwa skrini nyingi kablaview au pato kuu. |
| ❽ | USB | Mlango wa USB 3.0 kwa kunasa mawimbi na kutiririsha kupitia programu ya watu wengine hadi mifumo ya moja kwa moja. |
Tumia Bidhaa Yako
- Washa
Baada ya kuwasha, kifaa kinaonyesha skrini ya kuanza kwenye skrini ya kugusa ya TFT iliyojengwa.
- Menyu kuu
Gusa ikoni ili kuingiza vitendaji sambamba. Telezesha kidole ili kubadilisha ikoni.
Picha katika Picha (PIP)
- Washa PIP
Bonyeza ikoni ya PIP kwenye menyu kuu au ubonyeze kitufe cha S ili kuweka mipangilio ya kurekebisha PIP.
- Chagua skrini kuu na ndogo
Bonyeza "Rekebisha" kwenye kiolesura cha PIP na uchague ikoni ya A/B. Ikiwa ikoni kuu ya safu, A, ni ya kijani kibichi, kitufe cha ishara kinacholingana kitafifia. Bonyeza ishara nyingine ili kubadilisha safu ya A ya sasa ikiwa inahitajika. Bonyeza aikoni ya A/B tena ili kubadili kurekebisha safu B.
- Marekebisho ya Tabaka
Ingiza ukurasa wa Marekebisho, chagua safu (A/B), na utumie visu vya X/Y kurekebisha upana/urefu au uchague uwiano wa 9:16. Au ongeza safu iliyochaguliwa kwa Usawa ukitumia ikoni ya mwisho. Tumia "Kamili" kwa
skrini nzima au "Weka Upya" ili kurejesha mipangilio chaguomsingi.
- Mpangilio
Bonyeza "Mpangilio" ili kuchagua kutoka kwa miundo 10 chaguo-msingi.  Washa Kuchanganya
Washa uchanganyaji ili ubadilishe kati ya modi za A/B na urekebishe upana/msimamo.
View
Hifadhi a View
Bonyeza kitufe cha "View” ikoni ya kuhifadhi au kubadili views.
- Za: View inahaririwa.
- Kijani: Imehifadhiwa view.
- Kijivu: Hakuna iliyohifadhiwa view.

Uendeshaji wa Kiolesura
- Bonyeza kwa mwanga ili kuhifadhi pre ya sasaview kwa a view.
- Chagua mwongozo au otomatiki view byte.
- Weka view muda wa kubadili.

Athari za Mpito
Chagua Athari ya Mpito
Bonyeza ikoni ya "Athari ya Mpito" au bonyeza kitufe cha S ili kuchagua kutoka kwa athari 15 (kwa mfano, kufifia, kufuta).
Hali ya Mpito
- Hali ya T-Bar (Mwongozo)
Gonga aikoni ya MODE kwenye menyu kuu ili uingie. Hali chaguo-msingi: Sukuma T-Bar ili kubadilisha utanguliziview kwa pato kuu.
- Hali ya T-Bar (Mwongozo)
Gonga aikoni ya MODE kwenye menyu kuu ili uingie. Hali chaguo-msingi: Sukuma T-Bar ili kubadilisha utanguliziview kwa pato kuu.
Sauti
Usaidizi wa Sauti
Kifaa kidogo kina violesura viwili vya sauti, pembejeo nne za HDMI, na pato moja la HDMI, kusaidia sauti iliyopachikwa. Bofya ikoni ya sauti kwenye menyu kuu ili kufikia marekebisho ya sauti na mipangilio ya utendaji.
Marekebisho ya Kiasi
- Skrini ya kugusa: kwa violesura viwili vya sauti, chagua kituo na uiwashe, kisha ubofye vitufe vya "-" au "+" ili kurekebisha faida. Kwa HDMI 1–4, chagua kituo na ubofye “-” au “+” ili kurekebisha sauti.
- Vifundo: zungusha knob ya Y kwa MIC IN, LINE IN, HDMI 1~4 marekebisho ya sauti yaliyopachikwa. Zungusha kisu cha X kwa urekebishaji wa sauti ya Pato la HDMI.

Sauti-Fuata-Video& Mchanganyiko
- Sauti iliyopachikwa kutoka HDMI 1–4 inaweza kuchanganywa. Ikiwezeshwa, itacheza wakati huo huo na sauti nyingine katika utangulizi wa sasaview.
- Kwa sauti ya HDMI 1–4 iliyopachikwa, unaweza kuchagua ikiwa sauti itafuata uchezaji wa video na ikiwa itabadilika hadi kwenye pato kuu pamoja na video. Rekebisha sauti ya pembejeo za sauti au sauti iliyopachikwa ya HDMI.

Kufunga TAO Cloud
Kama kibadilishaji cha kwanza cha video cha sekta ya utiririshaji kinachotoa vipengele vinavyoweza kubinafsishwa na mtumiaji, vinavyowaruhusu watumiaji kufungua uwezo kamili kupitia usajili wa kila mwezi au ununuzi wa maisha yote kwenye Wingu la TAO.
| Aina ya Kazi | Njia ya Uidhinishaji | Maelezo ya Kazi |
| Kazi za Msingi | Bure |
|
| Kazi za Leseni za Wingu za TAO | Usajili wa Kila Mwezi/Maisha | ▼ Uzalishaji
▼ Utiririshaji wa mtandao
|
|
||
| Kamilisha Kazi | Fungua ufikiaji wa maisha kwa vipengele vyote |
Kupata Nambari ya Uthibitishaji
Ikiwa kifaa hakijafungwa, tumia nambari ya kuthibitisha ili kukifunga.
Ingia/Jisajili Wingu la TAO
- Tembelea https://www.tao1live.com.
- Weka barua pepe yako na msimbo wa uthibitishaji ili kuingia au kujiandikisha.

Kufunga Kifaa
- Nenda kwa "Vifaa Vyote"> "Funga Kifaa."
- Weka jina la kifaa maalum na msimbo wa uthibitishaji, kisha ubonyeze "Funga."

Uidhinishaji wa Kazi
- Nenda kwenye kiolesura cha usimamizi wa kifaa na ubofye "Mipangilio"
- Chagua chaguo za kukokotoa ili kuidhinisha (Mpango wa kila mwezi, Tenganisha Mpango wa Maisha na Utendaji Kamilisha) na ukamilishe malipo.

Kumbuka: Vipengele hivi vya kulipia vinahitaji ununuzi wa Wingu wa TAO ili kuwezesha. Mawazo ya viewing na kutumia kurasa za utendaji kwenye TAO Cloud ni kwamba lazima uende kwa Mipangilio na ujiandikishe kazi ya "TAO Remote Control" kwanza. Vitendaji vingine vinavyolipiwa vinaweza tu kuamilishwa kwenye Wingu la TAO na kifaa kidogo baada ya kujisajili kwenye kipengele cha Udhibiti wa Mbali wa TAO.
Pato la Video
- Chagua Mawimbi ya Kutoa
Sanidi onyesho na azimio la matokeo mawili ya HDMI.
- Onyesho la Habari
Washa vipengele kama vile urekebishaji wa HDMI/DVI, onyesho la mita ya sauti, mwongozo wa kufremu, au maelezo ya ubora wa mawimbi ya LCD.
Tiririsha
Watumiaji wanaweza kuunganisha mini kwenye TAO Cloud Platform kwa uzalishaji na uundaji wa maudhui kwa ufanisi. Kifaa kidogo kinaweza kutumia utiririshaji kwa wakati mmoja hadi majukwaa 4.
Mipangilio ya Kutiririsha Mapema
- Unganisha kifaa kidogo kwenye mtandao kwa kutumia kebo ya Ethaneti.
- Hakikisha kuwa kifaa kidogo kimefungwa kwenye Wingu la TAO.
- Washa kitufe cha Kutiririsha kwenye kiolesura cha utiririshaji cha mini.

Sambaza Anwani ya Kutiririsha kwa mini
- Nenda kwenye ukurasa wa usimamizi mdogo chini ya "Vifaa Vyangu" katika TAO Cloud.
- Weka anwani za utiririshaji za majukwaa lengwa katika sehemu ya utiririshaji.
- Bofya "Sambaza" ili kusambaza anwani.

Anzisha Mtiririko
Rudi kwenye kiolesura kidogo cha utiririshaji, chagua utiririshaji uliopokelewa URL, na ubofye ili kuanza kutiririsha. Ukurasa huu pia unaruhusu usanidi wa kigezo cha kutiririsha.
Kurekodi
Wezesha Rekodi
- Ingiza kiendeshi cha USB au diski kuu ya nje (iliyoumbizwa kwa EXT4) kwenye mlango wa REKODI.
- Bonyeza "Rekodi" kwenye menyu kuu ili kuanza. Bonyeza kitufe cha Rekodi ili kuanza kurekodi.

Mipangilio ya Kurekodi
Washa kurekodi sauti ikihitajika. Unaweza pia kuangalia matumizi ya diski, kuweka ubora wa kurekodi, au umbizo la diski.
Ufunguo wa Chroma
- Washa Keying
Wezesha kuondoa mandharinyuma ya kijani/bluu kwenye skrini ndogo (safu chaguomsingi B).
- Rekebisha Vigezo
Kurekebisha ukubwa / nafasi kama inahitajika; mipangilio hifadhi kwa sasa view.
PTZ
Badilisha mawimbi ya PTZ kuwa Preview
Chagua ishara ya PTZ katika utanguliziview skrini na uguse ikoni ya PTZ kwenye menyu kuu.
Rekebisha Vigezo
Tumia visu vya X/Y kurekebisha mkao, kukuza au kuzingatia. Nafasi:
- Zungusha X ili kugeuza kamera kushoto/kulia.
- Zungusha Y ili kuinamisha kamera juu/chini Kuza:
- Zungusha X kisaa ili kuvuta ndani.
- Zungusha X kinyume cha saa ili kuvuta nje. Kuzingatia:
- Zungusha X ili kurekebisha umakini.

Mipangilio ya PTZ
Kwenye kiolesura hiki, unaweza:
- Badili kamera za PTZ na uwashe vidhibiti.
- Thibitisha nambari ya bandari ya PTZ ni 01259.
- Hakikisha kifaa na PTZ ziko kwenye LAN sawa (tarakimu tatu za kwanza za IP zinalingana).
- Rekebisha kasi ya PTZ kwa "+/-."

Nembo
Ingiza Nyenzo ya Nembo kupitia TAO Cloud
- Fungua Wingu la TAO.
- Nenda kwenye Mkusanyiko Wangu > Vifaa Vyangu na ufikie ukurasa wa usimamizi wa kifaa kidogo.
- Chini ya Mipangilio ya Msingi, chagua tukio na uongeze nyenzo za nembo katika sehemu ya Usimamizi wa Maudhui.

Rekebisha Nembo
- Fungua ikoni ya nembo kutoka kwa kiolesura cha menyu kuu. Kiolesura cha nembo kitaonyesha nyenzo zilizotumika kutoka kwa TAO Cloud.
- Mara baada ya kuwezeshwa, nembo itaonekana katika pre ya sasaview.
- Tumia kisu cha X kurekebisha nafasi ya mlalo (kushoto/kulia).
- Tumia knob ya Y kurekebisha nafasi ya wima (juu/chini).

Badilisha Nembo
- Nenda kwenye TAO Cloud na ufikie ukurasa wa usimamizi wa kifaa kidogo.
- Chini ya Mipangilio ya Msingi, chagua nyenzo mpya ya nembo kwa ajili ya kubadilisha.
- Rudi kwenye kiolesura cha mipangilio ya nembo ndogo, gusa Onyesha upya, na nembo itasasishwa.

Xiamen RGBlink Science & Technology Co Ltd.
- Simu: +86-592-5771197
- Faksi: +86-592-5788216
- Mteja Namba ya simu: 4008-592-315
- Web: http://www.rgblink.com
- Barua pepe:support@rgblink.com
- Makao Makuu: Ghorofa ya 6, Nambari 37-3 Jumuiya ya Banshang, Jengo la 3, Xinke Plaza, Eneo la Maendeleo ya Viwanda la Mwenge Hi-Tech, Xiamen, Uchina

©2025 RGBlink Haki zote zimehifadhiwa.
Maswali Yanayoulizwa Mara Kwa Mara
Je, toleo la msingi la mini linajumuisha pato la HDMI?
Hapana, toleo la msingi la mini halijumuishi pato la HDMI. Ili kupata pato la HDMI, jiandikishe kwa PGM HDMI kwenye Wingu la TAO.
Nyaraka / Rasilimali
 |
RGBlink mini Streaming Switcher [pdf] Mwongozo wa Mtumiaji Kibadilishaji cha Utiririshaji kidogo, Kibadilishaji kidogo cha Utiririshaji, Kibadilishaji |
 |
RGBlink mini Streaming Switcher [pdf] Mwongozo wa Maelekezo Kibadilishaji cha Utiririshaji kidogo, Kibadilishaji kidogo cha Utiririshaji, Kibadilishaji |