Panduit F8BNM**BNS FlexCore ODF Front Access 288 Fiber Tethered Universal Enclosure Instruction
Product Information
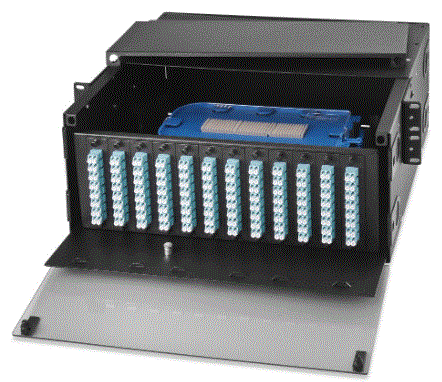
FlexCoreTM ODF Front Access 288 Fiber Tethered Universal Enclosure
Specifications:
- Part Number(s): F8BNM**BNS*****
- Installation Instructions: FS202
Installation of Boxed Assemblies [Less than or equal to 100ft (30m)]
- Open up the box and remove the foam to reveal the cable.
- Be careful when opening the box to not cut the cable while opening the box.
- Remove all strips of Tak-Ty holding together the coil of cable.
- Unspool approximately 10ft. (3m) of cable and place it off to the side of the box.
- Remove the outer cardboard shell to reveal the enclosure and foam end caps.
- Remove the two foam blocks located behind the enclosure.
- Remove the enclosure from the cardboard sleeve and remove the end caps from the outer box.
- Manually unspool the cable to the location where splicing will occur.
- Keep an eye on the cable transition to confirm that the cable is not twisting while being unspooled.
- Remove the endcaps.
- Remove the sleeve.
- Install the enclosure into the frame using the methods discussed in FS203.
- Attach the cable transition to the correct location on the ingress/egress plates on the 150mm vertical cable manager per FS206, Section 4.
- Secure the cable transition with a cable tie around it.
- If needed, pull out every tray in the enclosure to ensure there is enough slack for the tray to move without putting extra stress on fibers.
- If any cassette needs to be inspected individually, they can be removed from the tray as explained in FS203.
FAQ (Frequently Asked Questions)
- Q: How do I install boxed assemblies that are less than or equal to 100ft (30m)?
A: Follow the steps outlined in section 1 of the installation instructions. Make sure to be careful when opening the box to avoid cutting the cable. - Q: How do I unspool the cable?
A: Unspool approximately 10ft (3m) of cable and place it off to the side of the box. Keep an eye on the cable transition to ensure it doesn’t twist while being unspooled. - Q: How do I attach the cable transition to the vertical cable manager?
A: Refer to FS206, Section 4 for instructions on attaching the cable transition to the correct location on the ingress/egress plates using a cable tie.
INSTALLATION INSTRUCTIONS
NOTE: The following installation instruction shows pictures of a left-tethered enclosure. A right-tethered enclosure is also an option and would be installed in the same manner, but with the 150mm vertical cable manager located to the right of the enclosure.
Disclaimer: The information contained in this manual is intended as a guide for use by persons having technical skill at their own discretion and risk. The recommended practices are based on average conditions. Panduit makes no representation or warranty, express or implied, nor assumes any responsibility for the accuracy or completeness of these installation instructions. Panduit does not guarantee any favorable results nor assume any liability for damages, improper installation, system failures, or any other problems that could arise in connection with the use of these installation instructions
Installation of Boxed Assemblies
[Less than or equal to 100ft (30m)]
Open up the box and remove the foam to reveal cable.
- Be careful when opening the box to not cut the cable while opening the box

- Remove all strips of Tak-Ty holding together coil of cable

- Unspool ~10ft. (3m) of cable and place off to side of box

- Remove the outer cardboard shell to reveal the enclosure and foam end caps

- Remove 2 foam blocks located behind enclosure

- Remove enclosure in cardboard sleeve, and end caps from outer box.

- Manually unspool cable to location where splicing will occur.
- Keep an eye on the cable transition to confirm the cable is not twisting while being unspooled.

- Keep an eye on the cable transition to confirm the cable is not twisting while being unspooled.
- Remove Endcaps

- Remove sleeve

- Install enclosure into frame using methods discussed in FS203.

- Attach cable transition to correct location on ingress/egress plates on the 150mm vertical cable manager per FS206, Section 4.

- If needed, pull out every tray in the enclosure to ensure there is enough slack for the tray to move without putting extra stress on fibers.

- If any cassette wants to be inspected individually, they can be removed from the tray as explained in FS203.

- Installation of Boxed Assemblies [Less than or equal to 100ft (30m)] is Complete!
Installation of Spooled Assemblies
[From 101ft (31m) to 240ft (73m)] Product will arrive on a pallet
- 1 enclosure and spool per pallet
 Remove plastic shrink wrap from around pallet and enclosure. Note: Be careful to not damage cable when removing shrink wrap
- Cut strapping holding down enclosure and spool

- Remove bag protecting enclosure and spool

- Remove (4) screws holding spool onto pallet

- Move spool off of pallet and discard pallet accordingly

- Slide cardboard box up and off enclosure

- Remove both foam end caps

- Remove the corrugated tubing located on the cable in the slot in the spool

- Remove cardboard sleeve around enclosure

- Undo Tak-ty that is holding pulling eye to plastic harness

- Remove plastic harness by loosening the screw which holds it to spool

- Place the spool with enclosure on top onto a horizontal cable dereeler. Contact your Panduit representative for possible horizontal cable dereeler options if needed.

- Unspool cable using pulling eye until 1 loop of cable is left on drum

- Unspool last loop manually and fish through the slot on the spool

- Remove Tak Ty holding cable transition to spool

- Now cable and enclosure are completely free of spool!

- Follow Steps 1.10. to 1.13. to complete installation of enclosure in ODF FlexCoreTM Frame

- Installation of Spooled Assemblies [From 101ft (31m) to 240ft (73m)] is complete!
Correlation Between Bare Ribbon Blunt End and Tethered Cassettes
TETHERED LEFT ENCLOSURE LAYOUT 
TETHERED LEFT CASSETTE STANDARD POLARITY 
TETHERED RIGHT ENCLOSURE LAYOUT  TETHERED RIGHT CASSETTE STANDARD POLARITY

Existing Panduit FlexCoreTM Installation Instructions
For Technical Support: www.panduit.com/resources/install_maintain.asp
Documents / Resources
 |
Panduit F8BNM**BNS FlexCore ODF Front Access 288 Fiber Tethered Universal Enclosure [pdf] Instruction Manual F8BNM BNS FlexCore ODF Front Access 288 Fiber Tethered Universal Enclosure, F8BNM BNS, FlexCore ODF Front Access 288 Fiber Tethered Universal Enclosure, 288 Fiber Tethered Universal Enclosure, Tethered Universal Enclosure, Universal Enclosure |


