
Unitech RP902 MFi Bluetooth UHF Pocket Reader
Quick Start Guide V1.2
Differentiate RP902/RP902 MFi
There are five ways to differentiate between the RP902 Standard Version and the RP902 MFi Version:
Gift Box Outlook
The RP902 MFi version will have the MFi mark on the gift box.
P/N on the Product Label (in the battery compartment)
| RP902 Standard | RP902 MFi |
|---|---|
| RP902-33E8S0G | RP902-33EMS0G |
| RP902-43A8S0G | RP902-43AMS0G |
| RP902-43F8S0G | RP902-43FMS0G |
Product Label Color
- RP902 Standard: White
- RP902 MFi: Yellow
Example Product Label Text: MODEL型號:RP902, Bluetooth UHF Pocket Reader, 口袋型UHF讀寫器, FCC IDXXXXххххх СЕ, RP902-43A8S0G, S/N:XXXXXXXXXX, CMIIT ID:XXXXXXXXXX ROHS, Made in Taiwan製造, Power Source(規格): 5V 0.5A, Product of unitech. Another label shows: CE FC, FCC ID HLERPB02BU, 201-220350, CCAH22LP2930TO, Made in Taiwan 台灣製造, Power Source(規格): 5V 0.5A, Product of unitech.
Operating Mode in the Setting Page
- RP902 Standard: Supports "USB SPP, BT SPP, BT HID, Buffer & BLE HID"
- RP902 MFi: Only supports "USB SPP, BT SPP & Buffer"
Bluetooth Name Format on the Host Device (During Bluetooth Pairing)
- RP902 Standard: RP902_XXXX
- RP902 MFi: RP902_i_XXXX
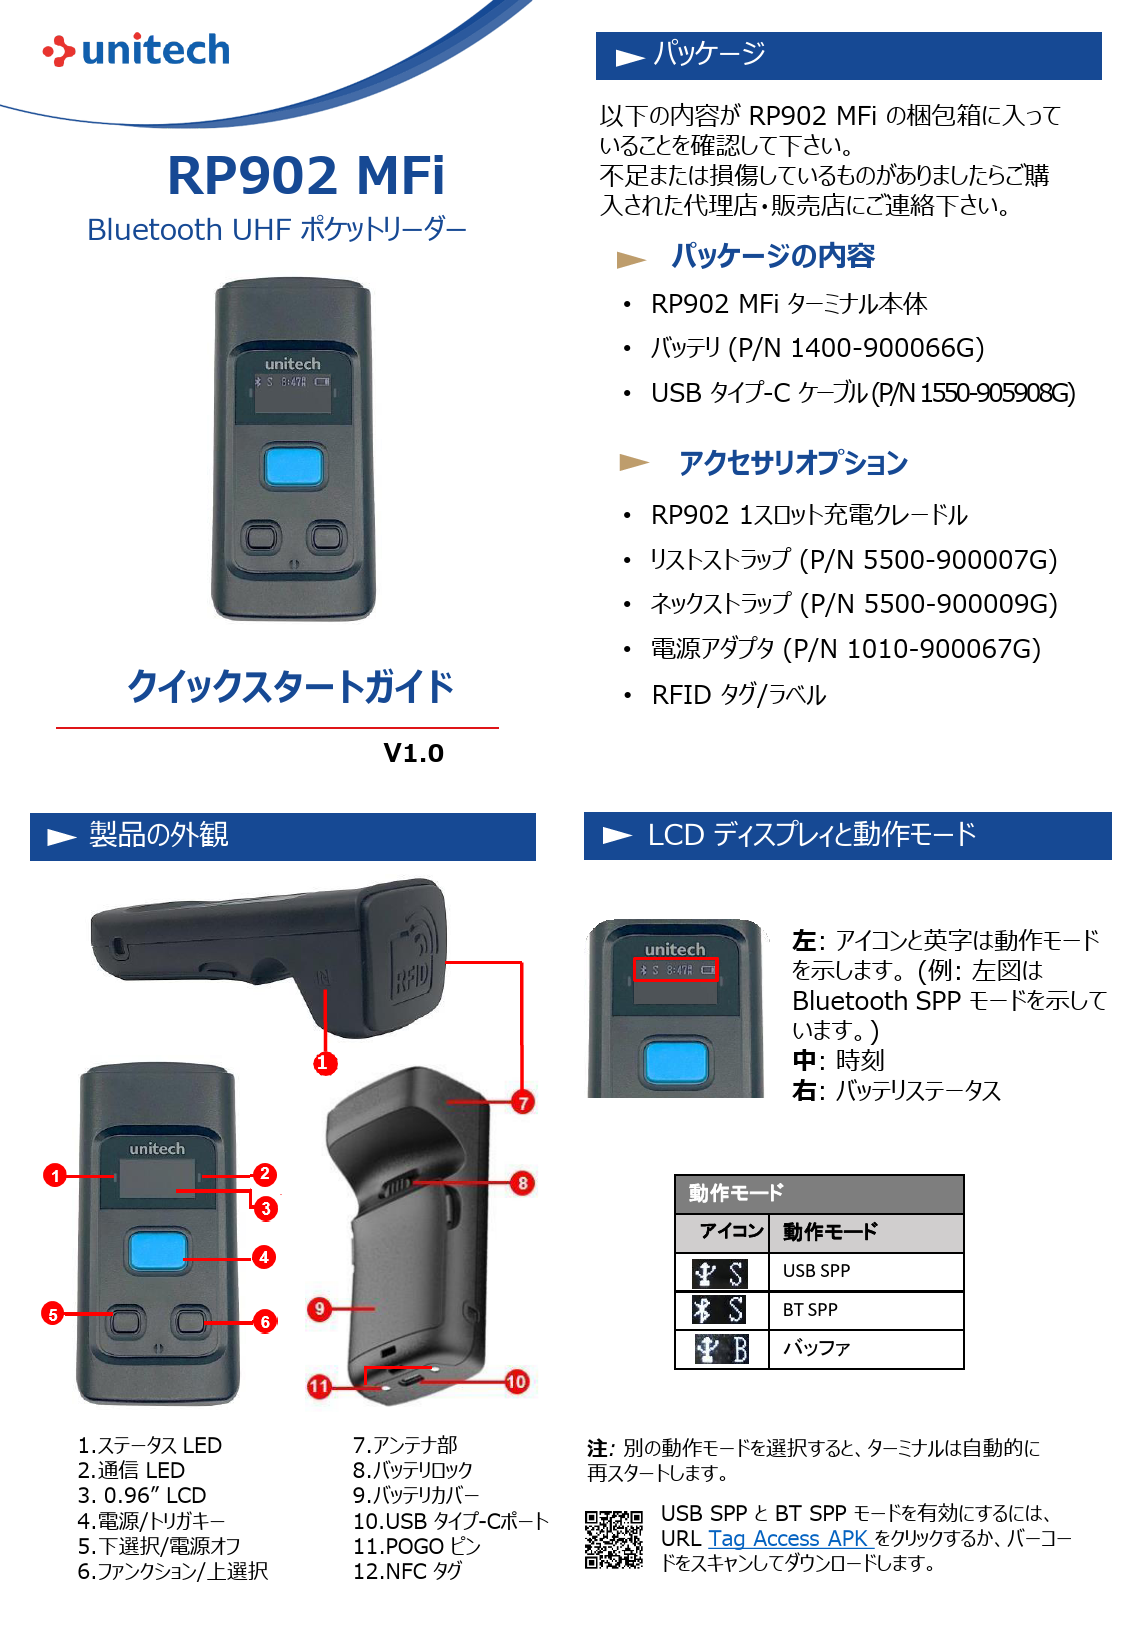
Package Contents
Please ensure the following contents are in the RP902 MFi gift box. If something is missing or damaged, please contact your Unitech representative.
- RP902 MFi Terminal
- Battery (PN#1400-900066G)
- USB Type-C Cable (PN#1550-905908G)
Optional Accessories
- One-Slot Charging Cradle (PN#5000-900096G)
- Wrist Lanyard (PN#5500-900007G)
- Neck Lanyard (PN#3210-900019G)
- Power Supply (PN#1010-900067G)
- RFID tags/labels
Product View
The RP902 MFi features the following components:
- 1. Status LED: Indicates device status.
- 2. Communication LED: Indicates Bluetooth or USB connection status.
- 3. 0.96" LCD: Displays information such as operation mode, time, and battery status.
- 4. Power/Trigger Key: Powers the device on/off and triggers scanning.
- 5. Select Down/Power Off Key: Navigates down and powers off the device.
- 6. Function/Select Up Key: Navigates up and selects options.
- 7. Antenna Area: For RFID signal transmission and reception.
- 8. Battery Lock: Secures the battery compartment.
- 9. Battery Cover: Covers the battery compartment.
- 10. USB Type-C Port: For charging and data connection.
- 11. POGO Pin: For charging via a cradle.
- 12. NFC Tag: For NFC functionality.
Install the Battery
- Turn the terminal to its rear side. Push the battery lock to the right to unlock the battery.
- Grab the two protrusions on both sides of the battery cover and lift upward to remove it.
- Insert the battery into the battery compartment from the top side and press down. Ensure half of the battery strap remains outside.
- Press down the battery.
- Align the two hooks at the bottom of the battery cover with the recesses on the battery compartment and insert. Ensure the battery strap is completely covered.
- Press down the battery cover and push the battery lock to the left to secure the battery.
Note: Please ensure the battery strap is not revealed.
Specifications
| Parameter | Details |
|---|---|
| Frequency | 865 - 928 MHz (US/EU/JP/TW/CN) |
| Standard | EPC global Class1 Gen2, ISO/IEC 18000-6C |
| Read Range | 1M: When Power is 22dBm 2M: When Power is 27dBm (Depends on the type and quantity of RFID tag and environment) |
| Weight | 106g |
| Operating Time | > 12 hours with 75,000 tag readings |
| Charge Time | 2 hours (via RP902 charging cradle) 3.5 hours (via USB type-C cable) |
| Bluetooth | Bluetooth® 5.0 (SPP(iAP2)) |
| Compatibility | RP902 with MFi Version: BT: iOS (MFi) USB: Windows RP902 Without MFi Version: BT: Android / Windows / iOS (BLE) USB: Windows |
| Operating Temp | -10°C to 50 °C |
Button & LED Overview
The device features several buttons and LEDs for operation:
- Status LED: Indicates device status.
- Communication LED: Indicates Bluetooth or USB connection status.
- Select Down/Power Off Key: Navigates down and powers off.
- Power/Trigger Key: Powers on/off and initiates scanning.
- Function/Select Up Key: Navigates up and selects options.
LCD Display
The LCD screen provides visual feedback:
- Left: Icon and alphabet indicate the operation mode (e.g., Bluetooth SPP mode).
- Middle: Displays the current time.
- Right: Shows the battery state.
Default Settings
| Setting | Default Value |
|---|---|
| Operating Mode | BT SPP Mode |
| Read Mode | Single Read |
| Power Setting | 22 dBm |
| Beep Setting | Low |
| Vibrate Setting | Enable |
| Auto Power-off | 2 min |
LED Indication
| LED | LED Status | Status LED | Communication LED |
|---|---|---|---|
| Off | Power off/ Fully charged | --- | |
| Red Solid | Battery charging | Connected with USB cable | |
| Green Flash | RFID tag being read successfully | RP902 MFi turned on | |
| Blue Flashing | --- | Waiting for BT connection | |
| Blue Solid | --- | BT connection success |
Note: During F/W Upgrade, Status LED will show solid red light.
Getting Start
Turning on RP902 MFi for the first time
- Short press the Power/Trigger Key to power on the RP902 MFi.
Note: Upon first power-on, the Communication LED will flash green, then show a flashing blue light, indicating it's waiting for Bluetooth connection.
- Enable the BT function on your host device and select "RP902_i_XXXX" (the RP902 MFi terminal name) to connect. After connection, the Communication LED will show a solid blue light.
Note: RP902 MFi supports NFC quick pairing.
Power Up/ Shut Down
Power Up
Short press the Power/Trigger Key. You will hear short beeps (1 beep for SPP mode, 3 beeps for Buffer mode) and the Communication LED will flash green, followed by the LCD screen appearing.
Shut Down
Long press the Select Down/Power Off button for approximately 3 seconds to shut down the terminal.
| Action | Key Press |
|---|---|
| Power On | Short press Power/Trigger Key |
| Power Off | Long press Select Down/Power Off Key (approx. 3 secs) |
Setting Page
Entering the Setting Page
- Enter the Setting Page: Short press Function/Select Up Key.
- Enter: Short press Power/Trigger Key.
- Up: Short press Function/Select Up Key.
- Down: Short press Select Down/Power Off Key.
- Return to Scan Page: Long press Function/Select Up Key (approx. 3 seconds).
Read Mode
- Single read: Short press Power/Trigger Key. Release and press again for another tag.
- Multiple read: Keep pressing Power/Trigger Key.
- Counter read: Press and hold the Power/Trigger Key.
- Rapid read: Short press Power/Trigger Key.
Note: Select the multiple reading mode to enable Continuous Reading.
Setting Page Options
| Setting | Options |
|---|---|
| Operating Mode | USB SPP mode |
| *BT SPP mode | |
| Buffer mode | |
| Read Mode | *Single read |
| Multiple read | |
| Counter read | |
| Rapid read | |
| Power Setting | 11-27 dBm (*22 dBm) |
| Beep Setting | High |
| Medium* | |
| Low | |
| Mute | --- |
| Vibrate Setting | *Enable |
| Disable | |
| Auto Power-off | Disable |
| 1-3/5/10 min (*2 min) | |
| Factory Default | Enable/Disable |
Data Configuration
| Category | Setting | Options |
|---|---|---|
| Format | *Hex | |
| ASCII | ||
| *EPC | ||
| Tag-Info | USER (0~5) | |
| TID | ||
| *by EPC | ||
| Tag-Unique | by Tag-Info | |
| None/Null | ||
| Terminator | CR/LF | |
| Tab | ||
| 1ms | ||
| HID Char-Delay | 5ms | |
| *10ms | ||
| 20ms | ||
| 50ms | ||
| 100ms |
Information
- FW Version
- Serial Number
- MAC Address
- SKU ID (Note: SKU ID: 1 = EU, 2 = US, 3 = JP)
- Temperature
Note: The "*" indicates the default setting. The data will be temporarily saved in the reader under Buffer Mode.
Note: For more details, please refer to RP902 MFi User's Manual, downloadable from https://www.ute.com/en/products/detail/RP902MFi.
Operating Mode
| Icon | Operating Mode |
|---|---|
| S | USB SPP |
| S | BT SPP |
| B | Buffer |
Note: Once you select a different operating mode, the terminal will automatically restart.
To enable USB SPP and BT SPP mode, please refer to the Tag Access APK. Download it via the link: https://www.ute.com/en/products/detail/RP902 (Download Section) or scan the barcode.
Read Mode
Single read
The terminal reads one tag per press. Release the Power/Trigger Key and press again to read another tag. The LCD screen displays the EPC code of the RFID tag being read.
Multiple read
The terminal reads multiple tags within RF coverage upon each press. Keep pressing the Power/Trigger Key to read tags that have not yet been read. Tags already read will not be read again unless the button is released and pressed again.
When there is only one tag: Shows the EPC Code of the tag being read.
Multiple tags being read: Shows the amount of tags being read.
Note: RP902 MFi does not support continuous reading by pressing the trigger key for more than 15 seconds. Users need to release the trigger key and press again to start a new round of reading.
Reading RFID Tags
It is recommended to read RFID tags by aiming the antenna area of the RP902 MFi at the RFID tag horizontally.
Reading distance may be impacted by the type of tag and environmental conditions. The reading range is 1m when power is 22dBm, and the maximum reading range is 2m when power is 27 dBm.
Charging the Battery
- Plug one end of the USB Type-C cable into the port on the reader and the other end into a USB port on the host PC or power adapter.
- Please fully charge the reader (or until the Status LED turns off) before use.
Required Time for full charge:
- One-Slot Charging Cradle: 2 hours
- USB Type-C Cable: 3.5 hours
Disconnect
Long press (about 3 - 5 seconds) the two buttons at the bottom of the RP902 MFi simultaneously to release the BT connection between the host device and the RP902 MFi.
Buttons: Select Down/Power Off Key and Function/Select Up Key.
Firmware Update
Note: For more details, please refer to the RP902 MFi F/W Update Instruction, downloadable from https://www.ute.com/en/products/detail/RP902MFi (FAQ Section), or by scanning the barcode.
Remove the Battery
- Turn the terminal to its rear side and push the battery lock to the right to unlock the battery.
- Grab the two protrusions on both sides of the battery cover and lift upward to remove it.
- Pull the battery strap upward to remove.
WARNING!
There is a risk of fire and burns if the battery is handled improperly. DO NOT disassemble, crush, puncture, short external contacts, or dispose of the battery pack in fire or water. DO NOT attempt to open or service the battery. Dispose used batteries according to local recycling guidelines in your area.
CAUTION!
To ensure the unit working properly, please keep all connectors away from contaminants such as dust, grease, mud, and water. Negligence may cause the unit to lose communication, short circuit, or overheat. If the connector is damaged, please ensure the connector is fully repaired before using the unit to avoid short circuiting.
File Info : application/pdf, 6 Pages, 1.13MB
DocumentDocumentReferences
 Unitech Global | Your Brilliant AIDC Solution Provider
- RP902 Bluetooth UHF RFID Pocket Reader â Unitech
- RP902 MFi / RP902 (2nd Gen) Bluetooth UHF RFID Pocket Reader â Unitech
Related Documents
 |
Unitech RP902 MFi Bluetooth UHF Pocket Reader Quick Start Guide Quick start guide for the Unitech RP902 MFi Bluetooth UHF Pocket Reader, covering package contents, specifications, operation, and battery handling. |
 |
Unitech RP902 Firmware Update and SDK Development Notes Instructions for updating the firmware of the Unitech RP902 device and important considerations for software development using the SDK, including library and API version requirements. |
 |
Unitech Rugged AIDC Solutions: Mobile Computers, Scanners, and More Discover Unitech's extensive portfolio of rugged Android mobile computers, smart phones, tablets, barcode scanners, RFID readers, and wearable devices designed to enhance business efficiency and data capture across various industries. |
 |
Unitech MS838B Quick Start Guide: Setup and Configuration for 2D Barcode Scanner Quick start guide for the Unitech MS838B 2.4G Wireless 2D Barcode Scanner, detailing setup, configuration, and operational modes. |
 |
Unitech SL220 iOS Sled Scanner: Features and Specifications Explore the Unitech SL220, an iOS sled scanner designed for enhanced work efficiency in warehousing, retail, and other industries. Learn about its superior 2D scanning performance, durable design, PD fast charging, and compatibility with Lightning and USB-C connectors. |
 |
Unitech MS836B 2.4G Wireless Laser Barcode Scanner Quick Start Guide Quick start guide for the Unitech MS836B 2.4G Wireless Laser Barcode Scanner, covering setup, operation modes, connectivity, and basic settings. |
 |
Unitech MS838B 2.4G Wireless 2D Barcode Scanner Quick Start Guide A comprehensive quick start guide for the Unitech MS838B 2.4G Wireless 2D Barcode Scanner, detailing setup, configuration, operation modes, and regulatory information. |
 |
Unitech MS838B 2.4G Wireless 2D Barcode Scanner Quick Setup Guide This guide provides quick setup instructions for the Unitech MS838B 2.4G Wireless 2D Barcode Scanner, covering connection, configuration, and operational modes for various wireless and USB interfaces. |