Amino Remote Control User Guide
This guide provides comprehensive instructions for operating and setting up your Amino remote control.
Copyright and Disposal Information
Copyright Notice: Amino Communications Ltd. All rights reserved. This document contains proprietary information. No part may be copied, reproduced, transmitted, distributed, transcribed, stored, modified, or translated without prior written consent from Amino.
Product Disposal Information (EU): The product is labelled in accordance with the European Directive 2002/96/EC (WEEE Directive) and should not be disposed of with household or commercial waste.
Disposal Instructions:
- Residential Users: Remove batteries and dispose of them and the product according to local authority recycling processes. Contact your local authority or retailer for information.
- Business Users: Contact your supplier for terms and conditions regarding disposal and ensure the product is not mixed with other commercial waste.
Disclaimer: Amino is not liable for errors or damages arising from this document. It is intended for informational and instructional purposes only. Amino reserves the right to make changes without prior notification.
Important Information about Using Batteries:
- Do not mix battery types or old/new batteries.
- Do not use rechargeable batteries.
- Remove batteries if the remote will not be used for several weeks to prevent leakage.
- Dispose of old batteries responsibly according to local regulations.
- Do not attempt to recharge batteries.
- Immediately remove leaking batteries, taking care to avoid skin or eye contact.
Contents Overview
This guide covers:
- Remote control layout
- Inserting batteries
- Operation and TV control setup (Brand Search)
- TV control setup (Auto Search)
- Shift TV functionality, Key fixing, Removing TV functionality
- Brand code tables
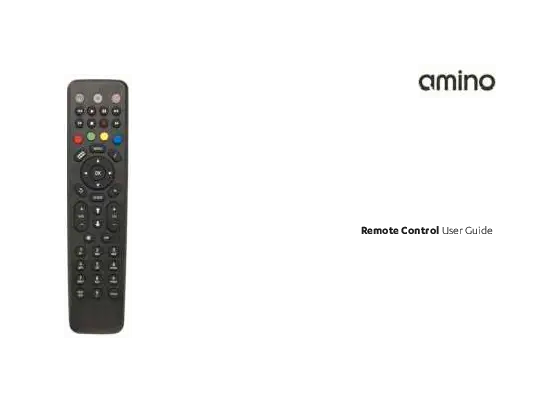
Remote Control Layout
The remote control features various buttons for controlling your set-top box (STB) and TV. Key areas include:
- TV AV Source Select button: Switches the TV input source.
- STB Standby button: Powers the set-top box on/off.
- STB PVR Transport buttons: Controls Play, Pause, Stop, Record, etc. for the PVR function.
- Colour Navigation buttons: Red, Green, Yellow, Blue buttons for specific functions.
- Information button: Displays information about the current content.
- Navigation and OK buttons: Used for menu navigation and selection.
- Exit button: Closes menus or returns to the previous screen.
- Page Up/Down buttons: Navigates through lists or pages.
- Channel Up/Down buttons: Changes TV or STB channels.
- Previous Channel Select button: Returns to the last viewed channel.
- Channel Select buttons and text entry: Numeric buttons for direct channel selection and text input.
- Subtitles button: Toggles subtitles on/off.
- TV Standby button: Powers the TV on/off.
- STB Menu button: Accesses the set-top box menu.
- PVR button: Accesses the Personal Video Recorder functions.
- Back button: Returns to the previous menu or screen.
- Electronic Program Guide button: Opens the TV guide.
- Volume Up/Down buttons: Adjusts audio volume.
- Mute button: Silences audio output.
- Teletext button (press and release) / TV SHIFT function (press and hold): Accesses Teletext or activates TV control functions.
The remote also has an IR window for transmitting signals and a Battery housing at the base. Note that some button functionalities (e.g., PVR) may vary depending on the specific STB model and service provider.
Inserting Batteries
- Slide the battery housing cover downwards to remove it.
- Insert 2 x AAA batteries, observing the correct polarity (+/-).
- Refit the battery housing cover.
Operation
When first used, all buttons transmit commands to the set-top box. Point the remote towards the front of the set-top box for correct operation. Do not obstruct the IR window.
A button press is indicated by the set-top box standby button flashing (or the TV standby button if a TV brand has been entered). If a button is held for over 30 seconds, the remote will stop transmitting to conserve battery life.
TV Control Setup: Brand Search
This feature allows the remote to control your TV. Follow these steps:
- Determine your TV's manufacturer.
- Find the corresponding 4-digit manufacturer code in this manual.
- Ensure your TV is turned on.
- Press and hold the '1' and '3' buttons simultaneously for approximately 3 seconds until the TV standby button remains lit. Release both buttons.
- Enter the 4-digit manufacturer code. The TV standby button will flash after each digit and remain lit after the fourth digit.
- Point the remote at the TV and press and hold the TV Standby Button or Mute button.
- Release the button when the TV turns off or displays the MUTE symbol. This may take several minutes.
- Press and hold the Text/SHIFT button, then press the STOP button simultaneously to finish. The TV standby button will turn off.
The following buttons should now control your TV: TV Standby, AV Source Select, Volume Up, Volume Down, Mute. If not all buttons work, a "KEY FIX" operation may be needed (see page 8). If the TV model changes, repeat the setup. If the brand is not found, the TV standby button will flash rapidly, and the remote will revert to normal operation.
TV Control Setup: Auto Search
If Brand Search fails, Auto Search can be used. This process may take up to 5 minutes.
- Ensure your TV is turned on.
- Press and hold the '1' and '3' buttons simultaneously for approximately 3 seconds until the TV standby button remains lit. Release both buttons.
- Point the remote at the TV and press and hold the TV Standby Button or Mute button.
- Release the button when the TV turns off or displays the MUTE symbol. This may take up to 5 minutes.
- Press and hold the Text/SHIFT button, then press the STOP button simultaneously to finish. The TV standby button will turn off.
If Auto Search fails, the remote cannot control that TV. If the brand is not found, the TV standby button will flash rapidly, and the remote will revert to normal operation.
Advanced TV Functions
TV Shift Functionality
Once a TV brand is programmed, additional buttons can control the TV. Press and hold the TEXT/SHIFT button (20) and then press:
- Digit buttons 0-9
- Left, Right, Up, Down, OK
- Channel Up, Channel Down
- The 4 colour keys
Note: Functionality of these buttons is not guaranteed.
Key Fix
If some TV buttons do not operate correctly, perform Key Fix:
- Press and hold the '1' and '9' buttons simultaneously for approximately 3 seconds until the TV standby button is lit.
- Try the TV buttons again.
- If a button does not work, hold it down permanently. The remote will cycle through settings. Release when the TV responds correctly.
- Repeat for other buttons if necessary.
- Press TEXT/SHIFT and STOP simultaneously to finish.
Removing TV Functionality
To reset the remote and erase TV control settings:
- Press and hold the '1' and '6' buttons simultaneously for approximately 3 seconds until the TV standby button is lit.
- Enter the sequence: 9 9 6.
- The TV settings will be deleted.
Brand Code Tables
The following pages contain extensive tables listing manufacturers (brands) and their corresponding 4-digit codes. These codes are used for programming the remote control to operate different TV sets. The tables cover a wide range of brands from A to Z, including many international and regional manufacturers. Due to the extensive nature of these tables, they are summarized here:
The tables list thousands of brand names and their associated numeric codes, essential for setting up the remote control for compatibility with various television models. Examples include brands like Acer (0028), Akai (0074), Apple (0172), Beko (0346), Daewoo (0692), Hitachi (1251), LG (1628), Panasonic (2153), Philips (2195), Samsung (2448), Sony (2679), Toshiba (3021), and many more.
These tables are crucial for users to find the correct code to enable their remote control to function with their specific television brand.