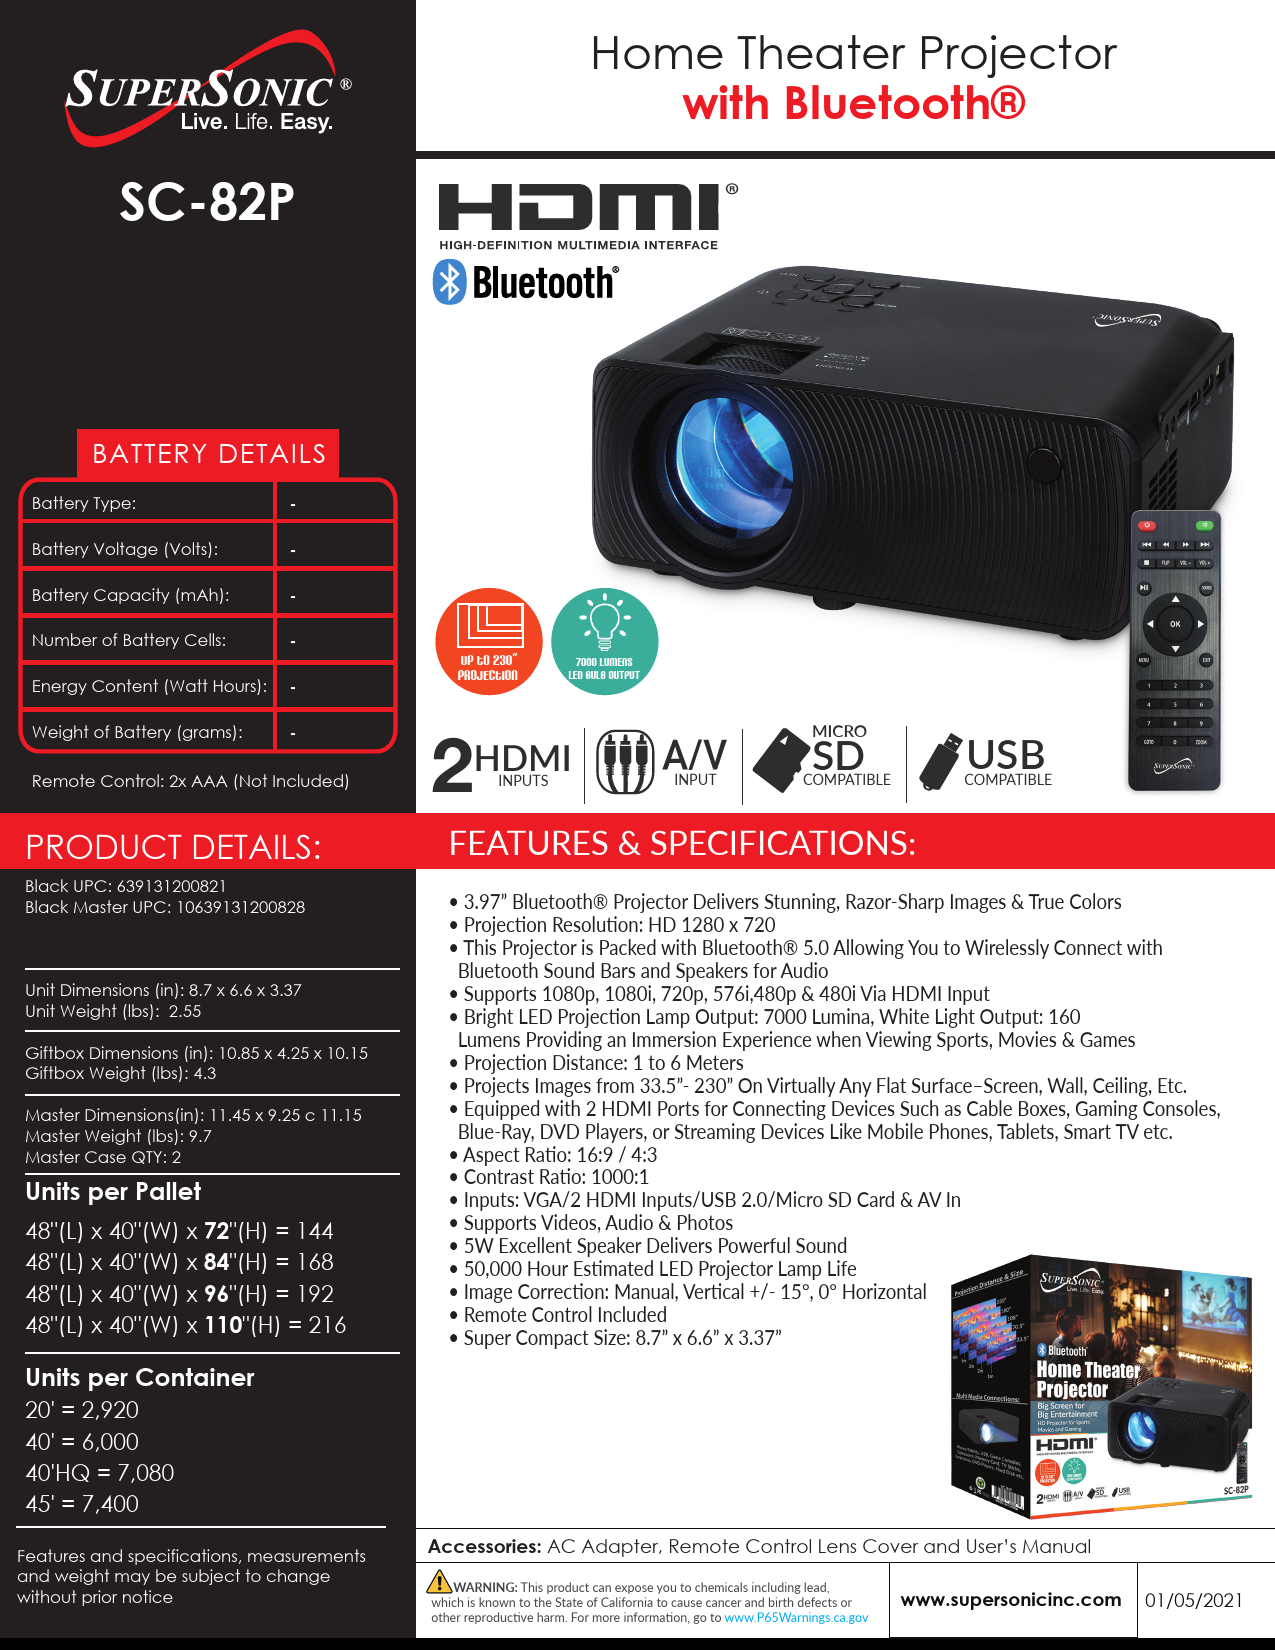
Supersonic SC-5524AIO User Manual
Live. Life. Easy.
Precautions Before Use
- Avoid obstruction of the air inlet and outlet.
- The power indicator on the bottom of the all-in-one will remain lit after the power is turned on.
- The system will start up when it is used for the first time. Do not force power off to avoid data loss or damage to the system.
Descriptions
The Supersonic SC-5524AIO All-in-One computer features the following components:
- 1. Speakers
- 2. Screen
- 3. 2.5" disk slot
- 4. HDMI
- 5. USB 2.0
- 6. DC (Power input)
- 7. Minijack 3.5mm (Audio output/input)
- 8. RJ45 (Ethernet port)
- 9. USB 3.0
- 10. USB 3.0
- 11. USB 3.0
- 12. USB 3.0
- 13. TF card (MicroSD card slot)
- 14. Reset button
- 15. Power button
- 16. Kensington lock (Security slot)
Diagrams showing the front, back, and bottom views of the device with numbered callouts are provided in the original document.
Equipment Start-up
Warning: When connecting the keyboard and mouse to the all-in-one, ensure that the computer and other equipment are in the off state. Do not switch them on.
Connect Keyboard and Mouse
Connect the keyboard and mouse to the specified keyboard and mouse interfaces on the all-in-one unit.
Diagrams illustrate connecting a keyboard and mouse to the rear ports.
Connect to Power Outlet
Plug the power cord into the equipment's power input port and the other end into a 100~240V AC outlet. Press the power button to turn on the device.
Diagrams show connecting the power adapter and plugging it into a wall socket.
Precautions
Please follow these safety precautions when using your device:
- Do not use power cords, damaged plugs, or loose plugs. Do not bend or damage the power cord. Do not touch the power cord with wet hands or pull the cord to disconnect the charger.
- Do not use the device while it is charging or touch it with wet hands.
- Do not hit or drop the charger and do not charge the battery with chargers not approved by the manufacturer.
- Do not use your device during an electrical storm. Handle and discard batteries and chargers with care.
- Do not handle damaged lithium-ion batteries or those showing leakage.
- Do not use the device near a pacemaker. If possible, avoid using it at a distance less than 15 cm, as the device can interfere with the pacemaker.
- Do not use the device in a hospital or near medical equipment that can be interfered by radio frequency. If you use medical equipment, ensure it is protected against radio frequencies. If you use a hearing aid, consult the manufacturer for information about interference.
- In potentially explosive environments, turn off the device.
- Always respect rules, instructions, and warning signs.
- Do not use the device in or near flammable chemicals refueling points (service stations) and/or explosives.
- Do not store or transport flammable liquids, gases, or explosive materials in the same compartment as the device, its parts, or accessories.
- If you want to charge the device, ensure an easily accessible power outlet is installed.
Images in this manual are for informational purposes only and may differ from the actual product.
For more information, visit http://www.supersonicinc.com/.
Introduction to Desktop and App Interface (Windows 11)
Windows 11 Startup Menu
On the start screen, you can see many application programs. Select the programs you need to open. You may need to log on to your Microsoft account for some applications to run completely.
Screenshot shows the Windows 11 Start Menu with various app icons.
Introduction to App Interface
Besides the applications already pinned to the start screen, you can also add and start other software applications.
Screenshot shows the Windows 11 Start Menu with pinned and recommended apps, and an "All apps" button.
Pinning and Unpinning Applications
To pin more applications to the start interface: Right-click the desired application icon and select "Pin to Start".
To unpin or delete an application from the start screen: Right-click the application icon and select "Unpin from Start".
Screenshots illustrate the process of pinning and unpinning apps from the Windows 11 Start Menu.
Search Menu
Use the external keyboard connected to your device. Type in the search box for Apps, Settings, Documents, photos, Music, WEB, etc.
Screenshot shows the Windows 11 search bar and results.
Basic Operations
1. Sleep, Restart, and Power Off
Access power options (Sleep, Shut down, Restart) from the Start Menu.
Screenshot shows the Windows 11 Start Menu with power options displayed.
2. Bluetooth Connect
Click the Bluetooth icon ?, then click to open Bluetooth. Navigate to Settings > Bluetooth & devices to search for and connect to other devices.
Screenshots show the quick settings panel and the Bluetooth & devices settings page in Windows 11.
3. Wi-Fi Connect
Click the Wi-Fi icon ?, choose your desired Wi-Fi network, and enter the password to connect.
Screenshots show the Wi-Fi connection panel and available networks in Windows 11.
4. Display Brightness and Power Management
Display Brightness:
There are two ways to change brightness:
A. Click the sun icon ☀️ on the taskbar to adjust brightness.
B. Navigate to Settings > System > Display > Brightness.
Screenshots show adjusting brightness via the taskbar quick settings and the System > Display settings page.
Power Management:
Configure power settings by navigating to Settings > System > Power.
Screenshot shows the Power settings page in Windows 11.
5. Add an Account
Add a Local Account:
Navigate to Settings > Accounts > Family & other users. Click "Add account" under "Add other user" and follow the prompts to create a new account.
Screenshots show the Accounts settings page and the process of adding a user.
Add a Microsoft Account:
Navigate to Settings > Accounts > Your info. Click "Sign in with a Microsoft account instead" and follow the prompts to link a Microsoft account.
Screenshots show the "Your info" settings page and the Microsoft account sign-in prompt.
6. Adjust Date and Time
Date and Time: Settings > Time & Language > Date & time. The "Set time automatically" option is enabled by default and will set the time when connected to the internet via Wi-Fi. You can change the time zone via the "time zone" option.
If you need to set the time manually, turn off the "Set time automatically" option, and the "Change" button will become active.
Region: Settings > Time & Language > Language & Region.
Screenshots show the Date & time settings and the Language & region settings in Windows 11.
Installing the 2.5" Disk
Before installing the 2.5" disk, ensure the device is powered off. Follow these steps:
- The disk should be facing up, with the R bracket at the bottom and the L bracket at the top.
- Fix the R bracket and L bracket to the lower part of the disk using four CM3 * 4 screws. Note that the bend should face upwards when fixed.
- Insert the mounted disk into the interface.
- Use two PA2.5 * 5 screws to secure the hard disk holder to the rear housing.
Initializing the Disk (First-time Use)
If the disk is used for the first time, follow these steps:
- Right-click the Start menu and select "Disk Management".
- The "Initialize Disk" window will appear. Click OK to initialize the disk. Choose between MBR or GPT partition styles; GPT is recommended for modern systems.
- Right-click the new disk and select "New Simple Volume" to follow the wizard steps for formatting and assigning a drive letter.
Screenshots illustrate the Disk Management utility, initializing a disk, and creating a new simple volume.
Connecting Another Monitor as 2nd Screen
Connect another monitor to the device via the HDMI interface. Open Settings > System > Display and select "Extend these displays". The other monitor will then function as a second screen.
Screenshot shows the Windows 11 Display settings for multiple displays.
Connecting Speakers
a. If the speaker has a 3.5 mm plug, insert it into the headphone hole.
b. If the speaker has Bluetooth, connect it to the device via Bluetooth following the steps outlined in the "Bluetooth connect" section.
Diagrams show audio ports and connection points.
Reset the PC
Navigate to Settings > System > Recovery. Click "Reset PC" and select your preferred option (Keep my files or Remove everything). Follow the on-screen instructions to complete the reset.
Screenshot shows the Windows 11 Recovery options page.
Troubleshoot
Find troubleshooting tips by navigating to Settings > System > Troubleshoot.
Screenshot shows the Windows 11 Troubleshoot settings page.
Specifications
| Item | Specification |
|---|---|
| Display | 1920x1080 VA |
| OS | Windows 11 |
| Input method | USB or Bluetooth Keyboard and mouse |
| DDR RAM | 8GB |
| Capacity | 256GB |
| External Capacity | TF-CARD, up to 128GB |
| Audio | AAC, FLAC, MP3, OGG, WAV, etc. (some need third-party software support) |
| Video | 3GP, MOV, MP4, MPG, AVI, etc. (some need third-party software support) |
| E-book | Support |
| Wireless network | Support WIFI |
| Language | English (other languages need to be downloaded from Internet) |
| OTG | Support |
| Temperature | -20°C to 60°C |
Warranty
Basic Warranty Statement
Supersonic Inc. ("Supersonic") warrants this product to the original purchaser ONLY, to be free from defects in materials and workmanship under normal use, for ninety (90) DAYS from the date of original purchase. Proof of purchase (receipt) is required.
Please visit http://www.supersonicinc.com/warranty for additional information.
FCC Statement
This equipment has been tested and found to comply with the limits for a Class B digital device, pursuant to part 15 of the FCC Rules. These limits are designed to provide reasonable protection against harmful interference in a residential installation. This equipment generates, uses, and can radiate radio frequency energy and, if not installed and used in accordance with the instructions, may cause harmful interference to radio communications. However, there is no guarantee that interference will not occur in a particular installation. If this equipment causes harmful interference to radio or television reception, which can be determined by turning the equipment off and on, the user is encouraged to try to correct the interference by one or more of the following measures:
- Reorient or relocate the receiving antenna.
- Increase the separation between the equipment and receiver.
- Connect the equipment into an outlet on a circuit different from that to which the receiver is connected.
- Consult the dealer or an experienced radio/TV technician for help.
Caution: Any changes or modifications to this device not explicitly approved by the manufacturer could void your authority to operate this equipment.
This device complies with part 15 of the FCC Rules. Operation is subject to the following two conditions: (1) this device may not cause harmful interference, and (2) this device must accept any interference received, including interference that may cause undesired operation.
RF Exposure Information
This equipment complies with FCC radiation exposure limits set forth for an uncontrolled environment. This equipment should be installed and operated with a minimum distance of 20cm between the radiator and your body.