LUMENS OIP-N40E AVoIP Encoder AVoIP Decoder

Specifications
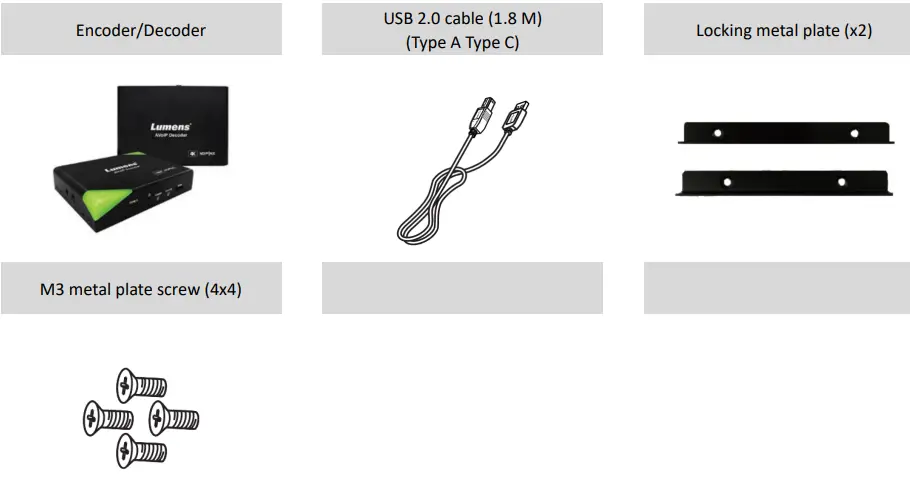
- Model: OIP-N40E / OIP-N60D
- Type: AVoIP Encoder/AVoIP Decoder
- Interface: USB 2.0, HDMI, Virtual USB Network Camera
- Recommended Cable: USB-C with 10Gbps transmission speed or higher
Product Usage Instructions
I/O Interface
OIP-N40E and OIP-N60D support USB-C cables with a transmission speed of 10Gbps or higher.
Product Installation
- Use the provided locking metal plates and screws to secure the encoder/decoder.
- Attach the metal plates to the sides of the encoder/decoder using the screws.
- Install the encoder/decoder on a stable surface like a table.
Operate through the body button
Follow the instructions in the user manual to operate the device using the physical buttons on the body.
Operate via webpages
Access the device’s web interface to control and configure settings remotely.
Product Application and Connection
Refer to specific sections for HDMI Signal Source Transmission Network, Virtual USB Network Camera, and USB Network Camera Extension applications.
[Important] To download the latest version of Quick Start Guide, multilingual user manual, software, or driver, etc., please visit Lumens https://www.MyLumens.com/support
Package Contents
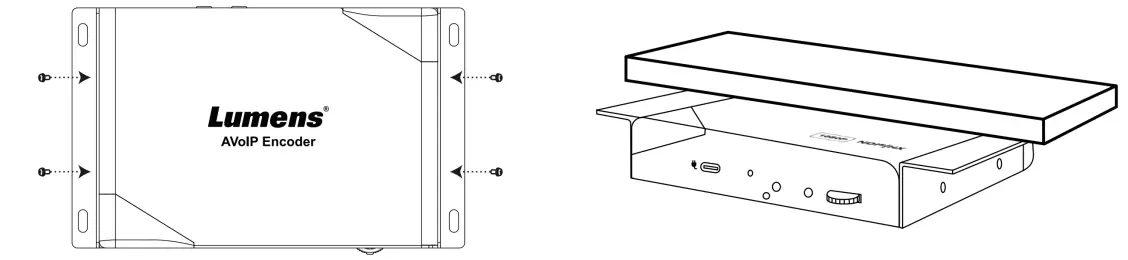
Product Installation
I/O Interface

USB-C cables are recommended to have a transmission speed specification of 10Gbps or higher
Product Installation
- Using the accessory metal plates
- Lock the accessory metal plate with screws (M3 x 4) to the lock holes on both sides of the encoder/decoder
- Install the metal plate and encoder on the table or cabinet according to the spatial area
- Use tripod
The camera can be mounted on a 1/4”-20 UNC PTZ tripod deck by using the lock holes on the side for the tripod of the encoder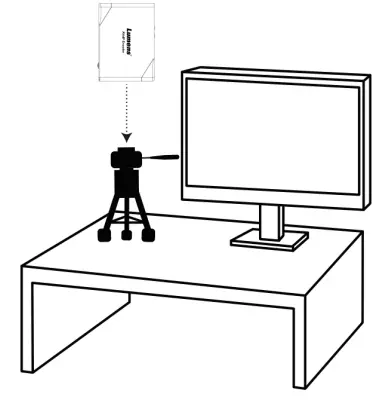
Description of Indicator Display
| Power Status | Tally Status | Power | Standby | Tally |
| Startup in progress (initialization) | – | Red light | – | Flickering Red/Green light |
|
In use |
Signal |
Red light |
Green light |
– |
| No Signal | – | |||
| Preview | Green light | |||
| Program | Red light |
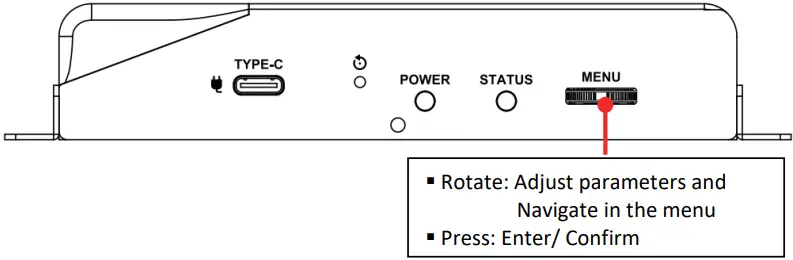
Product Operation
Operate through the body button
Connect the HDMI OUT to the display, press the Menu dial to enter the OSD menu. Through the Menu dial to navigate the menu and adjust the parameters
Operate via webpages
- Confirm the IP address
Refer to 3.1 Operate through the body button, confirm the IP address in Status (If the encoder is directly connected to the computer, the default IP is 192.168.100.100. You need to manually set the computer’s IP address in the same network segment.)
- Open the browser and input the IP address, e.g. 192.168.4.147, to access the login interface.

- Please enter the account/password to log in
Product Application and Connection
HDMI Signal Source Transmission Network (For OIP-N40E)
OIP-N40E can transmit HDMI signal source to IP devices
- Connection Method
- Connect the signal source device to the encoder’s HDMI or USB-C input port using HDMI or USB-C monitor transmission cable
- Connect the encoder and computer to the network switch using network cable
- Connect the encoder HDMI OUT to the display using HDMI cable
- Connect the HDMI signal source to the encoder HDMI IN, which can capture and synchronize the signal source to the display (Pass-through)

- Webpage Settings
[Stream] > [Source] to select the output signal > [Stream Type] > [Apply] - Streaming Output
Open streaming media platforms such as VLC, OBS, NDI Studio Monitor, etc., for streaming output
Virtual USB Network Camera (For OIP-N60D)
OIP-N60D can convert IP signal source into USB (UVC) for seamless integration with video conferencing platforms.
- Connection Method
- Connect the decoder to LAN
- Connect the computer to the decoder using USB-C 3.0 cable
- Webpage Settings
- [System] > [Output], open Virtual USB Setting
- [Source] > [Search new Source] > Select the desired output device > Click [Play] to output device signal source
- USB Camera Screen Output
- Launch a video software like Skype, Zoom, Microsoft Teams, or other similar software
- Choose the video source, to output USB network camera images
Source Name: Lumens OIP-N60D Decoder
USB Network Camera Extension (OIP-N40E/OIP-N60D required)
When used with the OIP-N encoder and decoder, it can extend the range of USB cameras through the network to improve installation flexibility.
- Connection Method
- Connect the OIP-N encoder/decoder to the local network
- Connect the USB camera to the decoder using USB-A cable
- Connect the monitor to the decoder using HDMI cable
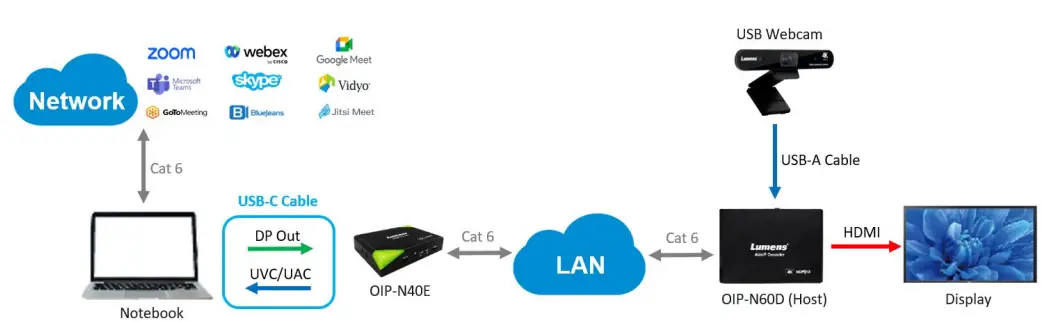 Connect the computer to the encoder using USB-C monitor transmission cable
Note- Computers can use USB-C to connect to encoder and use USB network camera
- Computers can project images onto a TV through a USB-C connection to encoder
- OIP-N60D Webpage Settings
[System] > [Output], open USB Extender - OIP-N40E Webpage Settings
- [System] > [Output] > Extender Source List
- [Search new Source] > Click [Available] to select the OIP-N60D decoder > Connection displays Connected
- USB Camera Screen Output
- Launch a video software like Skype, Zoom, Microsoft Teams, or other similar software
- Choose the video source, to output USB camera images
Source Name: Select according to the USB Camera ID
Setting Menu
Through body button [Menu] to enter the setting menu; the bold underlined values in the following table are defaults.
OIP-N40E
| 1st Level
Major Items |
2nd Level
Minor Items |
3rd Level
Adjustment Values |
Function Descriptions |
| Encode | Stream Type | NDI/ SRT/ RTMP/ RTMPS/ HLS/ MPEG-TS over UDP/ RTSP | Select the stream type |
| Input | HDMI-in From | HDMI/ USB | Select the HDMI-in source |
|
Network |
IP Mode | Static/ DHCP/ Auto | Dynamic Host Configuration |
| IP Address | 192.168.100.100 |
Configurable when set to Static |
|
| Subnet mask (Netmask) | 255.255.255.0 | ||
| Gateway | 192.168.100.254 | ||
| Status | – | – | Display the current machine status |
OIP-N60D
| 1st Level
Major Items |
2nd Level
Minor Items |
3rd Level
Adjustment Values |
Function Descriptions |
|
Source |
Source List | – | Display the signal source list |
| Blank Screen | – | Display black screen | |
| Scan | – | Update the signal source list | |
|
Output |
HDMI Audio From | Off/ AUX/ HDMI | Select the HDMI audio source |
| Audio Out From | Off/ AUX/ HDMI | Select where audio outputs | |
|
HDMI Output |
By Pass
Native EDID 4K@60/ 59.94/ 50/ 30/ 29.97/ 25 1080p@60/ 59.94/ 50/ 30/ 29.97/ 25 720p@60/ 59.94/ 50/ 30/ 29.97/ 25 |
Select the HDMI output resolution |
|
|
Network |
IP Mode | Static/ DHCP/ Auto | Dynamic Host Configuration |
| IP Address | 192.168.100.200 |
Configurable when set to Static |
|
| Subnet mask (Netmask) | 255.255.255.0 | ||
| Gateway | 192.168.100.254 | ||
| Status | Display the current machine status |
Webpage Interface
Connecting to Internet
Two common connection methods are shown below
- Connecting via switch or router
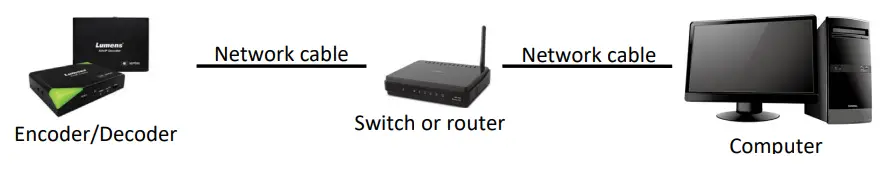
- To connect directly through network cable, the IP address of the keyboard/computer should be changed and set as the same network segment

Log in to the webpage
- Open the browser, and enter the URL of OIP-N in the IP address bar E.g.: http://192.168.4.147
- Enter administrator’s account and password
For a first-time login, please refer to 6.1.10 System- User to change the default password
Webpage Menu Description
Dashboard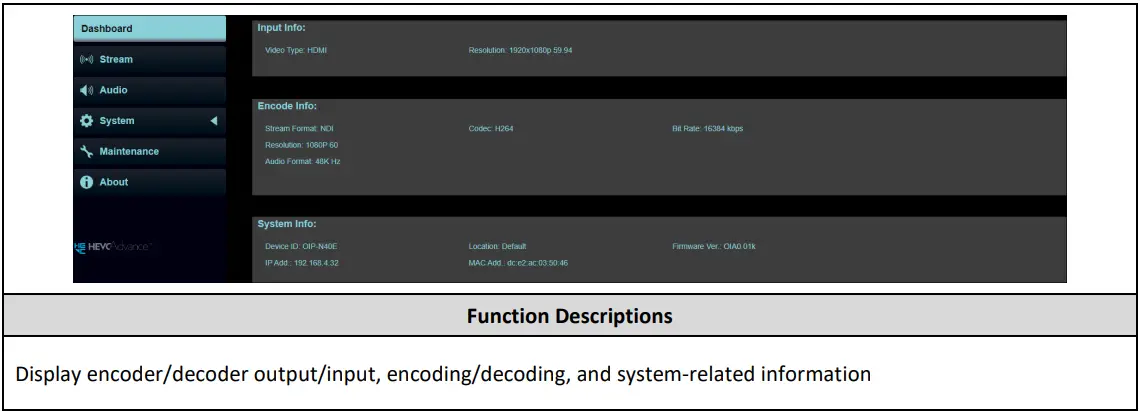
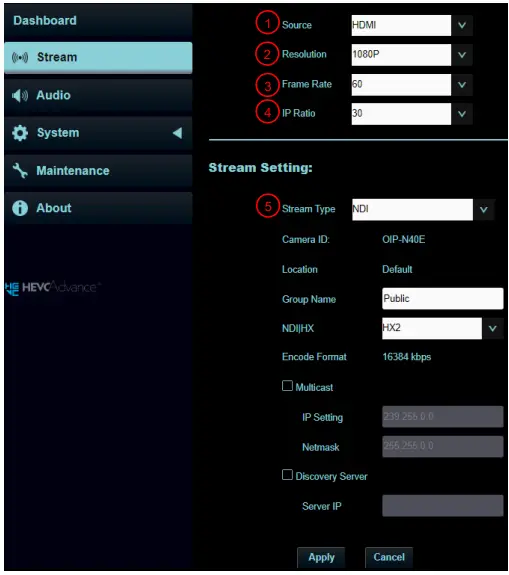
Stream (Applicable to OIP-N40E)
|
||
| No | Item | Description |
| 1 | Source | Choose the signal source |
| 2 | Resolution | Set output resolution |
| 3 | Frame Rate | Set frame rate |
| 4 | IP Ratio | Set IP Ratio |
| 5 | Stream Type | Select the stream type and make relevant settings based on the stream type |
| 6 | NDI | § Camera ID/Location: Name/Location display according to System Output settings |
| § Group Name: The group name can be modified here and set with Access Manager – Receive in NDI Tool
§ NDI|HX: HX2/HX3 is supported § Multicast: Enable/Disable Multicast It is suggested to enable Multicast when the number of users online watching the live image simultaneously is more than 4 § Discovery Server: Discovery service. Check to enter the Server IP address |
||
|
6.1 |
RTSP/ RTSPS |
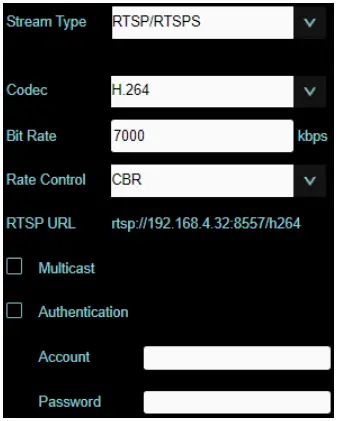 § Code (Encode Format): H.264/HEVC § Bit Rate: Setting range 2,000 ~ 20,000 kbps § Rate Control: CBR/VBR § Multicast: Enable/Disable Multicast It is suggested to enable Multicast when the number of users online watching the live image simultaneously is more than 4 § Authentication: Enable/Disable Username/Password Authentication The username/password is the same as the webpage login password, please refer to 6.1.10 System- User to add/modify account information |
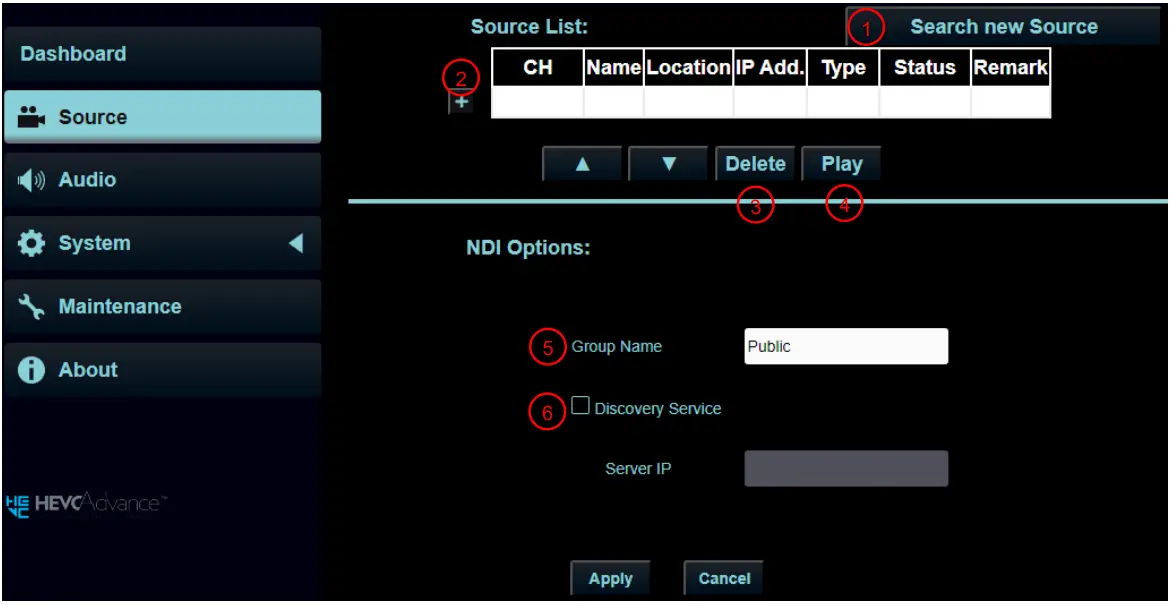
Stream (Applicable to OIP-N60D)
|
|
||
| No | Item | Description |
| 1 | Search New Source | Click to search for devices in the same network segment and display them in a list |
| 2 | +Add | Manual adding device |
| 3 | Delete | Check the device, click to delete |
| 4 | Play | Check the device, click to play |
| 5 | Group Name | The group name can be modified here and set with Access Manager – Receive in NDI Tool |
| 6 | Server IP | Discovery service. Check to enter the Server IP address |
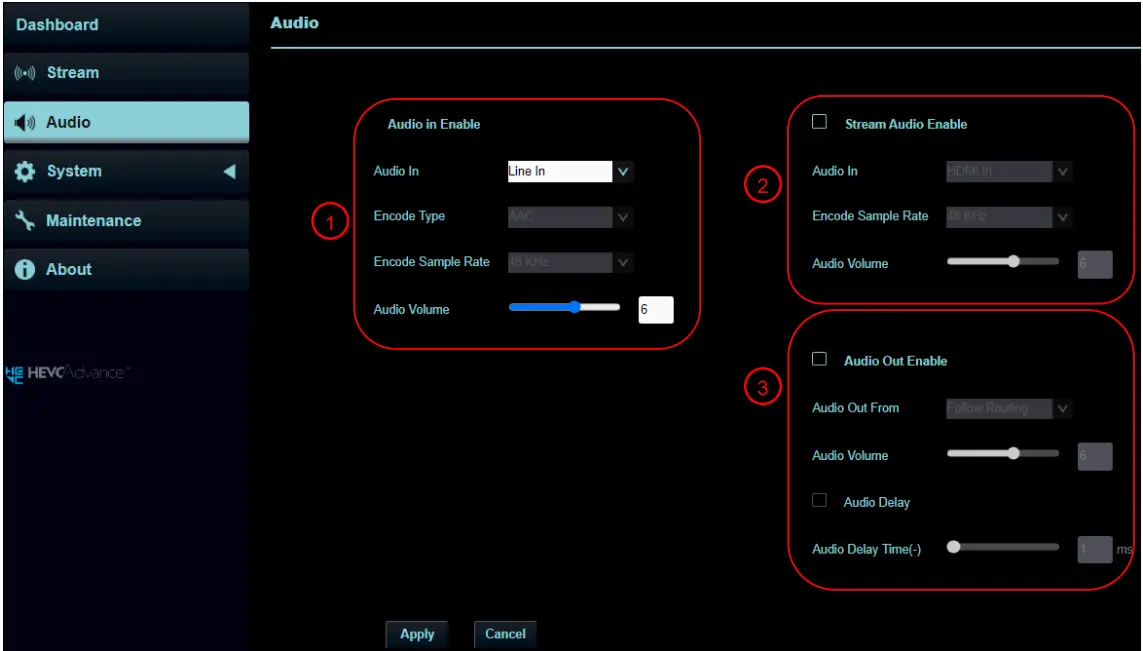
Audio (Applicable to OIP-N40E)
 |
||
| No | Item | Description |
| 1 | Audio In Enable | § Audio In: Enable/disable audio |
| § Encode Type: Encode Type AAC
§ Encode Sample Rate: Set Encode sample rate § Audio Volume: Volume adjustment |
||
|
2 |
Stream Audio Enable |
§ Audio In: Enable/disable audio
§ Encode Sample Rate: Set Encode sample rate § Audio Volume: Volume adjustment |
|
3 |
Audio Out Enable |
§ Audio Out From
§ Audio Volume: Volume adjustment § Audio Delay: Enable/disable Audio Delay, set the audio delay time (-1 ~ -500 ms) after enabling |
Audio (Applicable to OIP-N60D)
 |
||
| No | Item | Description |
|
1 |
Audio In Enable |
§ Audio In: Enable/disable audio
§ Encode Type: Encode Type AAC § Encode Sample Rate: Set Encode sample rate § Audio Volume: Volume adjustment |
|
2 |
HDMI Audio Out Enable |
§ Audio Out From: Audio output source
§ Audio Volume: Volume adjustment § Audio Delay: Enable/disable Audio Delay, set the audio delay time (-1 ~ -500 ms) after enabling |
|
3 |
Audio Out Enable |
§ Audio Out From: Audio output source
§ Audio Volume: Volume adjustment § Audio Delay: Enable/disable Audio Delay, set the audio delay time (-1 ~ -500 ms) after enabling |
System- Output (Applicable to OIP-N40E)
 |
||
| No | Item | Description |
|
1 |
Device ID/ Location |
Device Name/Location
§ The name is limited to 1 – 12 characters § The location is limited to 1 – 11 characters § Please use uppercase and lowercase letters or numbers for characters. Special symbols such as “/” and “space” cannot be used Modifying this field will modify the Onvif device name/location synchronously |
|
2 |
Display Overlay |
Set the stream to display “date and time” or “custom content” and to display
location |
| 3 | Extender Source List | Display the extendable signal source device |
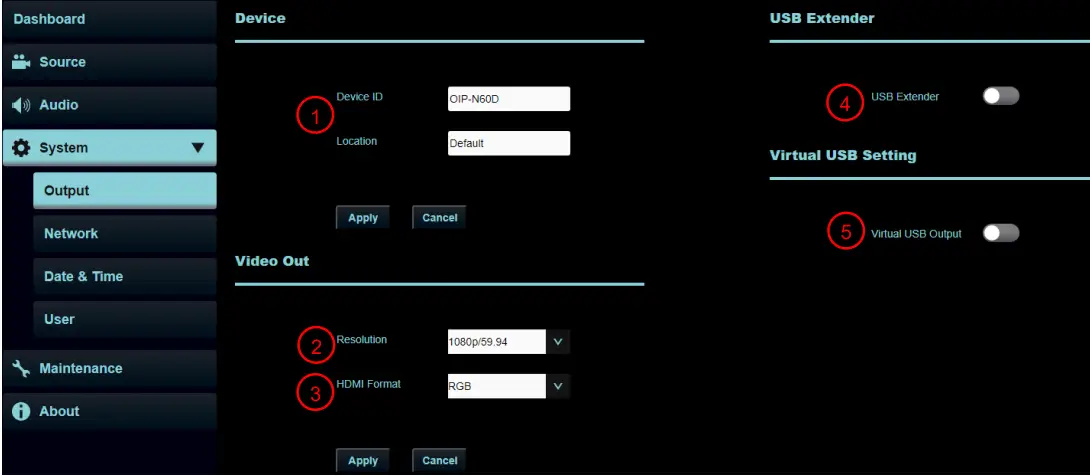
System- Output (Applicable to OIP-N60D)
 |
||
| No | Item | Description |
|
1 |
Device ID/ Location |
Device Name/Location
§ The name is limited to 1 – 12 characters § The location is limited to 1 – 11 characters § Please use uppercase and lowercase letters or numbers for characters. Special symbols such as “/” and “space” cannot be used Modifying this field will modify the Onvif device name/location synchronously |
| 2 | Resolution | Set output resolution |
| 3 | HDMI Format | Set HDMI format to YUV422/YUV420/RGB |
| 4 | USB Extender | Turn on/off the USB network camera extension |
| 5 | Virtual USB output | Turn on/off virtual USB network camera output |
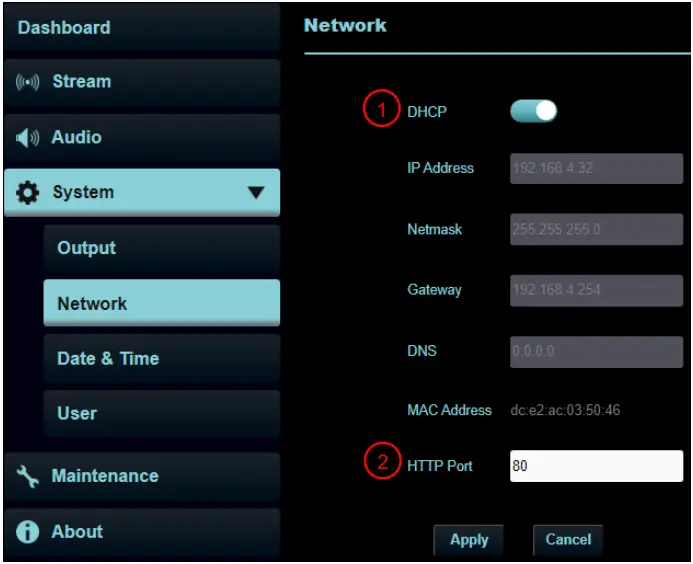
System- Network
 |
||
| No | Item | Description |
| 1 | DHCP | Ethernet setting for encoder/decoder. Change of setting is available when DHCP |
| function is closed | ||
| 2 | HTTP Port | Set HTTP port. The default Port value is 80 |
System- Date & Time
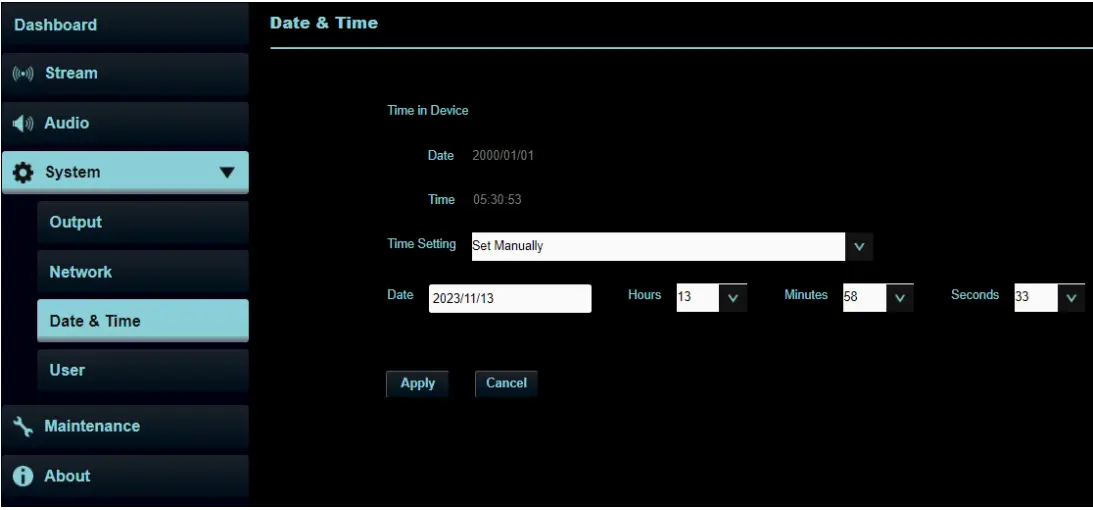 |
| Function Descriptions |
| Display the current device/computer date and time, and set the display format and synchronization way
When Manually Set is selected for [Time Settings], Date & Time can be customized |
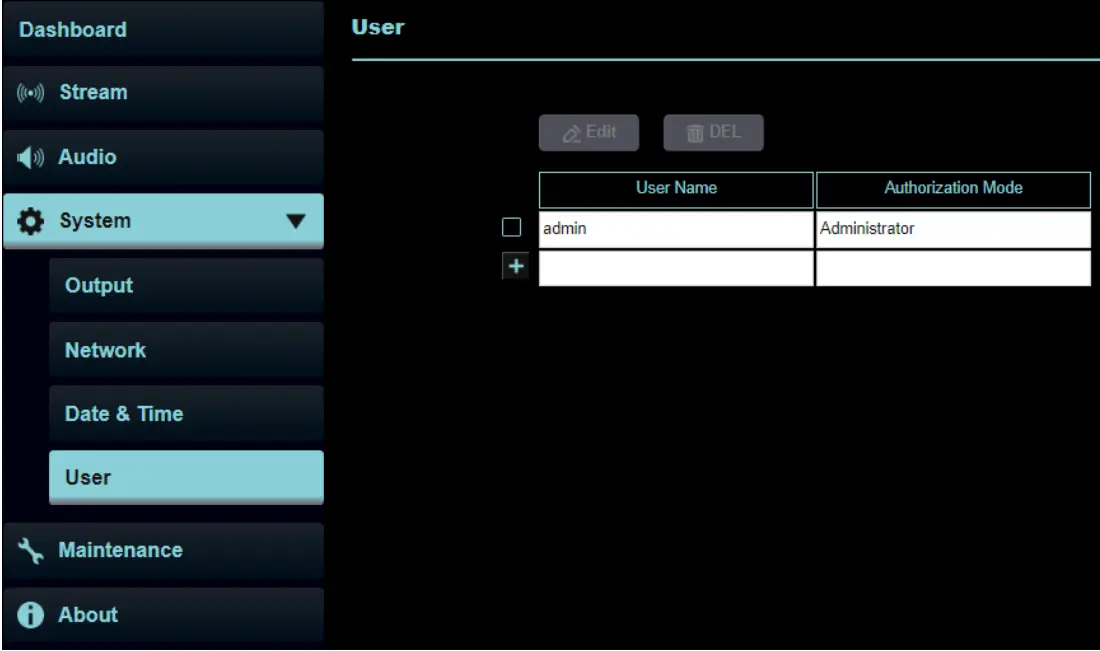
System- User
 |
||||
| Function Descriptions | ||||
| Add/Modify/Delete user account
n Supporting 4 – 32 characters for user name and password n Please mix uppercase and lowercase letters or numbers for characters. Special symbols or the underlined cannot be used n Authentication Mode: Set the new account management permissions |
||||
| User Type | Admin | Viewer | ||
| View | V | V | ||
| Setting/Account
management |
V | X | ||
| ※When Factory Reset is executed, it will clear the user’s data | ||||
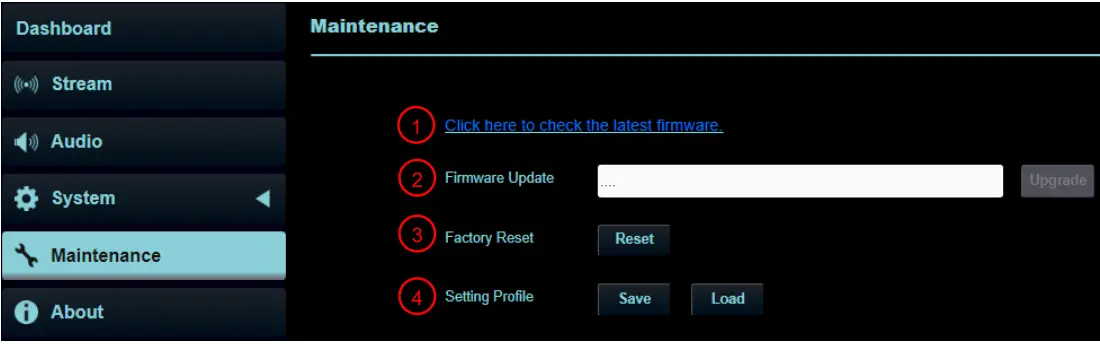
Maintenance
 |
||
| No | Item | Description |
|
1 |
Firmware link |
Click on the link to the Lumens website and enter the model to obtain the latest
firmware version information |
|
2 |
Firmware Update |
Select the firmware file, and click [Upgrade] to update the firmware Update takes about 2 – 3 minutes
Please do not operate or turn off the power of the device during the update to avoid firmware update failure |
| 3 | Factory Reset | Reset all configurations to factory default settings |
| 4 | Setting Profile | Save setup parameters, and users can download and upload device setup parameters |
About
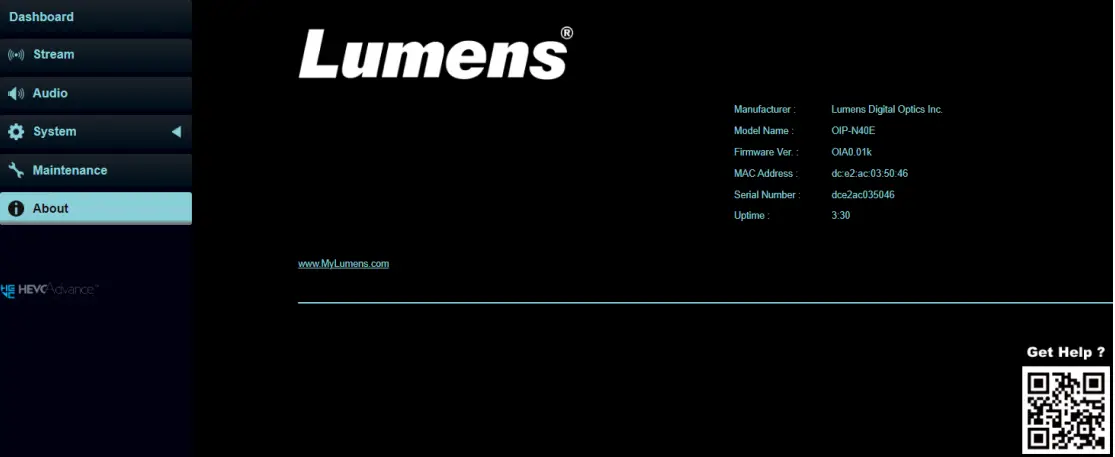 |
| Function Descriptions |
| Display the firmware version, serial number, and other related information of the encoder/decoder
For technical support, please scan the QR Code at the bottom right for assistance |
Troubleshooting
This chapter describes problems you may encounter while using OIP- OIP-N. If you have questions, please refer to related chapters and follow all the suggested solutions. If the problem still occurred, please contact your distributor or the service center.
| No. | Problems | Solutions |
|
1. |
OIP-N40E cannot display the signal source screen |
1. Confirm that the cables are fully connected. Please refer to Chapter 4, Product Application and Connection
2. Confirm that the input signal source resolution is 1080p or 720p 3. Confirm that USB-C cables are recommended to use specifications with a transmission rate of 10Gbps or higher |
|
2. |
OIP-N40E webpage USB extender cannot find OIP-N60D on the same
network segment |
1. Confirm that the OIP-N60D has enabled the USB extender function
2. Confirm that the management switch in the network has disabled the blocking of multicast packets |
|
3. |
Recommended specifications for USB-C cables |
Transfer rate of 10 Gbps or higher |
Safety Instructions
Always follow these safety instructions when setting up and using the product:
- Operation
- Please use the product in the recommended operating environment, away from water or source of heat.
- Do not place the product on a tilted or unstable trolley, stand or table.
- Please clean the dust on the power plug prior to usage. Do not insert the product’s power plug into a multiplug to prevent sparks or a fire.
- Do not block the slots and openings in the case of the product. They provide ventilation and prevent the product from overheating.
- Do not open or remove covers, otherwise it may expose you to dangerous voltages and other hazards. Refer all servicing to licensed service personnel.
- Unplug the product from the wall outlet and refer servicing to licensed service personnel when the following situations happen:
- If the power cords are damaged or frayed.
- If liquid is spilled into the product or the product has been exposed to rain or water.
- Installation
- For security considerations, please make sure the standard mount you use is in line with UL or CE safety approbations and installed by technician personnel approved by agents.
- Storage
- Do not place the product where the cord can be stepped on as this may result in fraying or damage to the lead or the plug.
- Unplug this product during thunderstorms or if it is not going to be used for an extended period.
- Do not place this product or accessories on top of vibrating equipment or heated objects.
- Cleaning
- Disconnect all the cables prior to cleaning and wipe the surface with a dry cloth. Do not use alcohol or volatile solvents for cleaning.
- Batteries (for products or accessories with batteries)
- When replacing batteries, please only use similar or the same type of batteries
- When disposing of batteries or products, please adhere to the relevant instructions in your country or region for disposing of batteries or products
Precautions
 This symbol indicates that this equipment may contain dangerous voltage which could cause electric shock. Do not remove the cover (or back). No user-serviceable parts inside. Refer servicing to licensed service personnel.
 This symbol indicates that there are important operating and maintenance instructions in this User Manual with this unit.
FCC Warning
This equipment has been tested and found to comply with the limits for a Class B digital device, pursuant to part 15 of the FCC Rules. These limits are designed to provide reasonable protection against harmful interference in a residential installation. This equipment generates, uses and can radiate radio frequency energy and, if not installed and used in accordance with the instructions, may cause harmful interference to radio communications. However, there is no guarantee that interference will not occur in a particular installation. If this equipment does cause harmful interference to radio or television reception, which can be determined by turning the equipment off and on, the user is encouraged to try to correct the interference by one or more of the following measures:
- Reorient or relocate the receiving antenna.
- Increase the separation between the equipment and receiver.
- Connect the equipment into an outlet on a circuit different from that to which the receiver is connected.
- Consult the dealer or an experienced radio/TV technician for help.
Notice :
- The changes or modifications not expressly approved by the party responsible for compliance could void the user’s authority to operate the equipment.
- This equipment has been tested and found to comply with the limits for a Class B digital device, pursuant to part 15 of the FCC Rules. These limits are to provide reasonable protection from harmful interference in residential installations.
IC Warning
This digital apparatus does not exceed the Class B limits for radio noise emissions from digital apparatus as set out in the interference-causing equipment standard entitled “Digital Apparatus,” ICES-003 of Industry Canada.
Copyright Information
- Copyrights © Lumens Digital Optics Inc. All rights reserved.
- Lumens is a trademark that is currently being registered by Lumens Digital Optics Inc.
- Copying, reproducing or transmitting this file is not allowed if a license is not provided by Lumens Digital Optics Inc. unless copying this file is for the purpose of backup after purchasing this product.
- In order to keep improving the product, the information in this file is subject to change without prior notice.
- To fully explain or describe how this product should be used, this manual may refer to names of other products or companies without any intention of infringement.
- Disclaimer of warranties: Lumens Digital Optics Inc. is neither responsible for any possible technological, editorial errors or omissions, nor responsible for any incidental or related damages arising from providing this file, using, or operating this product.
FAQ
Q: Where can I download additional resources for the product?
A: To download the latest version of the Quick Start Guide, multilingual user manual, software, or drivers, please visit Lumens at https://www.MyLumens.com/support.
Documents / Resources
 |
LUMENS OIP-N40E AVoIP Encoder AVoIP Decoder [pdf] User Manual OIP-N40E, OIP-N60D, OIP-N40E AVoIP Encoder AVoIP Decoder, OIP-N40E, AVoIP Encoder AVoIP Decoder, AVoIP Decoder, Decoder |