CONTROL by WEB X-410W Web Enabled Programmable Controller
Basic Setup Steps
- Power the module and connect via ethernet to a computer.
- Set IP address on computer to the same network as module.
(Ex: 192.168.1.50) Note: restore computer settings after setup. - To configure module, open web browser and enter: http://192.168.1.2/setup.html
- In General Settings under WiFi, enter the WiFi settings.
- Assign the module a permanent IP address or enable DHCP.
- Restart the module for the settings to take effect.
Factory Default Settings
- IP Address: 192.168.1.2
- Subnet Mask: 255.255.255.0
- Control Page Web Address: http://192.168.1.2
- Control Password: (no password set)
- Setup Page Web Address: http://192.168.1.2/setup.html
- Setup Username: admin
- Setup Password: web relay (all lower case)
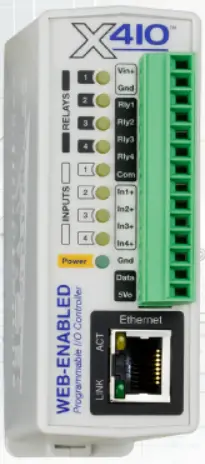
Pinout Diagram

www.ControlByWeb.com
1681 West 2960 South, Nibley, UT 84321, USA
Documents / Resources
 |
CONTROL by WEB X-410W Web Enabled Programmable Controller [pdf] User Guide X-410W Web Enabled Programmable Controller, X-410W, Web Enabled Programmable Controller, Enabled Programmable Controller, Programmable Controller, Controller |