Two Notes Reload II Multi Impedance Reactive Load Box
Specifications
- Max Power: 200W RMS
- Impedance Matching: AMP IMPEDANCE setting on Reload II must match amplifier’s speaker output impedance
- Connections: Speaker Cable for AMP IN and CAB OUT A/B; Instrument Cable not recommended
- Compatibility: Traditional guitar or bass cabinets for CAB OUT A/B; Active speakers for LINE OUT A/B XLR ports
Product Usage Instructions
Warnings & Setup Considerations
- Always ensure the impedance rating of your amplifier’s speaker output is matched to the AMP IMPEDANCE setting on Reload II; failure to ensure a correct match may result in irreversible damage to your amplifier or loadbox.
- Always connect the speaker out of your tube amplifier to an appropriate load (speaker cabinet or loadbox). Reload II, once powered, is such a load. Always power on Reload II before your amplifier. The maximum admissible power of Reload II is 200W RMS.
- Always use a Speaker Cable for connections between the amplifier’s speaker out and Reload II’s AMP IN. Always use a Speaker Cable for connections between Reload II’s CAB OUT A/B outputs and any connected cabinets. Using an Instrument Cable instead of a Speaker Cable can cause significant damage to your amplifier or Reload II, ultimately requiring service by a qualified technician. If unsure about the classification of your cabling, please seek advice from a qualified specialist.
- Only connect traditional guitar or bass cabinets to Reload II’s CAB OUT A/B connectors; for active speaker connections please use Reload II’s LINE OUT A/B XLR ports.
- Setting your amplifier’s master volume to maximum may result in irreversible damage to your amplifier or loadbox. The fact that the volume control of your amplifier is not set at maximum does not mean your amplifier is not running at maximum volume – as such, we advise setting the output of the companion amplifier to a volume configuration you would use in a rehearsal or on stage.
- The correct use of an amplifier with a loadbox requires a degree of precaution. When testing the amplifier at high volume, monitor the color of the tubes and the general state of the amplifier. Red-glowing tubes or any appearance of smoke are signs of a problem that may result in partial or complete destruction of the amplifier.
- When playing an amplifier connected to Reload II at high volume, you may hear some noise stemming from Reload II. This is perfectly normal. This sound is produced when power from the amplifier transmits through the coil of the reactive load embedded in the Torpedo Reload II.
- Reload II’s CLIP indicators on CHANNEL A or CHANNEL B light up red whenever the signal is too strong at the related CAB output. If present, please lower the volume with the corresponding CAB knob.
Introduction
- Multi-Impedance Reactive Load Box & Active Attenuator
- Introducing Torpedo Reload II. The latest instalment in Two notes’ class-leading reactive load solution legacy marking the definitive watershed in contemporary backline control.
- Featuring twin-channel operation, selectable multi-impedance compatibility and true continuous attenuation, Reload II is our most advanced Load Box to date. Its mission is simple: unleash the power of any amplifier or line-level source without compromise.
- Armed with a ground-up rework of our defining reactive load for a Celestion® Approved Load Response, the match is set to drive any amp’s power-stage (rated up-to 200W RMS) to perfection, retaining all the sonic integrity your performance demands.
- Scalable from a whisper to a full-throttle onslaught, Reload II’s ultra-transparent dual-mono 215W (per channel) amplifier/attenuator and paired speaker outputs preserve every facet of your tone.
- Add a Stereo FX Loop, twin DI outputs and GENOME Reload II Edition (software download) into the mix and Reload II doesn’t just enhance your rig, it redefines it.
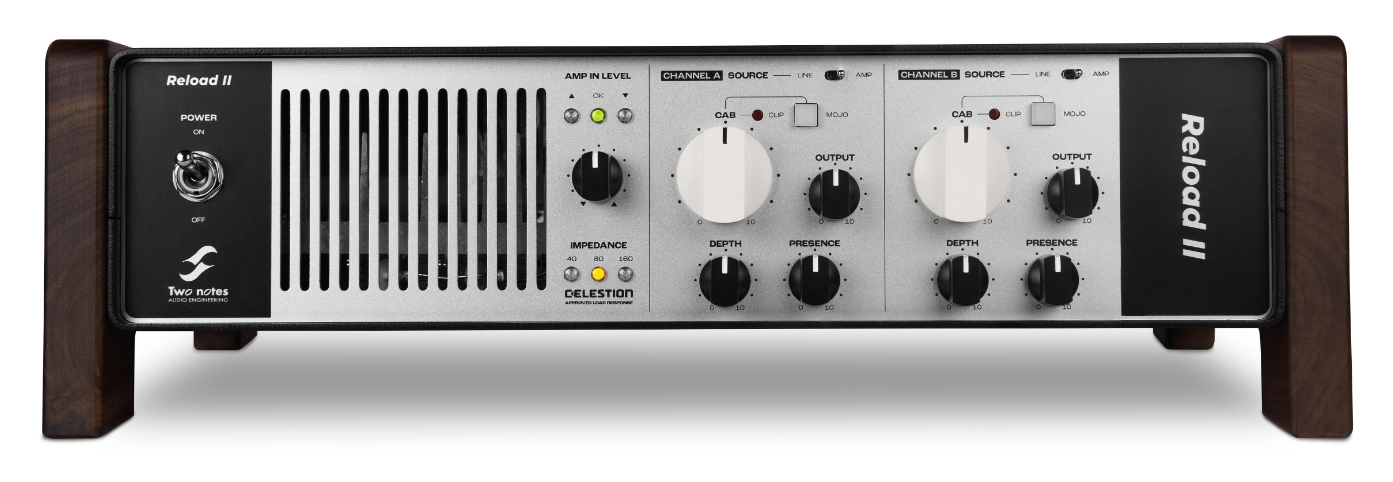
Front Panel Controls
- POWER ON/OFF Switch to power-on or power-off Reload II; the unit is operational when the impedance indicator LED is illuminated.
- AMP IN LEVEL (Knob & Indicator) Set the level of the connected amplifier (only) using the AMP IN LEVEL knob; optimise your signal in accordance with the LED indicators, ensuring the source level is set to “OK”.
- IMPEDANCE (Indicator) Highlights the impedance rating of Reload II’s Reactive Load, set via the AMP IMPEDANCE parameter (20) on the reverse of the device.
- CHANNEL SOURCE Use the independent switches on CHANNEL A or CHANNEL B to configure the input source (AMP or LINE) for the related CHANNEL.
- CAB Independent controls for both CHANNEL A or CHANNEL B set the cabinet output volume level for any cabinet connected to the CAB OUT outputs (21).
- CLIP (Indicator) Indicates whether Reload II’s Dual-Mono 215W per-channel power amplifier is clipping for either CHANNEL A or CHANNEL B.
- OUTPUT Independent knobs on CHANNEL A or CHANNEL B to set the LINE OUT (12) level for the related CHANNEL.
- DEPTH Emphasises the low-end frequency content of the source audio for the related CHANNEL.
- PRESENCE Emphasises the high-end frequency content of the source audio for the related CHANNEL.
- MOJO Engage to deliver high-power feel, even at low volume for the related CHANNEL’s CAB Output only
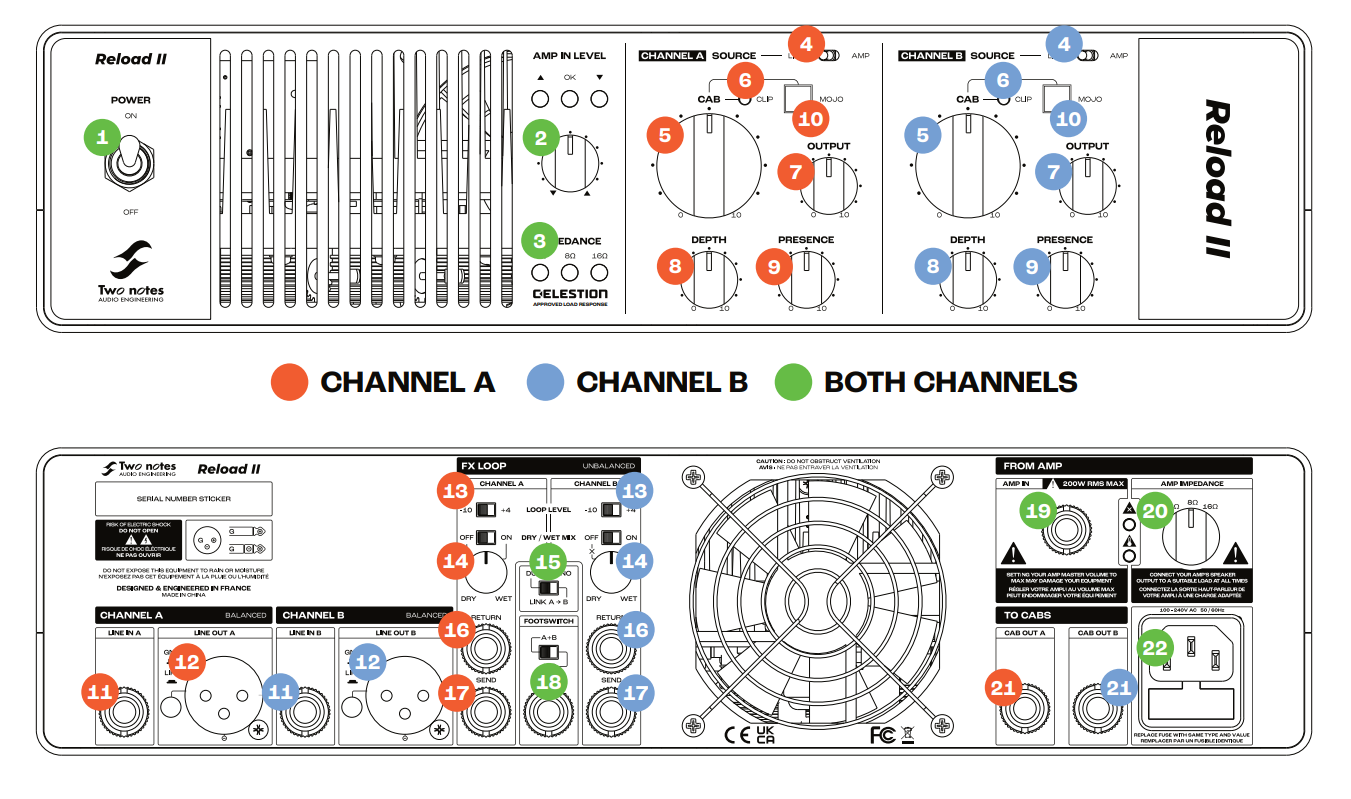
Rear Panel Controls & Connectors - LINE IN Connect ¼-inch TS or TRS Line Level sources (including Preamps, Modellers, Amp Sims andmore) to either LINE IN A and/or LINE IN B to feed CHANNEL A or CHANNEL B respectively.
- LINE OUT Connect the XLR LINE OUT A or LINE OUT B to interfaces, mixers or similar to send a balanced feed of the selected CHANNEL SOURCE (4) for CHANNEL A and CHANNEL B respectively.
- LOOP LEVEL Independent switches for CHANNEL A’s and CHANNEL B’s FX LOOP offering -10dBV or +4dBu operation.
Top Tip Use the +4dBu option for line level FX devices; use the -10dBV option for guitar level devices (i.e. pedal format delays). - DRY WET MIX (Knob & Switch) Configure whether DRY/WET MIX operation is active per CHANNEL using the independent ON/OFF switches; adjust the balance between the DRY SOURCE signal and effectedWET signal using the DRY/WET knob for either CHANNEL A or CHANNEL B.
- DUAL MONO / LINK A>B Use this selector to determine the RETURN routing behaviour of Reload II’s FX Loop; In DUAL MONO mode, each RETURN is configured independently in mono, feeding the respective CHANNEL corresponding to the RETURN; In LINK A>B MODE, the signal connected to RETURN A is replicated on RETURN B, irrespective of any source connected to RETURN B.
- SEND Low impedance FX SEND (¼-inch TS jack) for use with external effects processors including PEDALS, Multi FX Devices or similar.
- RETURN High impedance FX RETURN (¼-inch TS jack) for receipt of signals from the outputs of FX PEDALS, Multi FX Devices or similar.
- FOOTSWITCH A+B / A/B Set the behaviour of Reload II’s Footswitch input in line with either TS or TRS equipped footswitches:
- A/B Select for use with a TRS footswitch. Here, the switch connected to “Tip” will control the On/Off state of CHANNEL A and the switch connected to “Ring” will control the On/Off state of Channel B.
- A+B Select for use with a TS footswitch. Here the Switch connected to “Tip” will control the On/Off state of both CHANNELS.
- AMP IN Connect your Amplifier’s Speaker Output to this input; ensure a Speaker Cable is used for this connection and Reload II’s AMP IMPEDANCE (20) Selector is set to the correct impedance rating for your amplifier’s output.
- AMP IMPEDANCE Use this selector to match the impedance of your amplifier to the internal load in Reload II.
- CAB OUT Use these outputs to send source signals assigned to CHANNEL A or CHANNEL B to traditional guitar/bass cabinets
Top Tip Connect any cabinet with an impedance rating above 4Ω regardless of Reload II’s internal load impedance. - POWER SUPPLY Connect Reload II’s supplied power cable to this connector.
Connecting Amplifier and Cabinets
Connect your amplifier’s speaker out to Reload II’s AMP IN using a Speaker Cable. Connect traditional guitar or bass cabinets to CAB OUT A/B. For active speakers, use LINE OUT A/B XLR ports.
Amplifier Monitoring
Monitor your amplifier when testing at high volume. Check for red-glowing tubes or smoke, which indicate potential issues. Adjust the output volume of the companion amplifier to a suitable level for rehearsal or stage use.
Noise and Indicators
Noise from Reload II when playing at high volume is normal. The CLIP indicators on CHANNEL A or CHANNEL B light up red if the signal is too strong – lower volume using the corresponding CAB knob.
Register your Unit register.two-notes.com

Reload II User Guide reloadmanual.two-notes.com

FAQs
Q: What should I do if I hear noise coming from Reload II?
Noise at high volumes is normal due to power transmission through the reactive load. No action needed.
Q: How do I prevent damage to my amplifier or Reload II?
Always match impedance ratings, use appropriate cables, monitor amplifier state, and avoid setting master volume to maximum.
Documents / Resources
 |
Two Notes Reload II Multi Impedance Reactive Load Box [pdf] Installation Guide Reload II Multi Impedance Reactive Load Box, Reload II, Multi Impedance Reactive Load Box, Impedance Reactive Load Box, Reactive Load Box, Load Box, Box |