LOFFLER Multi-Function Printer

Product Information
Specifications
- Product Name: G-Suite Scan Fix for Konica Minolta
- Compatibility: Konica Minolta Multi-Function Printers (MFP)
- Effective Date: September 30, 2024
Product Usage Instructions
Section 1: Enabling 2-Step Verification on the G-Suite Admin Console
- Open admin.google.com and sign in using an administrator account.
- Select Security > Authentication > 2-Step Verification.
- Select the checkbox labeled “Allow Users to turn on 2-Step Verification.”
- Select the radio button to turn Enforcement OFF, then Save.
Section 2: Update Authentication Settings for an Individual Email Address
- Access mail.google.com and sign in to the Gmail account designated for scanning at the machine.
- Select Profile > Manage Google Account.
- Select Security.
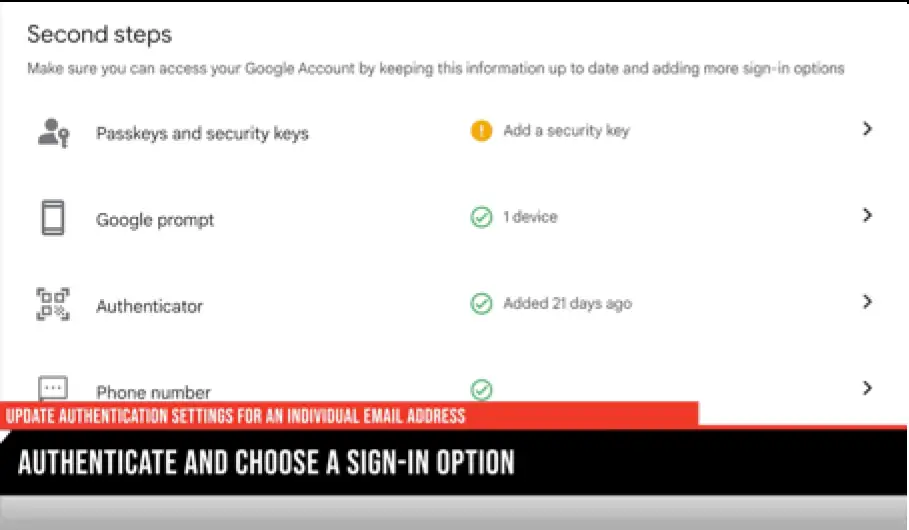
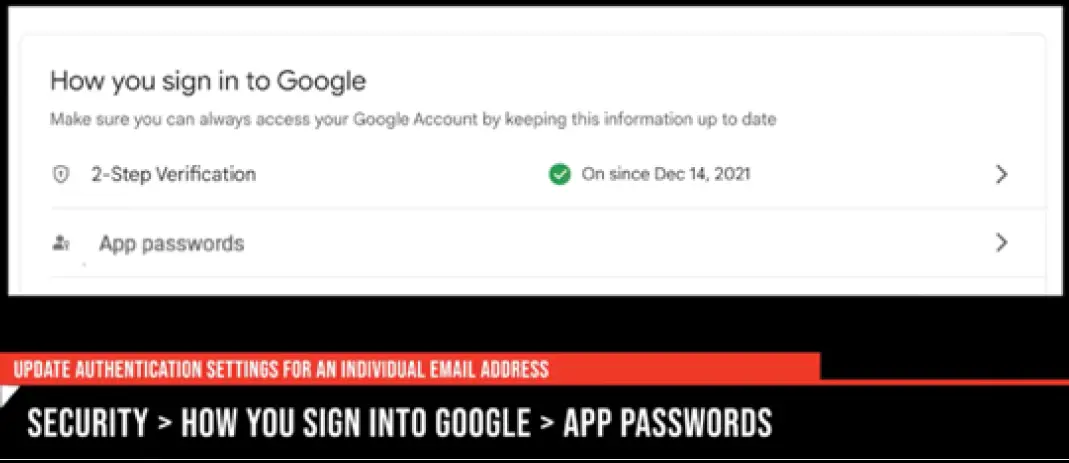
- Select 2-Step Verification / Get Started under subsection “How you sign in to Google.”
- Enter the Gmail account password when prompted.
- Choose a sign-in method for 2-Step Verification.
- Select “Try It” and Follow the Menu Prompts.
- After completing step 7, a confirmation screen will display. Select TURN ON to enable 2-Step Verification.
- Return to the Security page. Select App Passwords under “How you sign in to Google.”
- Reauthenticate when prompted.
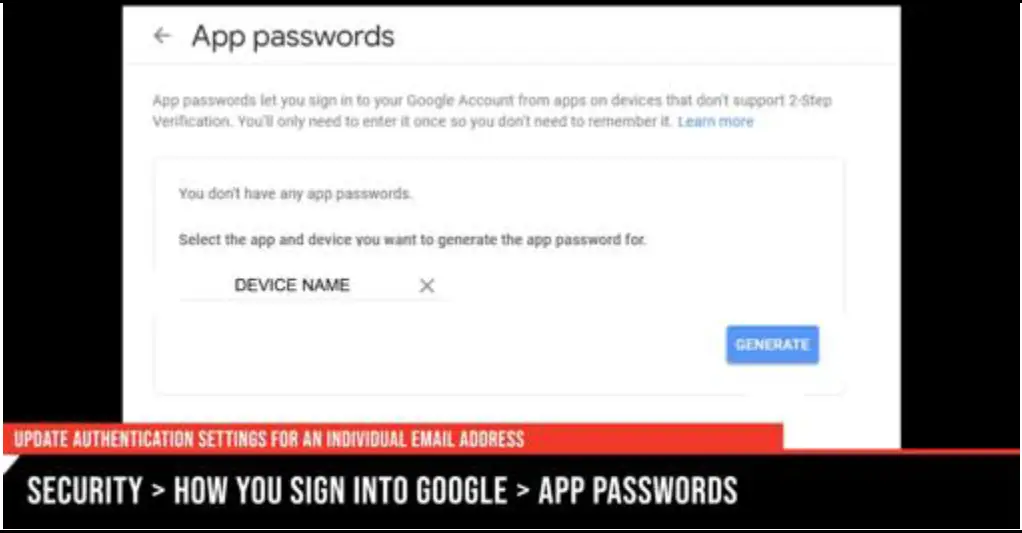
- Select App. Then, choose Mail as the app type and select Other.
- Name the scan device (ex: Canon MFP) and select generate.
- IMPORTANT: Make sure to write down the password before continuing to the next section!
Section 3: Updating the Password for a Konica Minolta Multi-Function Printer (MFP)
- Enter the IP Address of the machine in a web browser. Login as Administrator.
- Select Network > E-Mail Setting > E-Mail TX (SMTP).
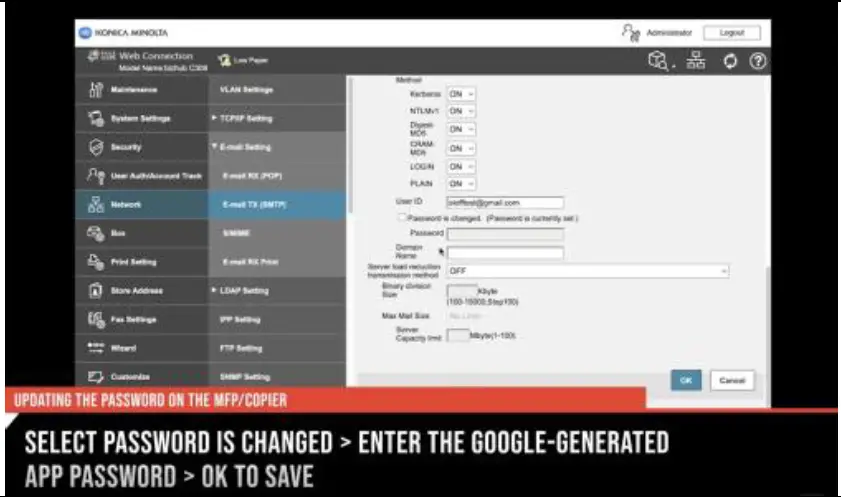
- Select “Password is Changed.”
- Enter in the Google-Generated App Password.
- Select OK to save.
Frequently Asked Questions (FAQ)
- Q: What should I do if I need additional assistance?
- A: Reach out to our Imaging Help Desk! Make sure to provide the ID# of the device so the IHD can provide model-specific assistance.
TECHNOLOGY TO POWER SUCCESS
G-Suite Scan Fix for Konica Minolta
Google is disabling Less Secure apps on September 30, 2024.
Guide Sections
- Enabling 2-Step Verification on the G-Suite Admin Console
- Update Authentication Settings for an Individual Email Address
- Updating the Password for a Konica Minolta Multi-Function Printer (MFP)
Section 1: Enabling 2-Step Verification on the G-Suite Admin Console
| 1. Open admin.google.com and sign-in using an administrator account. |  |
| 2. Select Security è Authentication è 2-Step Verification. | 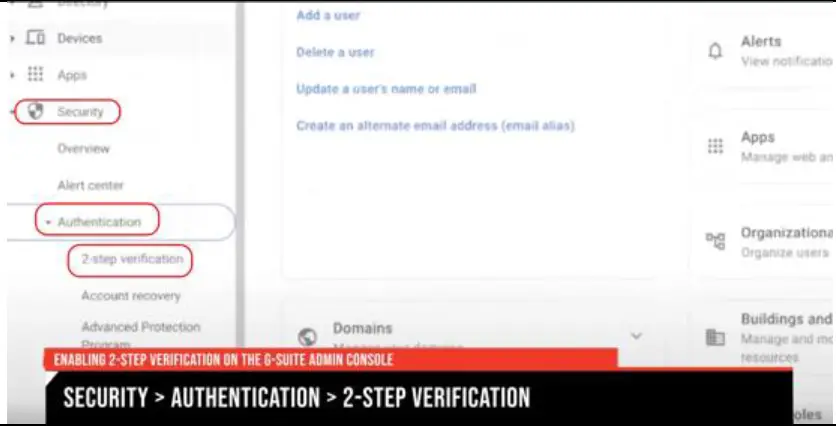 |
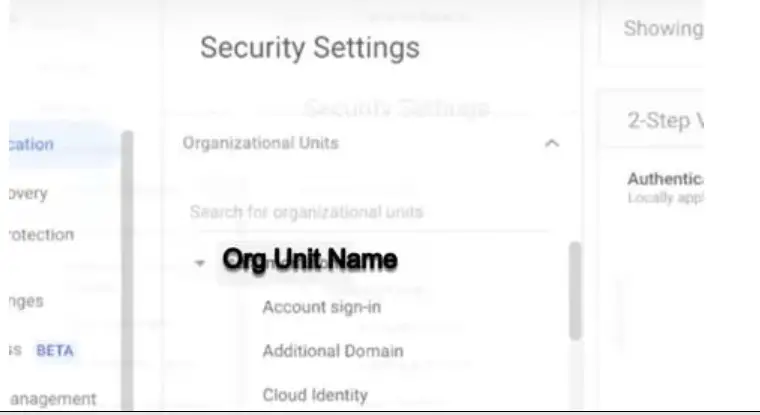
3. Select the Configuration Group to edit.
|
 |
| 4. Select the checkbox labeled Allow Users to turn on 2-Step Verification. 5. Select the radio button to turn Enforcement OFF, then Save. |
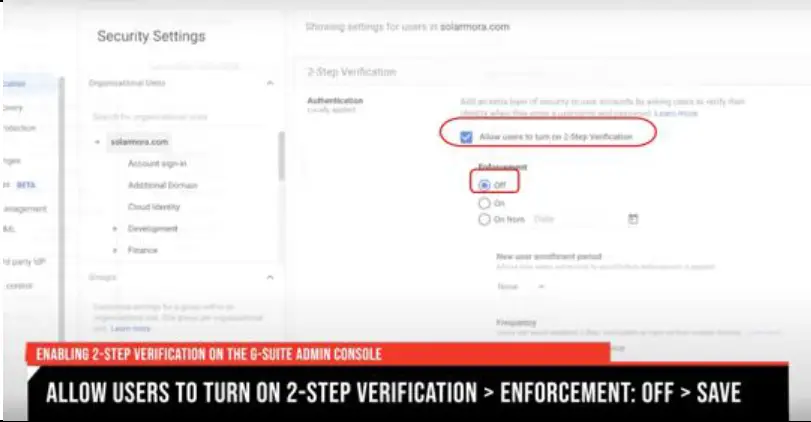 |
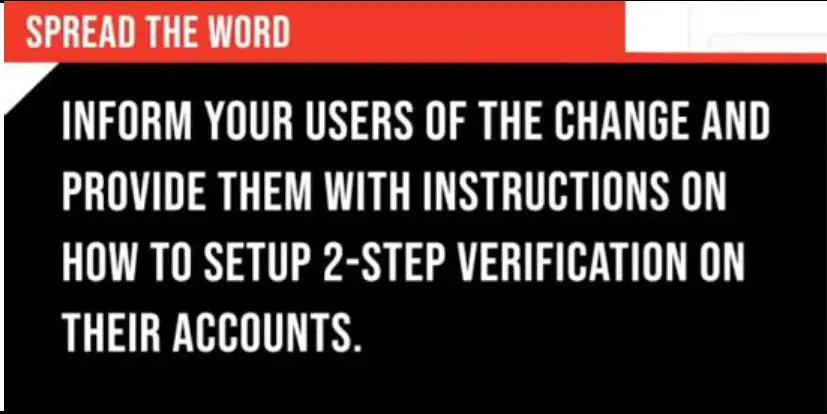
6. Notify users of the change and supply them with instructions for setting up 2-Step Verification on their accounts.
|
 |
Section 2: Update Authentication Settings for an Individual Email Address
| 1. Access mail.google.com and sign-in to the Gmail account designated for scanning at the machine. | 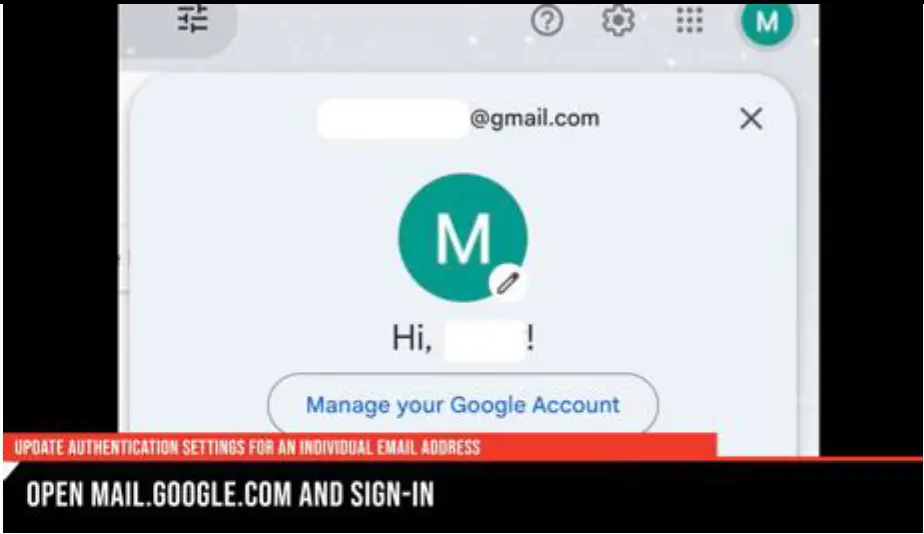 |
| 2. Select Profile è Manage Google Account. | 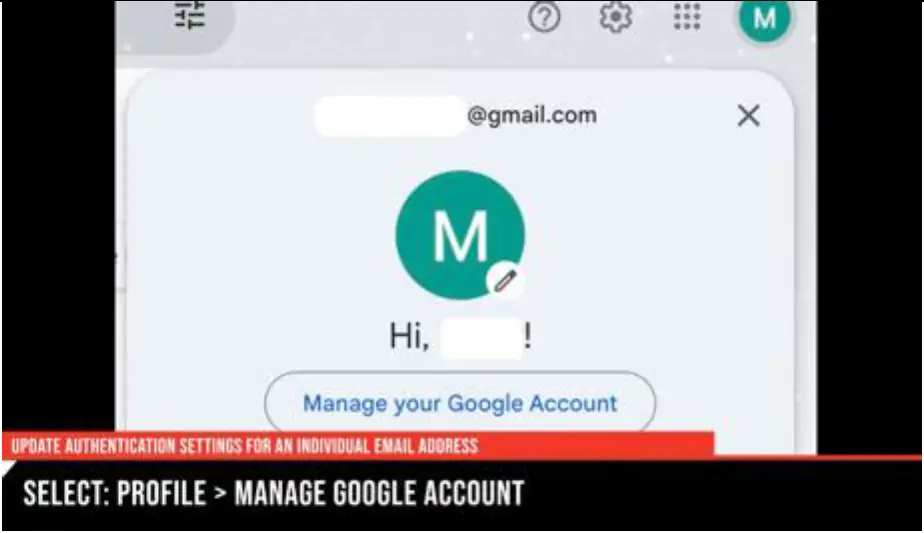 |
| 3. Select Security.
4. Select 2-Step Verification / Get Started under subsection How you sign in to Google. |
 |
| 6. Choose a sign-in method for 2-Step Verification. 7. Select Try It è Follow the Menu Prompts. |
 |
| 8. After completing step 7, a confirmation screen will display “it worked!” Select TURN ON to enable 2-Step Verification. | 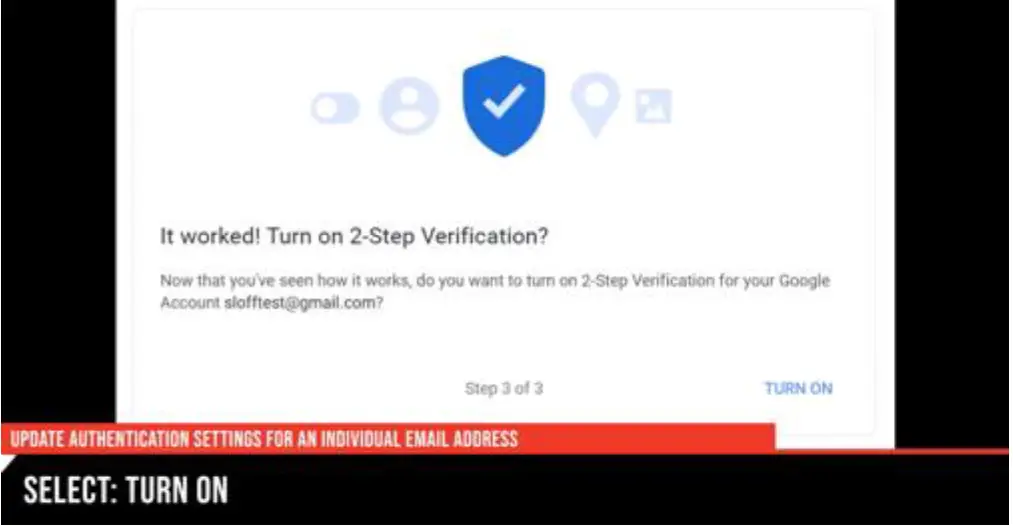 |
| 9. Return to the Security page. Select App Passwords under How you sign in to Google. 10. Reauthenticate when prompted. |
 |
| 11. Select App. Then, choose Mail as the app type and select Other. 12. Name the scan device (ex: Canon MFP) and select generate. 13. IMPORTANT: Make sure to write down the password before continuing to next section! |
 |
Section 3: Updating the Password for a Konica Minolta Multi-Function Printer (MFP)
| 1. Enter the IP Address of the machine in a web browser. Login as Administrator. |  |
| 2. Select Network è E-Mail Setting è E-Mail TX (SMTP). | 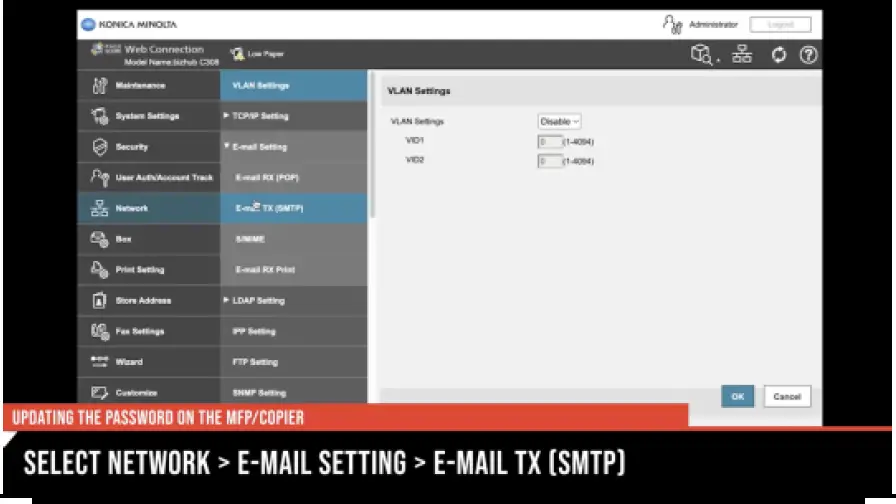 |
| 3. Select Password is Changed. 4. Enter in the Google-Generated App Password. 5. Select OK to save. |
 |
- MN St. Louis Park; Duluth
- Mankato
- 02024 Loffler Companies
- Rochester; St. Cloud; Willmar; Grand Rapids: Thief River Falls I
- WI Eau Claire: La Crosse; Green Bay
- IA. Sioux City; Spencer I
- Fargo, Grand Forks I SD, Aberdeen; Sioux Falls
- NE: I ND
Need additional assistance? Reach out to our Imaging Help Desk!
Make sure to provide the ID# of the device so the IHD can provide model-specific assistance.
- EMAIL: SERVICEANDINFO@LOFFLER.COM
- PHONE: CALL 952-925-6868 OR 888-425-2801 (FOLLOW PROMPTS)
- ONLINEPORTAL@LOFFLER.COM
- TEXT: 952-522-4001
![]()
Documents / Resources
 |
LOFFLER Multi-Function Printer [pdf] Instructions Multi-Function Printer, Printer |


