![]()
Attachment Assembly Addendum
Hedge Trimmer Attachment
Tools: Rubber mallet Allen wrenches included with kit
 |
 |
It is crucial that the attachment tubes are seated all the way into the attachment housings for the drive shafts to register properly.
- Back the tension and set screws all the way out but do not remove them from the housing
- Insert tube with set screw hole aligned with set screw
• (you may need to use the mallet to gently tap the tube all the way in) - Spin the set screw in by hand until you feel it contact the tube then rotate the tube as needed to align the hole. Once you have the alignment cinch down the screw being careful to not overtighten. A quarter-turn past bottom will do.
4. Tighten tension screw to a good snug fit.
The final assembly should look like fig 2 and 3
Pole Saw Attachment
Same Process As Hedge Trimmer

It is crucial that the attachment tubes are seated all the way into the attachment housings for the
drive shafts to register properly.
- Back the tension and set screws all the way out but do not remove from the housing
- Insert tube with set screw hole aligned with set screw
• (you may need to use the mallet to gently tap the tube all the way in) - Spin the set screw in by hand until you feel it contact the tube then rotate the tube as needed to align the hole. Once you have the alignment cinch down the screw being careful to not overtighten. A quarter-turn past the bottom will do.
- Tighten tension screws to a good snug fit.
The final assembly should look like fig 1 and 2
String Trimmer Attachment

This unit is preassembled with the exception of the shield and should be seated correctly.
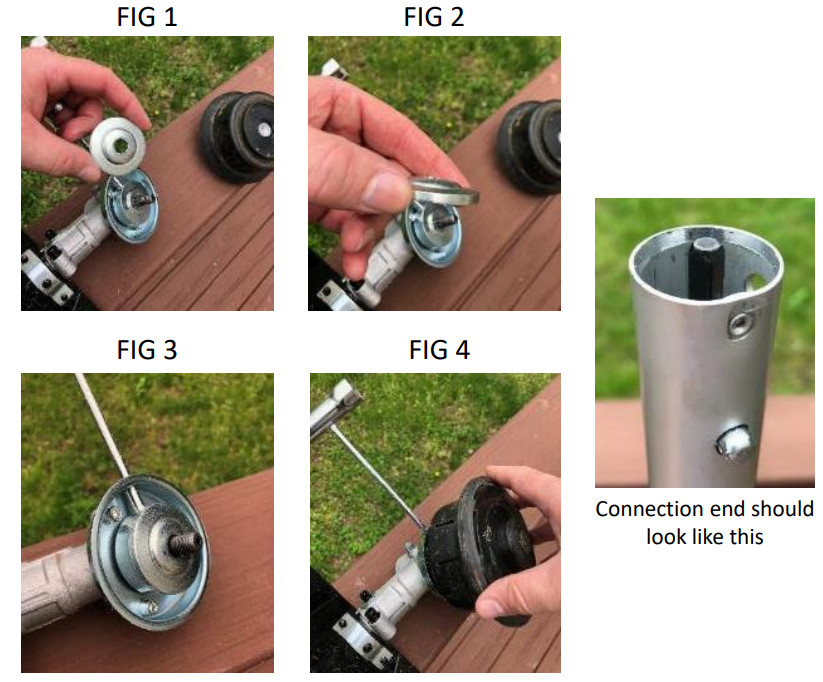
One issue that we commonly see is users inadvertently removing the Spacer Washer on the string trimmer head. This creates a situation where the Tap –N- Go
The spool head gets pinched onto the shroud and cannot spin freely. The washer is shown in Fig 1; proper install is shown in Figures 2 through 4. Please note the spark plug wrench is inserted onto the head locking hole in order to properly tighten the Tap –N-Go Head.
Edger Attachment
Tools: Allen wrenches included with kit
 |
 |
It is crucial that the attachment tubes are seated all the way into the attachment housings for the drive shafts to register properly.
Driveshaft square end should be flush with connection tube end.
- Back the tension and set screws all the way out but do not remove from the housing
- Insert tube with set screw hole aligned with set screw
- Spin the set screw in by hand until you feel it contact the tube then rotate the tube as needed to align the hole. Once you have the alignment cinch down the screw being careful to not overtighten. A quarter-turn past the bottom will do.
- Tighten tension screw to a good snug fit.
The final assembly should look like fig 2 and 3
Brush Cutter Blade Install

- Remove String Trimmer Spool
- Remove clamp washer/spacer
- Install brush cutter blade (note: the blade is made to spin in either direction)
- Put on clamp washer
- Put on nut protector washer
- Put on nut (note: this is reversely threaded)
- Put Allen wrench in the arbor lock hole
- Tighten lock nut down as tight as you can make it. (note: the blade fits onto the thrust washer by setting onto the raised 1” arbor space, you will need to
ensure it is aligned or it will not seat correctly. - It should look like picture 12 when assembled.
 |
 |
Pic 12
Edger Attachment
Tools: Allen wrenches included with kit
 |
|
It is crucial that the attachment tubes are seated all the way into the attachment housings for the drive shafts to register properly.
Driveshaft square end should be flush with connection tube end.
- Back the tension and set screws all the way out but do not remove from the housing
- Insert tube with set screw hole aligned with set screw
- Spin the set screw in by hand until you feel it contact the tube then rotate the tube as needed to align the hole. Once you have the alignment cinch down the screw being careful to not overtighten. A quarter-turn past the bottom will do.
- Tighten tension screw to a good snug fit.
The final assembly should look like fig 2 and 3
Blower Attachment Assembly

Documents / Resources
 |
BADGER BADGER Attachment Assembly Addendum [pdf] Instruction Manual BADGER, Attachment, Assembly, Addendum |


