15019 PM06 V2-14S Power Module Power Module

Product Information
The PM06 V2-14S Power Module is a device that regulates the power supply for 2S to 14S batteries. It has a rated current of 60A and a maximum current of 120A.
Technical Specifications
- Input voltage: 2S-14S
- Power Module rated current: 60A
- Power Module max current: 120A(<60 sec)
- UBEC output: DC 5.1V~5.3V
- UBEC output current: 3A Max (Note: To ensure proper heat dissipation, UBEC output current needs to be limited to <2A when using 14S battery.)
- Voltage Divider: 18.182
- Amperes per Volt: 36.364
Product Usage Instructions
To use the PM06 V2-14S Power Module, follow these steps:
- Connect the power module to your battery, ensuring that the input voltage is between 2S and 14S.
- Connect your device, such as a motor or speed controller, to the output terminals of the power module.
- Ensure that the power module is securely fastened and properly insulated.
- Power on your device and use as normal.
Note: Do not exceed the maximum current rating of the power module (120A) as this may cause damage to the device or lead to safety hazards.
PM06 V2-14S Power Module
Technical Specification
- Input voltage: 2S-14S
- Power Module rated current: 60A
- Power Module max current: 120A (<60 sec)
- UBEC output: DC 5.1V~5.3V
- UBEC output current: 3A Max (Note: To ensure proper heat dissipation, UBEC output current needs to be limited to <2A when using 14S battery.)
- Voltage Divider: 18.182
- Amperes per Volt: 36.364
Mechanical Specification:
- Dimensions: 35x35x5mm
- Mounting hole: 30.5mm*30.5mm
- Weight: 24g
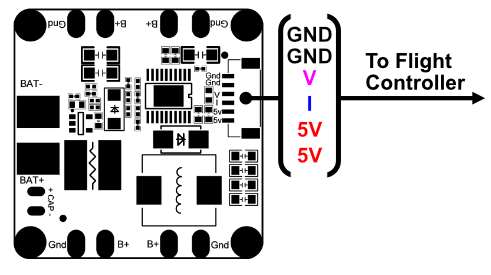
Pin Map:
PX4 QGroundControl Setup
- Connector the Power Module to battery and connect the flight controller to your ground station via USB.
- Open Q Ground Control go Vehicle Setup and Power tab and Input the Number of Cells.
- Ensure the Voltage Divider & Amps per Volt is correct.
For more information, refer to the PX4 Guide.
Ardupilot Mission Planner Setup
- Connector the Power Module to battery and connect the flight controller to your ground station via USB.
- Open Mission Planner, go to Setup page and Battery Monitor tab and select the following:
- Monitor – “Analog Voltage and Current”
- Sensor – “9: Holybro Pixhawk 4 PM”
- For Pixhawk 4, Pixhawk 4 Mini, Pix32v5, Pix32
- HW Ver – “0: CUAV V5/Pixhawk 4 or API “
Alternatively, input the following in the parameter list - BATT_VOLT_PIN: 0
- BATT_CURR_PIN: 1
- HW Ver – “0: CUAV V5/Pixhawk 4 or API “
- For Durandal
- HW Ver – “9: Durandal/ZealotH743” Alternatively, input the following in the parameter list
- BATT_VOLT_PIN: 16
- BATT_CURR_PIN: 17
- For Pixhawk 5X
You will need to use a digital power module like the that end with a “D” such as the PM02D.
For more information regarding setting up Power Module with Mission Planner. Please refer to the Ardupilot Wiki Page.
Current Rating
The XT60 plug and 12AWG wire that PM06 comes with are rated for 30A continuous current and 60A instantaneous current (<1 minute). If a higher current is being used, the plug type and wire size should be changed accordingly. The specifications and models are as follows:
| Plug Specification |
Wire Size |
Rated current: (4 hours, temperature rise <60 Deg C) | Burst Current: (1 minute, temperature rise <60 Deg C) |
| XT60 | 12 AWG | 30A | 60A |
| XT90 | 10 AWG | 45A | 90A |
| XT120 | 8 AWG | 60A | 120A |
Package Include:
- 1x Power Module
- 1x 80mm XT60 connector wire (pre-soldered)
- 1x Electrolytic capacitor: 220uF 63V (pre-soldered)
- 1x JST GH 6pin cable
Website: www.holybro.com
Documents / Resources
 |
Holybro 15019 PM06 V2-14S Power Module Power Module [pdf] User Guide 15019 PM06 V2-14S Power Module Power Module, 15019 PM06, V2-14S Power Module Power Module, Module Power Module, Power Module |


