![]()
 InnexScan
USER MANUAL
USER INTERFACE & SETTINGS GUIDE
Mac Edition v1.0
2025 COPYRIGHT © FUN TECHNOLOGY INNOVATION INC. ALL RIGHTS RESERVED.
About This Software
1.1. Copyright
All rights reserved by Fun Technology Innovation Inc. No part of the materials shall be reproduced in any form or by any means without prior written permission.
1.2. Trademarks
Mac and macOS are trademarks of Apple Inc., registered in the U.S. and other countries. All other products mentioned in this document are trademarks or registered trademarks of their respective owners.
1.3. Disclaimer
- The screenshots in this user’s manual were made with macOS® Sequoia 15.2. If you are using other versions of macOS®, your screen will look somewhat different but still function the same.
- Specifications of this software and contents of this user manual are subject to change without notice. Any modification, error correction, or feature updates made in the actual software may have not been timely updated in this user manual. User may refer to the actual software itself for more accurate detail. Any misprints, translation errors, or inconsistencies with existing software will be updated as soon as possible.
1.4. Introduction
InnexScan is a robust scanning solution specifically engineered for the Innex DS200 document scanner. It enables rapid and efficient scanning of various document types, from business cards to books, converting them into high-quality image formats. The software offers multiple features, including document scanning, book digitization, barcode recognition, and video recording. With its integrated OCR (Optical Character Recognition) feature, scanned images can easily be converted into searchable PDF files or editable Word, Excel, ePub, and Text formats.
For book scanning, InnexScan delivers exceptional results with its advanced image processing features. It can automatically flatten curved book pages, digitally remove finger artifacts from scans, repair damaged or frayed document edges, align pages based on text orientation, and precisely split dual-page book scans into separate images.
NOTE: This software is distributed exclusively with the Innex DS200 document scanner.
Full functionality, including advanced book scanning capabilities, is guaranteed only when paired with this hardware. When used with non-approved book scanners, certain features may be limited or unavailable.
User Interface Overview
This is the user interface of InnexScan. You can easily adjust the settings using the options below.

| No. | Description |
| 1 | Function Tabs |
| 2 | Advance Settings |
| 3 | Toolbar |
| 4 | Device Settings |
| 5 | File Save Path Settings |
| 6 | File Output List |
| 7 | Preview Thumbnails |
Function Tabs
The InnexScan software offers various scanning modes that you can choose from. To select a mode, simply click the function tab.

| Mode | Description |
| Document | The Document mode is designed for scanning documents, business cards, ID cards, and other paper materials. This function features a powerful image processing algorithm that can repair damaged document edges and rotate pages based on text orientation. It allows you to scan directly into image formats like JPG, PNG, BMP, and TIFF, and also supports OCR for converting scanned files into editable PDF, Word, Text, or Excel formats. |
| Book | The Book mode is used to scan books or magazines. This function embedded a Book Mode is designed for scanning books or magazines. This function features powerful image processing capabilities, including automatic scanning, flattening curved pages, removing fingerprints, cleaning up backgrounds, and splitting pages. |
| Barcode | The Barcode mode is used for scanning and recognizing barcodes or QR codes, then saving the results in JPEG, Text, Excel, or PDF formats. |
| ID Document | Scan the ID card and recognize the MRZ code. Run OCR to recognize the text and save the result in a searchable PDF or Excel file format. |
| Video | The Video function allows you to record video tutorials in MP4 or MOV file formats |
NOTE:
- Each of these Function Modes has different feature options and settings.
- Each of these Function Modes has its own file-saving directory. (For example, Document Mode can scan images into different file directories.)
Advance Settings
At the top of the main window, an advance settings button ![]() is available:
is available:
4.1. Menu Options
You can choose to turn the tooltip on or off.  4.2. Image Options:
In the Image Options tab, you can adjust the PDF compression settings.  4.3. Sub-Camera Settings:
In the Image Sub-Camera settings tab, you can select a position to merge the sub-camera image from a secondary camera or webcam.
NOTE:
- Sub-camera function is available only in the ID Documents mode when the Scan mode is set to ‘Multiple Page’ and Video mode. You can choose to merge a portrait with the scanned image of an ID document or passport and export it. If you select Merge, you can set the portrait’s position (webcam icon) relative to the scanned document (main camera). The merge is processed after clicking the Scan button. You can review the result in the preview thumbnails before exporting

Toolbar
On the left side toolbar, there are some useful control tools available:
| Buttons | Explanations | Note |
| Rotate Left 90 Degrees | ||
| Rotate Right 90 Degrees | ||
| Watermark | Add watermark on images (Note: Only available for some of the Function Tabs) |
|
| Web Camera | Only available when detected a web camera is connected (Note: Only available for some of the Function Tabs) |
|
 |
Laser Switch | Turn on / off the laser assist |
Device Settings
At the bottom of the main window, there are some control settings for the camera device:
| Functions | Explanations |
| Device | Select the camera device. |
| Video Settings |
These video settings allow you to adjust the Brightness, Contrast, Hue, Saturation, Sharpness, and White Balance of Innex DS200 |
| Resolution | Select the resolution of Innex DS200. |
NOTE:
- In the [Resolution] options, selecting a higher resolution will result in a lower video frame rate. If you are capturing a still image or scanning a document, select the highest available resolution. However, if you are using this device as a visual presenter, selecting a lower resolution may provide smoother video experience.
File Save Path Settings
On the right-hand side of the main window, there are options for setting the directory for saving files: 
| No. | Button | Explanations |
| 1 | Select | Select file save destination |
| 2 | Open | Open the current file location |
NOTE:
All Function Modes share the same default file-saving directory. However, you can set a different save path for each mode.
File Output List
Right-click on the image file in the file fetching column on the right-side output list of the main window to access the following options: 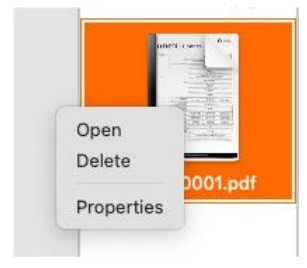
| Right Click Options | Explanations |
| Open | Open an image file |
| Delete | Delete a file |
| Properties | Show file information |
NOTE:
- Use the Shift on the keyboard to select multiple image files.
Preview Thumbnails
In the left-hand preview window, you can use the tools available on each thumbnail to rotate scanned images, change their order, or delete them. You can also double-click a thumbnail to enter Document Page Editor mode.

| Button | Explanations |
| Rotate Left 90 Degrees | |
| Rotate Right 90 Degrees | |
| Move image up | |
| Move image down | |
| Delete image |
NOTE:
The left side preview window is only available when the Scan Mode setting is set to [Multiple Image] mode.
Changing the UI language of InnexScan
To change the user interface language of InnexScan, follow these steps:
- Click the System Settings icon in macOS.

- Go to Language & Region settings.

- If you want to change only the InnexScan UI language, scroll down to “Applications”, click “+”, select “InnexScan”, and choose your preferred language from the list.

- After changing the language, relaunch InnexScan for the changes to take effect.

![]()
Documents / Resources
 |
Fun Tech C831 Innex Scan [pdf] User Manual C831 Innex Scan, C831, Innex Scan, Scan |