![]()
SCORP 2
Quick Start Guide

Quick Start Guide
Overview
* Not include camera.

| [1] Power button [2] Touch screen [3] Shutter button [4] Mode button [5] Joystick [6] F1 button [7] Kickstand [8] Handle [9] FPV button [10] Knob function switching button [11] Multifunction knob [12] Anti-drop lock for slider [13] Slider [14] Quick release plate lock [15] Slider lock [16] Vertical arm [17] Anti-drop lock [18] Quick release plate [19] Camera backing base [20] Slider [21] Slider lock [22] Image transmission port |
[23] Extension port 1 [24] Coss arm lock knob [25] Cross arm [26] Trigger button [27] Roll lock [28] Versatile arm [29] F2 button [30] Tilt lock [31] Tilt axis [32] Camera for tracking module [33] Indicator light for tracking module [34] Lens holder [35] Lens holder screw [36] Extension port 2 [37] Camera control port [38] Vertical arm lock knob [39] Pan axis [40] Pan axis [41] A/B button [42] Trigger button [43] 1/4 inch thread hole |
User manual
Scan the QR code to get the latest user manual or download it from the official website. https://www.feiyu-tech.cn/feiyu-scorp-2/

Download the App
Scan the QR code to download the app, or search for “Feiyu SCORP” in the App Store or Google Play.
* Requires iOS 11.0 or above, Android 6.0 or above.
 |
 |
| https://apps.apple.com/cn/app/feiyu-scorp/id1568214103 | https://cdn1.feiyu-tech.com/dl/app/feiyu_scorp.apk |
Getting started
2.1 Charging
Please fully charge the battery before power on the gimbal for the first time.
Charging with USB 2.0 to Type-C cable, supports quick charge.

2.2 Adjust the gimbal position to gimbal balancing position
The gimbal is folded by default, please unlock all the three axes and adjust the gimbal position to gimbal balancing position, and then lock the three axes.

Mounting the Camera
Before mounting the camera, make sure the camera is ready for shooting (Install the camera lens, and the lens cover should be removed, the memory card and battery needs to be inserted to the camera, and battery is fully charged) , complete all the steps which mentioned in chapter “2. Getting started” and the gimbal is adjusted to gimbal balancing position. Make sure the gimbal is powered off or in sleep mode before mounting the camera.
3.1 Attach the quick release plate and camera backing base(Optional)
Attach the quick release plate to camera by tightening the screw.
User can choose to attach the camera backing base if needed ( For example, when using a long or heavy lens). Attach the camera backing base to camera, then attach it to quick release plate by tightening 2 screws.

3.2 Install lens holder (Optional)
Install the lens holder on the quick release plate if needed, the rubber of the lens holder must be directly under the lens. It is recommended to use the lens holder when using a long or heavy lens.

3.3 Mount camera on gimbal
Unlock ① , slide ② into the slot, lock ① , loosen ③ , slide ④ into the slot as indicated, adjust the camera forward and backward until roughly balanced, then tighten ③ .

It is recommended to push the camera against the tilt axis. Unlock ① to move the camera left or right according to camera’s width to adjust, then lock ① .

Gimbal Balancing
Please balance the gimbal before shooting. Make sure the camera and lens are ready for shooting, and the gimbal is powered off or in sleep mode before balancing. It is recommended to hold up the camera first, then move the slide arm, cross arm and vertical arm.

https://www.feiyu-tech.com/play/149.html
4.1 Balancing the tilt axis
4.1.1 Balancing the vertical tilt
a. Unlock the tilt lock ① , and loosen the slide arm lock ② .
b. Rotate the tilt axis so that the camera lens is pointing upward. Check the direction which the lens tilts to.
c. If the lens tilts to one side, then the camera is that side heavy, move the slide arm ③ to the opposite direction, until the camera is steady pointing upward.
d. Tighten the slide arm lock ② while holding the camera.

4.1.2 Adjust depth for the tilt axis
a. Rotate the tilt axis so that the camera lens is pointing forward. Check the direction which the lens tilts to.
b. If the lens tilts to one side, then the camera is that side heavy, unlock the quick release plate lock ① and then move the quick release plate to the opposite direction, until the camera is steady pointing forward.
c. Lock the quick release plate lock ① while holding the camera.
The tilt axis is balanced when the camera is steady while tilted up or down by 45° .

4.2 Balancing the roll axis
a. Unlock the roll lock ① , check the direction which the camera tilts to.
b. If the camera tilts to one side, then the camera is that side heavy, loosen the cross arm lock knob ② and then move the cross arm to the opposite direction, until the camera can stay still and horizontal to the ground.
c. Tighten the cross arm lock knob ② .
The roll axis is balanced when the camera can stay still and horizontal to the ground.

4.3 Balancing the pan axis
a. Unlock the pan lock ① . Hold the tripod, and tilt the gimbal forward until it is horizontal to the ground.
b. If the camera tilts to one side, then the camera is that side heavy, loosen the vertical arm lock knob ② and then move the vertical arm ③ to the opposite direction, until the camera can stay still and horizontal to the ground.
c. Tighten the vertical arm lock knob ② .
The pan axis is balanced when the camera can stay still and horizontal to the ground.

Operation
5.1 Power ON/ OFF
Before power on the gimbal, make sure you have balanced gimbal, and unlocked all the three axes. If you haven’t unlocked all the 3 axes, gimbal will enter sleep mode to protect itself.
Please single tap power button to wake up gimbal after unlocked all the 3 axes.
! Please set motor power first after powering on gimbal for the first time or after changing a new camera/lens.
Long press the power button and release it when you hear the beep sound to power on/ off.

5.2 Follow mode introduction
PF: Pan follow, only the pan axis follows the movement of user’s hand.
PTF: Pan and tilt follow, where both the pan and tilt axes follow the movement of user’s hand, but roll axis does not.
FPV: Pan, tilt and roll follow, where all 3 axes follow the movement of user’s hand.
Lock: All 3 axes do not follow the movement of user’s hand, gimbal keeps the direction of the camera fixed.
FFW: Flash follow, where all 3 axes follow the movement of user’s hand in high follow speed.
5.3 Button operation
 |
Power button Long press: Power on/off Single tap: Wake up(In sleep mode) Double tap: Enter sleep mode |
 |
Mode button Single tap: PF mode(Default) /PTF/FPV (Switch in turn) Tap five times: Horizon calibration |
 |
Trigger button Double tap: Recenter Triple tap: Enter/Exit selfie mode (Pan axis turn 180° ) Press and hold: Lock mode (Release to exit) You can custom the function via APP |
 |
Joystick Push:Control the movement of the tilt and pan axes. |
 |
Shutter button* Press half way: Focus Single tap (Fully): Start/stop recording Long press (Fully): Take photo |
 |
FPV button Single tap: Enter/Exit FPV mod |
 |
F1 button Double tap: Enter/exit portrait mode Long Press: Activate AI Tracking (When AI is active) |
 |
F2 button Single tap: (1) Lock/Unlock screen (In home page) (2) Return to home page (In other pages) Double tap: Enter FFW mode |
 |
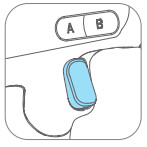
A/B button Long press: Mark the current position as A/B Single tap: Return to the position A/B that you have marked Can be used to mark axes/focus position. |
 |
Multifunction knob Turn: (1) Control the movement of the roll, tilt and pan axes. (2) Control focus. (3) Contol focus motor. (4) Adjust the parameter in the touch screen. Set current control option as option (1) or (2) or (3) through long press the knob function switching button or swipe up in home page. |
 |
Knob function switching button Single tap: Switch the control object while controlling the movement of the 3 axes (Tilt/ Pan/Roll) Long press: Switch the control options of Multifunction knob in turn (The movement of the 3 axes/Electronic focus/Focus motor) |
*Need to connect with camera. Refer to the camera compatibility list on https://www.feiyu-tech.com/feiyu-scorp-2/
More button function introductions please refer to the user manual.
5.4 Touch screen operation

![]() Motor power
Motor power
Use auto tune to adjust the motor power automatically, or adjust motor power for each axis manually.
![]() Follow speed
Follow speed
User can select different gimbal follow speed profiles, or custom follow speed.
![]() Follow mode
Follow mode
Select gimbal follow mode
| PF: Pan follow, only the pan axis follows the movement of user’s hand. | |
| PTF: Pan and tilt follow, where both the pan and tilt axes follow the movement of user’s hand, but roll axis does not. | |
| FPV: Pan, tilt and roll follow, where all 3 axes follow the movement of user’s hand. | |
| Lock: All 3 axes do not follow the movement of user’s hand, gimbal keeps the direction of the camera fixed. | |
| FFW: Flash follow, where all 3 axes follow the movement of user’s hand in high follow speed. |
![]() Scenario
Scenario
Scenario-based functional application.
Swipe from right to left
Joystick, gimbal and more settings

Swipe from left to right
Shooting parameters settings

Swipe up
Multifunction knob settings

– Return to previous menu: Swipe to right
Specifications
| Product name | Feiyu SCORP 2 3-Axis Handheld Gimbal for Camera |
| Product model | FeiyuF2-2 |
| Max. Tilt Range | +200° ~-120° |
| Max. Roll Range | +245° ~-75° |
| Max. Pan Range | 360° |
| Weight(Main body) | About 1070g |
| Payload Capability | About 2500g (Well-balanced) |
| Battery life | 13 Hours |
| Battery | 2500mAh |
| Operating Voltage | 8.4V-6.8V |
| Compatible Cameras | Sony, Canon, Nikon, Panasonic, etc. ( For specific camera and lens compatibility, please refer to the official website’s compatibility list. ) |
Accessories
[1] USB 2.0 to Type-C x1[2] Type-C to Micro x1
[3] Type-C to Type-C x1
[4] Type-C to TRS2.5 x1
[5] Type-C to Multi Sony shutter cable x1
[6] Type-C to 2.5mm Panasonic shutter cable (DC2.5mm) x1
[7] Type-C to TRS3.5 x1
[8] Type-C to Mini x1
[9] Tripod x1
[10] Fixed plate x1
[11] Slider x1
[12] Quick release plate x1
[13] Camera backing base x1
[14] Lens holder x1
[15] Lens holder screw x1
[16] Camera fixed screw x3
Kit Version Additions:
[17] ARRI Rosettes Expansion Accessory x1
[18] Expandable module x1
[19] Carbon Fiber Rod x1
[20] Storage Bag x1
Notice
- Make sure motor spinning is not blocked by external force when the product is power on.
- The product DO NOT contact water or other liquid if the product is not mark waterproof or splash-proof. Waterproof and splash-proof product DO NOT contact sea water or other corrosive liquid.
- DO NOT disassembly the product except marked detachable. It need send to FeiyuTech after-sales or authorized service center to fix it if you accidently disassembly and cause abnormal work. The relevant costs are borne by user.
- Prolonged continuous operation may cause the product surface temperature to rise, please operate carefully.
- DO NOT drop or strike the product. If the product is abnormal, contact Feiyu After-sales support.
Storage and Maintenance
- Keep the product out of the reach of children and pets.
- DO NOT leave the product near heat sources such as a furnace or heater. DO NOT leave the product inside of a vehicle on hot days.
- Please storage the product in dry environment.
- DO NOT overcharge or overuse the battery, otherwise it will cause damage to the battery core. If does not use the product for a long time, please charge it at least once within one month.
- Never use the product when the temperature is too high or too low.
FCC regulatory conformance:
This device complies with Part 15 of the FCC Rules.
Operation is subject to the following two conditions:
- This device may not cause harmful interference.
- This device must accept any interference received, including interference that may cause undesired operation.
NOTE
This equipment has been tested and found to comply with the limits for a Class B digital device, pursuant to part 15 of the FCC Rules. These limits are designed to provide reasonable protection against harmful interference in a residential installation.
This equipment generates uses and can radiate radio frequency energy and, if not installed and used in accordance with the instructions, may cause harmful interference to radio communications. However, there is no guarantee that interference will not occur in a particular installation. If this equipment does cause harmful interference to radio or television reception, which can be determined by turning the equipment off and on, the user is encouraged to try to correct the interference by one or more of the following measures:
- Reorient or relocate the receiving antenna.
- Increase the separation between the equipment and receiver.
- Connect the equipment into an outlet on a circuit different from that to which the receiver is connected.
- Consult the dealer or an experienced radio/TV technician for help.
NOTE
The manufacturer is not responsible for any radio or TV interference caused by unauthorized modifications to this equipment. Such modifications could void the user’s authority to operate the equipment.
RF Exposure
This equipment complies with FCC radiation exposure limits set forth for an uncontrolled environment.


Warranty Card
Product Model
Serial Number
Purchase Date
Customer Name
Customer Tel
Customer Email
Warranty:
- Within one year from the date of selling, the product is malfunctioning under normal due to non-artificial reasons.
- The malfunction of the product is not caused by artificial reasons such as unauthorized disassemble or conversion or addition.
- The buyer is able to provide the certificate of maintenance service: the warranty card, the legitimate receipts, invoices, or screenshot of purchasing.
The followings cases are not included under the warranty:
- Unable to provide legitimate receipt and warranty card with buyer’s info.
- The damage caused by human or irresistible factor.
More details about after-sales policy, please refer to after-sales page on website: https://www.feiyu-tech.com/service
* Our company reserves the right of final interpretation on the above-mentioned after sales terms and limitations.

![]()
Manufactured by:
Guilin Feiyu Technology Incorporated Company
Website: www.feiyu-tech.com
E-mail: support@feiyu-tech.com
Tel: +86 773-2320865 : 400-990-6118
Documents / Resources
 |
FeiyuTech SCORP 2 3 Axis Handheld Gimbal for Camera [pdf] User Guide FEIYUF2-2, 2AHW7-FEIYUF2-2, SCORP 2 3 Axis Handheld Gimbal for Camera, SCORP 2, 3 Axis Handheld Gimbal for Camera, Handheld Gimbal for Camera, Gimbal for Camera, Camera, Gimbal |