![]()
![]() Internet controlled thermostat, ZigBee
Internet controlled thermostat, ZigBee Quick Guide
Product Compliance
This product complies with the following EU Directives: 2014/30/EU, 2014/35/EU, 2014/53/ EU, 2011/65/EU
SAFETY INFORMATION:
Use in accordance with national and EU regulations. Use the device only as intended, keeping it in a dry condition. The product is for indoor use only. Please read the entire manual, before installation or use.
Product advantages:
| Power Supply 230V AC | |
 |
Communication in the ZigBee 3.0 standard |
 |
A multitude of functions available from ENGO Smart / Tuya Smart application |
 |
S1-S2 Input for additional sensor |
 |
ENGO binding function (devices connection in Online and Offline mode) |
 |
Maximum and minimum temperature settings |
Connection description
a) Connection diagram for gas boiler:
b) Connection diagram to pump / actuator:
c) Connection diagram to the control box:
Legend:
| Boiler connection* – Boiler’s contacts for ON/OFF thermostat (according to the boiler’s instructions) |
|
| Pump | |
| Valve actuator | |
| Temperature sensor | |
| L, N | 230V AC power supply |
| COM, NO | Voltage-free output |
| S1, S2 | Input terminals |
| SL1 | 230V AC voltage input |
| Fuse |
INTRODUCTION:
EONE230 is a flush-mounted room thermostat which works over ZigBee technology. It has a built-in humidity sensor and a minimum/maximum setpoint temperature limiting function. The EONE230 has a programmable change of the relay type and the ability to work in heating or cooling modes. The unique feature of this thermostat is the possibility of wireless control over ENGO binding function and wired control of devices that are connected directly to thermostat (e.g. wired control of heating boiler). In order to have the ability to controll wirelessly, EONEBAT needs to be used with ENGO Smart / TUYA Smart mobile application and EGATEZB internet gateway (sold separately). „ENGO binding” function provides wireless and direct connection to the receivers (e.g. ECB62ZB control box, EMODZB module or EREL1ZB12A relay) over the EGATEZB gateway. EONE230 can also work as standalone thermostat connected by wires to the controlled device (without EGATEZB internet gateway). After adding to the mobile app, thermostat offer more functions, e.g. push notifications or possibility of programming time schedules.
Technical specifications
| Power supply | 230V AC 50 Hz |
| Max. load | 3(1)A |
| Temperature range | 5,0°C – 45,0°C |
| Display temperature accuracy | 0,5°C |
| Control algorithm | TPI or Histeresis (from ±0,1°C to ±2°C) |
| Communication | ZigBee 3.0 2,4GHz |
| S1/S2 multifunctional input | Floor temp sensor, external air sensor, occupancy sensor |
| Output control | COM / NO (Volt-free) |
| IP protection class | IP30 |
| Dimension [mm] | 90 x 90 x 34 mm (13 mm after mounting in electrical box Φ 60) |

- Current humidity reading
- Current/Setpoint temperature
- Clock
- Temperature unit
- Heating indicator (icon is animating when there is heating demand)
- Cooling indicator (icon is animating when there is cooling demand)
- Schedule mode icon
- Temporary override mode
- External/Floor or Occupancy sensor
- Button lock
- Holiday mode
- Settings icon
- Receiver binding indicator
- ZigBee network connection indicator
- Settings icon / temperature settings
| ▲ | Change the parameter value up |
| ▼ | Change the parameter value down |
| Manual/Schedule mode – short button press (Online mode) | |
| Enther the installer parameters- hold 3 seconds | |
| Turn OFF/ON thermostat – hold 5 seconds | |
| ▲+▼ | Enter the pairing mode – hold 5 seconds |
| Enter binding mode – hold 5 seconds | |
| Factory reset – hold until the FA message appears | |
| ▲+ |
Lock/Unlock thermostat keys – hold 3 seconds |
| ▲+ |
Heating/Cooling mode change – hold 3seconds |
Installation thermostat in the app
Make sure your router is within range of your smartphone. Make sure you are connected to the Internet.
This will reduce the pairing time of the device.
STEP 1 – DOWNLOAD ENGO SMART APP
Download the ENGO Smart app from Google Play or Apple App Store and install it on your smartphone.
 https://play.google.com/store/apps/details?id=com.engo.smartlife
 https://apps.apple.com/us/app/engo-smart/id1606693444
STEP 2 – REGISTER THE NEW ACCOUNT
To register a new account, please follow the steps below:

Click „Register” to create new account.

Enter your e-mail address to which the verification code will be sent.
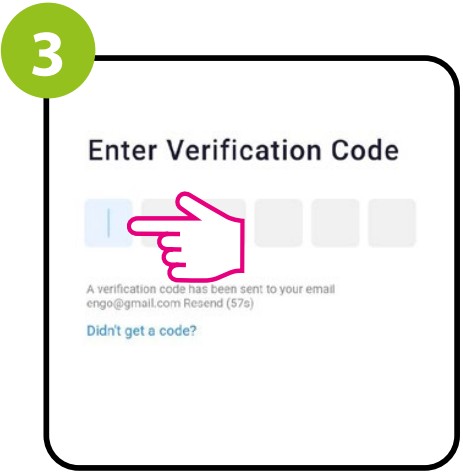
Enter the verification code received in the email. Remember that you only have 60 seconds to enter the code!!
 Then set the login password.
STEP 3 – CONNECT THE THERMOSTAT TO ZigBee

Make sure ZigBee Gateway has been added to the Engo Smart app. Press ▲ and ▼ hold the and buttons on the thermostat until the display shows „PA”. Then release the keys. The pairing mode will be started up.

Thermostat counts the time back (180s).
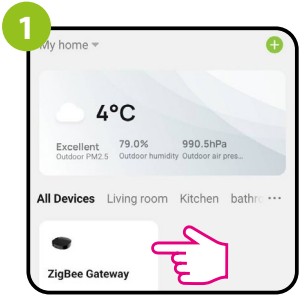 Enter the gateway interface.

In „Zigbee devices list” go „Add devices”.

Wait for the message “End” to appear on the thermostat screen.

After finding the device, go „Done”

The thermostat has been installed and displays the main interface.
 On the controller screen globe icon appeared stating that he has been he added to the ZigBee network.
Binding thermostat with the module/relay
Make sure that the module/relay and thermostat are in the same ZigBee network (they are added to the same gateway EGATEZB).

To properly link thermostat with the module/relay first click quickly the button on the device 5 times. The LED diode will start flashing slowly on red, which means the device is in binding mode.

On the EONE thermostat, hold ▲ and ▼ buttons until the “bind” message appears.
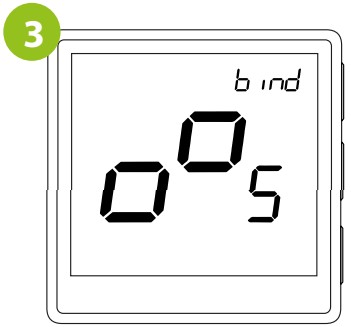
Release the keys, binding function process of linking thermostat with control box is active.

The “binding” process takes up to 300 seconds.

After successfull binding operation „End” message will be displayed. LED on the module will stop flashing.

Both devices have been successfully linked. Thermostat displays the main screen, icon “![]() ” appeared on the screen indicating connection with the receiver (module/relay in this case).
” appeared on the screen indicating connection with the receiver (module/relay in this case).
![]() ATTENTION:
ATTENTION:
If the binding process fails, it must be repeated taking into account the distances between devices, obstacles and local radio signal interferences.
 Remember:
Radio range can be increased by Engo ZigBee repeaters.
Binding thermostat with the ECB62ZB wireless control box
Make sure that the ECB62ZB control box and thermostat are in the same ZigBee network (they are added to the same gateway EGATEZB) and the POWER LED lights up blue.

In order to correctly link thermostat with the control box, first select the zone in the control box with the SELECT button (1) (zone which you want to link with thermostat). The LED (2) will flash 3 times for the selected zone. Confirm your selection by clicking PAIR button (2). The LED (2) will flash green with the previously selected zone – binding process has started, it is active for 10 minutes and during this time you can link thermostat with the selected zone.

On the EONE thermostat, hold ▲ and ▼ buttons until the “bind”message appears.
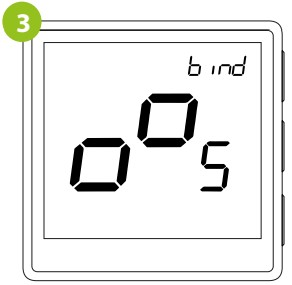
Release the keys, binding functionprocess of linking thermostat with control box is active.

The “binding” process takes up to 300 seconds.

After successfull binding operation „End” message will be displayed.

Both devices have been successfully linked. Thermostat displays the main screen, icon “![]() ” appeared on the screen indicating connection with the receiver (ECB62ZB in this case).
” appeared on the screen indicating connection with the receiver (ECB62ZB in this case).
![]() ATTENTION:
ATTENTION:
If the binding process fails, it must be repeated taking into account the distances between devices, obstacles and local radio signal interferences.
Remember:
Radio range can be increased by Engo ZigBee repeaters.
Installer settings
To enter installer parameters press and hold ![]() button for 3 seconds.
button for 3 seconds.
Use ▲ or ▼. button to move between parameters. Enter the parameter by ![]() . Edit the parameter using ▲ or ▼. Confirm the new parameter value with the
. Edit the parameter using ▲ or ▼. Confirm the new parameter value with the ![]() button.
button.
Installer parameters
| Pxx | Function | Value | Desription | Default value |
| P01 | Clock format | 12h | 12 hour | 24h |
| 24h | 24 hour | |||
| P02 | Heating/Cooling Selection | Heating | ||
| Cooling | ||||
| P03 | Control algorithm | TPI UFH | TPI for Underfloor Heating | TPI UFH for heating HIS 1.0 for cooling |
| TPI RAD | TPI for Radiators | |||
| TPI ELE | TPI for Electrical Heating | |||
| HIS 0.2 | SPAN +/-0,1°C | |||
| HIS 0.4 | SPAN +/-0,2°C | |||
| HIS 0.6 | SPAN +/-0,3°C | |||
| HIS 0.8 | SPAN +/-0,4°C | |||
| HIS 1.0 | SPAN +/-0,5°C | |||
| HIS 2.0 | SPAN +/-1,0°C | |||
| HIS 3.0 | SPAN +/-1,5°C | |||
| HIS 4.0 | SPAN +/-2,0°C | |||
| P04 | Offset temperature | -3.5°C do +3.5°C | If the thermostat indicates wrong temperature, you can correct it by max ± 3.5°C” | 0°C |
| P05 | “Minimum setpoint” | 5°C – 45°C | Minimum heating / cooling temperature that can be set | 5°C |
| P06 | “Maximum setpoint” | 5°C – 45°C | Maximum heating / cooling temperature that can be set | 35°C |
| P07 | S1/S2 Input | 1 | Disable | 1 |
| 2 | External sensor as a floor sensor | |||
| 3 | External sensor as an air sensor | |||
| 4 | Occupnacy sensor (ON/OFF volt free input) | |||
| P08 | Maximum floor temperature for heating (function active when P07=2) | 5°C – 45°C | In order to protect the floor, the heating will be turned off, when the temperature of the floor sensor rises above the maximum value. | 35°C |
| P09 | Minimum floor temperature for heating (function active when P07=2) | 5°C – 45°C | In order to protect the floor, the heating will be switched on, when the temperature of the floor sensor drops below the minimum value. | 10°C |
| P10 | Maximum floor temperature for cooling (function active when P07=2) | 5°C – 45°C | In order to protect the floor, cooling will be switched on, when the temperature of the floor sensor exceeds the maximum value. | 15°C |
| P11 | Minimum floor temperature for cooling (function active when P07=2) | 5°C – 45°C | In order to protect the floor, cooling will be turned off, when the temperature of the floor sensor drops below the minimum value | 7°C |
| P12 | Comfort warm floor | OFF | This function helps to keep the floor warm, even if there is no heating demand from the room thermostat.This feature is available only for Heating Mode. User can select 5 levels of warm floor feature. Note that comfort warm floor function will activate heating for specified amount of time (in relation to Level setting choosen by user). Heating will be activated only if in the past 1 hour heating was OFF. | OFF |
| Level 1 = 7min | ||||
| Level 2 = 11min | ||||
| Level 3 = 15min | ||||
| Level 4 = 19min | ||||
| Level 5 = 23min | ||||
| P13 | Valve protection | ON | Function disabled | OFF |
| OFF | Function enabled | |||
| P14 | Internal relay | NO | Relay type NO-COM | NO |
| NC | Relay type NC-COM | |||
| OFF | Relay disabled | |||
| P15 | Backlight brightness | 10% – 100% | Adjustable in the range from 10 to 100% | 50% |
| P16 | PIN Code for settings access | NO | Function disabled | NO |
| PIN | Function enabled | |||
| P17 | Require a PIN to unlock the keys every time (function active when P16=PIN) | NO | Function disabled | NO |
| YES | Function enabled | |||
| CLR | Clear settings factory reset | NO | No action | NO |
| YES | Factory Reset |
Factory reset
To RESET Thermostat to factory settings, hold down the ▲ and ▼ buttons until the FA message appears. Then release the keys. Thermostat will restart, will restore the default factory settings and display the main screen. If the regulator was added to the gate and the ZigBee network, it will be removed from it and you will need to add / pair it again.

 Ver. 7.4
Release date: I 2024
Soft:
ZigBee: v1.0.12
MCU: v2.0.9
Distributor:
QL CONTROLS Sp z o.o. Sp. k.
43-262 Kobielice
4 Rolna St.
Poland
Producer:
Engo Controls S.C.
43-262 Kobielice
4 Rolna St.
Poland
www.engocontrols.com
Documents / Resources
 |
ENGO Controls EONE230W Internet Controlled Thermostat [pdf] User Guide EONE230W, EONE230B, EONE230W Internet Controlled Thermostat, EONE230W, Internet Controlled Thermostat, Controlled Thermostat, Thermostat |