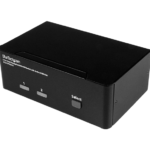
Belkin F1DN102KVM-UNN4 Secure Desktop KVM Switch

Specifications:
- Model: F1DN204KVM-UN-4
- Ports: 2/4 Port Secure Single/Dual-Head DP/HDMI-DP/HDMI
- Supports: USB keyboard and mouse connection
- Features: Common Access Card (CAC/DPP) functionality
- LEDs: Active port, CAC/DPP active (if equipped), Audio active (if equipped), Channel Buttons 1-4
Product Usage Instructions
Connect Peripherals:
Connect a USB keyboard and mouse to the corresponding KVM console port. Ensure the lights illuminate green for authorized devices.
Connect Peripherals to Computer (Host) Ports:
Connect the USB A end of a USB A to USB B cable to the computer and the USB B end to the KVM computer port for keyboard and mouse connectivity.
CAC/DPP Configuration and Operation:
If equipped, connect CAC/DPP using a separate USB cable. Configure CAC/DPP functionality for connected computers and switch channels/computer mapping as needed.
Power ON Your System:
Press the applicable front panel push button LED to power on your system.
Switch Between Computers:
Switch between computers by pressing the corresponding front panel button on the KVM. The selected computer’s front panel button will illuminate.
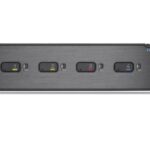
LEDs Index
- a. Active port
- b. CAC/DPP active (if equipped)
- c. Audio active (if equipped)
- d. Channel Buttons 1-4
Frequently Asked Questions
- Q: Can I hot-swap displays with this KVM switch?
- A: No, the secure switch does not support hot plug or swap of displays. Any display swaps require a restart of the KVM.
- Q: How do I know if my connected USB device is authorized?
- A: Authorized devices will have their lights illuminated in green. If unauthorized, the lights will illuminate red or flicker.
Objectives
- Scan the QR code or visit Belkin Cybersecurity YouTube Playlist for Secure KVM Unboxing and Troubleshooting videos.
- This guide includes instructions for installing Belkin F1DN102KVM-UNN4 and F1DN102KVM-UN-4, F1DN202KVM-UNN4 and F1DN202KVM-UN-4, F1DN104KVM-UNN4, F1DN104KVMUNN4Z and F1DN104KVM-UN-4, F1DN204KVM-UNN4, F1DN204KVMUNN4Z and F1DN204KVM-UN-4 KVM Switches.
- Universal – Second Generation KVM allows the sharing of keyboard, video, mouse, audio, and USB peripherals between multiple computers.
- This Manual and additional product documentation is available for online download on the Belkin website. For further assistance please refer to: http://www.belkin.com/us/Resource-Center/Cybersecurity/Secure-KVM-Switching/.

General
- Verify that all peripherals and computers are turned OFF prior to connecting them to the product.
- The KVM’s back panel is divided into sections of Console Ports and Computer Ports.
- Connect the peripherals to be shared by the KVM to the Console Ports.
- Connect each computer that needs access to shared peripherals to a specific Computer Ports section.
- Make sure that every computer is connected to a separate Computer Port section.
- The push buttons on the product’s front panel indicate which computer has current access to shared peripherals.
- To switch peripherals between computers, press the appropriate push button on the product’s front panel.
- Before installing an administrator may have a need to configure the KVM for CAC or DPP, and channel Illumination colorization. Consult your administrator for details
F1DN204KVM-UN-4 Model is shown
- Connect peripherals to the KVM Console Ports:
- Keyboard & Mouse: Keyboard & Mouse: Connect a USB keyboard and mouse to the corresponding KVM console port. The keyboard and mouse connected lights (rear panel) will illuminate green. If the keyboard or mouse are not authorized, the lights will illuminate red.
- Video: Connect the monitor cable to the KVM console video port. The EDID LEDs (rear panel) will operate as follows:
- Off: no EDID
- Flicker: EDID read in progress
- On: EDID received
Note: EDID is only read in the first few seconds of device boot. The secure switch does not support hot plug or swap of displays. In any swap of display(s) it is required to restart the KVM.
- Audio peripherals: Connect headphones/speakers to the KVM console audio-out port.
- Common Access Card (CAC/DPP) Configuration and Operation: Please refer to the relevant section.
- Connect peripherals to the KVM Computer (Host) Ports:
- Computer keyboard & mouse connection: Connect each computer to the KVM keyboard & mouse computer port using a USB A to USB B cable. Connect the USB A end to the computer and the USB B end to KVM.
- Computer Video connection: Connect each computer to the KVM computer video port using the corresponding video cable (DisplayPort/HDMI), if two video connections exist, make sure each PC video 1 is in the bottom connector.
- Computer audio connection: Connect each computer to the KVM audio-in port using an audio cable. Connect one end of the cable to the computer’s audio-out port using the 1/8″ (3.5mm) stereo plug. Connect the other end of the audio cable to the KVM audio-in computer port.
- Audio can be frozen on a channel (if equipped) and allow for the operator to hear the frozen channel audio when switched to another channel.
- To freeze an audio channel press and hold the channel button to be frozen for 3 seconds. The audio freeze light will illuminate.
- To unfreeze an audio channel press and hold any channel button for 3 seconds. The audio freeze light will extinguish

- Common Access Card (CAC/DPP) Configuration and Operation (if equipped): CAC/DPP connection to the computer (If equipped) requires a separate USB cable connection and allows the user to specify whether there is a connected device required for that computer or not. This allows the CAC/ DPP port to be connected and controlled separately to the keyboard, mouse, video, and audio.
Step 1 – Installation:
- Using the appropriate USB cable, connect one end of the cable to the computer that requires CAC/DPP, and the other end to the CAC/DPP port on the KVM Switch that corresponds to the computer. Important Note: Do not connect the USB cable if CAC/DPP functionality is not needed for that computer.
- If only some of the computers use CAC/ DPP functionality, make sure that computer #1 is connected to the CAC/DPP device. If needed, switch channels/computer mapping to create this configuration.
- If CAC/DPP is connected it is automatically enabled.
- Once configured, the CAC/DPP connection will be switched only when required by the connected computer. When switching from a CAC-enabled port to a non-CAC-enabled port, CAC/DPP can be frozen on a channel (if equipped) and allow for the operator to utilize the peripheral connected to a channel when switched to another channel. To freeze CAC/DPP to a channel press the channel button to be frozen 3 times in succession. The CAC freeze light will illuminate. To unfreeze CAC/DPP to a channel press any channel button 3 times in succession. The CAC freeze light will extinguish.
- In case the connected USB device cannot be detected by the secure product, the CAC status LED will not illuminate when frozen. The USB device will be detected only if it is fully compliant with the appropriate USB standards and is included in the list of recognized USB devices defined by the administrator (see your administrator for details) when configuring CAC functionality, possible reasons for USB device not being detected:
- Non-standard USB device
- Failed USB Device
- If the device is detected but is not authorized, the device will be rejected for security reasons. This will be indicated by a flickering or non-green-lit CAC connection LED (back panel). Smart card readers and CACs are included in the authorized USB devices list as standard.
- Power ON your system:
- Power ON the monitor/s: Make sure that the monitor/s is/are turned ON prior to powering the KVM.
- Power ON the system: Connect all peripherals and computers to the KVM prior to powering it up. Power ON the KVM by plugging it into the AC wall outlet. By default, after product power-up, the active channel will be computer #1, indicated by the applicable front panel push button LED lit.
- Important Notes: Anti-Tamper System: This Switch is equipped with active anti-tamper triggers. Any attempt to open the enclosure will activate the antitamper triggers, render the unit inoperable and warranty will be void. If the unit’s enclosure appears disrupted or if all the port LEDs flash continuously, please call Belkin Technical Support at 800-282-2355.
- Product Enclosure Warning Label and Tamper Evident Labels: Belkin Secure Switch uses product enclosure warning labels and holographic tamper evident labels to provide visual indications in case of enclosure intrusion attempt. If for any reason one of these seals is missing or appears disrupted, please avoid using the product and call Belkin Technical Support at 800-282-2355.
- Power ON Self-Test Procedure: As the product powers up it performs a self-test procedure. In case of self-test failure for any reason, including jammed buttons, the product will be Inoperable, and self-test failure will be indicated by abnormal LED behavior. In the above-mentioned cases, please call Technical Support and avoid using the product. For further information please refer to the product administrator and setup guides. Please note: Belkin Secure KVMs cannot be upgraded, serviced or repaired.
- Switching between computers: Switch between computers by pressing the corresponding front panel button on the KVM. The front panel button of the selected computer will illuminate.
- Power ON your system:
LEDs Index
- a. Active port
- b. CAC/DPP active (if equipped)
- c. Audio active (if equipped)
- d. Channel Buttons 1-4
- e. Num Lock
- f. Caps Lock
- g. Scroll Lock

To learn how to change front panel colors, go to: https://www.belkin.com/cybersecurity/resources or scan
Keyboard color configuration:
- Open WordPad or Notepad on the computer connected to channel #1.
- Using keyboard, type CTRL (Left), CTRL (Right), “t” in WordPad or Notepad to enter Admin Mode. Type CTRL (Left), CTRL (Right), “t” in sequential order, do not hold down the keys.
- Text will appear in WordPad or Notepad asking for a user name. The default user name is: “admin1234”. This account ID cannot be changed or deleted. Type in the user name, then click Enter.
- The default first device logon password is: “1234ABCDefg!@#”. Type in the password, then click Enter. (At first logon the administrator must set a new, nondefault, password. The new password must be at least: 8 characters long but not longer than 24k; at least one capital and one lower-case letter; at least one number; at least one symbol).
- Once authentication succeeded, type option 3 – configure sc followed, then click Enter.
- Under configure sc, type option 7 – RGB fp configuration, then click Enter.
- On choosing Option 7 – RGB Front Panel Configuration a new menu will appear with the following options:
- Upload FP configuration from a host
- Select Colors for Channels
- 8 Back
- 9 Exit terminal mode
On choosing option 1 – the user can upload an external file with RGB configuration. Option 2 opens a dialog where user will chose the color configuration, as follows:- Select a channel [1..4] (*or 1-8 in 8 Port units) or press esc to go back
- Select a color.
- r – red
- o – orange
- y – yellow
- w – white
- m – mint
- g – green
- c – cyan
- b – blue
- p – purple
- t – magenta
- 8 Back
- Choose option 9, Exit Terminal Mode.

Supported Hardware
The KVM switches support most standard speakers, headsets and USB keyboards and mice.
Note: For security reasons:
- Microphones or headsets with microphones should not be used and are not supported.
- Wireless keyboards, mice and audio should not be used and are not supported.
Models including “UN or UNN” in model name support DVI-D, DisplayPort and HDMI Video both from PCs and Monitors. The maximum supported resolution is 3840X2160 @60Hz. For optimal performance and security reasons it is recommended to use Belkin cable sets to connect PCs and monitors. Belkin offers a complete line up of cables to support customer needs. Please contact your Belkin sales representative or go to Belkin Website:
https://www.belkin.com/business/cybersecurityand-secure-kvm/kvm-switches—secure/secureaccessories/
Environmental
- The operating temperature is 32° to 104° F (0° to 40° C).
- Storage temperature is -4° to 140° F (-20° to 60° C).
- Humidity requirements are 0-80% relative humidity, and non-condensing.
Operating Systems
- Microsoft® Windows®
- Red Hat®, Ubuntu® and other Linux® platforms
- Mac OS® X v10.3 and higher
Power
- 12-volt DC (+/- 10%) , 2.5-Amp (max)
- F1DN102KVM-UN-4 and
- F1DN102KVM- Dimensions
- 12.5 (W)x1.9 (H)x6.2 (L) Inches, Weight: 3.9 Lbs
- 317.5, (W)x48.3 (H)x157.5 (L) mm, Weight: 1.77 kg
- F1DN202KVM-UN-4 and
- F1DN202KVM-UNN4 Dimensions
- 12.5 (W)x1.9 (H)x6.2 (L) Inches, Weight: 3.9 Lbs
- 317.5 (W)x48.3 (H)x157.5 (L) mm, Weight: 1.77 kg
- F1DN104KVM-UN-4,
- F1DN104KVMUNN4Z and
- F1DN104KVM-UNN4 Dimensions
- 12.5 (W)x1.9 (H)x6.2 (L) Inches, Weight: 3.9 Lbs
- 317.5 (W)x48.3 (H)x157.5 (L) mm, Weight: 1.77 kg
- F1DN204KVM-UN-4,
- F1DN204KVMUNN4Z and
- F1DN204KVM-UNN4 Dimensions
- 12.5 (W)x2.5 (H)x6.2 (L) Inches, Weight: 4.85 Lbs
- 317.5 (W)x63.5 (H)x157.5 (L) mm, Weight: 2.2 kg
This product is certified to the NIAP Protection Profile PSD version 4.0, a certification for peripheral sharing switch devices. In addition we, Belkin International Inc, of 555 S. Aviation Blvd. Suite 180, El Segundo, CA 90245- 4852, declare under our sole responsibility that the products described in this carton comply to the declarations found at:
https://www.belkin.com/us/supportarticle?
articleNum=316284
Documents / Resources
 |
belkin F1DN102KVM-UNN4 Secure Desktop KVM Switch [pdf] Installation Guide F1DN102KVM-UNN4, F1DN202KVM-UNN4, F1DN104KVM-UNN4, F1DN104KVMUNN4Z, F1DN204KVM-UNN4, F1DN204KVMUNN4Z, F1DN102KVM-UN-4, F1DN202KVM-UN-4, F1DN104KVM-UN-4, F1DN204KVM-UN-4, F1DN102KVM-UNN4 Secure Desktop KVM Switch, F1DN102KVM-UNN4, Secure Desktop KVM Switch, Desktop KVM Switch, KVM Switch, Switch |