
SIHOO B300-PRO
SIHOO B300-PRO Ergonomic Office Chair Instruction Manual
Model: B300-PRO
1. Introduction
Thank you for choosing the SIHOO B300-PRO Ergonomic Office Chair. This manual provides essential information for the safe assembly, operation, and maintenance of your new chair. Please read these instructions carefully before use and retain them for future reference.
The SIHOO B300-PRO is designed to provide comprehensive ergonomic support, featuring a breathable mesh backrest and seat, multi-directional lumbar support, 6D adjustable armrests, and a reclining mechanism to enhance comfort during extended periods of sitting.

Image: The SIHOO B300-PRO ergonomic office chair, showcasing its design in a workspace.
2. Safety Information
- Weight Limit: Do not exceed the maximum weight capacity of 150 kg (330 lbs).
- Proper Use: Use the chair only for its intended purpose as an office chair. Do not stand on the chair or use it as a step stool.
- Children: Keep children away from the chair during assembly and adjustment to prevent injury.
- Maintenance: Regularly check all bolts and screws to ensure they are tightened. Retighten if necessary.
- Floor Protection: For hard floors, consider using a chair mat to prevent scratches and damage.
3. Package Contents
Before assembly, ensure all parts are present and undamaged. If any parts are missing or damaged, please contact customer support.
- Backrest Assembly
- Seat Cushion Assembly
- Armrests (Left and Right)
- Headrest
- Gas Lift Cylinder
- Star Base
- Casters (5 pieces)
- Mechanism Plate
- Hardware Kit (screws, washers, Allen wrench)
- Gloves (for assembly)
- Instruction Manual (this document)
4. Assembly Instructions
Assembly typically takes 30-60 minutes. It is recommended to assemble the chair on a soft, clean surface to prevent damage. Follow the included pictorial guide for detailed steps.
- Attach Casters to Base: Insert the five casters into the holes at the end of each leg of the star base until they click securely into place.
- Insert Gas Lift: Place the gas lift cylinder into the center hole of the star base.
- Attach Mechanism to Seat: Align the mechanism plate with the screw holes on the underside of the seat cushion. Ensure the front of the mechanism faces the front of the seat. Secure with screws using the provided Allen wrench.
- Attach Armrests to Seat: Attach the left and right armrests to the sides of the seat cushion using the designated screws. Pay close attention to the orientation of each armrest.
- Attach Backrest to Seat: Connect the backrest to the seat assembly. Ensure all screw holes align and tighten securely.
- Attach Headrest: Slide the headrest into the top of the backrest until it is securely in place.
- Connect Seat to Gas Lift: Carefully place the assembled seat and backrest onto the gas lift cylinder, ensuring it is centered and stable.
Important: Double-check the orientation of the armrests and the seat mechanism during assembly to avoid re-assembly.
5. Operating Instructions
Your SIHOO B300-PRO chair offers multiple adjustment features for personalized comfort. All primary adjustments are conveniently located under the seat.

Image: Overview of the chair's comprehensive adjustment capabilities.
5.1. Chair Height Adjustment
- To raise the chair, lift the lever located under the right side of the seat while taking your weight off the seat.
- To lower the chair, lift the lever while seated.
- The chair features a 5-stage height adjustment for optimal desk alignment.
5.2. Reclining Function
- The chair offers 3 reclining angles: 110°, 123°, and 135°.
- To recline, locate the lever under the left side of the seat. Pull the lever outwards to unlock the recline, lean back to your desired angle, and push the lever inwards to lock it.
- The smart mechanism automatically adjusts recline resistance based on your body weight.

Image: Demonstrating the 135-degree recline function for relaxation.
5.3. Lumbar Support Adjustment
The multi-directional lumbar support adapts to your lower back curve.

Image: Visual guide to the 4D micro-precise lumbar support, showing vertical, horizontal, depth, and rotational adjustments.
- Height Adjustment (50mm): Use the knob on the side of the lumbar support to move it up or down.
- Depth Adjustment (20mm): Push or pull the lumbar support to adjust its forward/backward position.
- Micro-Adjustment (10mm): Fine-tune the lumbar support depth for precise fit.
- Rotational Adjustment (3°): Adjust the angle of the lumbar support for optimal spinal alignment.
5.4. 6D Armrest Adjustment
The 6D armrests offer extensive customization to support your arms and shoulders in various postures.

Image: Breakdown of the 6D armrest adjustments, including height, depth, width, rotation, and recline linkage.
- Height (4.5cm): Press the button on the side of the armrest and move it up or down.
- Forward/Backward (4.5cm): Slide the armrest pad forward or backward.
- Left/Right (15cm): Slide the armrest pad horizontally.
- Rotation (360°): Rotate the armrest pad to your preferred angle.
- Recline Linkage: The armrests move in conjunction with the chair's recline, maintaining support.
- Rebound (100°): The armrests can be flipped up or down.
5.5. Headrest Adjustment
The 3D bionic wide headrest provides comprehensive support for your head and neck.
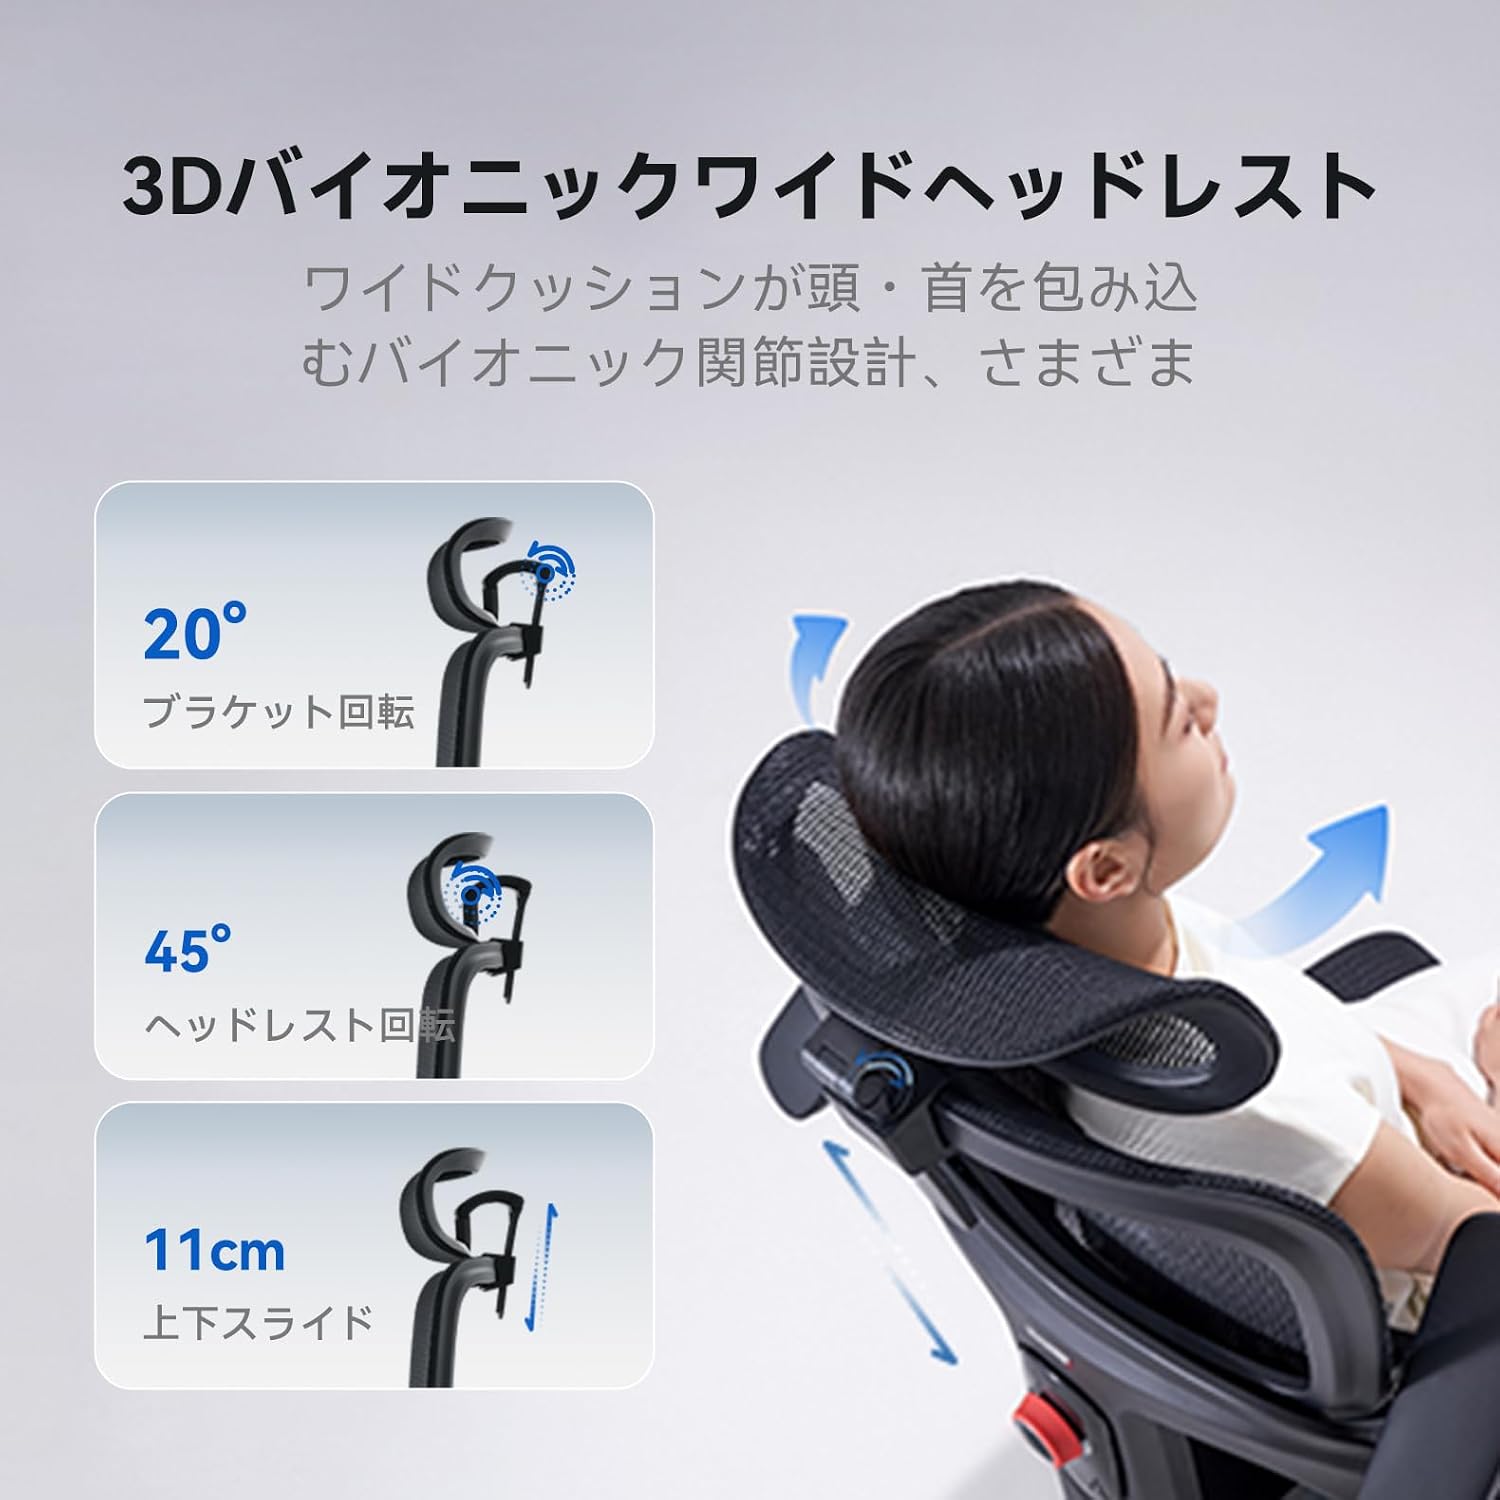
Image: Details of the headrest adjustments, including bracket rotation, headrest rotation, and vertical slide.
- Bracket Rotation (20°): Adjust the angle of the headrest bracket.
- Headrest Rotation (45°): Tilt the headrest pad for optimal comfort.
- Vertical Slide (11cm): Move the headrest up or down to match your height.
5.6. Seat Cushion Adjustment
The 48.5cm wide seat cushion offers 3 stages of adjustment to suit different activities.

Image: Visual representation of the seat cushion's 3-stage adjustment, controlled by a single lever.
- Stage 1: Focused work (forward position).
- Stage 2: Relaxed reading (mid position).
- Stage 3: Napping/rest (rearward position).
- Adjust the seat cushion position using the lever under the seat.
6. Maintenance
- Cleaning: Wipe the chair frame with a soft, damp cloth. For the mesh fabric, use a mild soap solution and a soft brush, then wipe clean with a damp cloth and allow to air dry. Avoid harsh chemicals or abrasive cleaners.
- Inspection: Periodically check all screws and bolts to ensure they are tight. Retighten as needed to maintain stability and safety.
- Casters: Keep casters free of hair and debris to ensure smooth movement.
7. Troubleshooting
| Problem | Possible Cause | Solution |
|---|---|---|
| Chair is unstable or wobbly. | Loose screws or bolts. | Check and tighten all assembly screws and bolts. |
| Chair does not adjust height. | Gas lift cylinder malfunction or lever not engaged. | Ensure the height adjustment lever is fully engaged. If the issue persists, the gas lift may need replacement. Contact customer support. |
| Casters do not roll smoothly. | Debris caught in casters. | Remove any hair or debris from the caster wheels. |
| Squeaking noises. | Loose connections or friction between parts. | Tighten all screws. Apply a small amount of silicone lubricant to moving parts if necessary, avoiding contact with mesh. |
8. Specifications

Image: Detailed product dimensions and key features.
- Brand: SIHOO
- Model: B300-PRO
- Color: Black
- Material: Polypropylene, Mesh
- Product Dimensions (D x W x H): 72 cm x 73.5 cm x 110-135.5 cm (adjustable height)
- Item Weight: 18.5 kg
- Maximum Weight Capacity: 150 kg (330 lbs)
- Reclining Stages: 3 (110°, 123°, 135°)
- Armrest Type: 6D Adjustable
- Lumbar Support: Multi-directional (4D micro-precise)
- Headrest: 3D Bionic Wide, Adjustable
- Assembly Required: Yes
- Country of Origin: China
9. Warranty and Support
The SIHOO B300-PRO office chair comes with a 3-year quality guarantee from the date of purchase. This warranty covers manufacturing defects and material flaws under normal use.
For warranty claims, technical support, or any questions regarding your product, please contact SIHOO customer service through the retailer where you purchased the chair or visit the official SIHOO website for contact information.
Please retain your proof of purchase for warranty validation.
Related documentsB300-PRO


Ask a question about this manual
Ask about setup, troubleshooting, compatibility, parts, safety, or missing instructions. Manuals+ will review the question and use this page’s manual context to help answer it.