
1. Introduction
This manual provides instructions for the LMHOME PR903WD Wi-Fi Trail Camera. This device is designed for outdoor surveillance, wildlife monitoring, and security applications. It features 4K video recording, 60MP photo capture, and a rapid trigger speed. Equipped with a 5200mAh battery and an integrated solar panel, it ensures extended operation in remote areas. The camera offers advanced night vision capabilities and can be conveniently controlled via the 'TrailCam GO' smartphone application.

Image: The LMHOME PR903WD Trail Camera highlighting its solar power and key features like 4K video and 60MP images.
2. Setup
2.1 Unboxing and Components
Verify that all components are present in the package:
- 1 x LMHOME PR903WD Trail Camera
- 1 x Installation Belt
- 1 x USB Cable
- 1 x Bracket Holder
- 3 x Screws and Stoppers
- 1 x 32GB SD Card (pre-installed or included separately)
2.2 Battery and Solar Panel
The camera features a built-in 5200mAh battery and an integrated solar panel. The solar panel automatically recharges the battery when exposed to sunlight, ensuring continuous operation. For initial setup or prolonged cloudy periods, the camera can also be charged via the provided USB cable connected to a power adapter or power bank.
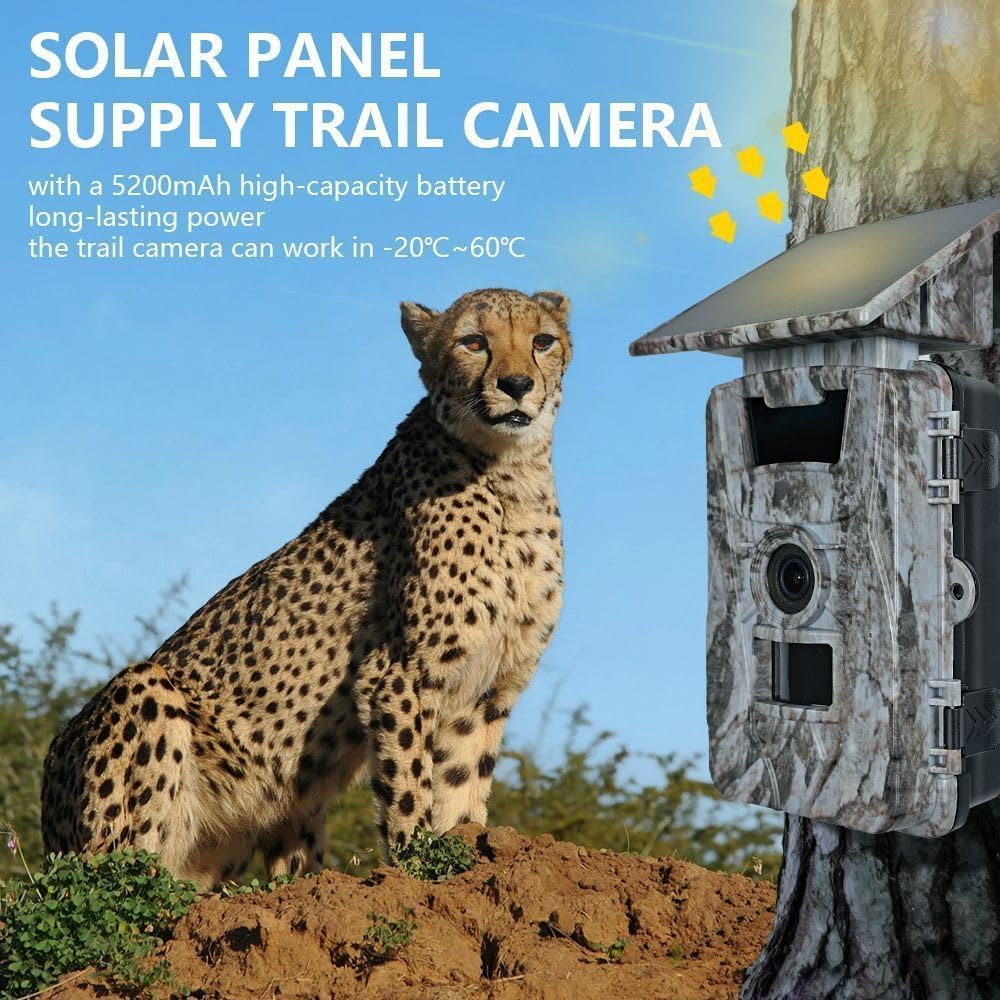
Image: The LMHOME PR903WD Trail Camera with its solar panel, illustrating its self-sustaining power feature.
2.3 SD Card Insertion
Locate the SD card slot on the camera. Insert the provided 32GB SD card with the metal contacts facing the correct direction until it clicks into place. Ensure the card is properly seated before closing the compartment cover.
2.4 Mounting the Camera
Choose a suitable location for your camera, considering the desired field of view and sunlight exposure for the solar panel. Use the included installation belt to secure the camera to a tree or pole. Alternatively, use the bracket holder, screws, and stoppers to mount the camera on a wall or other flat surface. Adjust the camera's angle to cover the target area effectively.
2.5 App Installation and Connection
To control the camera and access recordings, download the 'TrailCam GO' application on your smartphone (available for iOS and Android). Enable Bluetooth and Wi-Fi on your phone. Open the 'TrailCam GO' app and follow the on-screen instructions to pair your smartphone with the camera. The Wi-Fi connection range is approximately 15 meters (49 feet) and requires an unobstructed line of sight between the phone and the camera.

Image: A smartphone connected to the trail camera via the 'TrailCam GO' app, demonstrating remote control and viewing.
3. Operating the Camera
3.1 Powering On/Off
To power on the camera, slide the power switch to the 'ON' position. The camera will perform a self-check. To power off, slide the switch to 'OFF'.
3.2 Recording Modes
The camera supports both photo and video recording. You can configure the desired mode and resolution settings via the 'TrailCam GO' app.
- Photo Resolution: Up to 60MP
- Video Resolution: Up to 4K UltraHD

Image: The trail camera demonstrating its 4K video resolution by capturing a clear image of a seagull.
3.3 Motion Detection and Trigger Speed
The camera features a highly sensitive Passive Infrared (PIR) motion sensor with a 120-degree detection angle. When motion is detected, the camera triggers within 0.3-0.6 seconds to capture images or video. You can adjust the PIR sensitivity and trigger settings through the app.
3.4 Night Vision
Equipped with 46 pieces of 940nm infrared LEDs, the camera provides clear night vision without emitting a visible glow that could disturb wildlife. The infrared range extends up to 20 meters (65 feet), allowing for detailed recordings in complete darkness.

Image: A deer captured by the trail camera using its night vision feature, showing clear detail in low light.
3.5 Data Transfer and Viewing
Recorded photos and videos can be viewed and downloaded directly to your smartphone via the 'TrailCam GO' app. Connect to the camera's Wi-Fi, open the app, and navigate to the gallery section.
4. Maintenance
4.1 Cleaning
Regularly clean the camera lens, PIR sensor, and solar panel with a soft, dry cloth to ensure optimal performance. Avoid using abrasive cleaners or solvents.
4.2 Battery Care
Ensure the solar panel is kept clear of obstructions to maximize charging efficiency. If the camera is stored for an extended period, fully charge the internal battery before storage and periodically recharge it to maintain battery health.
4.3 SD Card Management
Format the SD card periodically using the camera's settings (accessible via the app) to prevent data corruption and ensure optimal recording performance. Replace the SD card if it shows signs of wear or malfunction.
4.4 Weather Resistance
The LMHOME PR903WD camera is rated IP66 for water and dust resistance, making it suitable for outdoor use in various weather conditions, including rain, wind, snow, and ice. Ensure all compartment covers are securely closed to maintain its weather-resistant seal.

Image: The trail camera demonstrating its IP66 weather resistance against dust, rain, ice, and snow.
5. Troubleshooting
5.1 Camera Not Powering On
- Check if the power switch is in the 'ON' position.
- Ensure the internal battery is charged. Connect the camera to a power source via USB or ensure the solar panel is receiving adequate sunlight.
5.2 No Recordings or Poor Image Quality
- Verify that the SD card is correctly inserted and has sufficient free space. Format the SD card if necessary.
- Check the camera's settings via the app to ensure the recording mode (photo/video) and resolution are correctly configured.
- Clean the camera lens and PIR sensor to remove any dirt or obstructions.
- Ensure the camera is positioned within the effective range of the subject and that there are no obstructions blocking the PIR sensor.
5.3 App Connection Issues
- Ensure Bluetooth and Wi-Fi are enabled on your smartphone.
- Make sure your smartphone is within 15 meters (49 feet) of the camera and there are no significant physical obstructions.
- Restart both the camera and your smartphone, then try connecting again.
- Check if the 'TrailCam GO' app has the necessary permissions (e.g., location, storage) on your smartphone.
6. Specifications
| Model Number | PR903WD |
| Image Sensor | 3 MP CMOS 1/3" |
| Photo Resolution | Up to 60 MP |
| Video Resolution | 4K/2.7K/1080P/720P |
| Video Format | MP4 (H.264) |
| Trigger Time | 0.3s - 0.6s |
| PIR Detection Angle | 120 degrees |
| Lens Angle | 100 degrees |
| IR LEDs | 46 pcs 940 nm (No-Glow) |
| Night Vision Range | 1-20 meters (65 feet) |
| Display Screen | 2.0" LCD |
| Battery | Built-in 5200 mAh |
| Connectivity | Wi-Fi, Bluetooth, HDMI |
| Water Resistance | IP66 |
| Operating Temperature | -20°C to 60°C (-4°F to 140°F) |
| Dimensions | 7 x 5 x 14 cm (2.76 x 1.97 x 5.51 inches) |
| Weight | 167 Grams (0.37 lbs) |

Image: The camera's 120-degree wide-angle field of view, illustrating its broad coverage.
7. Warranty and Support
For detailed warranty information, technical assistance, or customer support, please refer to the official LMHOME website or contact their customer service department directly. Keep your purchase receipt as proof of purchase for any warranty claims.