
1. Introduction
This manual provides detailed instructions for the assembly, operation, and maintenance of your DUMOS L-Shaped Desk. Please read all instructions carefully before beginning assembly and retain this manual for future reference.
Key features of your desk include:
- Multiple Storage Options: Three sturdy fabric drawers, each supporting up to 22 lbs, ideal for files, notebooks, or office supplies.
- Adjustable Open Shelves: Flexible storage for books, decor, or a CPU tower, reducing desktop clutter.
- Convenient Charging Station: Integrated with 3 outlets, 1 USB port, and 1 Type-C port for powering various devices.
- Flexible Storage Design: Reversible shelves and drawers can be installed on either side to suit your room layout.
- Steel X-Bar Support: Strong steel frame with X-bar reinforcement ensures stability, supporting up to 198 lbs.
- Durable MDF Board: Crafted from premium P2-grade engineered wood with a water-resistant, wear-resistant, and scratch-resistant smooth finish.
2. Setup and Assembly
Please follow the step-by-step instructions below for proper assembly. It is recommended to have a second person assist with assembly for ease and safety.
Official assembly video for the DUMOS L-Shaped Desk. This video demonstrates the complete assembly process from unboxing to final setup.
2.1. Unpacking and Part Identification
Carefully unpack all components and lay them out on a clean, soft surface to prevent scratches. Verify all parts are present against the included parts list. If any parts are missing or damaged, please contact customer support.
2.2. Frame Assembly
- Assemble the main metal frames for both the desk and the shelving unit. Ensure all screws are tightened securely.
- Attach the crossbars to the main frames, ensuring they are properly aligned.
- Connect the two main sections of the desk frame using the provided connectors and screws. Ensure the designated holes for the X-bar support face outward as illustrated in the diagram.
2.3. Shelf Installation
- Insert the wooden shelves into the designated slots on the shelving unit. Adjust the height of the middle shelf according to your needs using the pre-drilled holes. Secure the shelves with screws.
- Attach the desktop panels to the assembled frame. Ensure all connections are firm.
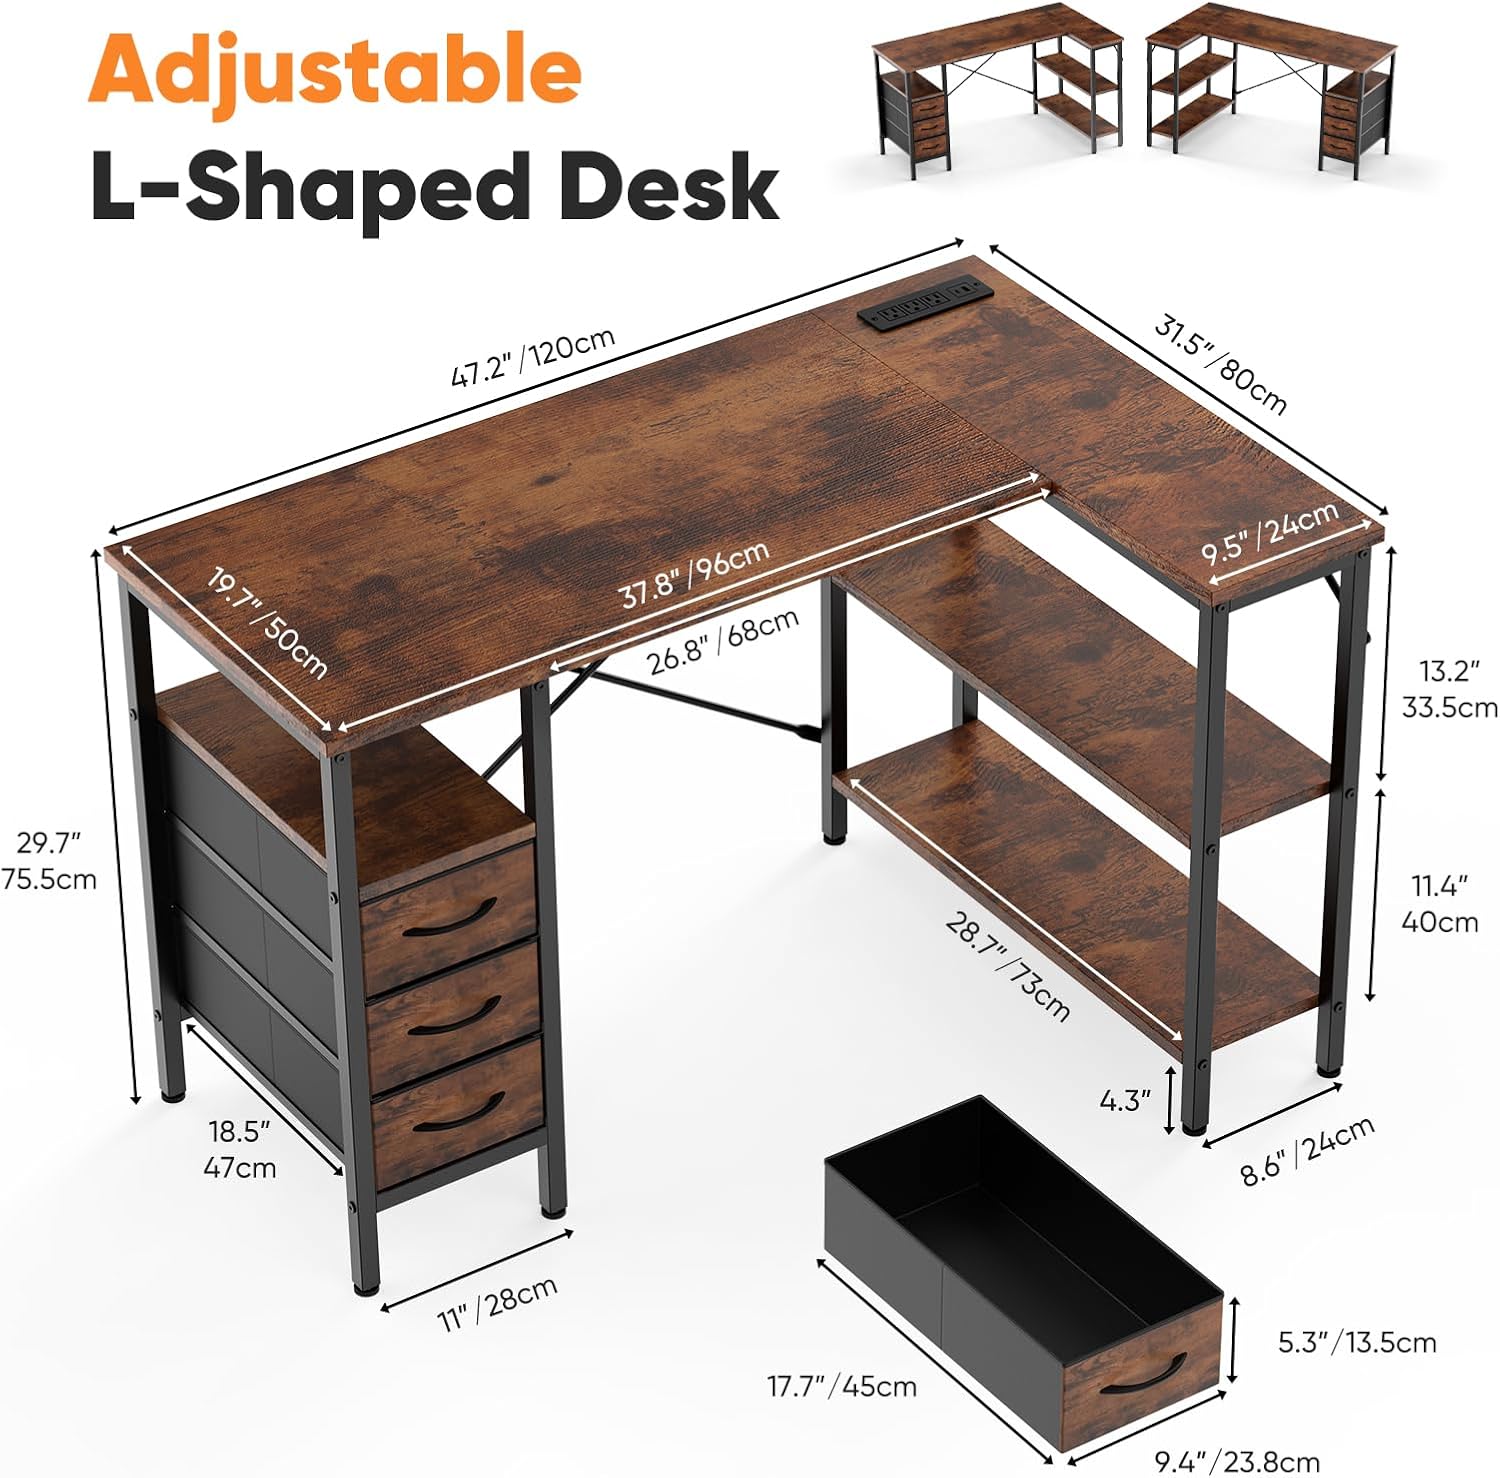
Figure 1: Desk Dimensions and Component Layout. Refer to this diagram for overall measurements and component placement during assembly.
2.4. X-Bar Support and Power Outlet Installation
- Install the steel X-bar support at the back of the desk frame for enhanced stability. Secure it firmly with the provided hardware.
- Place the power outlet unit into the pre-cut opening on the desktop. Secure it with screws.

Figure 2: Steel X-Bar Support and Adjustable Feet. The X-bar provides structural integrity, and adjustable feet ensure stability on uneven surfaces.
2.5. Drawer Assembly
- Assemble the fabric drawers by inserting the bottom panel and attaching the wooden front panel with the handle.
- Slide the assembled drawers into the designated compartments.

Figure 3: Fabric Storage Drawers. These drawers offer ample space for organizing office supplies and personal items.
3. Operating the Power Outlet
Your DUMOS L-Shaped Desk includes a built-in power outlet for convenient charging of your electronic devices. The unit features 3 standard outlets, 1 USB-A port, and 1 Type-C port.
- Connect the desk's power cord to a standard wall outlet.
- Plug your devices into the available outlets or USB/Type-C ports.
- Caution: Risk of Electric Shock. Do not open. For indoor use only. Ensure the total power draw of connected devices does not exceed the unit's maximum rating.

Figure 4: Integrated Power Outlet. Provides easy access to power for laptops, monitors, tablets, and smartphones.
4. Maintenance
To ensure the longevity and appearance of your DUMOS L-Shaped Desk, follow these maintenance guidelines:
- Cleaning: Wipe surfaces with a damp cloth, then dry immediately with a clean, dry cloth. Avoid abrasive cleaners or harsh chemicals that may damage the finish.
- Spills: Promptly wipe up any spills to prevent staining or damage to the wood surface.
- Weight Capacity: Do not exceed the maximum weight recommendation of 198 lbs on the desktop. Each fabric drawer supports up to 22 lbs.
- Stability: Periodically check all screws and connections to ensure they remain tight. Re-tighten if necessary.
- Environmental Conditions: Avoid placing the desk in direct sunlight or near heat sources, as this can cause warping or fading.
5. Troubleshooting
If you encounter any issues with your DUMOS L-Shaped Desk, please refer to the following common solutions:
- Wobbly Desk: Ensure all screws are fully tightened. Check that the adjustable feet are properly leveled on uneven floors.
- Parts Not Fitting: Double-check the orientation of parts against the assembly diagrams. Some parts may appear similar but have specific orientations (e.g., designated holes facing outward). Do not force parts together.
- Power Outlet Not Working: Verify the desk's main power cord is securely plugged into a functional wall outlet. Check for any tripped circuit breakers.
- Damaged or Missing Parts: If you received damaged or missing components, please contact DUMOS customer support with your purchase details for assistance.
6. Specifications
| Feature | Detail |
|---|---|
| Brand | DUMOS |
| Model Number | D3BC-RT47-DM-B |
| Shape | L-Shape |
| Product Dimensions (D x W x H) | 31.5"D x 47"W x 29.7"H |
| Color | Brown |
| Style | Modern |
| Top Material Type | Wood (P2-grade engineered wood) |
| Frame Material Type | Steel |
| Maximum Weight Recommendation | 198 Pounds |
| Number of Drawers | 3 (Fabric) |
| Number of Shelves | 1 (Adjustable) |
| Power Outlet | 3 AC Outlets, 1 USB-A Port, 1 Type-C Port |
| Special Features | Adjustable Height, Built-In USB Outlet, Reversible Design, Scratch Resistant |
7. Warranty and Customer Support
DUMOS products are designed for quality and durability. For any warranty claims, missing parts, or technical support, please contact DUMOS customer service through your original point of purchase. Please have your model number and purchase date available when contacting support.


