
1. Introduction
The Voswitch JL500 is a power distribution system engineered for Jeep Wrangler JL (2018-Present) and Jeep Gladiator JT (2020-Present) vehicles. This system provides a clean, factory-integrated solution for controlling up to five auxiliary accessories, offering a professional OEM look and simplified wiring for various electrical components.
It features a 5-switch control panel designed to mount directly into the factory headlamp switch bezel, eliminating the need for bulky universal switch boxes. The system includes a pre-wired harness and a custom under-hood mounting bracket for a plug-and-play installation.
2. Product Overview & What's Included
The Voswitch JL500 kit provides all necessary components for installation and operation. Familiarize yourself with each part before beginning the installation process.
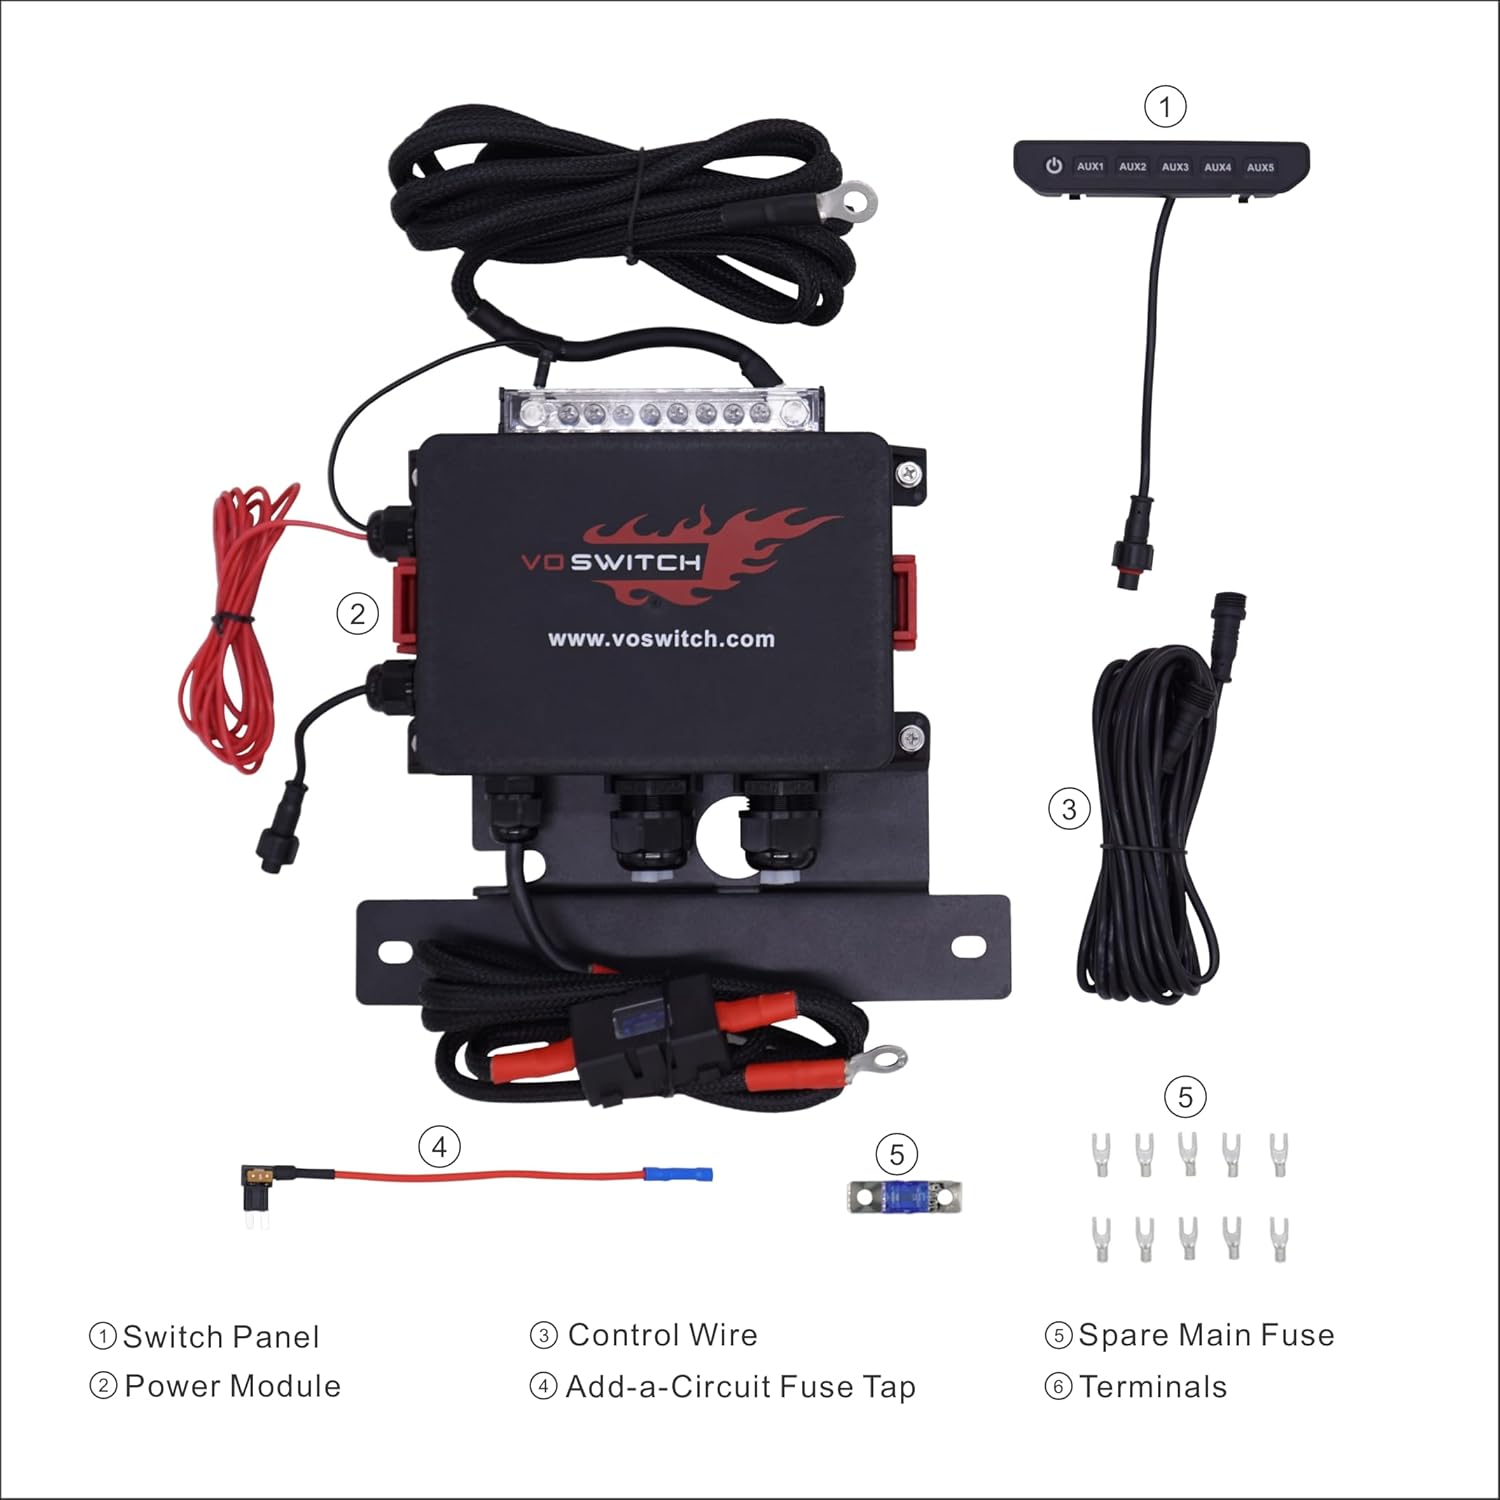
Image 2.1: Voswitch JL500 Kit Contents. This image displays all components included in the Voswitch JL500 package, clearly labeled for identification.
- (1) JL500 Power Module: The central unit for power distribution and control.
- (1) Switch Panel: The 5-switch control interface for the vehicle's interior.
- (1) Under-Hood Mounting Bracket: Secures the power module in the engine bay.
- (1) 100A In-Line Fuse & Battery Cable Set: Provides main power connection and protection.
- All required mounting hardware and terminals: For secure installation and accessory connections.
3. Compatibility Check
The Voswitch JL500 is designed for specific Jeep models and configurations. Please verify your vehicle's compatibility before installation.
- Compatible Vehicles: Jeep Wrangler JL (2018-Present) and Jeep Gladiator JT (2020-Present).
- Exclusions: This system is NOT compatible with Wrangler 4xe or 392 models.
- Bezel Requirement: If your Wrangler or Gladiator features a factory decorative plug next to the headlight switch, the JL500 snaps directly into that slot without requiring a new bezel. For vehicles without this factory decorative plug, a Mopar Bezel (Part #6NU24TX7AB or 7FS801A8AB) is required and must be purchased separately.

Image 3.1: Headlamp Switch Bezel Compatibility. This image illustrates how to check for the factory decorative plug in your Jeep's headlamp switch bezel, and shows the Mopar replacement bezel required if the plug is absent.
4. Setup & Installation
The Voswitch JL500 is designed for a 100% plug-and-play installation, requiring no trimming, drilling, or wire splicing. Follow these general steps for a successful setup.
4.1. Power Module Installation
- Identify a suitable location under the hood for the JL500 Power Module, typically near the battery. The custom under-hood mounting bracket is designed for this purpose.
- Securely attach the power module to the mounting bracket, then install the bracket in the chosen location using the provided hardware.
- Connect the 100A in-line fuse and battery cable set to your vehicle's battery terminals, ensuring proper polarity (red to positive, black to negative).
- Route the main power cables and control wires away from moving parts and heat sources, securing them with cable ties.

Image 4.1: Power Module Installed. This image shows the Voswitch JL500 Power Module securely mounted under the hood of a Jeep, demonstrating a typical installation.
4.2. Switch Panel Installation
- Locate the factory headlamp switch bezel in your Jeep's interior.
- If your vehicle has a decorative plug in the bezel, carefully remove it. The JL500 switch panel is designed to snap directly into this opening.
- If your vehicle does not have the decorative plug, install the required Mopar replacement bezel (Part #6NU24TX7AB or 7FS801A8AB) first, then insert the JL500 switch panel.
- Connect the switch panel's harness to the main control wire routed from the power module. Ensure all connections are firm.

Image 4.2: Wiring Connections. This image provides a closer look at the power module and its wiring connections, illustrating the pre-wired harness design.
4.3. Connecting Accessories
- Identify the output terminals on the JL500 Power Module for connecting your auxiliary accessories (e.g., LED light bars, air compressors).
- Connect the positive wire of each accessory to its corresponding output terminal on the power module. Ensure proper grounding for all accessories.
- The system uses standard, replaceable relays and fuses for each circuit. Refer to the wiring diagram (if provided separately) for specific circuit assignments and fuse ratings.
5. Operating Instructions
The JL500 switch panel offers intuitive control over your connected accessories with customizable features.
5.1. Basic Operation
- Power On/Off: The system automatically powers up upon ignition. Individual switches control their respective accessories.
- Switch Activation: Press a switch once to activate the connected accessory (Solid ON mode). Press again to turn it off.
5.2. Advanced Features
- Flash/Strobe Mode: For accessories connected to programmable switches, a simple double-click will toggle between Solid (ON) and Flash/Strobe patterns. This feature is useful for increased visibility or signaling.
- Memory Dimming: The switch panel features dimmable backlighting (10%-100%). The system remembers your preferred dimming level for comfortable night driving.
- Low Voltage Disconnect (LVD): The power module includes an LVD feature to protect your vehicle's battery from excessive discharge. If the battery voltage drops below a safe threshold, the system will automatically shut off to prevent a dead battery.
- Sleep Mode: When the vehicle is parked and ignition is off, the system enters a sleep mode to ensure ultra-low power consumption, further protecting your battery.
6. Maintenance
The Voswitch JL500 is designed for reliability and ease of maintenance, utilizing standard automotive components.
- Fuse Replacement: The power module uses standard, replaceable relays and fuses. In the event of a blown fuse, replace it with a fuse of the identical amperage rating. Always carry spare fuses suitable for your accessories.
- Connection Inspection: Periodically inspect all wiring connections, especially those under the hood, to ensure they remain secure and free from corrosion or damage.
- Cleaning: Keep the switch panel and power module clean and free of dirt or debris. Use a soft, dry cloth for cleaning. Avoid harsh chemicals.
7. Troubleshooting
If you encounter issues with your Voswitch JL500 system, refer to the following troubleshooting steps:
- Accessory Not Functioning:
- Verify the corresponding switch on the panel is activated.
- Check the fuse for that specific accessory circuit in the power module. Replace if blown.
- Ensure the accessory's wiring connections to the power module and its ground are secure.
- Test the accessory by connecting it directly to a 12V power source to rule out an accessory fault.
- System Not Powering On:
- Confirm the vehicle's ignition is on. The system powers up with ignition.
- Check the main 100A in-line fuse connected to the battery. Replace if blown.
- Verify all battery cable connections are tight and free of corrosion.
- Ensure the vehicle's battery has sufficient charge. The Low Voltage Disconnect (LVD) may prevent system activation if battery voltage is too low.
- Switch Panel Backlighting Issues:
- Check the dimming settings. Adjust the brightness if necessary.
- Ensure the switch panel's connection to the main control wire is secure.
If these steps do not resolve the issue, contact Voswitch customer support for further assistance.
8. Specifications
| Feature | Specification |
|---|---|
| Model Number | JL500 |
| Brand | Voswitch |
| Compatible Vehicle Types | Jeep Wrangler JL (2018+), Jeep Gladiator JT (2020+) |
| Operating Voltage | 12 Volts (DC) |
| Total Output Current | 100 Amps |
| Number of Switches | 5 |
| Operation Mode | ON-OFF (with Flash/Strobe option) |
| Control Type | Customizable |
| Mounting Type | Panel Mount (Factory Bezel Integration) |
| Connector Type | Plug In |
| Circuit Type | Multi-way |
| Contact Material | Silver |
| UPC | 717373634304 |
9. Warranty & Support
For specific warranty information regarding your Voswitch JL500 Power Distribution System, please refer to the documentation included with your purchase or visit the official Voswitch website. Warranty terms and conditions may vary.
If you require technical assistance, have questions about installation, or need support for your product, please contact Voswitch customer support directly. Contact information can typically be found on the Voswitch website or within your product packaging.


