Introduction
This manual provides detailed instructions for the installation, operation, and maintenance of your WALI Laptop Pole Mount (Model 011ARMLPN). Please read these instructions carefully before use to ensure proper setup and safe operation. This mount is designed to enhance comfort and optimize workspace by elevating your laptop or monitor.
Package Contents
Verify that all components are present before beginning installation:
- Laptop Pole Mount x 1
- Mounting Holes Plate x 1
- User manual x 1
- Necessary hardware (screws, Allen keys)
Product Features
- Universal Compatibility: Fits pole diameters from 1.1" to 2.36" and supports 10"–15.6" laptops (max load 15.4 lbs). Also supports VESA 75x75 or 100x100 mm monitors up to 17.6 lbs.
- Full Motion Flexibility: Offers 10.1" arm extension, +45°/-45° tilt, and +/-90° swivel for optimal viewing angles.
- Ergonomic Comfort: Elevates your device to eye level to reduce neck, shoulder, and eye strain.
- Space-Saving Design: Frees up desktop space by suspending your laptop or monitor.
- Secure & Stable Hold: Equipped with adjustable heavy-duty clamps for a firm, wobble-free setup.
- Vented Laptop Tray: Features air circulation holes to help dissipate heat from your laptop.
- Cable Management: Integrated clips help organize and conceal cables for a tidy workspace.

Image: Close-up of the vented laptop tray, highlighting adjustable clips and slip-resistant pads for secure laptop placement and heat dissipation.
Setup Instructions
Follow these steps to assemble and install your WALI Laptop Pole Mount:
Overview of Installation Steps

Image: A visual guide to the 3-step installation process: 1. Attach the arm onto the pole. 2. Assemble the VESA plate and the laptop tray. 3. Attach the VESA plate to the arm.
Step 1: Attach the Arm onto the Pole
Secure the mounting arm to your existing pole. Ensure the clamps are tightened firmly to prevent movement. The mount is compatible with pole diameters between 1.1" and 2.36".
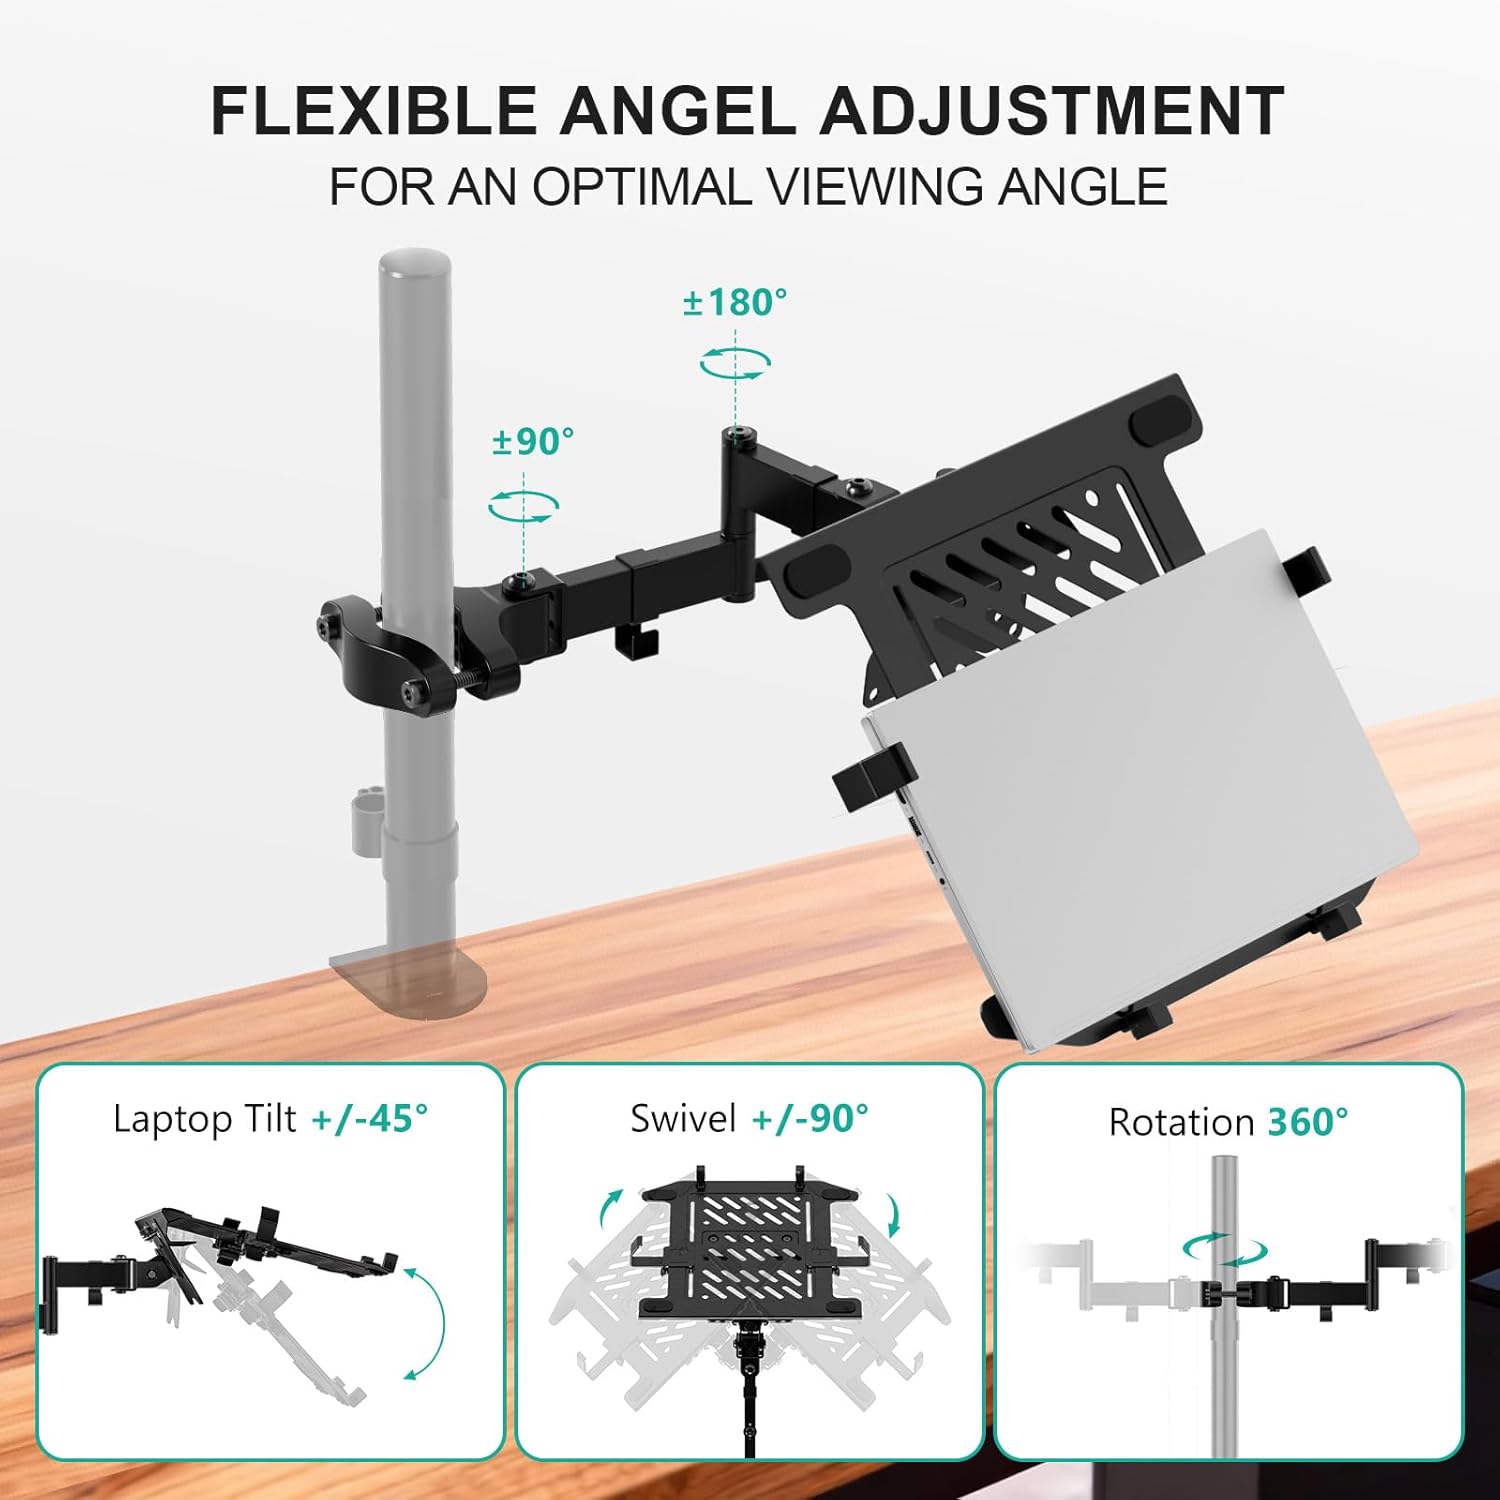
Image: Detailed view of the adjustable clamp, showing M8x55 and M8x70 screws for securing the mount to poles of varying diameters (1.1" to 2.4").
Step 2: Assemble the VESA Plate and Laptop Tray
If using the laptop tray, attach it to the VESA plate using the provided screws. Ensure the tray is securely fastened.
Step 3: Attach the VESA Plate to the Arm
Connect the assembled VESA plate (with or without the laptop tray) to the end of the mounting arm. Secure it with the appropriate hardware. For monitor installation, attach the monitor directly to the VESA plate.
Operating Instructions
The WALI Laptop Pole Mount offers extensive adjustability for optimal viewing and ergonomic comfort:
- Tilt: Adjust the laptop tray or monitor +45° to -45° to reduce glare and find your preferred angle.
- Swivel: Rotate the arm +/-90° to share your screen or reposition your device.
- Rotation: The entire setup can rotate 360° for landscape or portrait orientation.
- Height Adjustment: Loosen the clamp on the pole to slide the arm up or down to your desired height, then re-tighten securely.

Image: Illustration demonstrating the flexible angle adjustments: Laptop Tilt +/-45°, Swivel +/-90°, and Rotation 360°.
Maintenance
To ensure the longevity and optimal performance of your WALI Laptop Pole Mount, follow these maintenance guidelines:
- Regular Cleaning: Wipe down the mount with a soft, damp cloth. Avoid abrasive cleaners that may damage the finish.
- Check Tightness: Periodically inspect all screws and clamps to ensure they remain tight. Re-tighten if any looseness is detected to maintain stability.
- Lubrication: If any joints become stiff, a small amount of silicone-based lubricant can be applied to moving parts.
Troubleshooting
If you encounter any issues with your WALI Laptop Pole Mount, refer to the following common solutions:
- Mount is Wobbling:
- Ensure all clamps securing the arm to the pole are fully tightened.
- Verify that the VESA plate and laptop tray are securely attached to the arm.
- Check the stability of the pole itself.
- Difficulty Adjusting Position:
- Loosen the adjustment screws slightly before attempting to reposition, then re-tighten once the desired position is achieved.
- Apply a small amount of silicone lubricant to the joints if they are excessively stiff.
- Laptop Slipping from Tray:
- Ensure the adjustable clips on the sides of the tray are properly positioned and secured around your laptop.
- Verify that the slip-resistant pads on the tray are intact and providing adequate grip.
Specifications
<| Feature | Detail |
|---|---|
| Model Number | 011ARMLPN |
| Brand | WALI |
| Laptop Size Compatibility | 10" - 15.6" |
| Laptop Weight Capacity | Up to 15.4 lbs |
| Monitor Size Compatibility | 17" - 32" |
| Monitor Weight Capacity | Up to 17.6 lbs |
| VESA Compatibility | 75x75mm, 100x100mm |
| Pole Diameter Compatibility | 1.1" - 2.36" |
| Arm Extension | 10.1" |
| Tilt Range | +45° / -45° |
| Swivel Range | +/-90° |
| Rotation | 360° |
| Color | Black |
| Item Weight | 5.96 pounds |

Image: Diagram illustrating the product dimensions, including pole diameter (1.10"-2.36"), arm extension (4.96" + 3.3" + 3.3"), and laptop tray dimensions (11" x 11.75" with adjustable width 9.5"-16.5").
Warranty and Support
WALI products are designed for durability and performance. For any questions, technical assistance, or warranty information, please refer to the contact details provided in your product packaging or visit the official WALI website. Protection plans are available for purchase separately.
For customer support, you may also refer to the information provided by the retailer.


