1. Introduction
This manual provides comprehensive instructions for the installation, setup, and troubleshooting of your MACHINIST X99 V9S+ M-ATX Motherboard. Please read this guide thoroughly before proceeding with installation to ensure optimal performance and system stability.
2. Key Features & Specifications
- CPU Socket: LGA 2011-3, supporting Intel Xeon E5 V3/V4 series processors and Core i7 5th/6th Gen processors (e.g., E5-1660 V3, E5-2666 V3, E5-2670 V3, E5-2650 V3, E5-2698 V3, E5-1620 V4, E5-2630 V4, E5-2640 V4, E5-2686 V4, E5-2690 V4, i7-5960X, i7-6900K).
- Chipset: Intel C612.
- Memory: 4-Channel DDR4 slots, compatible with ECC, RECC, and non-ECC DDR4 memory. Maximum capacity: 4 x 32GB (128GB total). Server memory and desktop memory cannot be used together. Core i7 series processors are not compatible with Desktop RAM.
- Storage: 3 x NVME M.2 slots (PCIe 3.0 X4 bandwidth, up to 3600MB/s). NGFF M.2 drives are not supported. 6 x SATA 3.0 ports.
- Expansion Slots: 1 x PCIe 3.0 X16 slot, 1 x PCIe 3.0 X4 slot.
- Network: 1 x Gigabit LAN interface.
- USB: USB 3.0 and USB 2.0 ports.
- Audio: HD Audio.
- Power Supply: 6-phase power supply.
- Cooling: VRM cooling fan and heat dissipation armor protection.
- Other: 1 x TPM M.2 interface (supports only ASUS 14PIN TPM module).
Visual Overview

Image: Overview of the MACHINIST X99 V9S Intel Motherboard, highlighting its design and key components.
3. Setup & Installation
3.1 CPU Installation
Carefully align your LGA 2011-3 CPU with the socket on the motherboard. Ensure the CPU is seated correctly before closing the retention mechanism. Do not force the CPU into the socket.

Image: Close-up of the LGA 2011-V3 CPU socket on the motherboard, showing the CPU being inserted.
3.2 Memory (RAM) Installation
Insert DDR4 memory modules into the 4-Channel DDR4 slots. Ensure the notches on the RAM modules align with the slots. Press down firmly on both ends of the module until the clips snap into place. Refer to the motherboard's silkscreen for recommended slot population order for optimal performance.

Image: View of the motherboard highlighting the 4-Channel DDR4 memory slots.
3.3 Storage (NVME M.2 & SATA) Installation
For NVME M.2 SSDs, insert the drive into one of the 3 NVME M.2 slots and secure it with the provided screw. For SATA drives, connect the SATA data cable to the motherboard's SATA 3.0 ports and to your storage device. Connect the SATA power cable from your power supply to the drive.
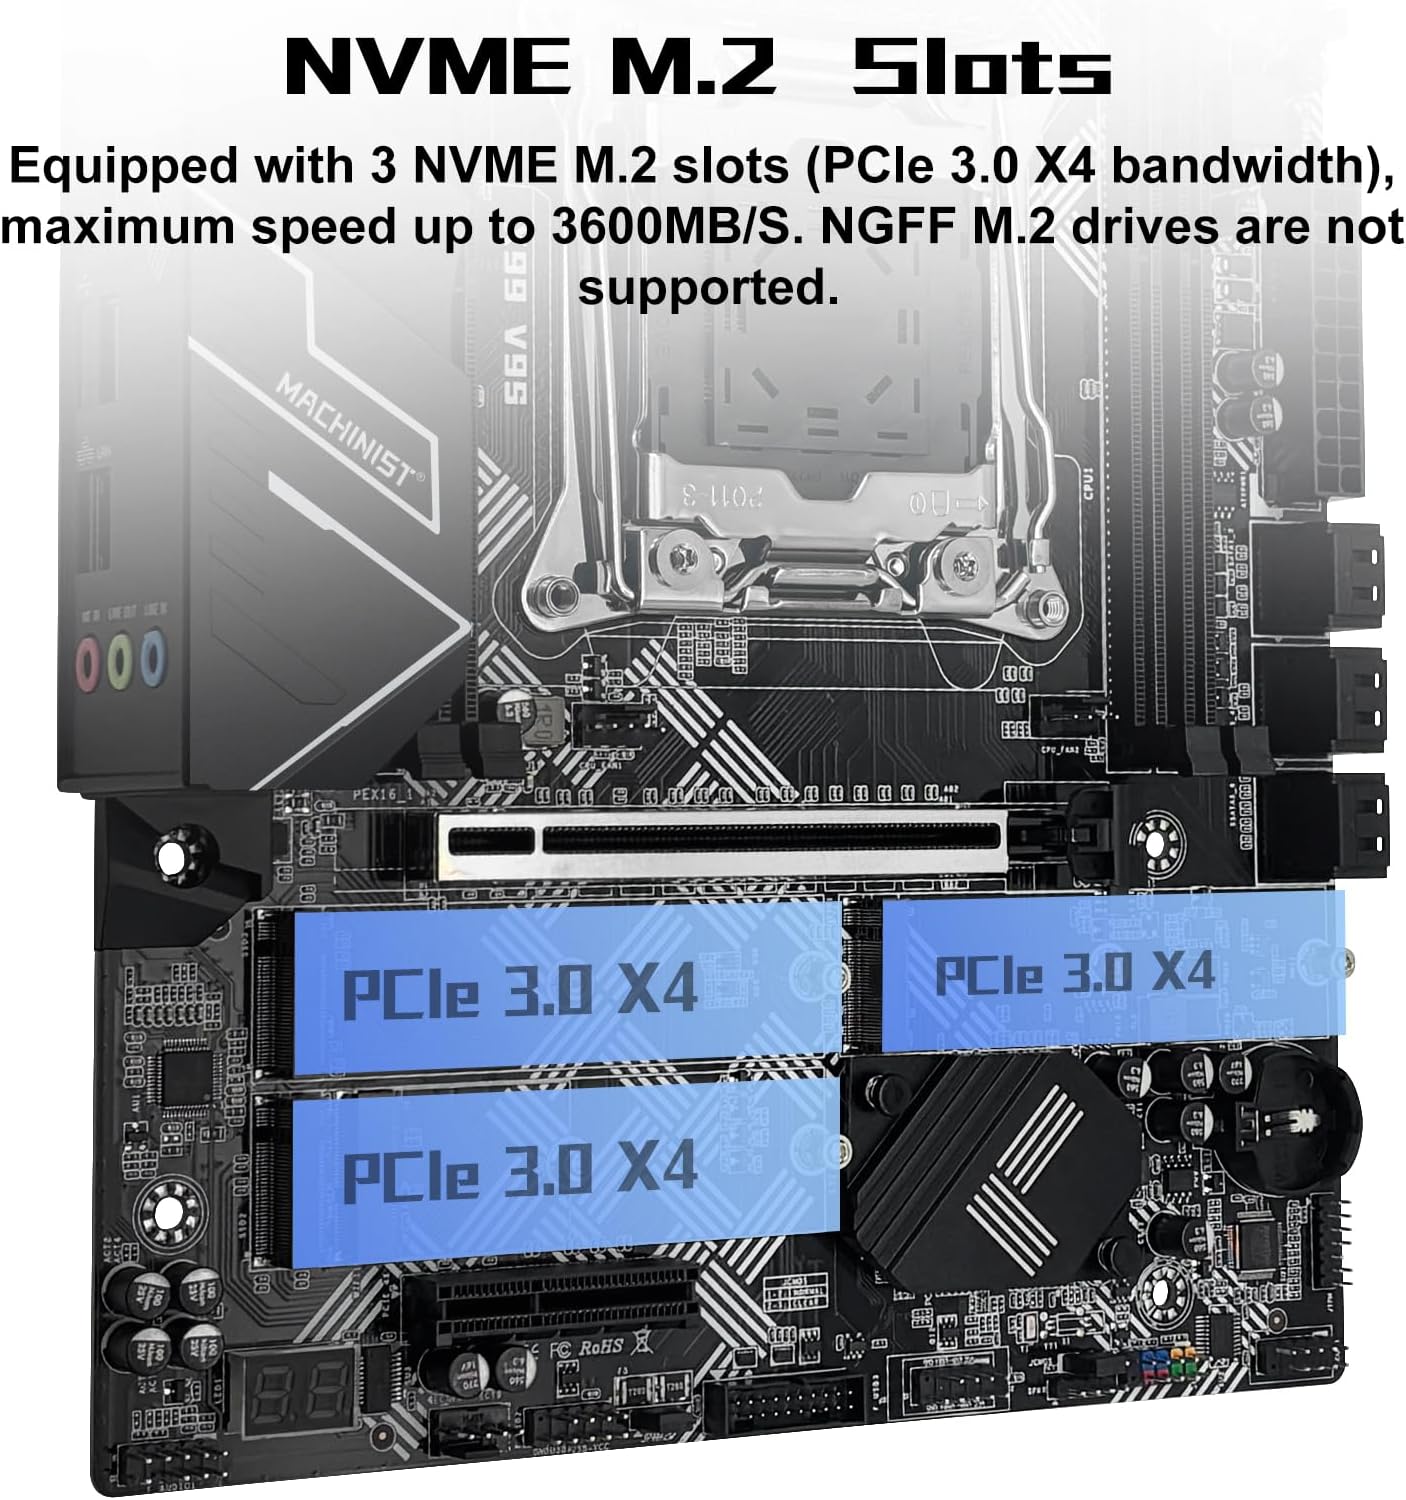
Image: Close-up of the motherboard showing the NVME M.2 slots.
3.4 Expansion Card (PCIe) Installation
Insert your graphics card or other PCIe expansion cards into the appropriate PCIe 3.0 X16 or PCIe 3.0 X4 slots. Ensure the card is fully seated and secured with the case's retention mechanism.

Image: The motherboard's PCIe expansion slots, including PCIe 3.0 X16 and PCIe 3.0 X4.
3.5 Power Connections
Connect the 24-pin ATX main power connector and the 8-pin CPU power connector from your power supply to the corresponding ports on the motherboard. Ensure all power connections are secure.
3.6 Front Panel & Peripheral Connections
Connect your case's front panel connectors (power button, reset button, USB ports, audio jacks) to the corresponding headers on the motherboard. Refer to the motherboard diagram for correct pin assignments.
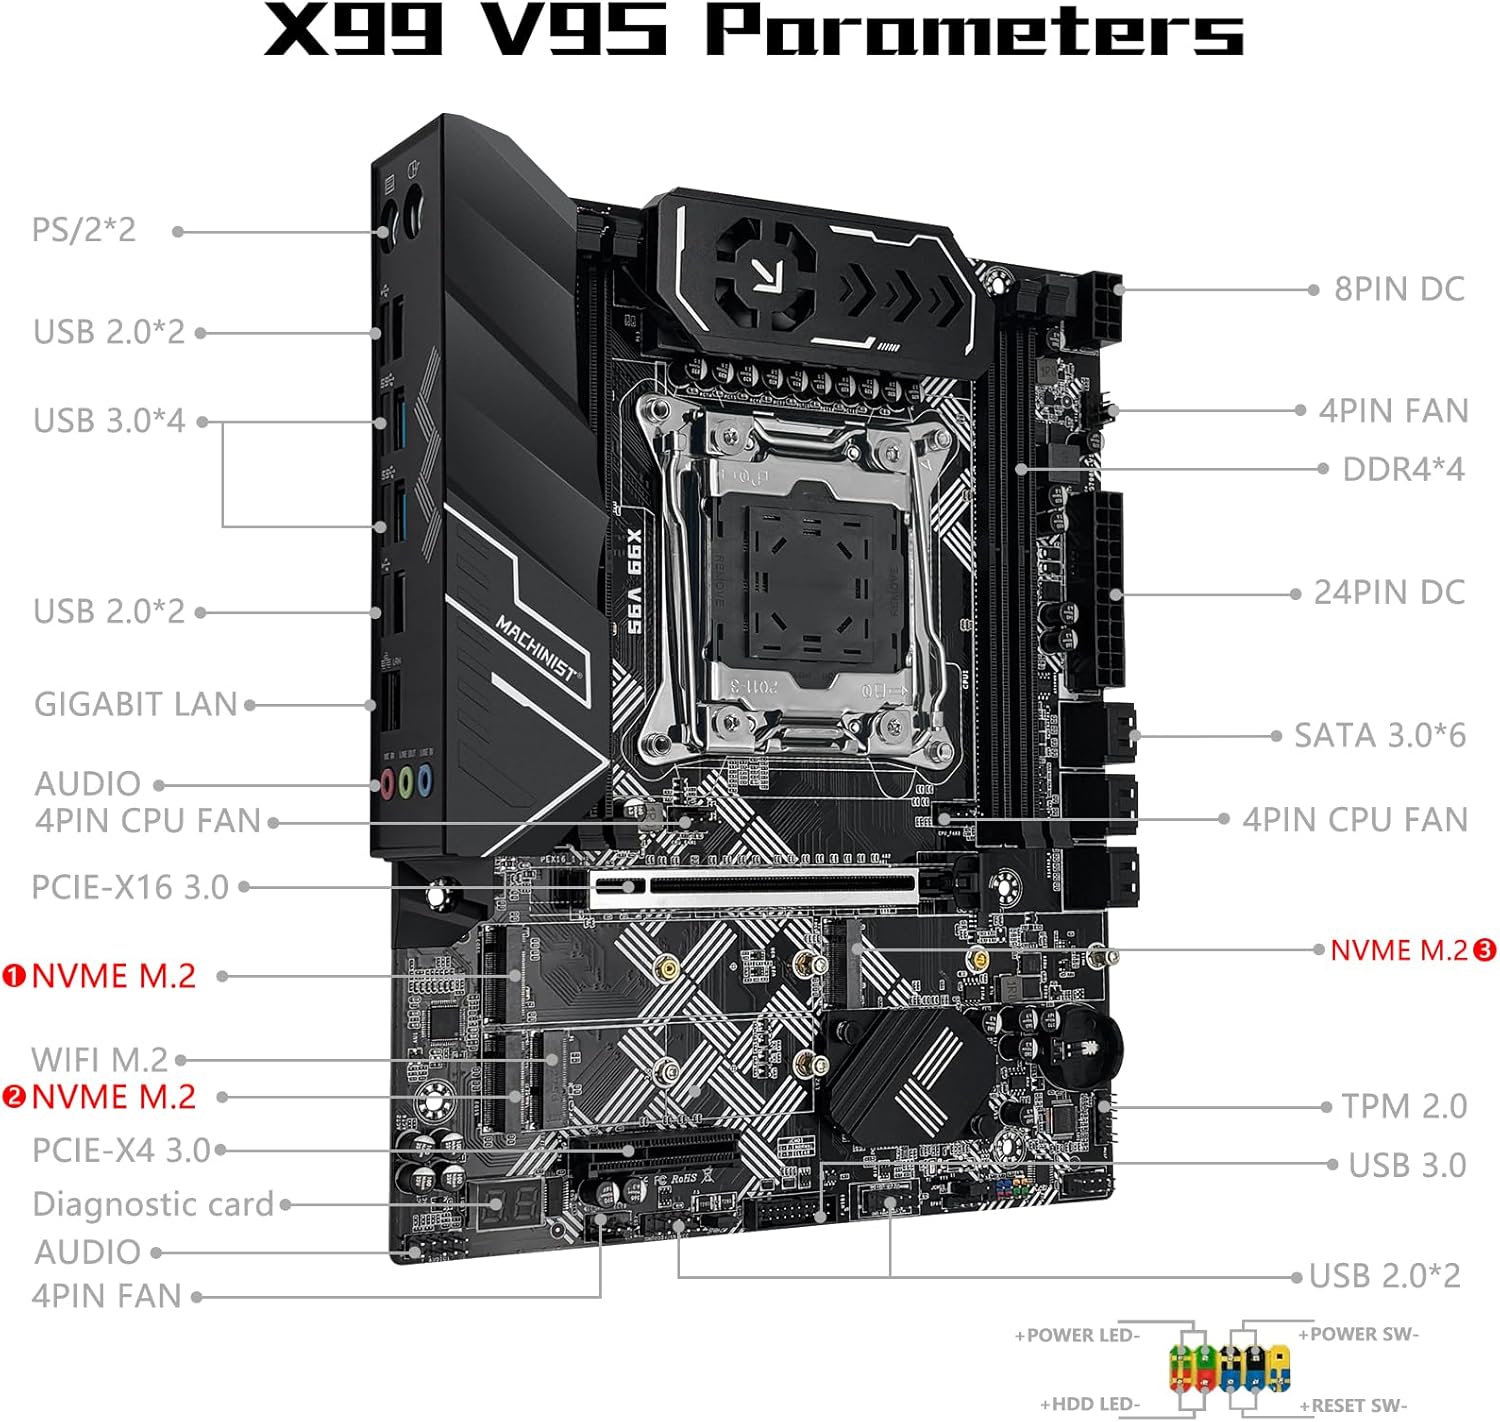
Image: Detailed diagram of the X99 V9S motherboard parameters, showing various ports and headers.
3.7 Clear CMOS
To clear CMOS, disconnect the motherboard's power. Locate the CMOS clear jumper and pull out the jumper cap on pins "1" and "2". Install it on pins "2" and "3" for 5 seconds. Then, place it back on pins "1" and "2".

Image: Visual guide on how to clear the CMOS settings on the motherboard.
4. Operating Instructions
4.1 BIOS/UEFI Setup
Upon first boot, access the BIOS/UEFI setup by pressing the designated key (usually DEL or F2) during startup. Configure boot order, system time, and other essential settings. Save changes and exit to proceed with operating system installation.
4.2 Driver Installation
After installing your operating system, install the necessary drivers for the chipset, LAN, audio, and any other integrated components. Drivers are typically available on the manufacturer's website.
5. Maintenance
To ensure the longevity and stable operation of your motherboard, regularly perform the following maintenance tasks:
- Keep the system clean and free of dust by using compressed air.
- Ensure all cables and components are securely connected.
- Monitor system temperatures to prevent overheating.
- Update BIOS/UEFI firmware and drivers as recommended by the manufacturer.
6. Troubleshooting
6.1 No Power / Fans Don't Spin
If the system does not power on and fans do not spin:
- Verify motherboard and CPU power connections.
- Confirm CPU and memory model compatibility and condition.
- Ensure memory modules are properly seated.
- If the issue persists, clear the CMOS (refer to Section 3.7).
6.2 No Display (Fans Spin, Keyboard Lights Unresponsive)
If there is no display but fans spin and keyboard lights remain unresponsive when pressing Caps Lock:
- Verify motherboard and CPU power connections.
- Ensure memory modules are properly seated.
- Confirm CPU and memory model compatibility and condition.
- If issues persist, clear the CMOS (refer to Section 3.7).
6.3 No Display (Fans Spin, Keyboard Lights Respond)
If there is no display but fans are spinning and the Caps Lock indicator lights up when pressing Caps Lock:
- Verify the monitor is powered on and the display data cable is securely connected.
- Check the condition of the display cable, GPU, and monitor.
- If the issue persists, clear the CMOS (refer to Section 3.7).
7. Package Contents
The retail package for the MACHINIST X99 V9S+ M-ATX Motherboard typically includes:
- 1 x MACHINIST X99 V9S+ M-ATX Motherboard
- 1 x LGA 2011-v3 Cooler Bracket
- 1 x SATA Cable
- 1 x I/O Shield
Note: The CR2032 battery for the motherboard is not included and must be purchased separately. A physical user manual is also not included in the package; this digital document serves as the primary instruction guide.

Image: Contents of the MACHINIST X99 V9S+ M-ATX Motherboard retail box.
8. Official Product Videos
8.1 X99 Motherboard Overview
Video: A detailed overview of an X99 motherboard, showcasing its features and design. This video provides a general understanding of X99 series motherboards.
8.2 Product Overview Video
Video: A general product overview video, highlighting various aspects and components of the motherboard. This video offers a visual tour of the product.
9. Warranty & Support
For specific warranty information and support, please refer to the product listing on Amazon or contact MACHINIST customer service directly. Protection plans may be available for purchase separately.


