1. Introduction
Thank you for choosing the PEXMOR Electric Bike. This manual provides essential information for the safe assembly, operation, maintenance, and troubleshooting of your new electric bicycle. Please read this manual thoroughly before your first ride to ensure proper use and to maximize your riding experience. Keep this manual for future reference.

Figure 1.1: The PEXMOR Electric Bike, a 26-inch fat tire model designed for various terrains.
2. Safety Information
Your safety is paramount. Always adhere to the following safety guidelines:
- Wear a Helmet: Always wear an approved bicycle helmet that fits properly.
- Obey Traffic Laws: Follow all local traffic laws, regulations, and signage.
- Pre-Ride Check: Before each ride, inspect brakes, tires, battery charge, and all quick-release levers.
- Visibility: Use the integrated headlight and consider additional reflective gear, especially when riding at night or in low light conditions.
- Weather Conditions: Exercise caution in wet or slippery conditions. Braking distances increase significantly.
- Weight Limit: Do not exceed the maximum load capacity of 330 lbs (150 kg).
- Age Range: This electric bike is intended for adult use.
3. Package Contents
Upon unpacking, verify that all components are present:
- PEXMOR Electric Bike (85% assembled)
- 48V 14AH LG Removable Battery
- Battery Charger
- Assembly Tools
- User Manual
4. Setup and Assembly
Your PEXMOR Electric Bike arrives 85% assembled. Follow these steps to complete the assembly:
- Unpack: Carefully remove the bike and all components from the packaging.
- Install Front Wheel: Attach the front wheel to the fork. Ensure the disc brake rotor is correctly seated within the caliper.
- Install Handlebar: Secure the handlebar to the stem. Adjust the angle for comfortable riding.
- Install Pedals: Note that pedals are typically marked 'L' for left and 'R' for right. Thread them carefully into the crank arms. The left pedal threads counter-clockwise.
- Install Seat Post: Insert the seat post into the frame and adjust the seat height for proper leg extension. Secure with the quick-release lever.
- Install Headlight: Attach the headlight to the designated mounting point and connect its cable.
- Charge Battery: Fully charge the battery before your first ride. Refer to the 'Battery Information' section for details.
- Final Checks: Double-check all bolts, nuts, and quick releases to ensure they are securely tightened. Inspect brake function and tire pressure.

Figure 4.1: Bike dimensions and recommended rider height (5.4'-6.4') and maximum load capacity (330 lbs / 150 kg).
5. Components Overview
Familiarize yourself with the key components of your PEXMOR Electric Bike:
- 750W BAFANG Motor: Provides powerful assistance for climbing and reaching speeds up to 32 MPH (52 KM/H).
- 48V 14AH LG Removable Battery: Integrated into the frame, offering extended range.
- 26" x 4.0" Fat Tires: Designed for strong grip and puncture resistance across various terrains including snow, sand, mountain, and city roads.
- Dual Disc Brakes: Front and rear mechanical disc brakes provide reliable stopping power.
- Lockable Front Fork Suspension: Absorbs shocks for a smoother ride and can be locked for efficient pedaling on smooth surfaces.
- Smart LCD Display: Shows battery power, current speed, mileage, and assist level.
- Shimano 7-Speed Gear Shifter: Allows for precise gear changes to adapt to different riding conditions.
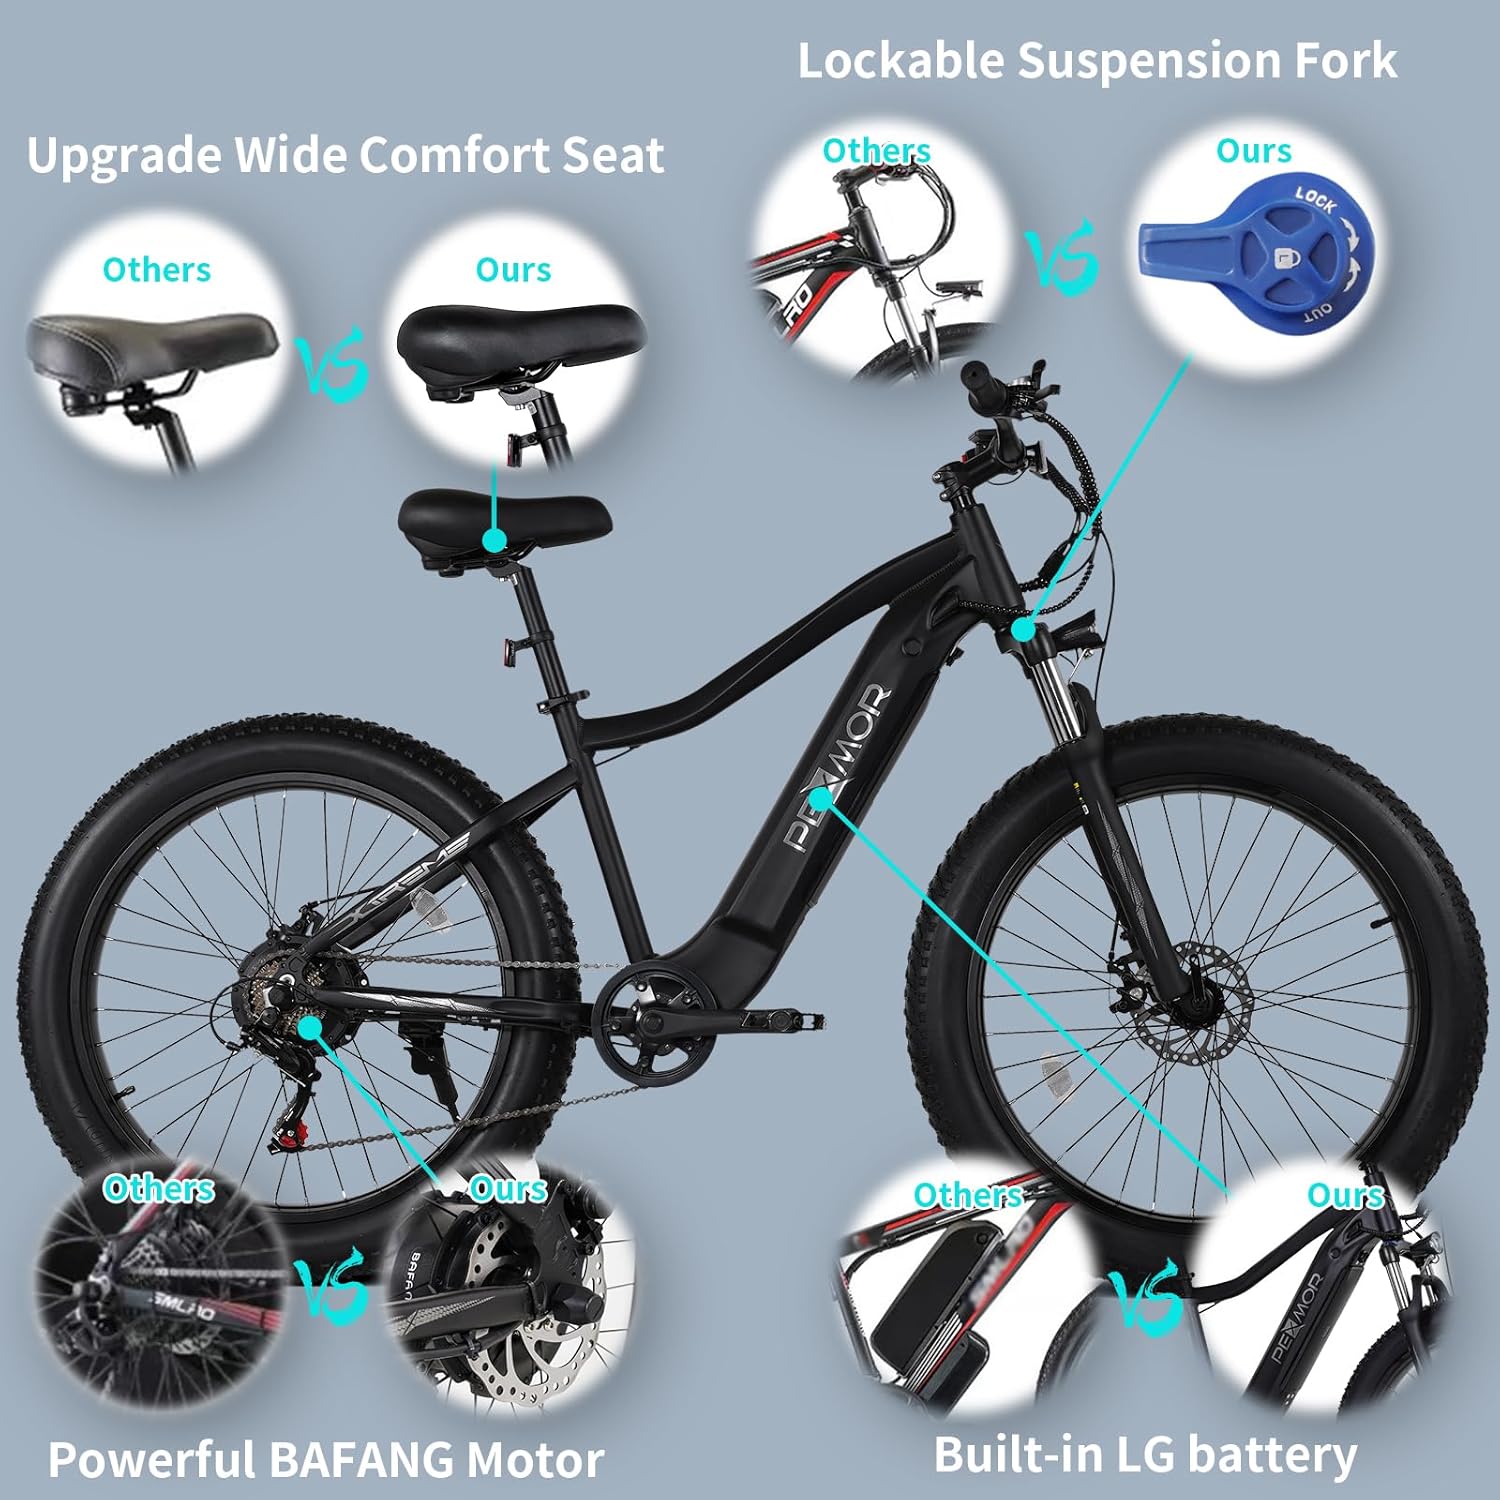
Figure 5.1: Visual comparison highlighting the upgraded comfort seat, lockable suspension fork, powerful BAFANG motor, and built-in LG battery.

Figure 5.2: Close-up of the multifunction LCD display showing battery, speed, assist level, and mileage, alongside the Shimano 7-speed shifter.

Figure 5.3: Detailed view of the upgraded wide comfort seat, bright LED headlight, smart LCD display, and dual disc brakes.

Figure 5.4: The 26"x4.0" fat tire, illustrating its adaptability to snow, sand, mountain, and city roads.
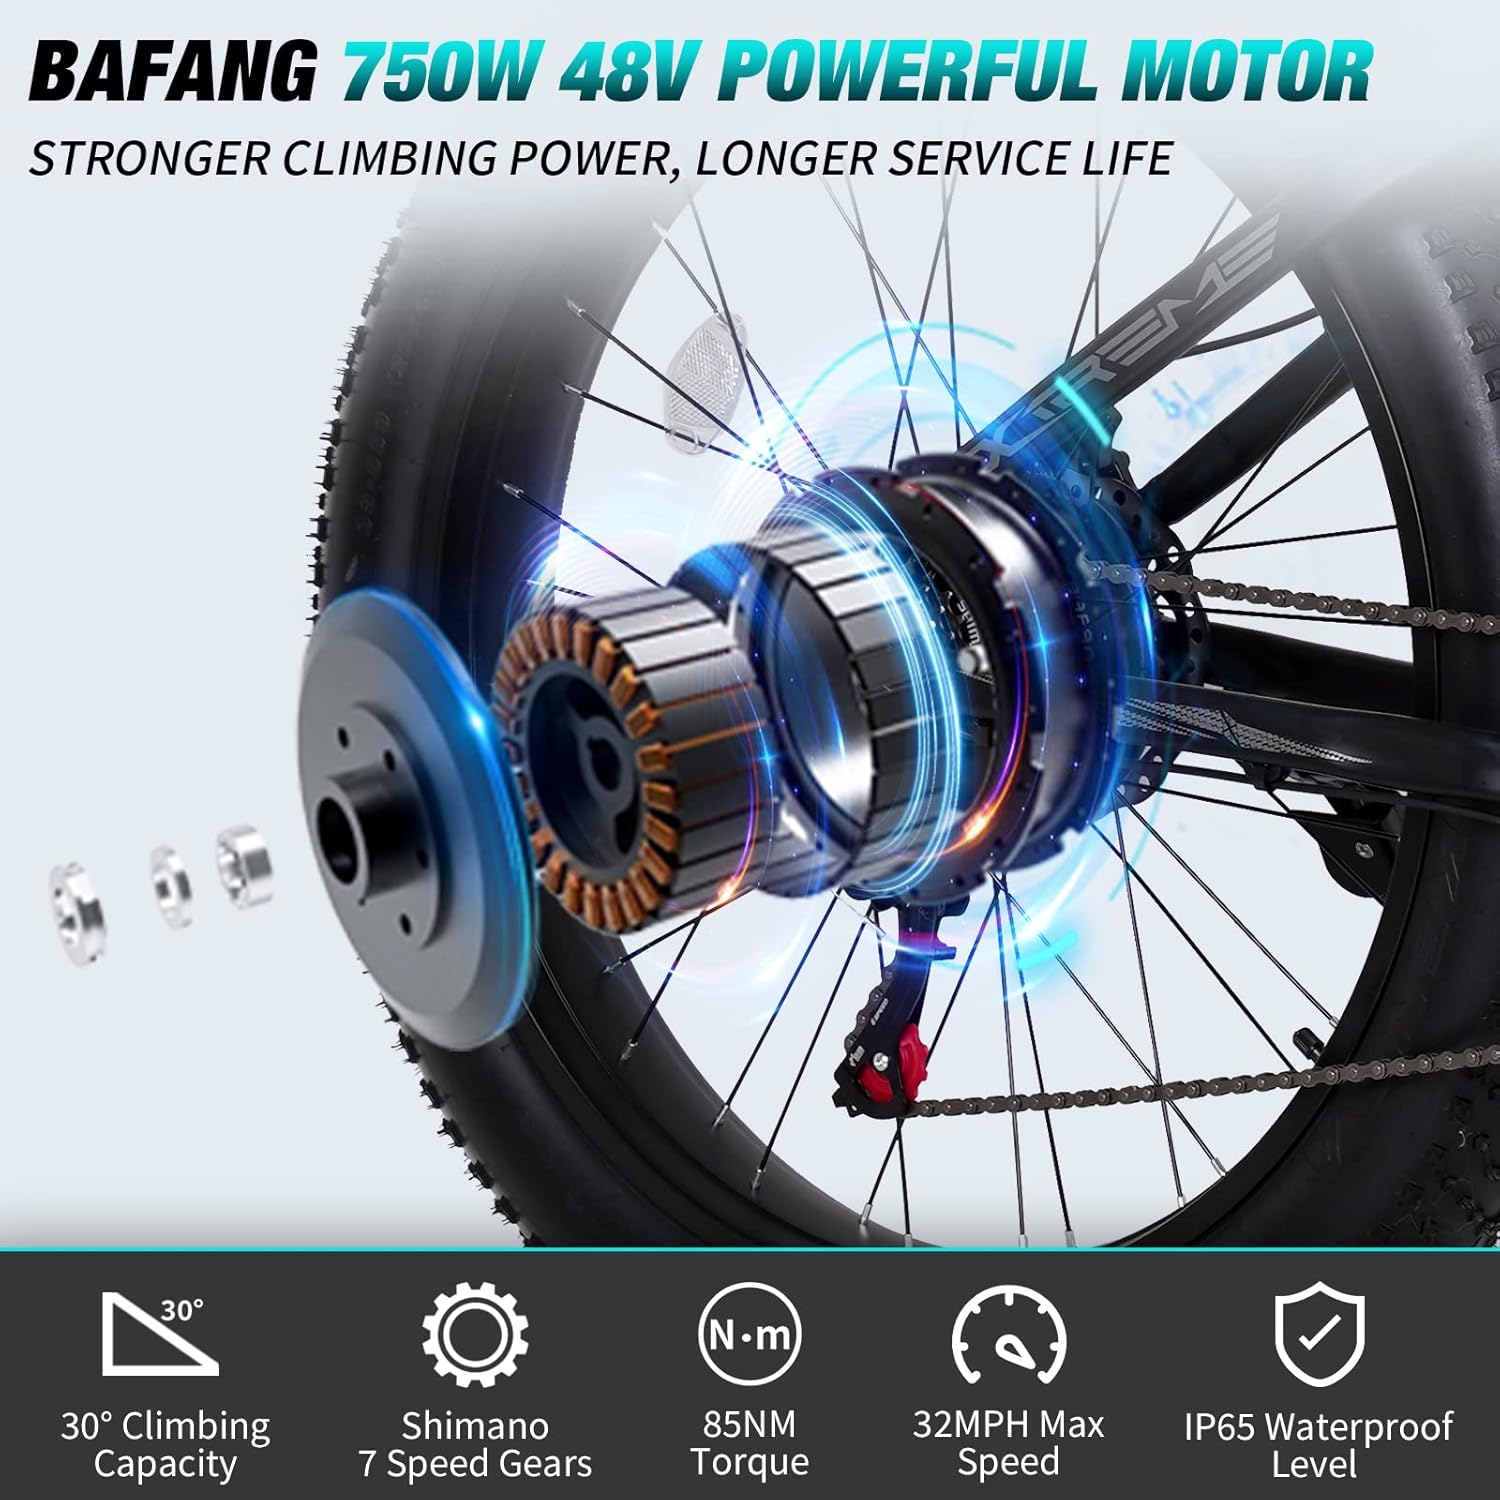
Figure 5.5: Close-up of the lockable front fork suspension, designed for shock absorption and comfortable riding.
6. Operating Instructions
Understand how to operate your electric bike for optimal performance and safety.
6.1 Powering On/Off
- To Power On: Press and hold the power button on the LCD display until the screen illuminates.
- To Power Off: Press and hold the power button again until the screen turns off.
6.2 Riding Modes
The PEXMOR Electric Bike offers three riding modes:
- Ordinary Bicycle Mode: The motor provides no assistance. Ride as a traditional bicycle.
- PAS (Pedal Assist System) Mode: The motor provides assistance based on your pedaling effort. Adjust the assist level via the LCD display. This mode can travel up to 62-75 miles (100-120 KM).
- Electric Mode: The motor provides full power without pedaling, controlled by the throttle. This mode can travel up to 49 miles (80 KM).
6.3 Using the LCD Display
The smart LCD display provides real-time information:
- Battery Power: Indicates the remaining battery charge.
- Speed: Displays current riding speed.
- Mileage: Tracks distance traveled.
- Assist Level: Allows you to select the desired level of pedal assistance.
6.4 Shifting Gears
Use the Shimano 7-speed gear shifter on the handlebar to change gears. Shift to a lower gear for easier pedaling uphill and a higher gear for faster speeds on flat terrain or downhill. Always ease off the pedals slightly when shifting for smoother transitions.
6.5 Braking
The bike is equipped with front and rear dual disc brakes. Apply both brakes simultaneously and gradually for controlled stopping. Avoid sudden, hard braking, especially the front brake, to prevent loss of control.

Figure 6.1: The PEXMOR Electric Bike demonstrating its capability on snow terrain, highlighting its versatility.
7. Battery Information
Proper battery care ensures longevity and performance.
7.1 Charging the Battery
- Ensure the bike is powered off.
- Locate the charging port on the battery or frame.
- Connect the charger to the charging port, then plug the charger into a standard wall outlet.
- The charger indicator light will typically show red during charging and turn green when fully charged.
- Disconnect the charger once charging is complete. Do not overcharge.
7.2 Battery Removal and Installation
The 48V 14AH LG battery is removable for convenient charging or storage. Consult the specific instructions provided with your bike for the exact removal and installation procedure, which typically involves unlocking with a key and sliding the battery out of its compartment.
7.3 Battery Care and Storage
- Store the battery in a cool, dry place, away from direct sunlight and extreme temperatures.
- If storing for an extended period, charge the battery to approximately 50-70% every 1-2 months.
- Do not expose the battery to water or moisture.
8. Maintenance
Regular maintenance ensures the longevity and safe operation of your electric bike.
- Tires: Check tire pressure before each ride. Maintain recommended PSI for optimal performance and safety.
- Brakes: Regularly inspect brake pads for wear and ensure brake levers operate smoothly. Adjust as needed.
- Chain: Keep the chain clean and lubricated to prevent rust and ensure smooth shifting.
- Fasteners: Periodically check all bolts, nuts, and screws for tightness.
- Cleaning: Clean the bike with a damp cloth. Avoid high-pressure washing directly on electrical components.
- Professional Service: For complex repairs or adjustments, consult a qualified bicycle mechanic.
9. Troubleshooting
This section addresses common issues you might encounter.
| Problem | Possible Cause | Solution |
|---|---|---|
| Bike does not power on | Battery not charged or not properly seated; loose electrical connection. | Ensure battery is fully charged and securely installed. Check all visible connections. |
| Motor not assisting | PAS level set to 0; brake levers engaged; motor cable disconnected. | Increase PAS level on the display. Release brake levers. Check motor cable connection. |
| Short battery range | Low tire pressure; riding in high assist mode; cold weather; battery degradation. | Inflate tires to recommended pressure. Use lower assist modes. Charge battery fully. |
| Brakes feel weak | Worn brake pads; loose brake cable; disc rotor contamination. | Inspect and replace brake pads if worn. Adjust brake cable tension. Clean rotors with disc brake cleaner. |
10. Specifications
Detailed technical specifications for the PEXMOR Electric Bike:
| Feature | Specification |
|---|---|
| Bike Type | Electric Bike |
| Brand | PEXMOR |
| Model Name | Electric Bicycle 750W BAFANG Motor |
| Motor | 750W BAFANG Motor |
| Max Speed | 32 MPH (52 KM/H) |
| Battery | 48V 14AH LG Removable Battery |
| Electric Mode Range | Up to 49 Miles (80 KM) |
| PAS Mode Range | Up to 62-75 Miles (100-120 KM) |
| Number of Speeds | 7 (Shimano Gear Shifter) |
| Wheel Size | 26 Inches |
| Tire Type | 26" x 4.0" Fat Tire |
| Brake Style | Dual Disc Brake |
| Suspension Type | Front (Lockable) |
| Frame Material | Aluminum |
| Maximum Load Capacity | 330 Pounds (150 KG) |
| Item Weight | 62 Pounds |
| Special Features | Smart LCD display, Headlight |
| Assembly Required | Yes (85% assembled) |
11. Warranty and Support
The PEXMOR Electric Bike comes with a 9-month limited warranty. This warranty covers manufacturing defects under normal use. For warranty claims, technical support, or any issues with your bike, please contact PEXMOR customer service through your original purchase channel. When contacting support, please provide your order details and relevant photos or videos of the issue to facilitate a quicker resolution.


