1. Introduction
Thank you for choosing the KATOOL KT-2002P Mini Tire Changer Machine. This manual provides essential information for the safe and efficient operation, installation, and maintenance of your new equipment. The KT-2002P is designed for changing tires with a maximum wheel diameter of 39 inches and tire sizes ranging from 12 to 22 inches, making it suitable for various applications including road rescue, shop repair, and home garage use. Please read this manual thoroughly before operating the machine to ensure proper usage and to prevent injury or damage.
2. Safety Information
Always adhere to the following safety guidelines to prevent accidents and ensure safe operation:
- Read and understand all instructions in this manual before operating the machine.
- Wear appropriate personal protective equipment (PPE), including safety glasses, gloves, and sturdy footwear.
- Ensure the machine is placed on a stable, level surface capable of supporting its weight and the weight of the tire/wheel assembly.
- Verify that all connections, especially air and electrical, are secure and meet specified requirements.
- Keep hands and clothing clear of moving parts during operation.
- Do not exceed the maximum wheel diameter or tire size specifications.
- Never attempt to service damaged or improperly inflated tires.
- Disconnect power and air supply before performing any maintenance or adjustments.
- Keep children and unauthorized personnel away from the operating area.
3. Product Components
The KATOOL KT-2002P Mini Tire Changer Machine consists of several key components designed for efficient tire service.

Figure 3.1: Overview of the KATOOL KT-2002P Mini Tire Changer Machine, showcasing its compact design and primary operational parts including the central post, turntable, and bead breaker arm.
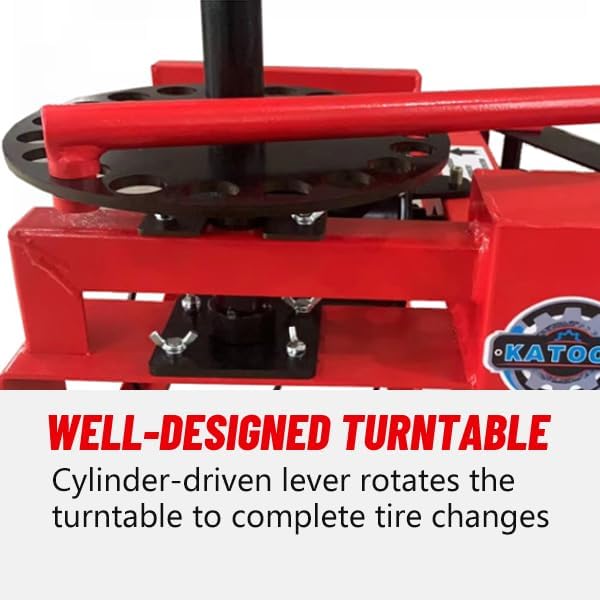
Figure 3.2: Close-up view of the machine's well-designed turntable, which is cylinder-driven to facilitate smooth and efficient tire changes.

Figure 3.3: The enlarged cylinder, featuring an aluminum alloy piston, provides up to 2.5 tons of pressure for powerful and reliable operation during tire bead breaking.

Figure 3.4: Illustration demonstrating the machine's capability to handle tires with a maximum wheel diameter of 39 inches, accommodating a wide range of vehicle types.
4. Setup Instructions
Follow these steps for the initial setup of your KATOOL KT-2002P Mini Tire Changer Machine.

Figure 4.1: Visual guide for the initial assembly and connection steps of the tire changer machine.
- Insert Cylinder and Tighten: Insert the main cylinder into its designated slot and securely tighten the retaining screw.
- Fix Foot Switch: Position the foot switch in a convenient location and ensure it is stable.
- Install Shovel: Attach the bead breaker shovel to its arm.
- Plug in Turntable and Tighten Screws: Connect the turntable mechanism and secure it by tightening all associated screws.
- Fix Connection Block: Secure the connection block, ensuring all components are properly aligned.
- Insert Bird Head and Arm: Install the 'bird head' (tire mounting/demounting tool) onto its arm.
- Place Turntable Pull Rod: Position the turntable pull rod for easy access and operation.
- Connect Foot Switch and Air Source: Connect the foot switch to the machine and then connect the machine to a suitable air source.
- Installation Completed: Once all steps are followed, the machine is ready for operation.
5. Operating Instructions
This section outlines the general procedure for changing a tire using the KATOOL KT-2002P machine. For a visual demonstration, please refer to the video below.
Video 5.1: A detailed demonstration of the KATOOL KT-2002P Mini Tire Changer Machine in operation, showing the process of tire demounting and mounting.
- Prepare the Wheel: Remove the valve core to fully deflate the tire. Remove any wheel weights or accessories.
- Position the Wheel: Place the wheel onto the turntable, ensuring it is centered and securely clamped.
- Break the Beads: Use the bead breaker arm to separate the tire beads from the wheel rim. Apply pressure evenly and move around the tire until both beads are free.
- Demount the Tire: Position the 'bird head' tool at the edge of the rim. Use a tire lever to lift the top bead over the 'bird head'. Rotate the turntable to fully demount the top bead. Repeat for the bottom bead.
- Mount the New Tire: Lubricate the beads of the new tire and the rim. Place the bottom bead onto the rim, using the 'bird head' and turntable rotation to guide it into place. Repeat for the top bead.
- Inflate the Tire: Reinsert the valve core. Inflate the tire to the manufacturer's recommended pressure, ensuring the beads seat properly. Listen for two distinct 'pops' as the beads seat.
- Check for Leaks: Apply a soapy water solution to the tire beads and valve stem to check for any air leaks.
6. Maintenance
Regular maintenance ensures the longevity and optimal performance of your tire changer.
- Cleaning: Keep the machine clean from dirt, grease, and tire debris. Use a damp cloth and mild detergent.
- Lubrication: Periodically lubricate moving parts, such as the turntable mechanism and bead breaker pivot points, with appropriate grease or oil.
- Inspection: Regularly inspect all bolts, nuts, and fasteners for tightness. Check air hoses and fittings for wear or leaks. Inspect the 'bird head' and tire levers for damage or excessive wear.
- Air Supply: Ensure your air compressor and lines are free of moisture and contaminants. Drain the compressor tank regularly.
7. Troubleshooting
This section addresses common issues you might encounter during operation.
| Problem | Possible Cause | Solution |
|---|---|---|
| Machine does not power on. | No power supply; faulty switch. | Check power cord and outlet; inspect foot switch and electrical connections. |
| Bead breaker not effective. | Insufficient air pressure; improper positioning. | Verify air pressure meets specifications; reposition tire and apply pressure closer to the rim. |
| Tire difficult to demount/mount. | Insufficient lubrication; incorrect tool angle. | Apply generous tire lubricant to beads and rim; adjust the angle of the 'bird head' and tire lever. |
| Air leaks during inflation. | Improper bead seating; damaged valve core. | Ensure beads are fully seated; replace valve core if damaged. |
8. Technical Specifications
Key technical details for the KATOOL KT-2002P Mini Tire Changer Machine.

Figure 8.1: Visual representation of the machine's dimensions and key product parameters.
| Feature | Specification |
|---|---|
| Brand | KATOOL |
| Model | KT-2002P |
| Max Wheel Diameter | 39 inches |
| Tire Sizes Supported | 12" to 22" |
| Bead Breaker Pressure | Up to 2.5 tons (via enlarged cylinder) |
| Manufacturer | KATOOL |
| Item Model Number | KT-2002P |
| First Available | August 11, 2025 |
9. Warranty and Support
KATOOL products are manufactured to high-quality standards. For specific warranty details, please refer to the documentation included with your purchase or contact KATOOL customer service.
For technical support, spare parts, or any inquiries regarding your KT-2002P Mini Tire Changer Machine, please visit the official KATOOL Store or contact their customer service department. You can find more information at the KATOOL Store on Amazon.


