1. Introduction
Thank you for choosing the ESSLNB 80mm Astronomical Travel Telescope. This manual provides essential information for setting up, operating, and maintaining your telescope to ensure optimal performance and enjoyment. This refractor telescope is designed for astronomy beginners, offering clear views of celestial objects.
Key features include a 400mm focal length, an 80mm objective lens with multi-fully high transmission coated optics for improved brightness and clarity, and a 3X Barlow lens for enhanced magnification. It also features an erect-image diagonal prism for comprehensive viewing and comes with a portable tripod and carrying bag.
2. Package Contents
Before assembly, please ensure all components listed below are present in your package:
- 1 x Telescope Tube
- 1 x K25mm Eyepiece
- 1 x K9mm Eyepiece
- 1 x 3X Barlow Lens
- 1 x Protective Cover
- 1 x Adjustable Tripod (with Accessory Tray)
- 1 x Finder Scope (5X20)
- 1 x Phone Adapter with 10X Eyepiece
- 1 x Star Target Planisphere (PVC)
- 1 x Metal Moon Filter
- 1 x Backpack
- 1 x Accessory Backpack
- 1 x Cleaning Cloth
- 1 x User Manual
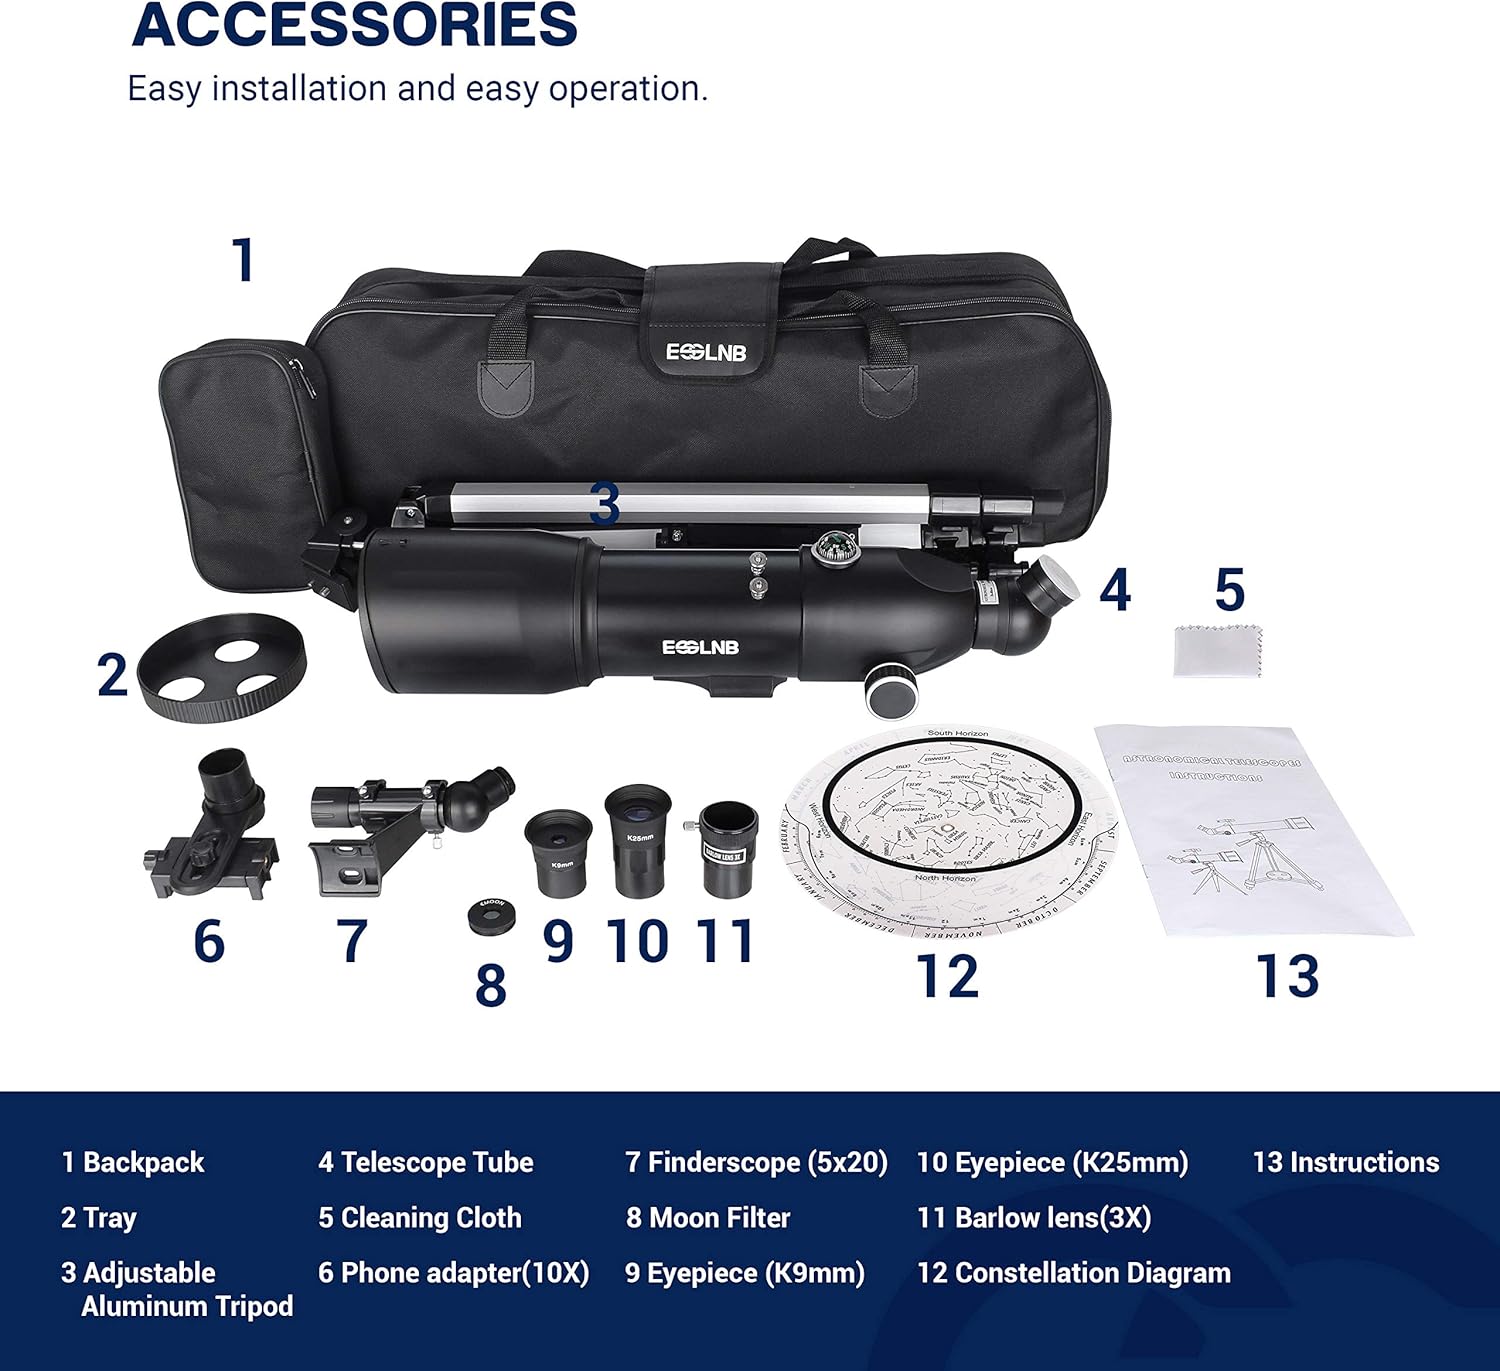
Image: All components included in the ESSLNB telescope package.
The image above displays all the items you should find in your package, including the telescope tube, various eyepieces, lenses, tripod, and carrying bags.
3. Setup
Follow these steps to assemble your ESSLNB telescope:
- Set up the Tripod:
Extend the tripod legs to the desired height. The tripod is adjustable up to 120cm (47.2 inches). Secure the legs by tightening the locking mechanisms. Attach the accessory tray to the center of the tripod for convenient storage of eyepieces and other small items. The tripod features a bubble level to ensure stability on uneven surfaces.
Image: The adjustable aluminum tripod with measurements indicating its height range.
The tripod can be adjusted to various heights, from 530mm (20.9 inches) to 1200mm (47.2 inches), providing flexibility for different viewing positions.
- Attach the Telescope Tube:
Carefully place the telescope tube onto the tripod mount. Secure it using the provided screws or clamps. Ensure it is firmly attached to prevent movement during observation. The mount allows for 180-degree vertical and 360-degree horizontal rotation.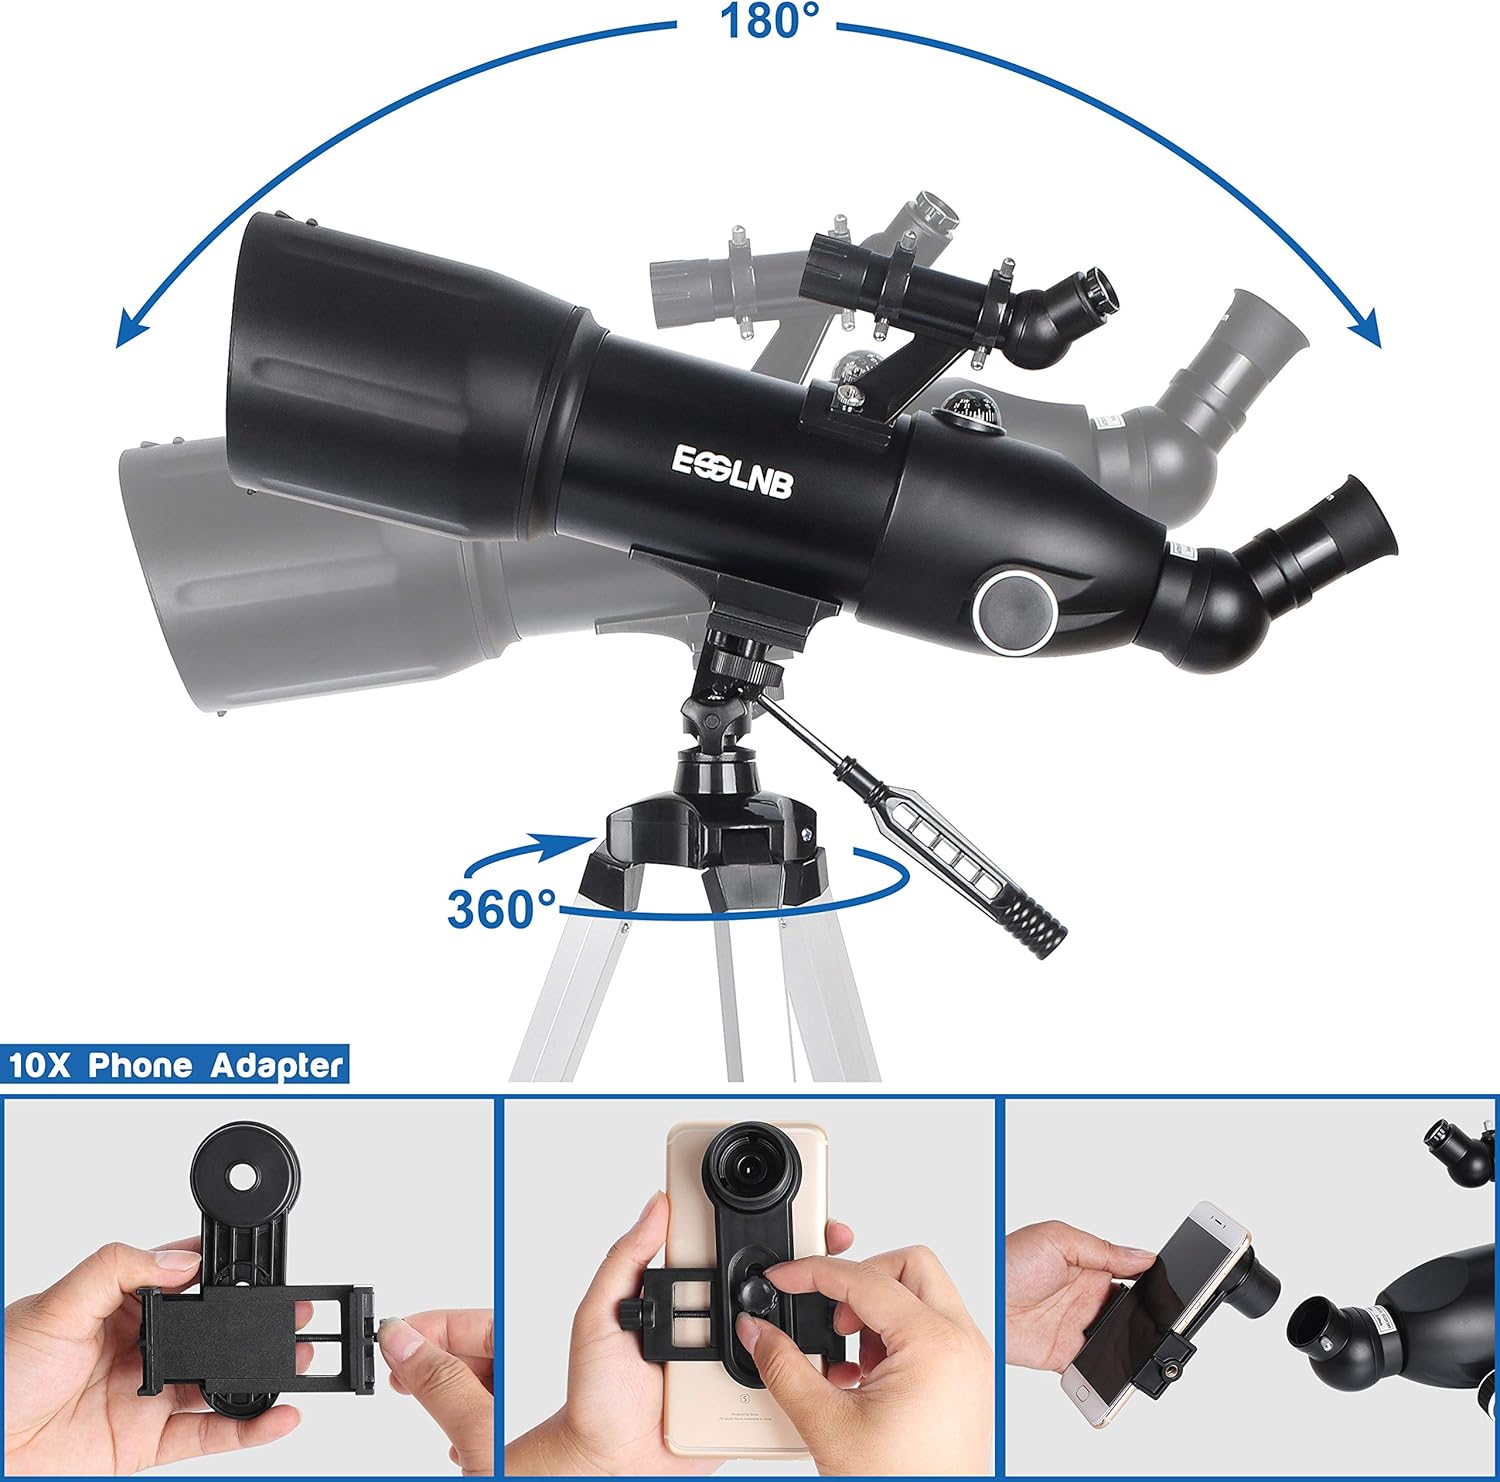
Image: The telescope tube securely attached to the tripod, demonstrating its rotational capabilities.
The telescope can be rotated 360 degrees horizontally and 180 degrees vertically for flexible viewing.
- Install the Finder Scope:
Locate the finder scope and attach it to the designated bracket on the main telescope tube. Tighten the screws to hold it in place. The finder scope helps in quickly locating objects in the sky before viewing them through the main eyepiece. - Insert the Erect-Image Diagonal Prism:
Insert the 128° erect-image diagonal prism into the focuser of the telescope. This prism ensures that images are viewed upright, which is beneficial for terrestrial observations. It can also rotate 360 degrees for comprehensive viewing.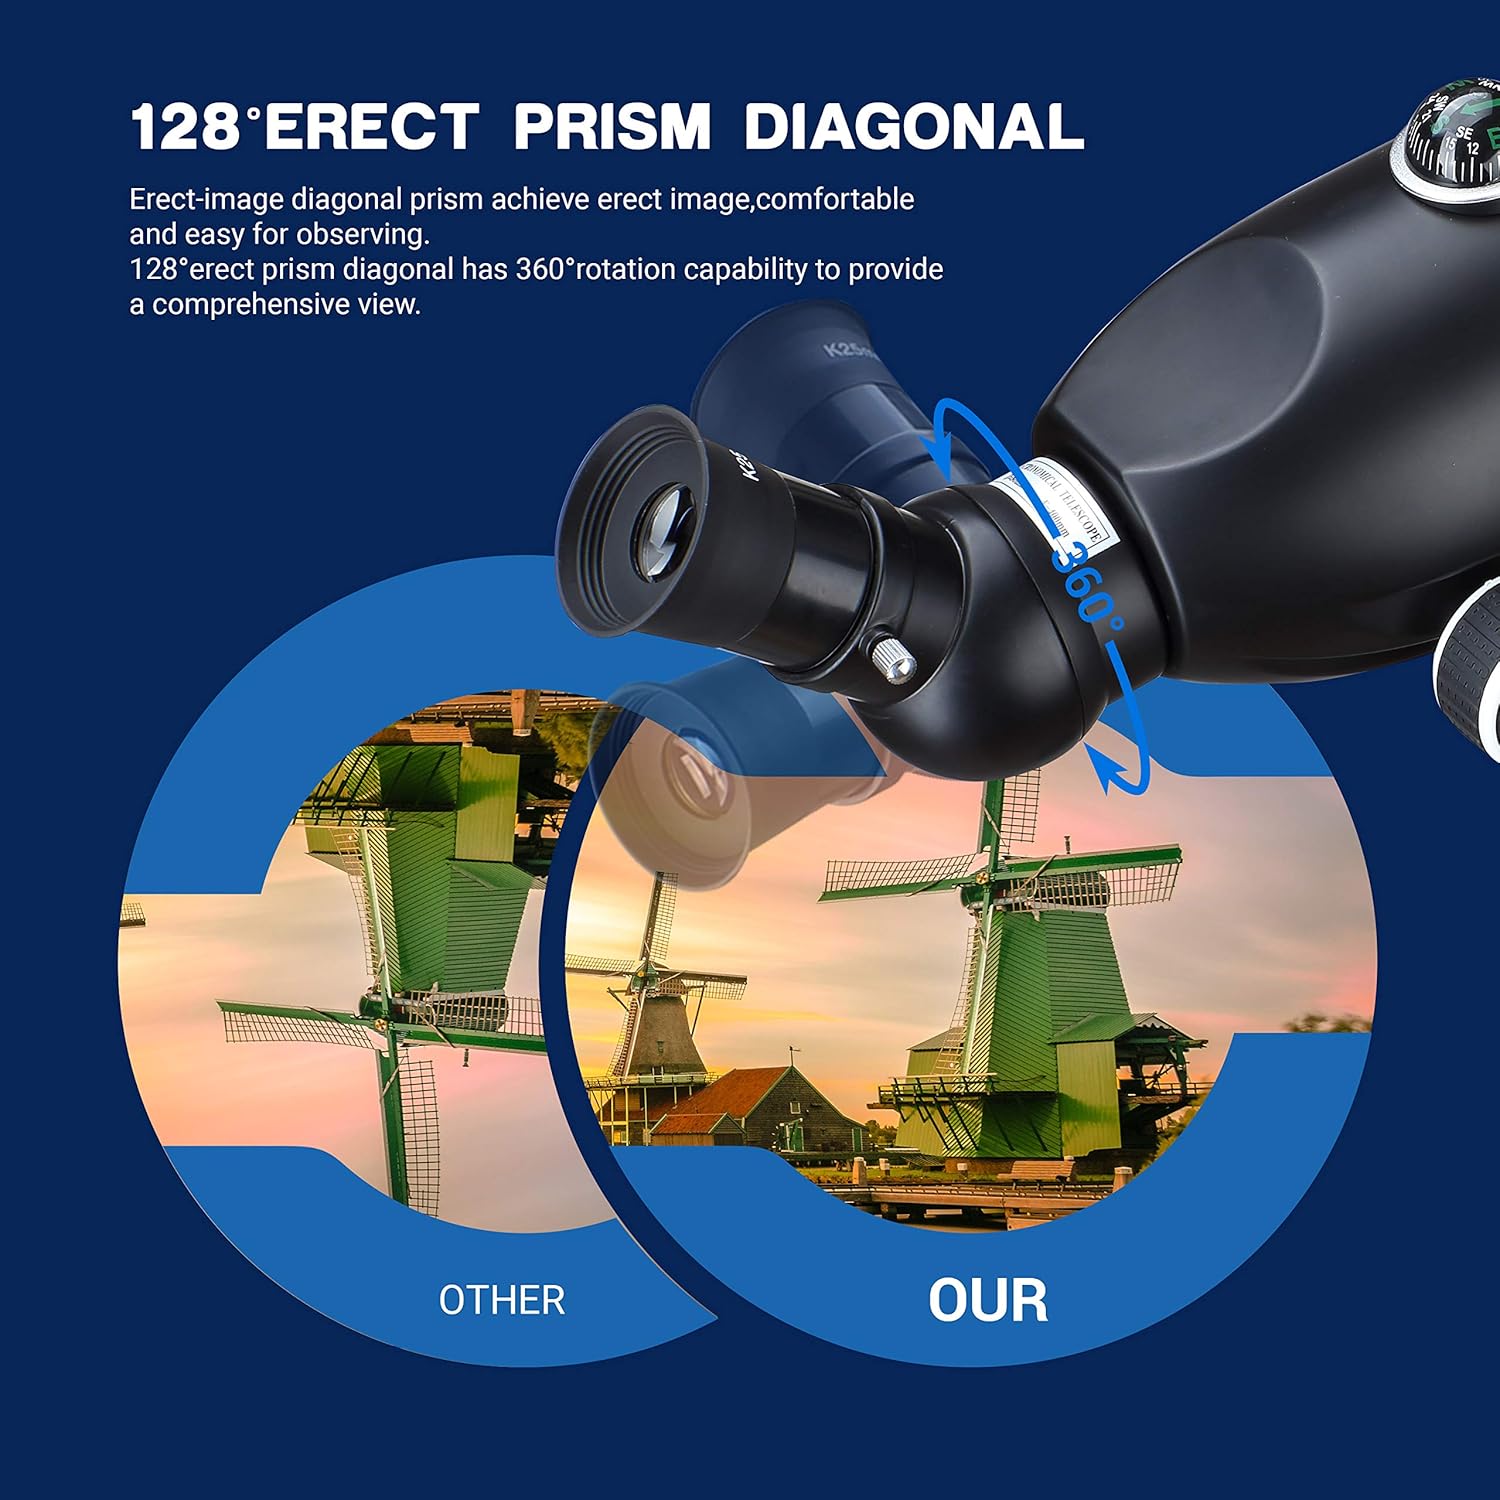
Image: Close-up of the erect-image diagonal prism, highlighting its 360-degree rotation.
The erect-image diagonal prism provides an upright and wide-angle view, making observation more comfortable.
- Choose and Insert an Eyepiece:
Select either the K25mm or K9mm eyepiece. For initial viewing, start with the K25mm eyepiece as it provides lower magnification and a wider field of view, making it easier to locate objects. Insert the chosen eyepiece into the diagonal prism. Secure it by tightening the small screw on the diagonal.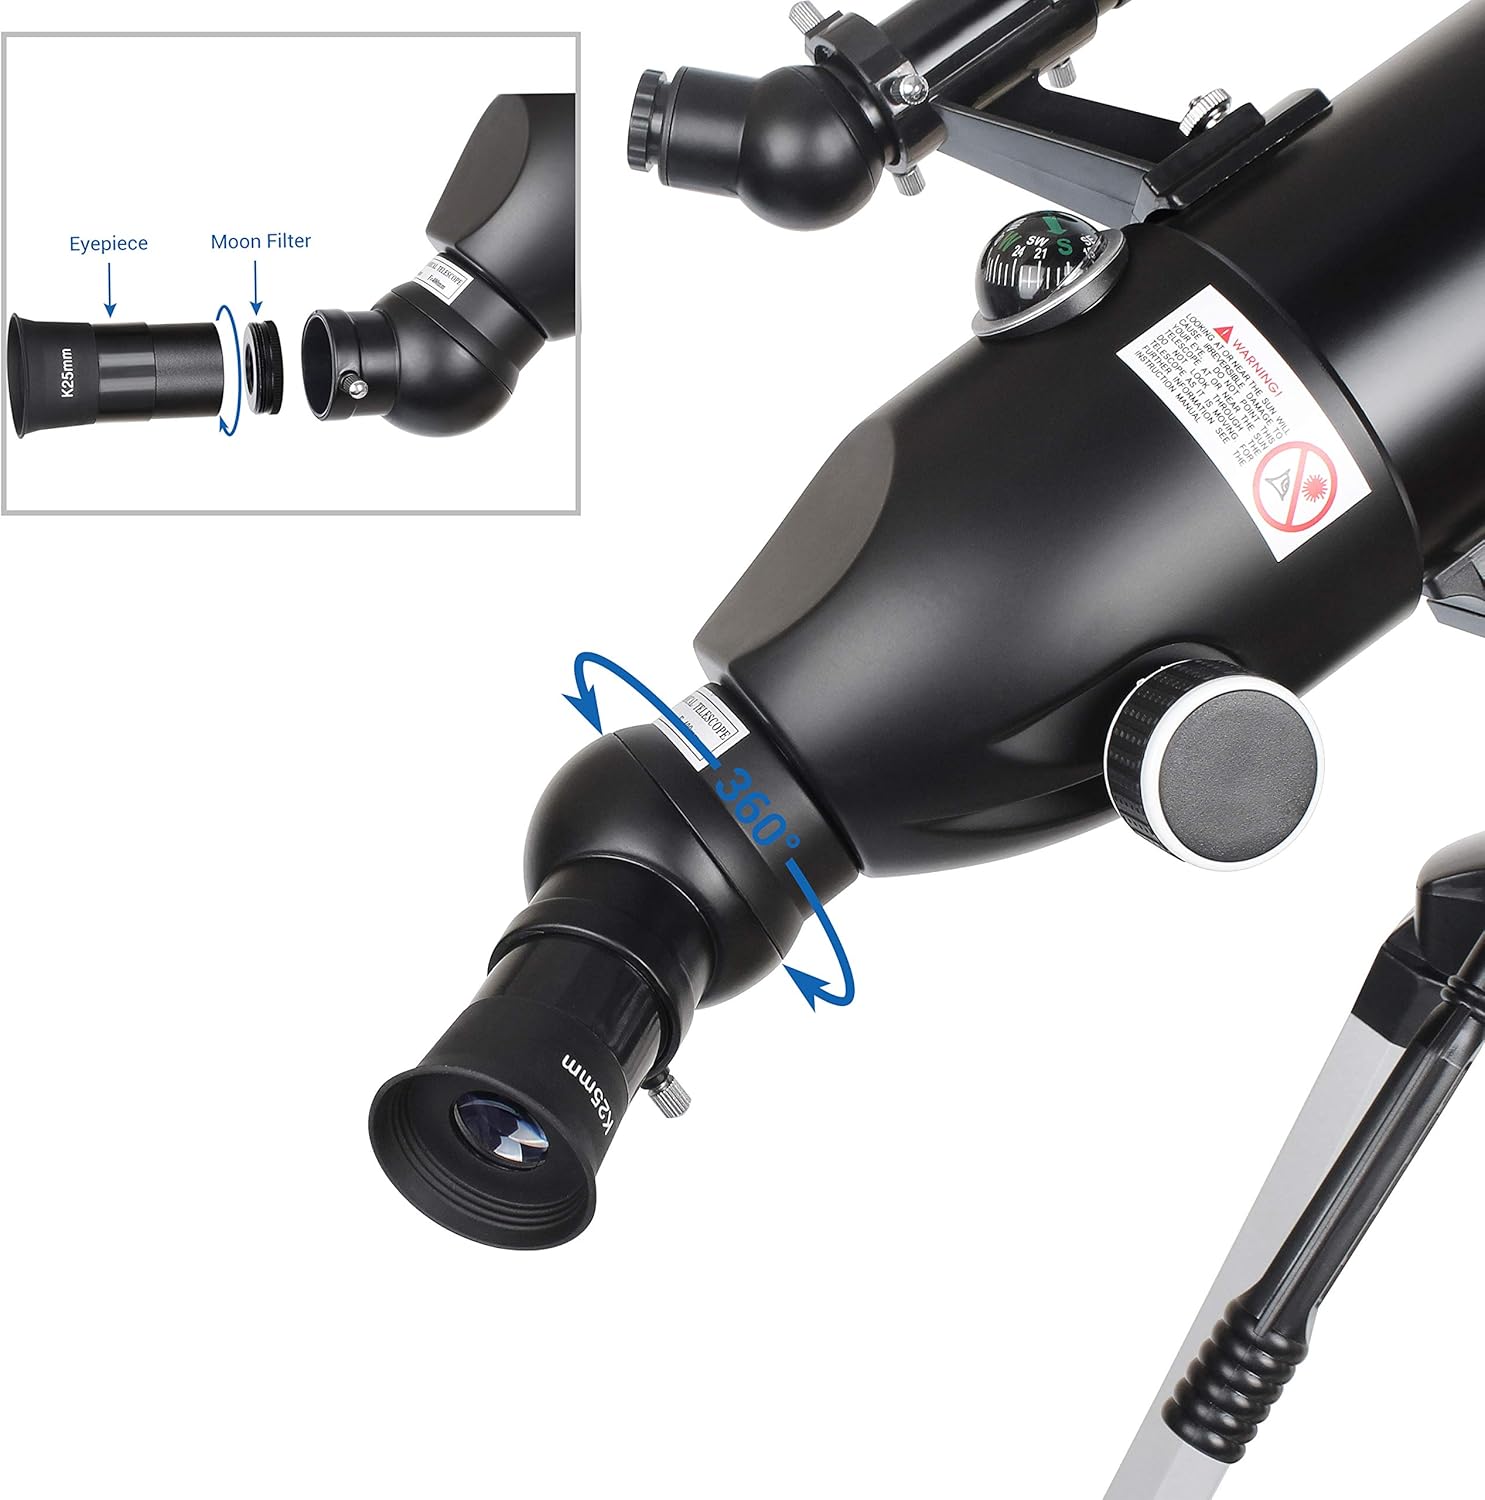
Image: Installation of an eyepiece and the metal moon filter.
The eyepieces (K9mm, K25mm) and 3X Barlow lens are stored in a small accessory bag to prevent damage.
- (Optional) Attach the 3X Barlow Lens:
For higher magnification, insert the 3X Barlow lens into the diagonal prism first, then insert your chosen eyepiece (K9mm or K25mm) into the Barlow lens. - (Optional) Attach the Metal Moon Filter:
For comfortable viewing of the moon, screw the metal moon filter onto the bottom of your chosen eyepiece before inserting it into the diagonal or Barlow lens. This helps reduce glare. - (Optional) Attach the Phone Adapter:
The telescope comes with a phone adapter that includes a 10X eyepiece. This allows you to easily capture photos or videos through the telescope. You do not need to use the K9mm or K25mm eyepieces when using the phone adapter's integrated 10X eyepiece.
Video: Official ESSLNB video demonstrating the assembly and features of the 80mm Astronomical Telescope.
This video provides a visual guide to the assembly process and highlights key features of the ESSLNB telescope, including its portability and ease of setup.
Video: Official ESSLNB video showcasing the 400X80mm Telescope for Astronomy Beginners.
This video offers another perspective on the telescope's features and how it can be used by beginners for astronomical observations.
4. Operating
Once assembled, operating your telescope involves a few key steps:
- Align the Finder Scope:
Before observing, align the finder scope with the main telescope. During daylight, point the main telescope at a distant, stationary object (e.g., a tree or building). Look through the finder scope and adjust its alignment screws until the crosshairs are centered on the same object. This ensures that whatever you see in the finder scope will also be visible in the main telescope's eyepiece. - Locate an Object:
Use the finder scope to locate the celestial object you wish to observe. Once the object is centered in the finder scope's crosshairs, it should be visible in the main telescope's eyepiece. - Focus the Image:
Look through the main eyepiece and slowly turn the focus knob until the image appears sharp and clear. - Adjust Magnification (Optional):
If you desire higher magnification, replace the K25mm eyepiece with the K9mm eyepiece. For even greater magnification, use the 3X Barlow lens in conjunction with either eyepiece. - Using the Phone Adapter:
Attach your smartphone to the phone adapter. Align your phone's camera lens with the adapter's eyepiece. This allows you to view the telescope's image on your phone screen and capture photos or videos.

Image: A person using the ESSLNB telescope to observe the night sky.
The telescope is user-friendly for both adults and children, making it an excellent tool for exploring the night sky.
5. Maintenance
Proper maintenance will prolong the life of your telescope:
- Cleaning Lenses: Use the provided cleaning cloth or a soft, lint-free cloth specifically designed for optical lenses. Gently wipe the lenses to remove dust and smudges. Avoid using abrasive materials or harsh chemicals.
- Storage: When not in use, always replace the protective covers on the objective lens and eyepieces. Store the telescope in its backpack in a dry, dust-free environment to prevent damage.
- Handling: Handle the telescope with care. Avoid dropping it or subjecting it to strong impacts, as this can misalign optical components.
6. Troubleshooting
Here are some common issues and their solutions:
- Blurry Image: Ensure the focus knob is properly adjusted. If the image remains blurry, check that the eyepiece is fully inserted and secured. Also, verify that the finder scope is correctly aligned with the main telescope.
- Unstable View: Make sure the tripod legs are fully extended and locked, and that the telescope tube is securely mounted. Use the bubble level on the tripod to ensure it is on a flat surface. Avoid touching the telescope during observation to minimize vibrations.
- Difficulty Locating Objects: Ensure the finder scope is accurately aligned with the main telescope. Start with the lowest magnification eyepiece (K25mm) to get a wider field of view, then switch to higher magnification once the object is found.
7. Specifications
| Feature | Specification |
|---|---|
| Product Dimensions | 25 x 25 x 51.6 inches |
| Item Weight | 6.3 ounces |
| Brand | ESSLNB |
| Model Name | Telescope |
| Optical Tube Length | 400 Millimeters |
| Eyepiece Lens Description | Kellner (K9mm, K25mm) |
| Objective Lens Diameter | 80 Millimeters |
| Telescope Mount Description | Altazimuth Mount |
| Focus Type | Manual Focus |
| Power Source | Adapter |
| Finderscope | Reflex (5X20) |
8. Warranty and Support
For any questions, technical support, or warranty inquiries, please refer to the contact information provided in your product packaging or visit the official ESSLNB website. Keep your purchase receipt as proof of purchase for warranty claims.


