1. Introduction
This manual provides detailed instructions for the assembly, operation, and maintenance of your AECOJOY 20' x 8' Wall-Mounted Hardtop Gazebo Pergola, Model 16455+16410BK. Please read this manual thoroughly before beginning installation and retain it for future reference. Proper installation and care will ensure the longevity and optimal performance of your gazebo.

Image: The AECOJOY 20' x 8' Wall-Mounted Hardtop Gazebo Pergola provides an elegant outdoor living space.
2. Safety Information
Adhering to these safety guidelines is crucial for preventing injury and damage to the product.
- Always follow the provided manual for installation. Do not deviate from the instructions.
- Ensure the gazebo is securely attached to a stable wall structure and firmly stabilized on the ground using appropriate anchors. This product is designed to be wall-mounted, not freestanding.
- Exercise caution during assembly and disassembly to avoid injury. It is recommended that at least two people participate in the assembly process.
- Do not exceed the structural weight limits of the gazebo, especially concerning snow load. The roof is designed to withstand approximately 7 inches of heavy snow (6 lbs/sq.ft).
- In extreme weather conditions, such as heavy winds exceeding 70 mph, severe thunderstorms, or blizzards, it is advisable to secure or temporarily remove curtains and netting to prevent damage.
- Regularly inspect all connections and fasteners to ensure they remain tight and secure.
3. Package Contents
Before beginning assembly, verify that all components listed in the parts list (typically found in the separate assembly guide) are present and undamaged. If any parts are missing or damaged, contact customer support immediately.
Typical components include:
- Metal frame components (posts, beams, connectors)
- Hardtop roof panels (Sun Panels)
- Curtains and mosquito netting
- Hardware kit (bolts, screws, washers, anchors for wall and ground)
- Assembly tools (basic wrenches, hex keys may be included)
4. Setup and Installation
The installation process requires careful attention to detail and adherence to the provided assembly guide. It is recommended to have at least two individuals for assembly, which may take 8-10 hours.
4.1 Site Preparation
- Choose a flat, level surface adjacent to a sturdy wall where the gazebo will be mounted.
- Clear the area of any obstructions or debris.
- Ensure adequate clearance around the gazebo for assembly and future use.
4.2 Assembly Steps
- Unpack and Organize: Lay out all components and hardware. Verify against the parts list.
- Assemble Frame: Follow the step-by-step instructions in the separate assembly manual to construct the metal frame. Pay close attention to the orientation of each piece.
- Wall Attachment: Securely attach the wall-side posts and beams to your wall structure using the provided accessories. Ensure the wall is capable of supporting the gazebo's weight and wind loads.
- Ground Stabilization: Once the frame is assembled and attached to the wall, securely fix the ground posts to the ground as instructed. For concrete surfaces, heavy-duty concrete screws (not always included) may be required for optimal stability.
- Install Roof Panels: Carefully insert and position the hardtop roof panels. A wooden block and rubber mallet may assist in seating them without damage.
- Attach Curtains and Netting: Install the curtains and mosquito netting onto the designated tracks. Ensure zippers operate smoothly for a complete seal.
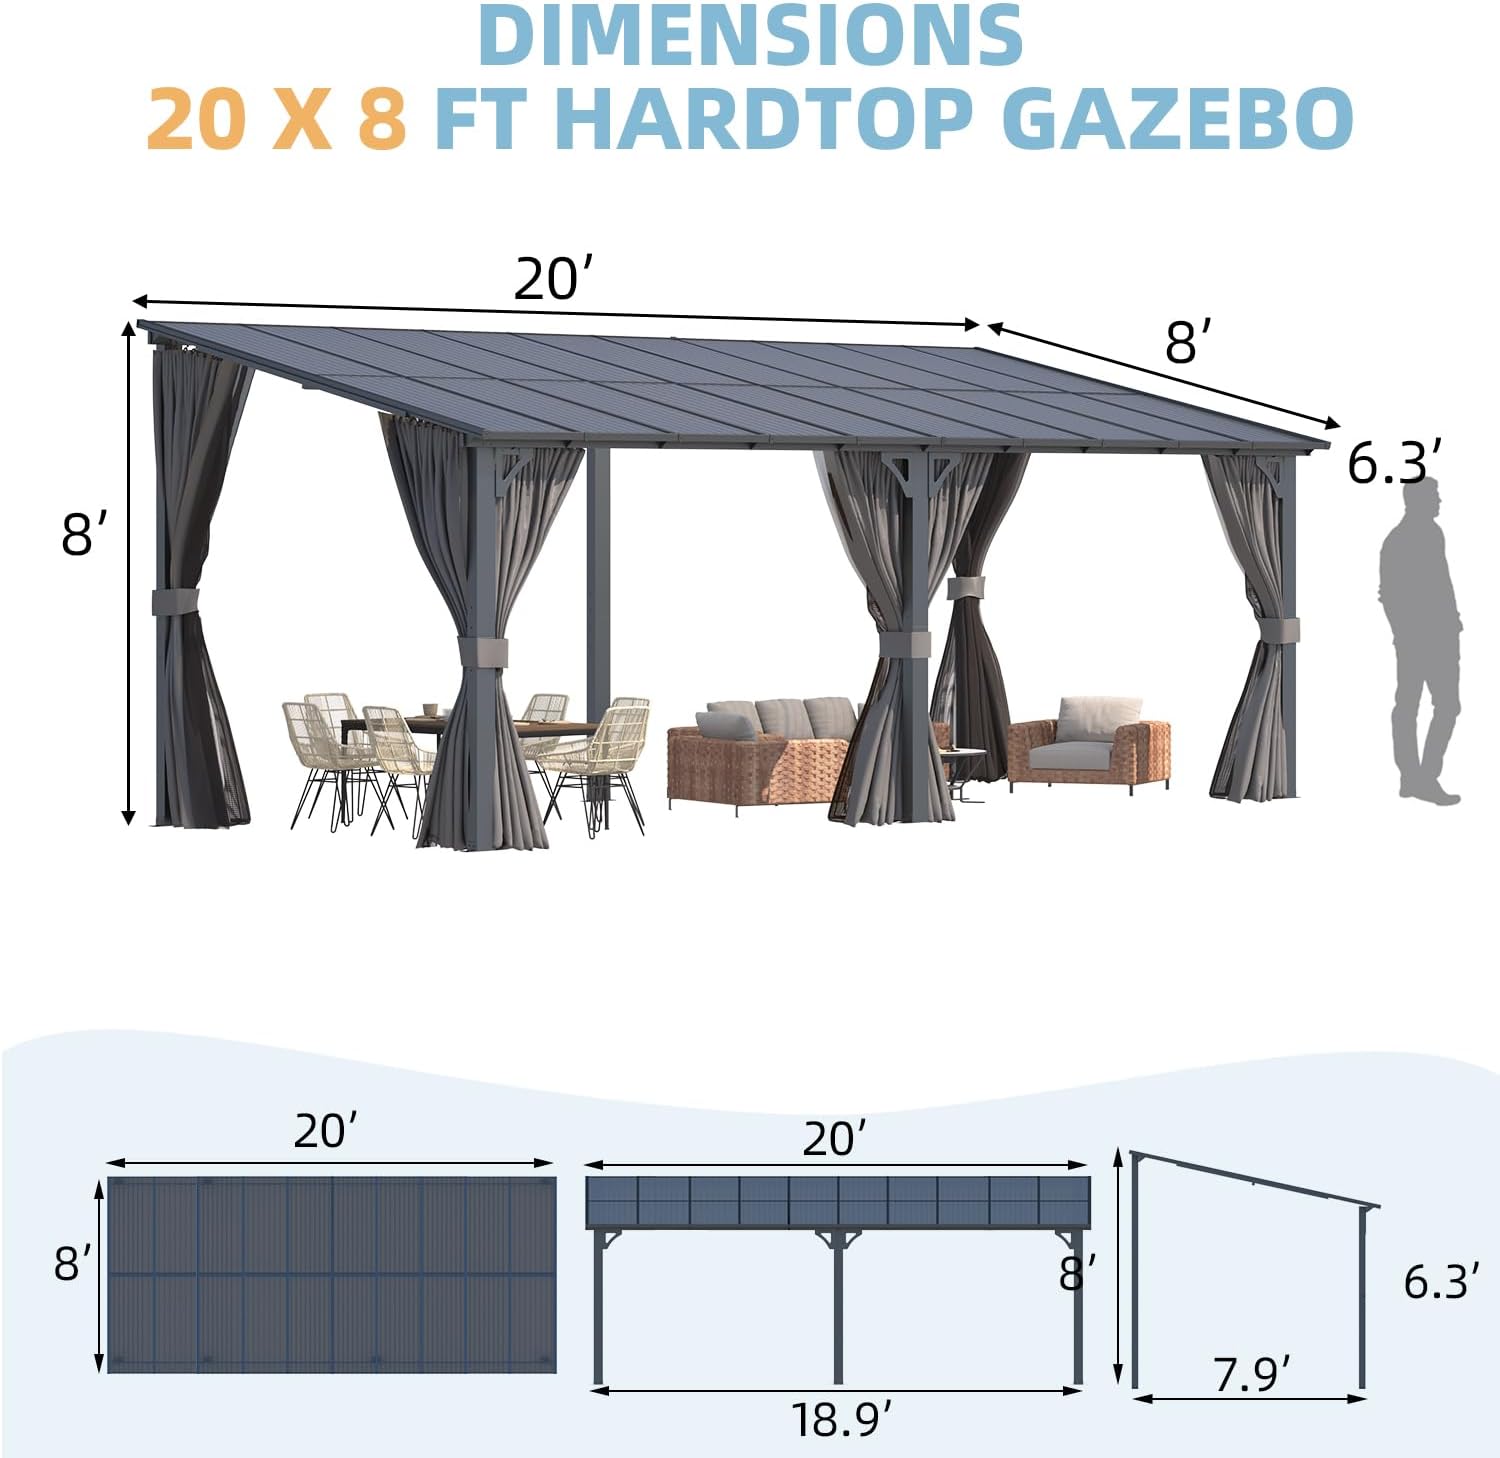
Image: Dimensional diagram of the 20' x 8' gazebo, illustrating its overall size and height.

Image: Detail of the 3-sided curtains and mosquito netting, showing the zipper closure for enhanced protection.
5. Operating Instructions
5.1 Curtains and Netting
- The gazebo features 3-sided curtains and mosquito netting. These can be operated independently.
- Use the integrated zippers to fully close the netting or curtains for privacy and protection from insects or elements.
- When not in use, tie back the curtains and netting to the posts using the provided straps to prevent them from flapping in the wind.
5.2 Weather Considerations
- Sun Protection: The hardtop roof provides comprehensive protection against harmful UV rays (UPF 50++).
- Rain Protection: The inclined roof design and meticulous detailing ensure water resistance. Water will drain off the roof effectively.
- Snow Load: The hardtop roof is designed to withstand snow loads up to 6 lbs/sq.ft, equivalent to approximately 7 inches of heavy snow. In areas with consistently heavy snowfall, it is advisable to clear snow accumulation periodically to prevent excessive load.
- Wind Resistance: When properly installed and anchored, the gazebo can confidently withstand winds of around 70 mph. For winds exceeding this, or during severe storms, consider temporarily removing curtains and netting to reduce wind resistance.

Image: Seasonal benefits of the gazebo, highlighting UV protection in summer and snow capacity in winter.
6. Maintenance
Regular maintenance will extend the life and appearance of your gazebo.
- Cleaning the Frame: Clean the metal frame with a mild soap and water solution. Rinse thoroughly and dry to prevent water spots and corrosion. Avoid abrasive cleaners.
- Cleaning Roof Panels: The hardtop panels can be cleaned with a soft cloth, mild soap, and water. Do not use harsh chemicals or abrasive brushes that could scratch the surface.
- Cleaning Curtains and Netting: Curtains and netting can typically be spot cleaned with mild soap and water. For deeper cleaning, refer to any specific care labels. Ensure they are completely dry before storing or closing for extended periods to prevent mildew.
- Hardware Inspection: Periodically check all bolts, screws, and anchors to ensure they are tight. Re-tighten as necessary.
- Winter Care: While the roof is designed for snow, it is recommended to clear heavy snow accumulation to prolong the product's life. If possible, store curtains and netting indoors during harsh winter months.
7. Troubleshooting
This section addresses common issues you might encounter.
- Gazebo feels shaky after assembly:
Ensure all frame connections are securely tightened. Verify that the gazebo is properly anchored to both the wall and the ground as per instructions. For concrete surfaces, appropriate heavy-duty anchors may be required.
- Roof leaks:
Check that all roof panels are correctly seated and sealed. Inspect for any gaps or misalignments. Ensure all screws and fasteners related to the roof are tight. If leaks persist, a silicone sealant may be applied to seams, though the design aims for inherent waterproofing.
- Curtains/Netting do not fit or slide smoothly:
Verify that the tracks for the curtains and netting are installed correctly and are free of obstructions. Ensure the curtain/netting pieces are oriented properly. If the issue is with fit, double-check the assembly of the frame sections that support the tracks.
- Missing or damaged parts:
Before assembly, carefully check all parts against the provided list. If any parts are missing or damaged upon receipt, contact AECOJOY customer support for replacements.
8. Specifications
| Feature | Detail |
|---|---|
| Brand | AECOJOY |
| Model Number | 16455+16410BK |
| Product Dimensions | 240"L x 96"W x 96"H (20'L x 8'W x 8'H) |
| Item Weight | 206 Pounds |
| Material | Aluminum, Metal, Sun Panels |
| Frame Material | Metal & Aluminum |
| Water Resistance Level | Waterproof |
| Shape | Rectangular |
| Ultraviolet Light Protection | UPF 50++ |
| Snow Capacity | 6 lbs/sq.ft (approx. 7" heavy snow) |
| Wind Resistance | Up to 70 mph (when properly secured) |
| Assembly Required | Yes |
| Color | Dark |
9. Warranty and Support
AECOJOY stands behind its products. For any concerns related to installation, usage, maintenance, or replacements, a professional technical team is available 24/7 to provide assistance.
For support, please refer to the contact information provided with your purchase documentation or visit the official AECOJOY website.
This product is designed for a worry-free experience, with support available for maintenance and replacement needs.


