
Welcome
Thank you for choosing the Reboot MIG 200A Multi-process Welding Machine. This manual provides essential information for the safe and efficient operation, maintenance, and troubleshooting of your new welder. Please read this manual thoroughly before operating the machine and keep it for future reference.
Important Safety Information
Welding can be dangerous. It is crucial to follow all safety precautions to prevent injury or damage. Always ensure proper ventilation, wear appropriate personal protective equipment (PPE), and understand the risks associated with electrical equipment and welding fumes.
- Read the Manual: Always read and understand the entire instruction manual before operating the welding machine.
- Electrical Safety: Ensure the power supply matches the machine's requirements. Do not operate with damaged cables or plugs. Always connect to a grounded outlet.
- Ventilation: Weld in a well-ventilated area to avoid inhaling hazardous fumes. Use fume extractors if necessary.
- Personal Protective Equipment (PPE): Always wear a welding helmet with appropriate shade, flame-resistant clothing, welding gloves, and safety shoes.
- Fire Prevention: Keep flammable materials away from the welding area. Have a fire extinguisher readily available.
- Hot Surfaces: Welding equipment and workpieces become extremely hot. Allow them to cool before handling.
- Arc Rays: Protect your eyes and skin from arc rays, which can cause severe burns.
- Gas Cylinders: Handle gas cylinders with care. Secure them properly to prevent tipping.
Product Overview
Key Features
- 5-in-1 Multi-function: Supports ARC (MMA), Gas MIG, Spot Welding, and Lift TIG welding modes.
- Adjustable Welding Speed: Output current up to 200A, capable of welding steel up to 8.0 mm thick (60% duty cycle).
- Synergic Control: Continuous feed control for perfect welding of thin steel sheets, stainless steel, and thicker steel parts. Voltage automatically adapts to the set amperage in MIG mode.
- Powerful Welding Performance: Easy arc ignition, anti-stick function for easier electrode removal, and arc force for smoother welds and deeper penetration.
- Multiple Protection Functions: Equipped with overcurrent, overload, and temperature control protection. Automatic shutdown and fan activation for cooling in case of duty cycle exceedance.
- Wire Compatibility: Compatible with 1kg wire rolls: 0.8mm/0.9mm/1.0mm solid wire and 0.8mm/0.9mm/1.0mm flux-core wire.
Components Included
The RBM2000 PRO package includes the following components:
- Reboot MIG 200A Multi-process Welding Machine (RBM2000 PRO)
- MIG Torch
- Ground Clamp
- Electrode Holder (for MMA/Stick welding)
- Gas Hose and Clamps
- Welding Gloves
- Consumables (e.g., contact tips, nozzles)
- User Manual

Figure 1: The Reboot MIG 200A Multi-process Welding Machine shown with various included accessories such as the MIG torch, ground clamp, electrode holder, gas hose, and welding gloves. This image provides a comprehensive view of the product and its accompanying parts.
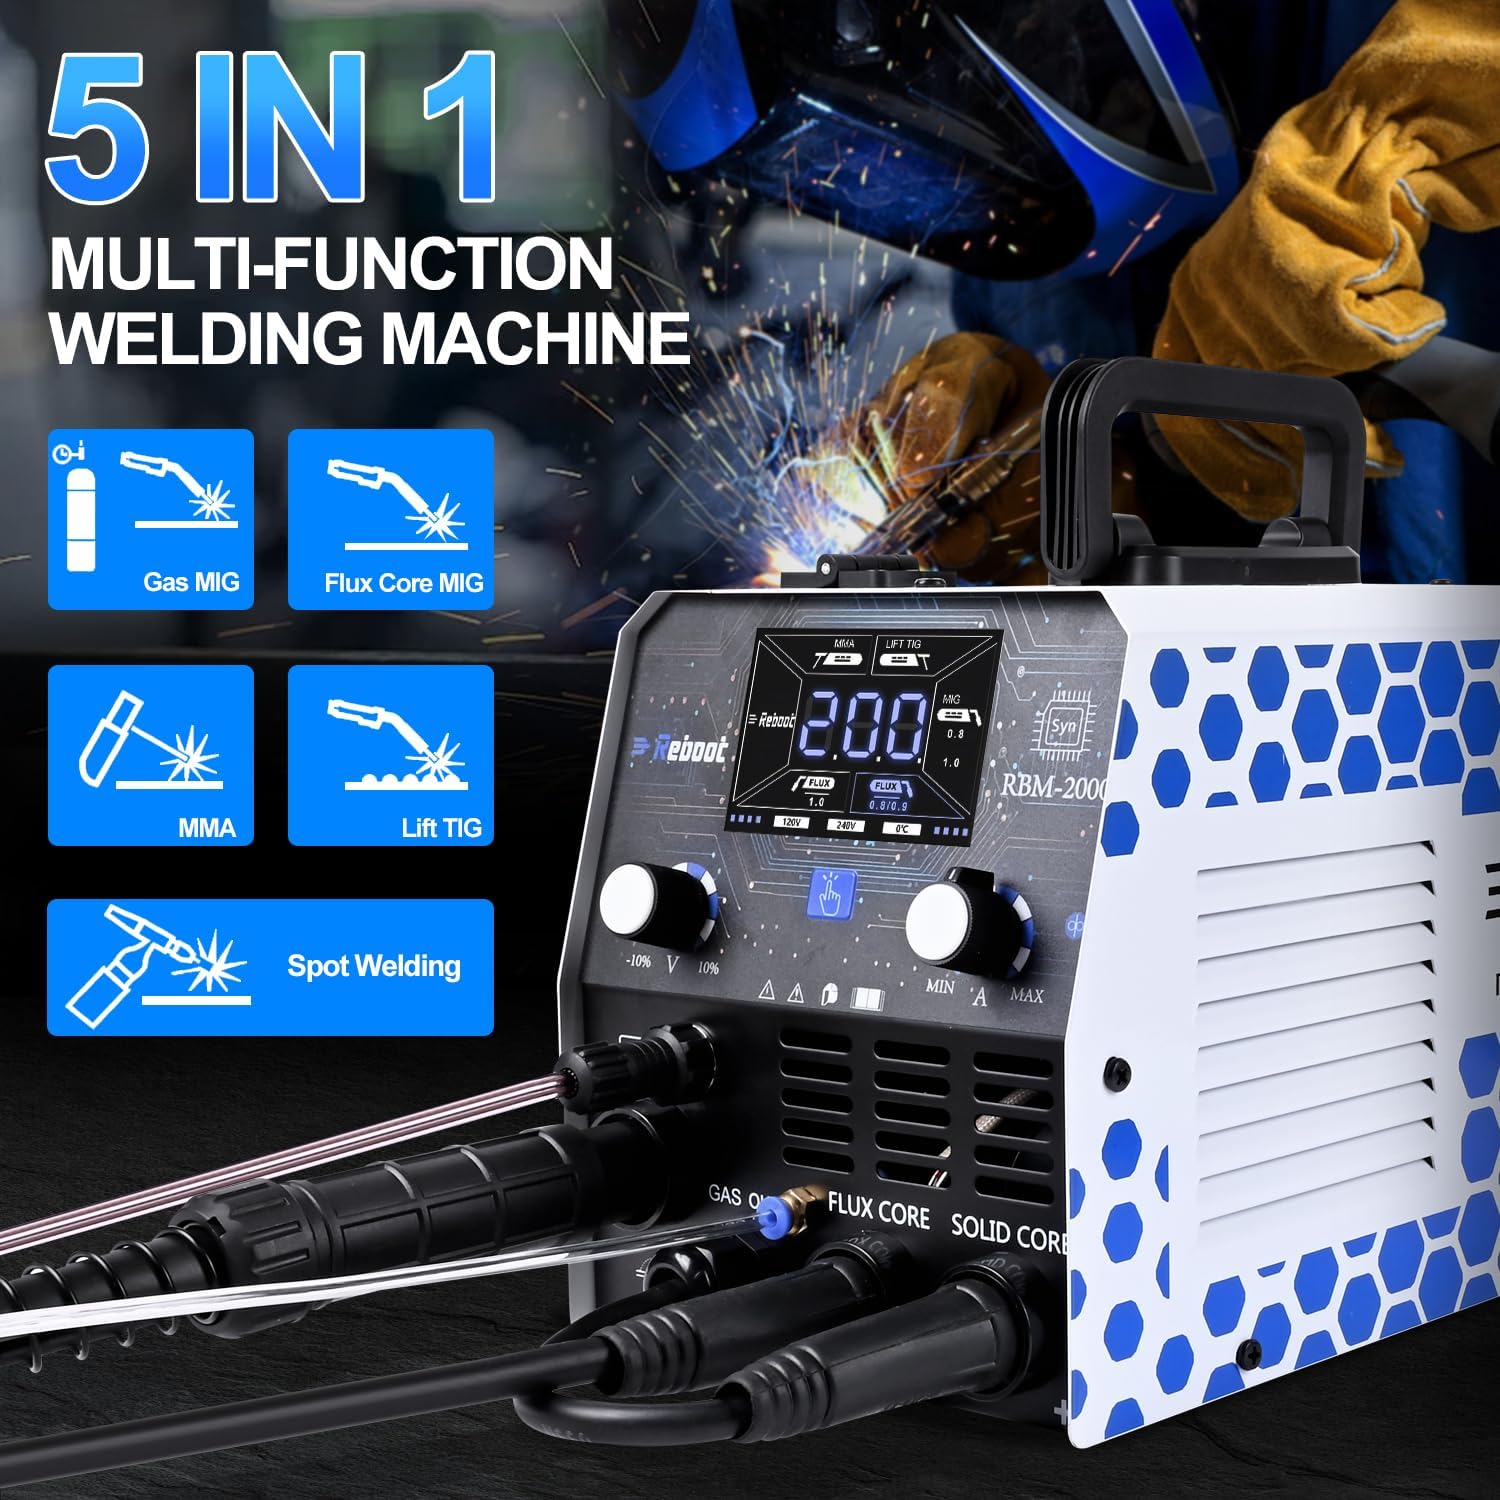
Figure 2: A close-up view of the Reboot MIG 200A welding machine's control panel, emphasizing its 5-in-1 multi-function capabilities: Gas MIG, Flux Core MIG, MMA, Lift TIG, and Spot Welding. This visual aids in understanding the versatility of the machine.
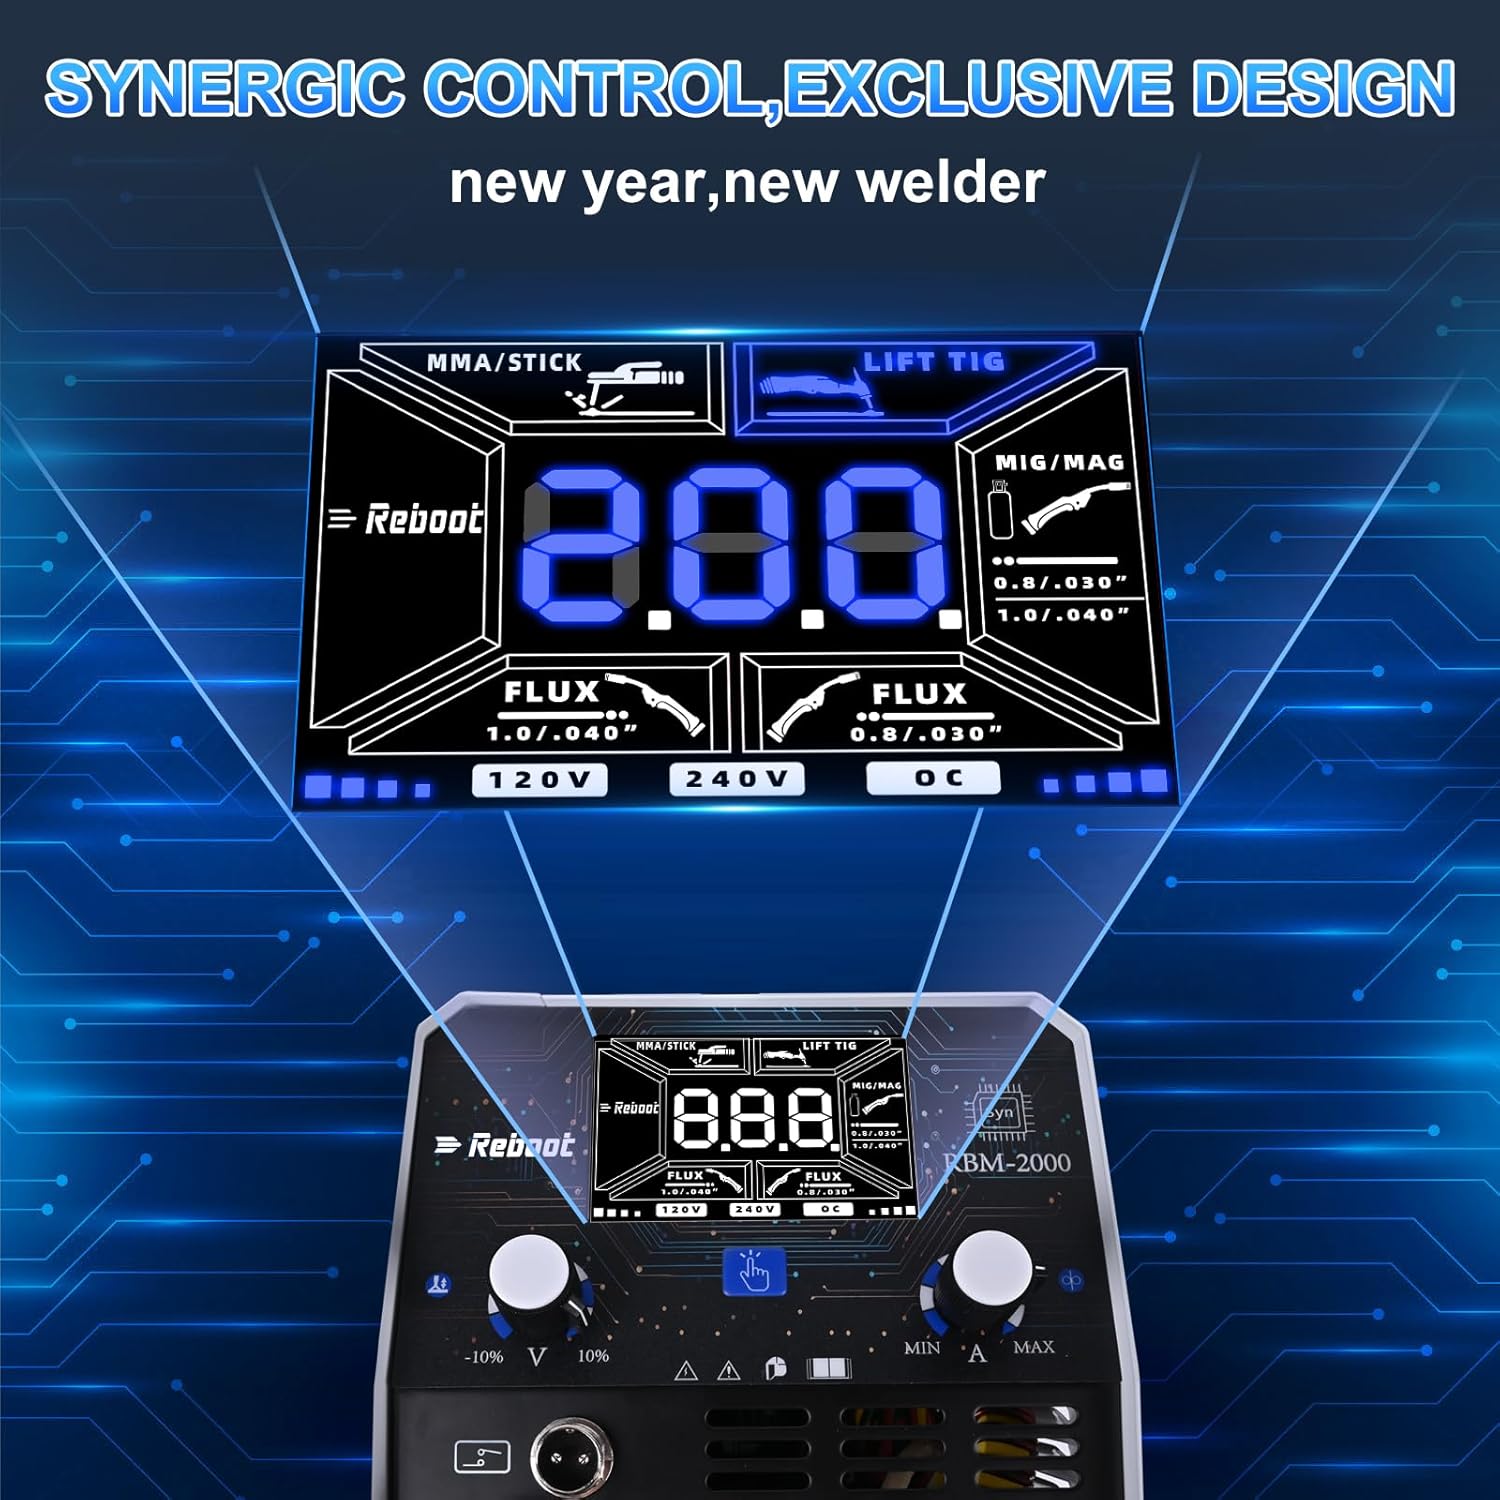
Figure 3: A detailed view of the large LED display on the Reboot MIG 200A welding machine, showcasing its synergic control interface. The display shows settings for MMA/Stick, Lift TIG, and MIG/MAG modes, along with voltage and current adjustments, indicating advanced control features.

Figure 4: An internal view of the Reboot MIG 200A welding machine, illustrating the mechanism for installing a 2-pound wire spool. This image highlights the wire feed system and compatibility with 0.6mm, 0.8mm, 0.9mm, and 1.0mm wires.

Figure 5: The Reboot MIG 200A welding machine set up in an outdoor work environment, demonstrating its portability and suitability for various job sites. The image shows the welder connected to a gas cylinder and other welding accessories.
Setup
1. Unpacking and Inspection
Carefully remove the welding machine and all accessories from the packaging. Inspect for any signs of damage during transit. If any damage is found, contact your supplier immediately.
2. Power Connection
- Ensure the power switch on the welder is in the "OFF" position.
- Connect the power cord to a suitable 230V AC power outlet with proper grounding.
- Verify that the power supply circuit can handle the machine's maximum current draw (200A).
3. Wire Installation (MIG/Flux Core)
- Open the wire feed compartment.
- Place the 1kg wire spool onto the spindle, ensuring it rotates freely.
- Feed the wire through the guide tube and into the drive rollers.
- Close the drive roller tension arm and adjust the tension appropriately (not too tight, not too loose).
- With the MIG torch straight, press the wire feed button (usually on the control panel or torch) to feed the wire through the torch liner until it exits the contact tip.
- Cut off any excess wire, leaving about 1/2 inch (12mm) protruding from the contact tip.
4. Gas Connection (Gas MIG)
- Connect one end of the gas hose to the gas inlet on the rear of the welding machine.
- Connect the other end of the gas hose to your shielding gas regulator on the gas cylinder.
- Ensure all connections are tight to prevent gas leaks.
- Open the gas cylinder valve slowly and set the desired gas flow rate on the regulator (typically 10-15 L/min for MIG).
5. Connecting Welding Cables
- Connect the ground clamp cable to the appropriate terminal on the front panel (usually marked "-"). Attach the ground clamp securely to the workpiece or welding table.
- Connect the electrode holder cable (for MMA/Stick) or the MIG torch cable to their respective terminals. Ensure connections are firm.
Operating Instructions
1. Control Panel Overview
The large LED display provides clear readings and allows for easy adjustment of welding parameters. Refer to Figure 3 for a visual guide.
- Mode Selection: Use the dedicated button or knob to select between MMA/Stick, Gas MIG, Flux Core MIG, Lift TIG, and Spot Welding modes.
- Current/Amperage Knob: Adjusts the welding current (Amps).
- Voltage Knob: Adjusts the welding voltage (Volts), primarily for MIG welding.
- Wire Feed Speed Knob: Adjusts the speed at which the welding wire is fed (for MIG/Flux Core).
- Synergic Control: In MIG mode, the machine automatically adjusts voltage based on the selected amperage and wire type, simplifying setup.
2. Welding Modes
Select the appropriate welding mode based on your application and material.
- MIG (Gas/Flux Core): Ideal for various metals, offering high productivity. Use gas for clean welds, flux core for outdoor or gas-less applications.
- MMA/Stick: Suitable for thicker materials and outdoor use, less sensitive to wind.
- Lift TIG: Provides precise, high-quality welds, especially for thin materials. (Note: TIG torch not included).
- Spot Welding: For joining overlapping sheets of metal at specific points.
3. Adjusting Parameters
Start with recommended settings for your material thickness and wire type, then fine-tune as needed. The synergic control feature in MIG mode simplifies this process by automatically adjusting voltage.
4. Welding Process
- Ensure proper grounding of the workpiece.
- Wear all required PPE.
- Position the torch/electrode correctly.
- Initiate the arc and begin welding, maintaining a consistent travel speed and arc length.
- Monitor the weld puddle and adjust parameters if necessary.
Maintenance
Regular maintenance ensures the longevity and optimal performance of your welding machine.
- Cleaning: Regularly clean the machine's exterior with a dry, soft cloth. Use compressed air to blow out dust from inside the machine, especially around the fan and circuit boards, but ensure the machine is unplugged.
- Torch and Cable Inspection: Inspect the MIG torch, electrode holder, and ground clamp cables for any damage, cuts, or loose connections before each use. Replace worn-out parts.
- Contact Tip and Nozzle: For MIG welding, regularly check and clean the contact tip and nozzle. Replace the contact tip when the bore becomes enlarged or clogged.
- Wire Feed Rollers: Keep the wire feed rollers clean and free of debris. Ensure the correct groove size is used for your wire diameter.
- Storage: Store the welding machine in a clean, dry environment, away from dust, moisture, and extreme temperatures.
Troubleshooting
This section provides solutions to common issues you might encounter.
| Problem | Possible Cause | Solution |
|---|---|---|
| No Power | Power cord unplugged, circuit breaker tripped, machine's power switch off. | Check power connections, reset circuit breaker, turn on power switch. |
| No Arc | Poor ground connection, wrong welding mode, incorrect settings, faulty torch/electrode holder. | Ensure ground clamp is secure, select correct mode, adjust current/voltage, inspect and replace faulty components. |
| Wire Feed Issues (MIG) | Incorrect wire tension, clogged contact tip, bent liner, wrong drive roller size. | Adjust tension, clean/replace contact tip, check/replace liner, ensure correct drive rollers. |
| Overheat Protection Activated | Exceeded duty cycle, poor ventilation, blocked air vents. | Allow machine to cool down, ensure adequate ventilation, clear air vents. |
| Poor Weld Quality | Incorrect parameters, improper technique, contaminated workpiece, wrong shielding gas/flow. | Adjust settings, practice technique, clean workpiece, check gas type and flow rate. |
Technical Specifications
| Specification | Value |
|---|---|
| Model | MB14 (RBM2000 PRO) |
| Input Voltage | 230V AC |
| Output Current | Up to 200A |
| Welding Thickness (Steel) | Up to 8.0 mm |
| Duty Cycle | 60% |
| Wire Roll Compatibility | 1 kg (0.8mm/0.9mm/1.0mm solid wire, 0.8mm/0.9mm/1.0mm flux-core wire) |
| Dimensions (Package) | 37 x 26 x 24 cm |
| Weight (Package) | 6.7 kg |
| Manufacturer | Reboot-EU |
Warranty and Support
Warranty Information
The Reboot MIG 200A Multi-process Welding Machine comes with a 1-year warranty from the date of purchase. This warranty covers manufacturing defects and ensures reliable operation under normal use. Please retain your proof of purchase for warranty claims. For specific return policy details, refer to the seller's terms of sale, which typically allow for refunds or replacements within 30 days.

Figure 6: The Reboot MIG 200A welding machine displayed alongside a "1 Year Warranty" badge, indicating the product's coverage period. This image reinforces the manufacturer's commitment to product quality and support.
Customer Support
For technical assistance, troubleshooting, or warranty inquiries, please contact Reboot-EU customer support. As a seller with 13 years of experience in manufacturing and marketing professional welding machines, Reboot-EU is committed to providing reliable support.
Please visit the official Reboot store on Amazon for more information or to contact support: Reboot Store
Official Product Videos
No official product videos with "Seller" as creator type were found in the provided data to embed directly into this manual. Please refer to the product page for any available video content.


