1. Introduction
This manual provides detailed instructions for the installation, operation, and maintenance of your ASUS ROG Strix B850-G Gaming WiFi mATX Motherboard. Designed for AMD Ryzen 9000 Series processors and DDR5 memory, this motherboard offers advanced features for high-performance computing. Please read this manual thoroughly before proceeding with installation and usage.

Image: The ASUS ROG Strix B850-G Gaming WiFi mATX Motherboard alongside its retail packaging, showcasing its white aesthetic and key features.
2. Key Features
The ASUS ROG Strix B850-G Gaming WiFi mATX Motherboard incorporates several advanced technologies and design elements:
- Advanced AI PC Ready: Optimized for future AI computing applications.
- AMD AM5 Socket: Supports AMD Ryzen 9000, 8000, and 7000 series desktop processors.
- Intelligent Control: Features ASUS AI Advisor, AI Networking II, and AEMP for simplified setup and enhanced performance.
- Robust Power Solution: 14+2+1 power stages rated for 80A per stage, with an 8+8-pin ProCool power connector, alloy chokes, and durable capacitors.
- Optimized Thermal Design: Equipped with massive heatsinks bridged to VRMs with high-conductivity thermal pads and an integrated I/O cover.
- Latest M.2 Support: Includes one PCIe 5.0 M.2 slot and two PCIe 4.0 M.2 slots with heatsinks, plus an additional PCIe 4.0 M.2 slot on the underside.
- Abundant Connectivity: Multiple USB 20Gbps Type-C, USB 10Gbps Type-C, and USB 5Gbps Type-A ports, PCIe 5.0 x16 SafeSlot, HDMI, and DisplayPort.
- High-Performance Networking: On-board WiFi 7 (802.11be) and Intel 2.5Gb Ethernet.
- DIY Friendly Design: Features PCIe Slot Q-Release, M.2 Q-Latch, M.2 Q-Release, Q-Antenna, Q-Dashboard, Q-LED, BIOS FlashBack button, Clear CMOS button, and pre-mounted I/O shield.
- Immersive Audio: Realtek ALC1220P codec with Savitech SV3H712 amplifier and Dolby Atmos support.

Image: Diagram illustrating the motherboard's AI Networking II and ASUS AI Advisor features for optimized performance and connectivity.

Image: Visual representation of the motherboard's DDR5, PCIe 5.0, USB 20Gbps Type-C, Dolby Atmos, Intel 2.5Gb Ethernet, and WiFi 7 capabilities.
3. Setup
Follow these steps for initial setup of your motherboard:
- Install CPU: Carefully place your AMD AM5 processor into the CPU socket. Ensure proper alignment and secure the retention arm.
- Install CPU Cooler: Attach your chosen CPU cooler according to its manufacturer's instructions.
- Install Memory (RAM): Insert DDR5 memory modules into the DIMM slots. Ensure they are fully seated until the clips lock into place.
- Install M.2 SSDs: Utilize the M.2 Q-Latch or M.2 Q-Release mechanisms for tool-free installation of M.2 solid-state drives into the available slots. The PCIe 5.0 M.2 slot offers the highest performance.
- Install Graphics Card: Insert your graphics card into the PCIe 5.0 x16 SafeSlot. The PCIe Slot Q-Release button simplifies removal.
- Connect Power: Connect the 24-pin ATX power connector and the 8+8-pin ProCool CPU power connectors from your power supply to the motherboard.
- Connect Peripherals: Connect USB devices, display cables (HDMI/DisplayPort), and network cables (2.5G LAN or WiFi Q-Antenna).

Image: Demonstrates the EZ PC DIY features including PCIe Slot Q-Release, M.2 Q-Release, ASUS Q-Antenna, and New M.2 Q-Latch for simplified component installation.
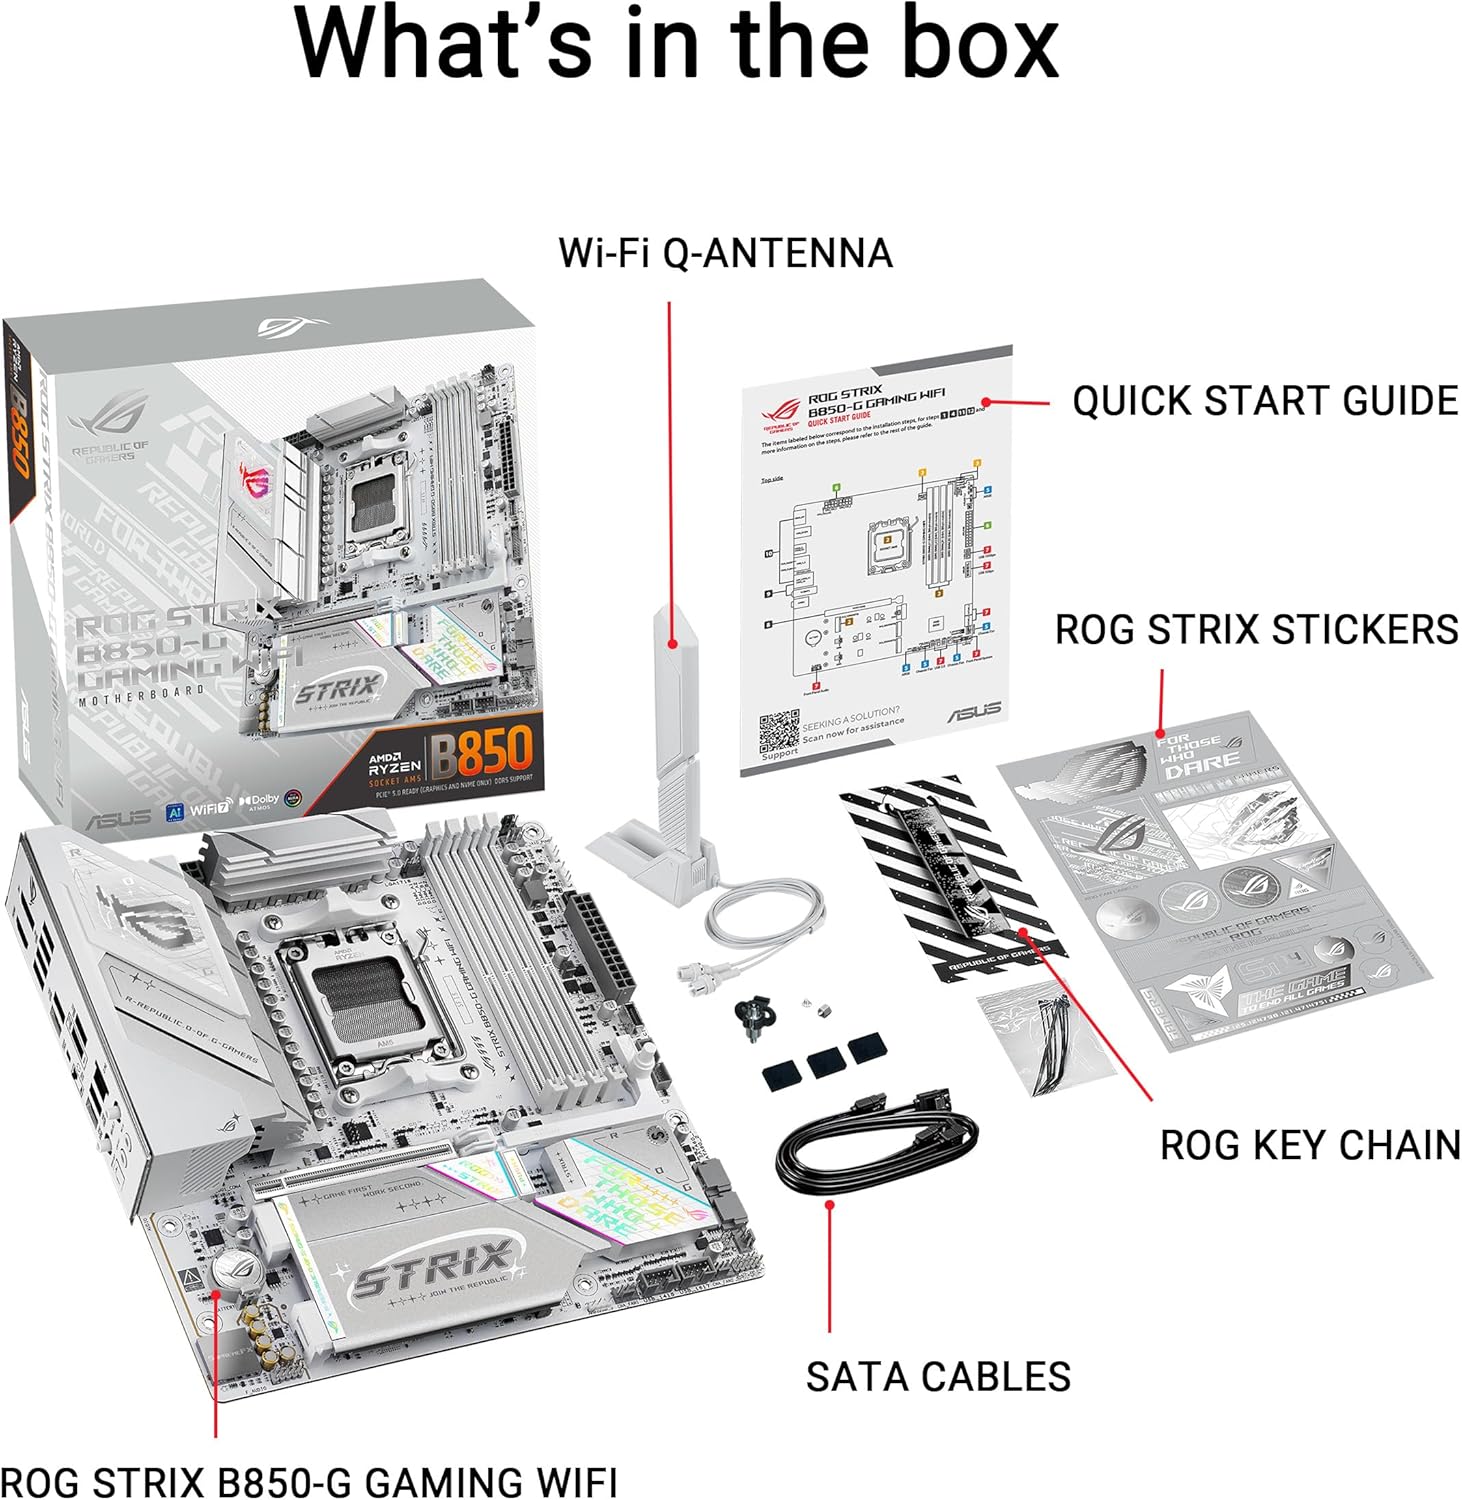
Image: A detailed view of the motherboard's rear I/O panel, highlighting various USB ports, display outputs, 2.5G LAN, and WiFi 7 antenna connectors.
3.1. WiFi 7 Antenna Installation
To utilize the integrated WiFi 7, connect the included ASUS WiFi Q-Antenna to the designated ports on the rear I/O panel. The Q-Antenna design simplifies this connection process.

Image: The ASUS ROG Strix B850-G Motherboard with the WiFi Q-Antenna connected to the rear I/O ports.
4. Operating
The motherboard's operation is managed through its UEFI BIOS and supporting software.
4.1. BIOS Configuration
Access the UEFI BIOS by pressing the DEL or F2 key during system startup. The intuitive UEFI BIOS dashboard allows for configuration of system settings, boot order, and advanced features.
4.2. AI Features
Leverage ASUS AI Advisor for system optimization and AI Networking II for intelligent network management, ensuring stable and high-speed connectivity. AEMP (ASUS Enhanced Memory Profile) assists in optimizing DDR5 memory performance.
4.3. Aura Sync RGB Lighting
Customize the integrated RGB lighting and connected addressable Gen 2 headers using ASUS-exclusive Aura Sync software for personalized aesthetics.

Image: An angled view of the motherboard showcasing its integrated RGB lighting zones, customizable via Aura Sync.
5. Maintenance
Regular maintenance ensures optimal performance and longevity of your motherboard.
- BIOS Updates: Periodically check the ASUS support website for the latest BIOS updates. Use the BIOS FlashBack button for convenient updates, even without a CPU or RAM installed.
- Clear CMOS: If you encounter system instability due to incorrect BIOS settings, use the Clear CMOS button on the rear I/O panel to reset BIOS settings to default.
- Dust Removal: Keep the motherboard and surrounding components free of dust using compressed air. Ensure the system is powered off and unplugged before cleaning.
- Driver Updates: Install the latest drivers for your motherboard components from the ASUS support website to ensure compatibility and performance.
6. Troubleshooting
If you encounter issues, consider the following steps:
- Q-LED Diagnostics: The Q-LED indicators on the motherboard provide visual cues for boot-up issues related to CPU, DRAM, VGA, or Boot Device. Refer to the motherboard manual for specific Q-LED codes.
- Check Connections: Ensure all power cables, data cables, and expansion cards are securely connected.
- Component Reseating: Try reseating RAM modules, the graphics card, and other components to ensure proper contact.
- BIOS Reset: Use the Clear CMOS button to revert BIOS settings to factory defaults if configuration issues are suspected.
- Operating System Compatibility: Note that for Windows 11, WiFi 7 requires version 24H2 or later for full functionality. Windows 11 21H2/22H2/23H2 only supports WiFi 6E. For Windows 10, only WiFi 6 is supported.
- Contact Support: If problems persist, refer to the ASUS support website or contact customer service for further assistance.
7. Specifications
| Feature | Specification |
|---|---|
| Brand | ASUS |
| Series | ROG STRIX B850-G GAMING WIFI |
| Model Name | ROG STRIX B850-G GAMING WIFI |
| CPU Socket | Socket AM5 |
| Compatible Processors | AMD Ryzen™ 9000, 8000 & 7000 Series Desktop Processors |
| Chipset Type | AMD B850 |
| RAM Memory Technology | DDR5 |
| Memory Speed | 8000 MHz |
| Memory Storage Capacity | 256 GB (Max) |
| Platform | Windows 10, Windows 11 |
| Color | WHITE |
| Item Weight | 2.9 pounds |
| Product Dimensions (LxWxH) | 9.6 x 9.6 x 1.9 inches |
8. Official Product Video
Video: An official overview of the ASUS ROG Strix B850-G Gaming Motherboard, highlighting its design and features.
9. Warranty and Support
This ASUS product comes with a manufacturer's warranty. For detailed warranty information, technical support, driver downloads, and further assistance, please visit the official ASUS support website:
You may also refer to the included Quick Start Guide for initial setup information.

Image: The contents of the motherboard box, including the motherboard, Wi-Fi Q-Antenna, Quick Start Guide, ROG Strix stickers, ROG key chain, and SATA cables.


