
FOTING FT-CLP5503
FOTING 13" Sand Filter Pump User Manual
Model: FT-CLP5503
Brand: FOTING
Introduction
This manual provides comprehensive instructions for the safe operation, installation, and maintenance of your FOTING 13" Sand Filter Pump. Designed for above-ground pools up to 13,000 gallons, this system features a 1 HP pump with a 3800 GPH flow rate and a versatile 6-way valve for enhanced water circulation and filtration. Please read this manual thoroughly before use to ensure optimal performance and longevity of your unit.

Figure 1: FOTING 13" Sand Filter Pump System
This image displays the complete FOTING 13" Sand Filter Pump system, including the blue filter tank, black pump unit, connecting hoses, and clamps. Filter balls are also shown, indicating their use with the system.
Safety Information
Always adhere to the following safety guidelines to prevent injury or damage to the equipment.
- WARNING: Risk of Electric Shock. Do not plug into power while standing on a wet or damp surface.
- WARNING: To reduce risk of electric shock, connect only to a properly grounded, grounding-type receptacle.
- WARNING: To reduce risk of electric shock, install only on a circuit protected by a Ground Fault Circuit Interrupter (GFCI).
- This pump has been evaluated for use with water only.
- Ensure all electrical connections are dry and secure before operation.
- Keep children and pets away from the pump system during operation.
- Always disconnect power before performing any maintenance or service.
- Do not operate the pump if it or the power cord is damaged.

Figure 2: Control Panel and Safety Labels
This image shows a close-up of the pump's control panel, highlighting important safety warnings regarding electrical shock and proper grounding, as well as the digital display for timer settings.
Product Components
The FOTING Sand Filter Pump system includes the following components:
- 1 x User Manual
- 1 x Warranty Card
- 1 x Pressure Gauge
- 1 x Drain Piece
- 1 x Pair of Flange Clamps
- 1 x O-ring
- 1 x Allen Wrench
- 1 x NPT 1-1/2 Female Connectors
- 1 x Sealing Tape
- 1 x Hose Clamps
- 1 x Sand Cover
- 1 x Sylphon Bellows
- 1 x Filter Assembly
- 1 x Base
- 1 x Valve Head Assembly
- 1 x Cylinder (Filter Tank)
- 1 x Screws & Nuts Set
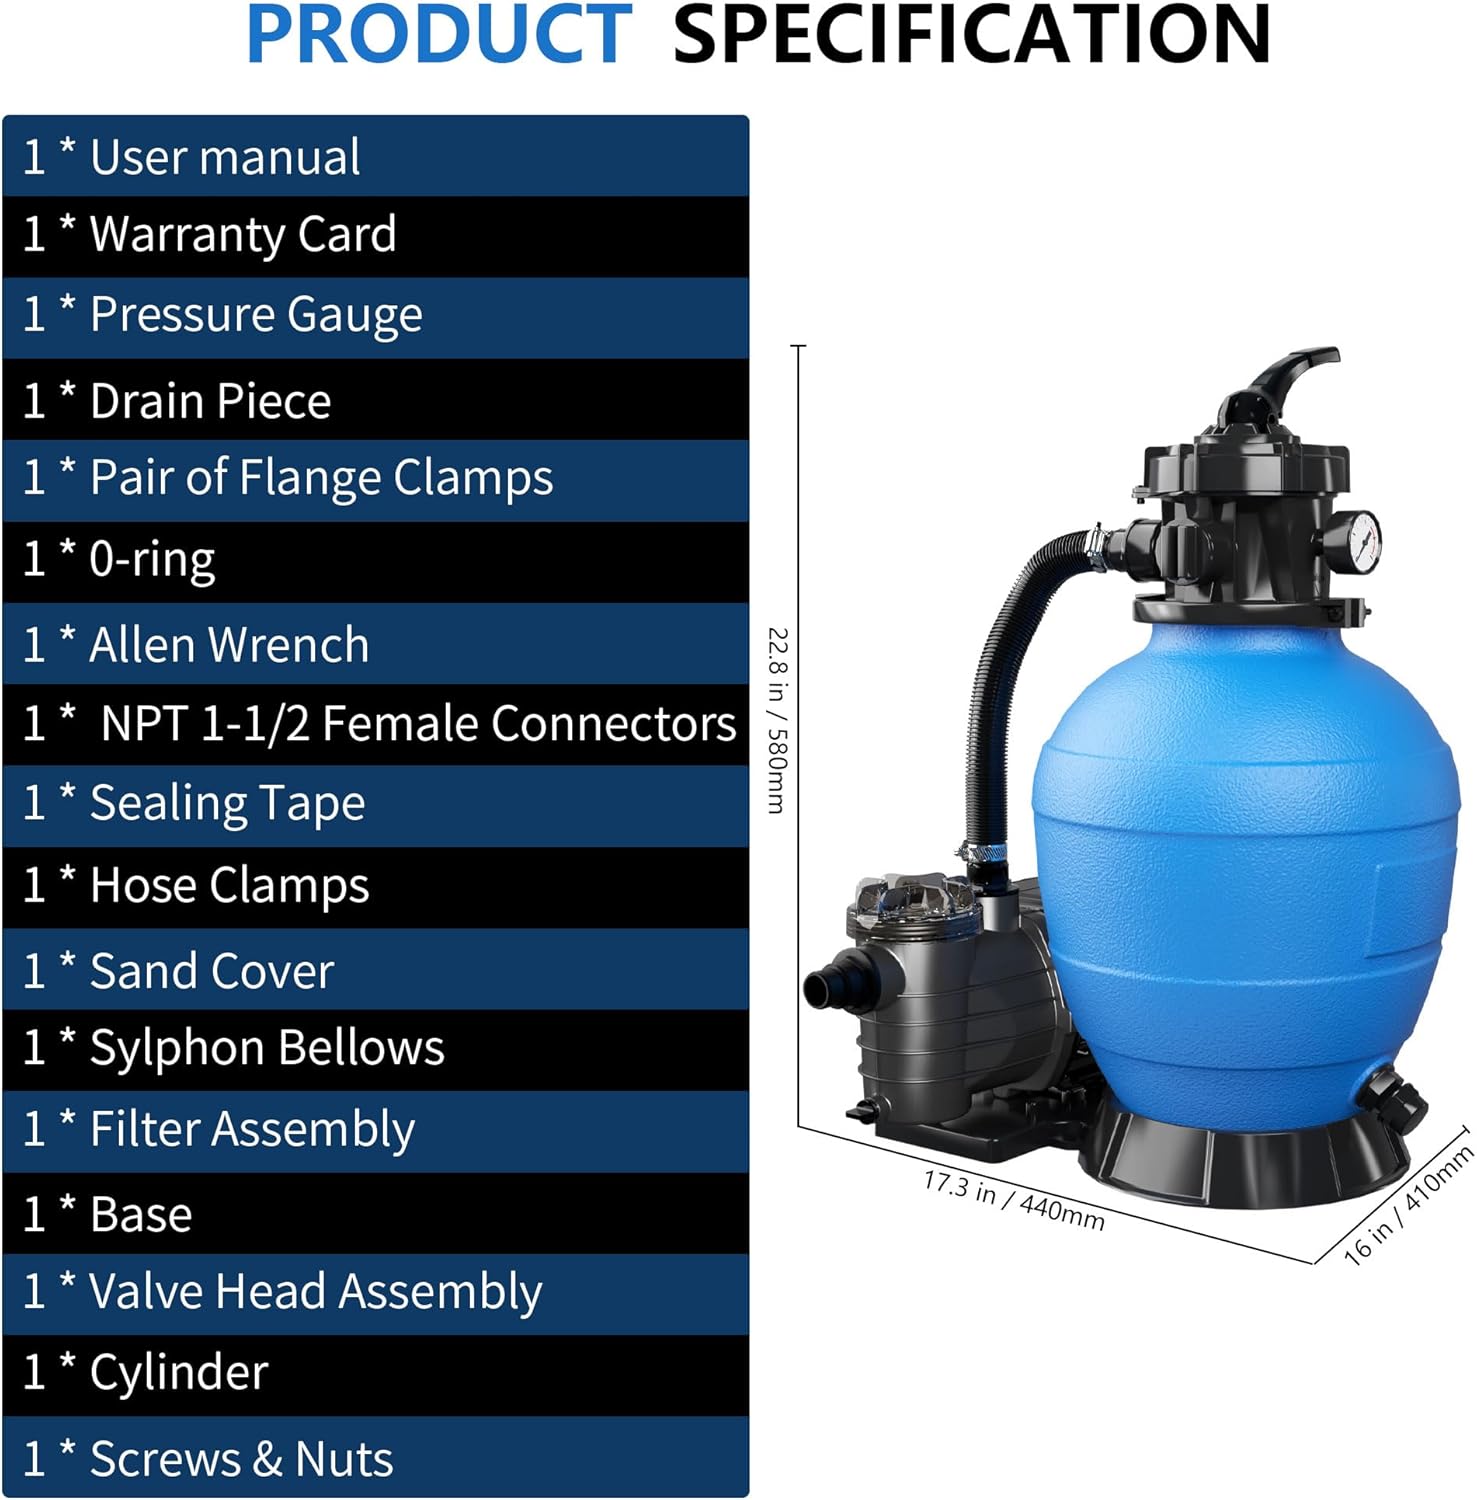
Figure 3: Included Components and System Dimensions
This image provides a visual list of the components included with the FOTING sand filter pump system, alongside a diagram illustrating the overall dimensions of the assembled unit.
Setup and Installation
Follow these steps for proper assembly and installation of your sand filter pump system.
- Positioning the Unit: Place the filter pump system on a firm, level surface near your above-ground pool. Ensure it is within reach of a GFCI-protected electrical outlet and away from direct sunlight or excessive moisture.
- Assembling the Base and Tank: Securely attach the filter tank (cylinder) to its base.
- Adding Filter Media:
- Remove the multi-port valve from the top of the filter tank.
- Carefully add the recommended amount of filter sand (approximately 66 lbs) or filter balls (200g included, additional may be needed) into the tank. Ensure the standpipe is centered during this process.
- Smooth the top of the filter media.
- Installing the Multi-Port Valve: Place the multi-port valve (6-way valve) onto the top of the filter tank, ensuring it seats properly with the standpipe. Secure it with the provided flange clamps and O-ring.
- Connecting Hoses:
- Connect the pump's outlet to the "PUMP" port on the multi-port valve.
- Connect the pool's return line to the "RETURN" port on the multi-port valve.
- Connect the pool's skimmer/suction line to the pump's inlet.
- Ensure all connections are tight and use sealing tape on threaded fittings as needed to prevent leaks.
- Installing Pressure Gauge: Screw the pressure gauge into its designated port on the multi-port valve.
- Priming the Pump: Before starting, ensure the pump is filled with water to prevent dry running. Open all necessary valves to allow water to flow into the pump and filter tank.

Figure 4: Hose Connection Diagram
This diagram illustrates the proper connection of 1.5" PVC hoses, including pump hose connectors and hose adapters, for integrating the filter pump with an above-ground pool system.
Operating Instructions
Understand the functions of the 6-way valve and timer settings for effective pool filtration.
6-Way Valve Functions
The multi-port valve allows you to select different operational modes. Always turn off the pump before changing valve positions.
- FILTER: Normal filtering mode. Water passes through the filter media, cleaning the pool.
- BACKWASH: Reverses water flow to clean the filter media. Water is discharged through the waste port.
- RINSE: Used after backwashing to flush out remaining debris from the filter and settle the sand. Water is discharged through the waste port.
- WASTE: Bypasses the filter and drains water directly from the pool, useful for vacuuming heavy debris or lowering water level.
- CLOSED: Stops water flow to the filter. Never operate the pump with the valve in the CLOSED position.
- RECIRCULATE: Bypasses the filter and circulates water directly back to the pool. Useful for mixing chemicals without filtering.

Figure 5: Multi-Port Valve Settings
This image details the six operational modes of the multi-port valve: Filter, Backwash, Rinse, Waste, Closed, and Recirculate, with brief descriptions of each function.
Intelligent Timing Modes
The pump features a 24-hour dual-mode intelligent timing system for convenient operation.
- Single Cycle Mode: Allows you to set a specific duration for the pump to run once per 24-hour period.
- Continuous Cycle Mode: The pump runs continuously until manually turned off or a new setting is applied.
Refer to the control panel for setting specific run times. The digital display will show the current setting.

Figure 6: Dual-Mode Intelligent Timing
This image illustrates the two intelligent timing modes available: Single Cycle Mode and Continuous Cycle Mode, along with the control panel interface for setting these options.
Maintenance
Regular maintenance ensures the longevity and efficiency of your FOTING Sand Filter Pump.
- Backwashing and Rinsing: Perform backwashing when the pressure gauge reads 8-10 PSI above its clean starting pressure, or when pool water appears cloudy.
- Turn off the pump.
- Set the 6-way valve to "BACKWASH".
- Turn on the pump and run until the water in the sight glass (if present) runs clear (typically 2-3 minutes).
- Turn off the pump.
- Set the 6-way valve to "RINSE".
- Turn on the pump and run for 30-60 seconds.
- Turn off the pump.
- Set the 6-way valve back to "FILTER" and restart the pump.
- Cleaning the Filter Basket: Periodically inspect and clean the pump's filter basket to remove large debris that could impede flow.
- Turn off the pump and disconnect power.
- Open the clear cover of the filter basket.
- Remove and empty the basket. Rinse it thoroughly.
- Replace the basket and secure the clear cover.
- Winterizing: Before freezing temperatures, drain all water from the pump, filter, and hoses. Store the pump in a dry, protected area.


Figure 7: Filter Basket and Clear Cover
These images show a detailed view of the pump's filter basket, designed for preliminary debris filtration, and the clear cover that allows visual inspection of the pump's internal state.
Troubleshooting
Refer to this section for common issues and their solutions.
| Problem | Possible Cause | Solution |
|---|---|---|
| Low Water Flow / Poor Filtration | Clogged filter basket; Dirty filter media; Air in system; Incorrect valve setting. | Clean filter basket; Backwash/Rinse filter; Bleed air from system; Ensure valve is on "FILTER". |
| Pump Not Starting | No power; GFCI tripped; Motor overload. | Check power connection; Reset GFCI; Allow motor to cool, then restart. |
| Water Leaks | Loose connections; Damaged O-rings/seals; Cracked housing. | Tighten all connections; Inspect and replace O-rings/seals; Contact customer service for cracked housing. |
| Cloudy Pool Water | Insufficient filtration time; Dirty filter media; Improper chemical balance. | Increase filtration time; Backwash/Rinse filter; Test and adjust pool chemistry. |
Specifications
Detailed technical specifications for the FOTING 13" Sand Filter Pump.
- Model Number: FT-CLP5503
- Manufacturer: FOTING
- Item Weight: 25.4 pounds
- Product Dimensions: 13.38 x 17.32 x 21.25 inches
- Size: 3800GPH (13in)
- Color: Blue
- Style: Above Ground
- Material: Metal, Plastic
- Power Source: Corded Electric
- Flow Rate: 3800 GPH (Gallons Per Hour)
- Horsepower: 1 HP
- Maximum Head: 44 ft
- Sand Capacity: 66 lbs
- Filter Ball Capacity: 200g (included)
- Recommended Pool Size: Up to 13,000 Gallons
- Valve Type: 6-Way Multi-Port Valve
- Timing: 24-Hour Dual-Mode Intelligent Timing (Single Cycle, Continuous Cycle)

Figure 8: Key Performance Specifications
This image provides a summary of the FOTING sand filter pump's key performance specifications, including system flow rate, valve type, compatible pool size, tank capacity, and filter media capacity.
Warranty and Support
FOTING stands behind the quality of its products.
- Warranty: This product is backed by a three-year warranty from the date of purchase. This warranty covers manufacturing defects and material flaws under normal use.
- Customer Service: For any questions, technical assistance, or warranty claims, please contact FOTING customer support. Refer to the warranty card included with your product for specific contact details.
Ask a question about this manual
Ask about setup, troubleshooting, compatibility, parts, safety, or missing instructions. Manuals+ will review the question and use this page’s manual context to help answer it.