
1. Introduction
This manual provides comprehensive instructions for the installation, operation, and maintenance of your Leadfan Car Radio Stereo system, designed specifically for Toyota Prius models from 2004 to 2009. This unit features a 9-inch touchscreen, Wireless Apple CarPlay, Android Auto, Bluetooth, GPS, WiFi, FM radio, microphone input, steering wheel control compatibility, and backup camera support. Please read this manual thoroughly before installation and use to ensure proper functionality and safety.

Image: The Leadfan Car Radio Stereo unit displaying its Android interface with various app icons, alongside a backup camera, wiring harness, and a trim piece. This image illustrates the main product and some key components.
2. Safety Information
- Always ensure the vehicle is turned off and the battery is disconnected before performing any installation or wiring.
- Improper installation can lead to electrical shorts, damage to the vehicle's electrical system, or personal injury. If you are unsure about any step, consult a qualified professional.
- Do not operate the device in a way that distracts you from driving. Always prioritize road safety.
- Keep the unit away from water and excessive moisture.
- Use only specified power cables and accessories.
3. Package Contents
Verify that all items are present in the package:
- Leadfan Car Radio Stereo Unit (9-inch touchscreen)
- Power Cable Harness (Plug and Play for Toyota Prius 2004-2009)
- GPS Antenna
- USB Cables (x2)
- RCA Cable (for audio/video output)
- Backup Camera Input Cable
- Backup Camera (1080p, 170° view angle)
- CanBus Decoder (if applicable for vehicle model)
- External Microphone
- Installation Accessories (brackets, screws)
- User Manual
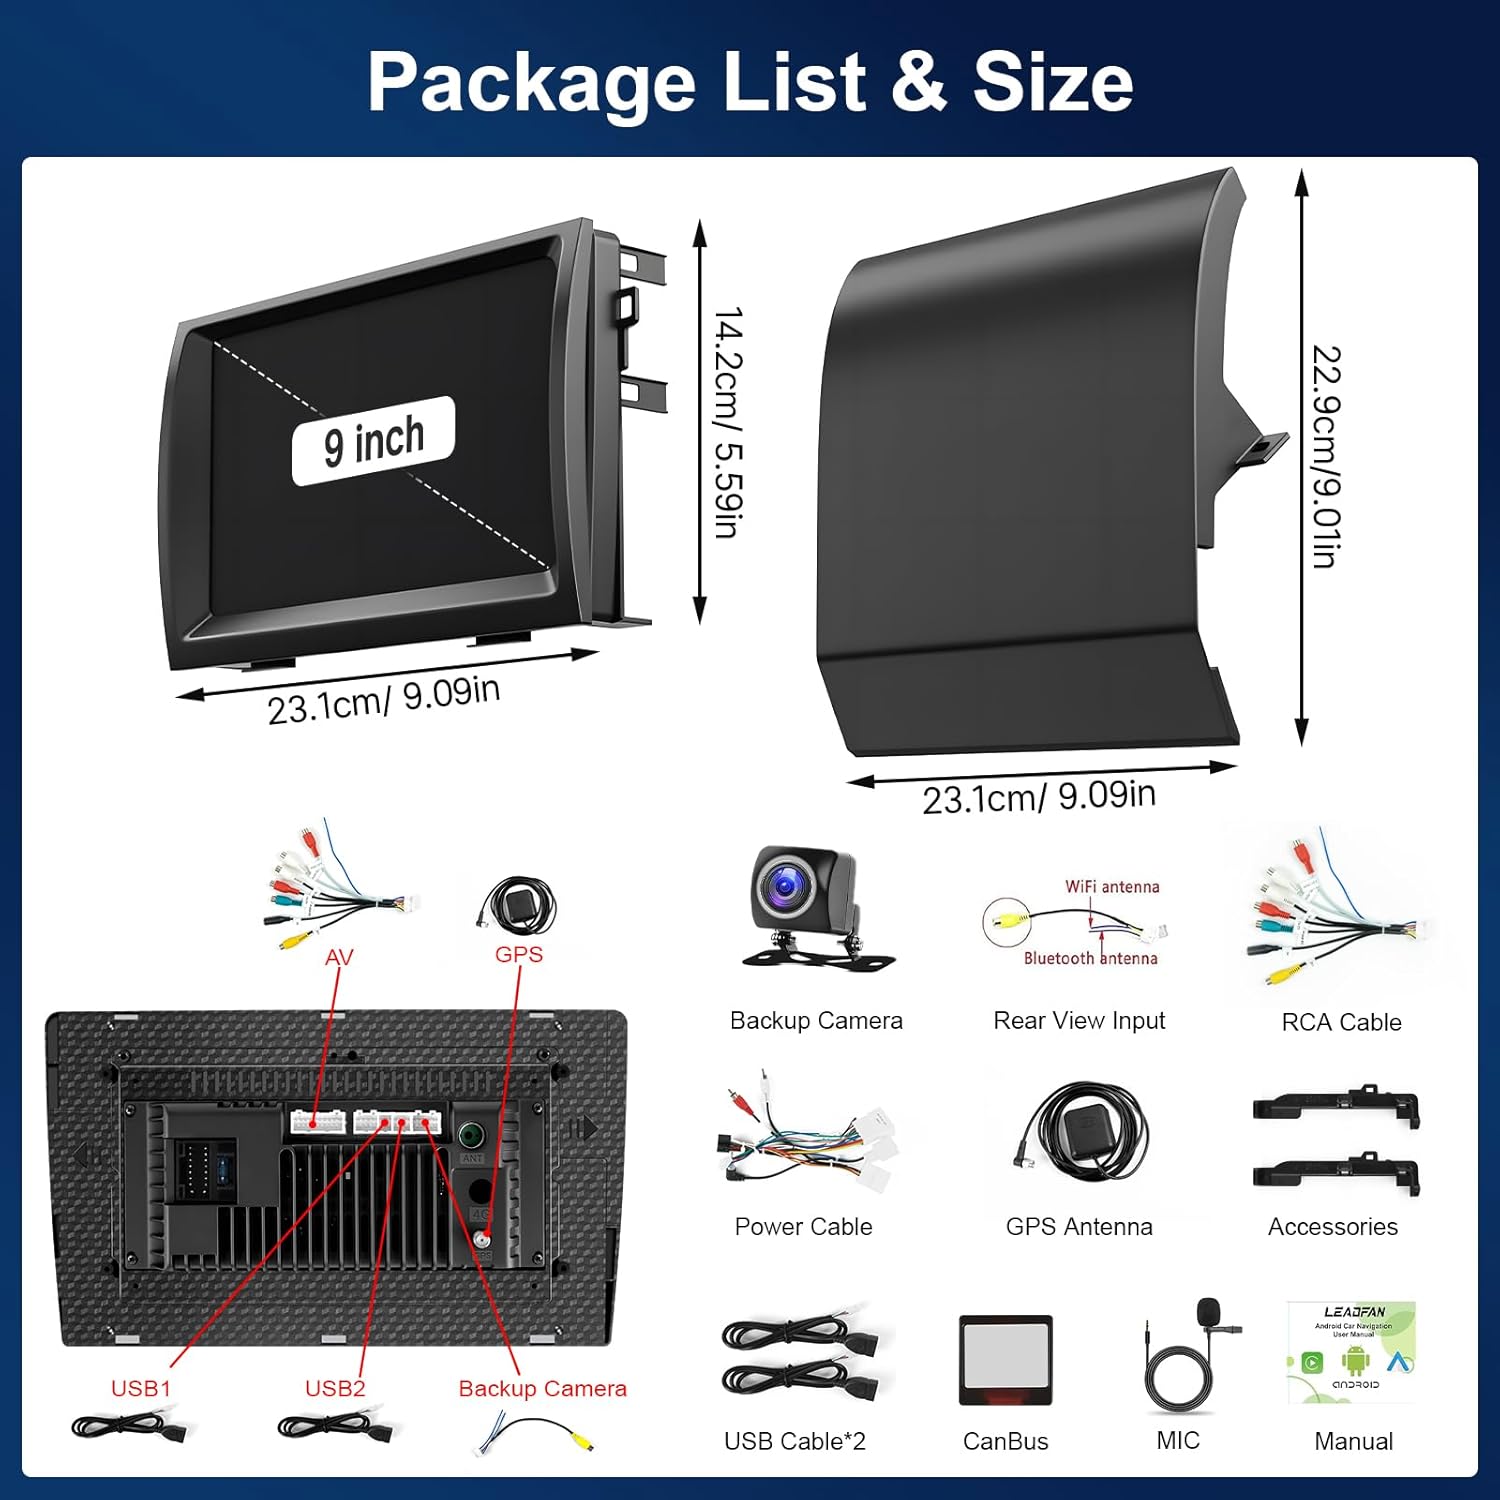
Image: A visual representation of the car stereo's dimensions and a comprehensive layout of all included cables and accessories, such as USB cables, GPS antenna, backup camera, and power cables. This helps in identifying all components.
4. Setup and Installation
This unit is designed for plug-and-play installation in Toyota Prius 2004-2009 models, including those with JBL premium audio. However, it is not compatible with the original factory camera. Professional installation is recommended.
4.1 Pre-Installation Check
- Confirm vehicle compatibility (Toyota Prius 2004-2009).
- Ensure the vehicle's original audio system is either standard or JBL/BO-SE premium audio with a factory large screen.
- Disconnect the vehicle's battery before starting installation.
4.2 Removing the Factory Radio
- Carefully remove the trim panels surrounding the factory radio using appropriate trim removal tools.
- Unscrew the mounting bolts/screws securing the factory radio.
- Gently pull out the factory radio and disconnect all wiring harnesses and antenna cables.
4.3 Wiring Connections
Connect the provided wiring harnesses to the new Leadfan unit and the vehicle's existing wiring. The main power harness is designed for plug-and-play. Refer to the wiring diagram provided with your unit for specific connections.
- Power Harness: Connect the vehicle-specific power harness to the main power input of the Leadfan unit.
- GPS Antenna: Connect the GPS antenna and mount it in a location with a clear view of the sky (e.g., dashboard, under the windshield).
- USB Cables: Route the USB cables to a convenient location for connecting external devices.
- External Microphone: Connect the external microphone for improved call quality and voice commands.
- WiFi Antenna: Connect the WiFi antenna for network connectivity.
4.4 Backup Camera Installation
The included 1080p backup camera provides a 170° view angle. Install the camera at the rear of the vehicle, typically near the license plate light. Connect the camera's video output to the 'Backup Camera Input' on the head unit and its power wire to the vehicle's reverse light circuit (12V) so it activates when reverse gear is engaged.
4.5 Steering Wheel Control (SWC) Connection
Connect the SWC wires from the vehicle's harness to the corresponding SWC inputs on the Leadfan unit. After installation, you will need to configure the steering wheel buttons through the unit's settings menu. This allows you to map functions like volume up/down, track skip, and mode selection to your steering wheel buttons.
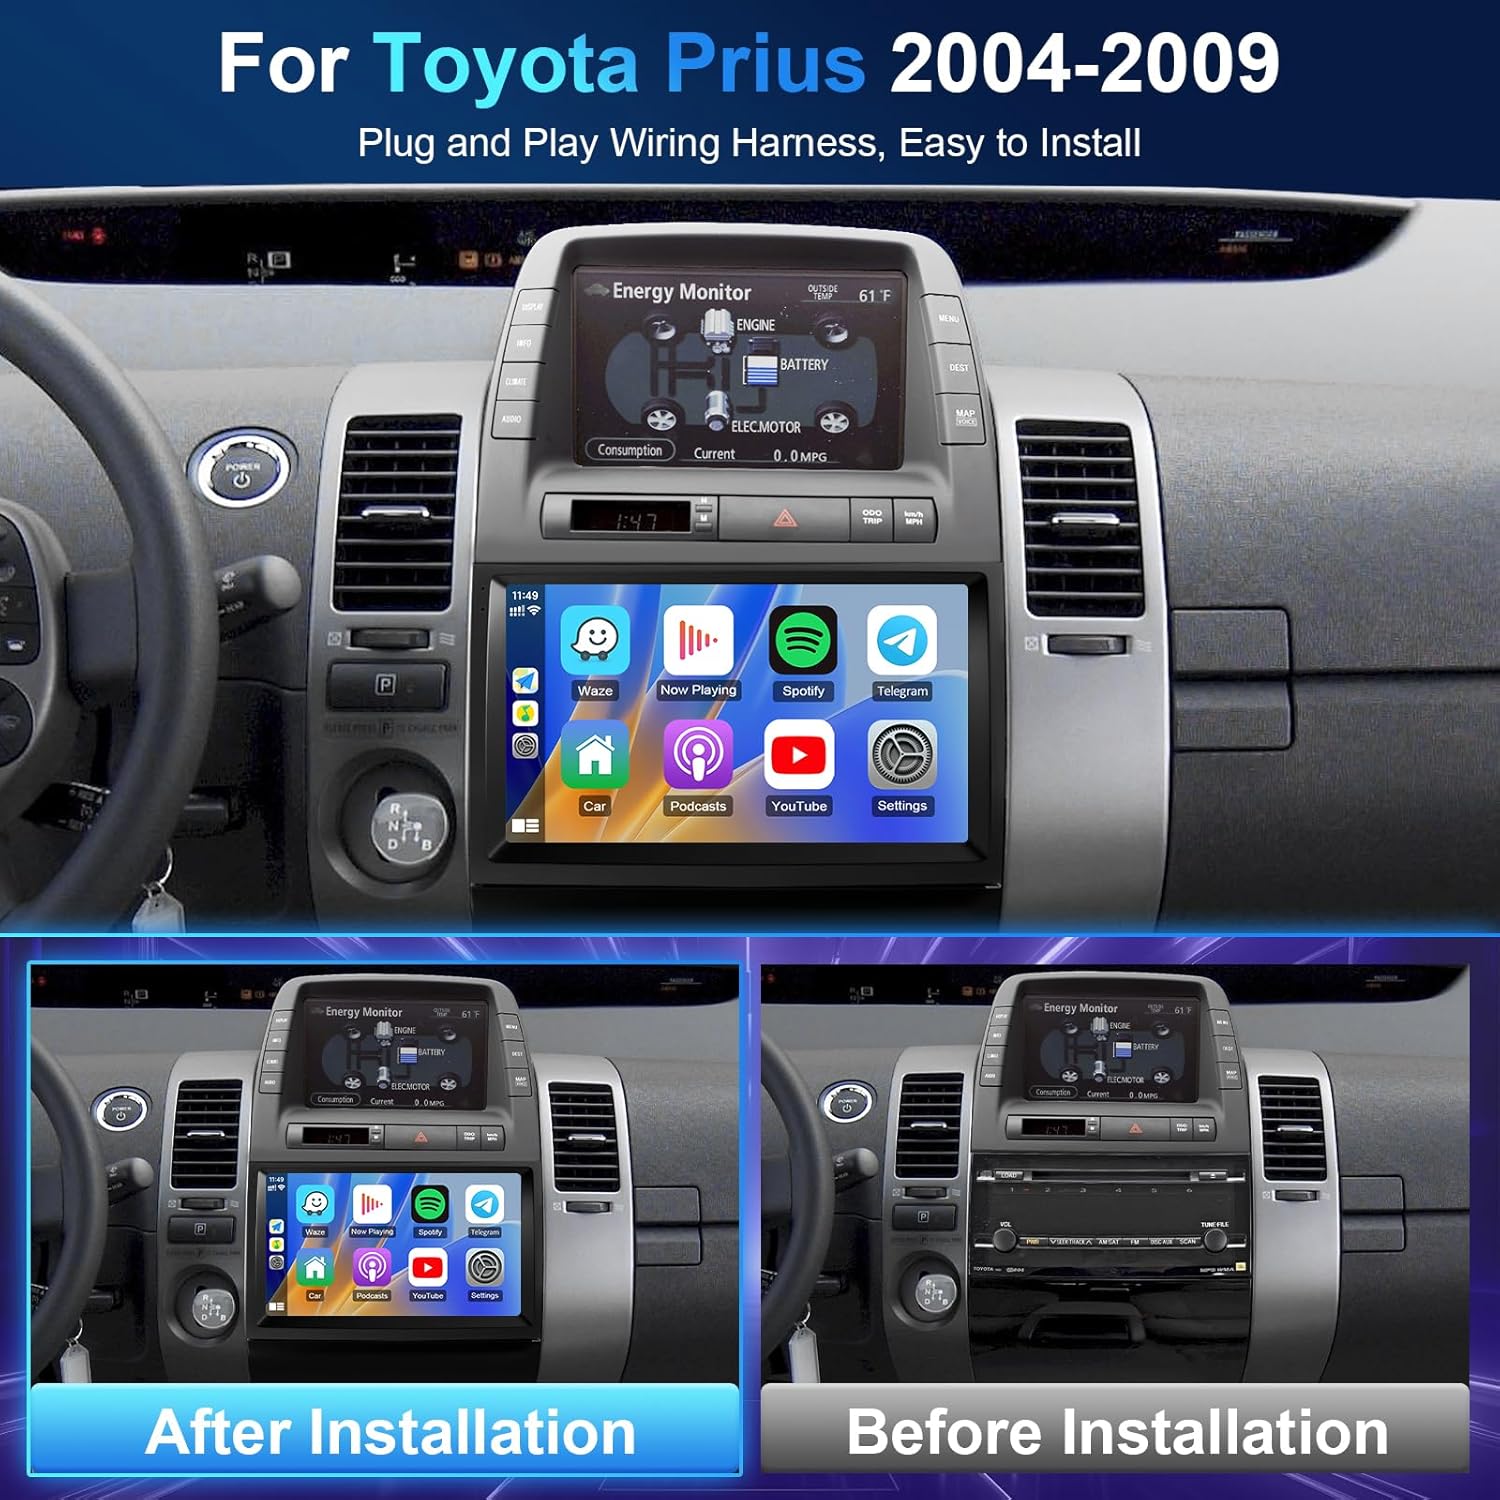
Image: A side-by-side comparison showing the original Toyota Prius dashboard on the right and the same dashboard on the left with the new Leadfan car stereo installed. This demonstrates the integrated fit and appearance after installation.

Image: A multi-panel image illustrating various features: the Bluetooth 5.1 interface for music playback and calls, the FM radio tuner, a simulated backup camera view with guidelines, and the steering wheel control learning interface. This image is relevant for both setup (SWC, backup camera) and operation (Bluetooth, FM).
4.6 Final Assembly
- Carefully slide the new Leadfan unit into the dashboard opening.
- Secure the unit with the mounting bolts/screws.
- Reattach the trim panels.
- Reconnect the vehicle's battery.
- Turn on the vehicle and test the unit's functionality.
5. Operating Instructions
Your Leadfan Car Radio Stereo runs on Android 12, offering a user-friendly interface and a wide range of features.
5.1 Basic Navigation and Touchscreen
- The 9-inch capacitive touchscreen supports multi-touch gestures.
- Swipe left/right to navigate between home screens.
- Tap icons to open applications.
- Use the back, home, and recent apps buttons (usually on-screen or physical) for navigation.

Image: A visual demonstration of the 2.5D touchscreen's features, highlighting its 1280P HD resolution, the ability to use a split screen for two applications simultaneously, and the responsive touch interface. This illustrates the display capabilities.
5.2 Wireless Apple CarPlay & Android Auto
Connect your iPhone or Android phone wirelessly to access navigation, music, calls, and messages directly on the car stereo screen.
- Ensure Bluetooth and Wi-Fi are enabled on your phone and the car stereo.
- On the car stereo, open the CarPlay or Android Auto application.
- Follow the on-screen prompts to pair your phone.
- Once connected, your phone's compatible apps will appear on the stereo display.
5.3 MirrorLink
MirrorLink allows you to mirror your phone's screen onto the car stereo. iOS devices support wireless connection, while Android devices support both wireless and wired connections.
- Open the MirrorLink application on the car stereo.
- For Android wired connection, connect your phone via USB.
- Follow the on-screen instructions to establish the connection.

Image: A detailed collage showcasing the wireless connectivity for Apple CarPlay and Android Auto, the MirrorLink function for both iOS and Android devices, GPS navigation, hands-free calling, online music streaming, and voice control capabilities. This image highlights the smart connectivity features.
5.4 GPS Navigation
The unit supports both offline and online navigation maps. Pre-installed maps for North America are available. For online maps, ensure the unit is connected to Wi-Fi or a mobile hotspot.
- Tap the 'Navigation' or 'Maps' icon to open the GPS application.
- Enter your destination using the on-screen keyboard or voice input.
- Select your preferred route and start navigation.
5.5 FM Radio
Access the FM radio tuner to listen to local stations.
- Tap the 'Radio' icon.
- Use the scan function to find available stations or manually tune to a frequency.
- Save your favorite stations as presets.
5.6 Bluetooth 5.0
Connect your phone via Bluetooth for hands-free calling and audio streaming.
- Go to 'Settings' > 'Bluetooth' on the car stereo.
- Enable Bluetooth and make the device discoverable.
- On your phone, search for the car stereo's Bluetooth name and pair.
- Once paired, you can make/receive calls and play music through the car speakers.
5.7 Wi-Fi Connection
Connect to a Wi-Fi network or mobile hotspot to access online features, download apps, and use online maps.
- Go to 'Settings' > 'Network & Internet' > 'Wi-Fi'.
- Turn on Wi-Fi and select your desired network.
- Enter the password if prompted.

Image: This image displays the GPS navigation interface with both online and offline map views, showing detailed routes and destinations. Below, a YouTube interface is visible, emphasizing the multimedia capabilities. A prominent Wi-Fi symbol indicates internet connectivity features.
5.8 EQ Settings
Customize your audio experience using the built-in Equalizer (EQ) settings. Adjust bass, treble, and other audio parameters to suit your preferences.
- Access the 'EQ' or 'Sound Settings' application.
- Choose from preset sound modes or manually adjust individual frequency bands.
5.9 Split Screen Function
The split-screen feature allows you to run two applications simultaneously, such as navigation on one side and music playback on the other. To activate, swipe up from the bottom of the screen or long-press the recent apps button (depending on UI version) and drag an app to one side of the screen.
6. Maintenance
- Cleaning the Screen: Use a soft, lint-free cloth to gently wipe the touchscreen. For stubborn smudges, slightly dampen the cloth with water or a screen-safe cleaner. Avoid harsh chemicals or abrasive materials.
- Software Updates: Periodically check for software updates through the unit's settings menu to ensure optimal performance and access to new features. A stable Wi-Fi connection is required for updates.
- General Care: Avoid exposing the unit to extreme temperatures, direct sunlight for prolonged periods, or excessive vibrations.
7. Troubleshooting
| Problem | Possible Cause | Solution |
|---|---|---|
| Unit does not power on | Loose power connection, blown fuse, incorrect wiring. | Check all power connections. Verify vehicle fuses. Ensure correct wiring according to the diagram. |
| No sound | Volume too low, mute activated, speaker wires disconnected, incorrect audio settings. | Increase volume. Check if mute is active. Verify speaker wire connections. Adjust audio output settings. |
| GPS signal lost or inaccurate | GPS antenna obstructed or improperly installed, poor satellite coverage. | Ensure GPS antenna has a clear view of the sky. Check antenna connection. Move to an open area. |
| Bluetooth not connecting | Bluetooth off on unit or phone, device not discoverable, pairing issue. | Ensure Bluetooth is enabled on both devices. Make the unit discoverable. Delete previous pairings and re-pair. |
| Backup camera not displaying | Camera power issue, video cable disconnected, incorrect camera input selected. | Check camera power supply (reverse light). Verify video cable connection. Ensure the unit is set to the correct camera input. |
| Steering Wheel Controls not working | SWC wires incorrectly connected, controls not configured in settings. | Verify SWC wiring. Go to unit settings and perform the steering wheel control learning process. |
8. Specifications
- Brand: Leadfan
- Screen Size: 9 Inches
- Operating System: Android 12
- Processor: 4 Core
- Memory (ROM): 32 GB
- Display Type: LED
- Touch Screen Type: Capacitive
- Screen Resolution: 1280 * 720
- Connectivity Technology: Bluetooth 5.0, USB, Wi-Fi
- Special Features: Wireless Apple CarPlay, Android Auto, MirrorLink, GPS Navigation (North America maps), FM Radio, Bluetooth Hands-free Calling, EQ Settings, Split Screen, Backup Camera Support (1080p, 170°), Steering Wheel Control (SWC)
- Audio Output Mode: Stereo
9. Warranty and Support
For technical support, warranty information, or any questions regarding your Leadfan Car Radio Stereo, please refer to the contact information provided by your seller or on the product packaging. You may also find assistance by clicking the "Sold by Nideo" link on the product page and then selecting "Ask a question" for direct support.
Please retain your proof of purchase for warranty claims.


