1. Introduction
This instruction manual provides comprehensive guidance for the installation, operation, and maintenance of your ZALMAN P40 DS White Mid-Tower PC Case. Please read this manual thoroughly before proceeding with any installation or operation to ensure proper usage and to prevent damage to the product or other components.
The ZALMAN P40 DS White Mid-Tower PC Case offers a distinct style with updated chassis features, including advanced back connector compatibility for a cleaner build. A key feature is its integrated 9.1-inch display (1920 x 492 resolution) located on the left side, near the power supply compartment. This display is configurable via the OZ Wide software, allowing users to show system information through customizable widgets. The case also includes four pre-installed 120mm ARGB fans for optimal cooling and aesthetic appeal.

Figure 1.1: ZALMAN P40 DS White Mid-Tower PC Case with installed components.
2. Safety Information
- Always disconnect the power supply from the wall outlet before installing or removing any components.
- Handle all components with care to avoid damage from static electricity. Consider using an anti-static wrist strap.
- Keep the case and components away from water, moisture, and direct sunlight.
- Ensure proper ventilation around the PC case to prevent overheating.
- Do not attempt to modify the case or its components. Unauthorized modifications may void your warranty and pose safety risks.
- Keep small parts and screws out of reach of children.
3. Package Contents
Please verify that all items listed below are present in your package. If any items are missing or damaged, please contact your retailer or ZALMAN customer support.
- ZALMAN P40 DS White Mid-Tower PC Case
- Accessory Box (containing screws, cable ties, standoffs, etc.)
- User Manual (this document)
- Warranty Information Card
4. Product Overview
The ZALMAN P40 DS is a mid-tower PC case designed for high-performance builds with a focus on aesthetics and functionality. It supports ATX motherboards and features a spacious interior for various components.
4.1 Key Features
- Integrated 9.1-inch LCD Display: A high-resolution screen (1920 x 492) for system monitoring and customization via OZ Wide software.
- Back Connector Compatibility: Designed to support motherboards with rear-facing connectors for a cleaner internal layout.
- Pre-installed ARGB Fans: Four 120mm ARGB fans provide efficient cooling and vibrant lighting effects.
- Spacious Interior: Accommodates large graphics cards, multiple storage drives, and various cooling solutions.
- Durable Construction: Made from alloy steel for robust and long-lasting performance.

Figure 4.1: Internal view of the ZALMAN P40 DS case.

Figure 4.2: Front view of the ZALMAN P40 DS case with components.
5. Installation Guide
Follow these steps to install your PC components into the ZALMAN P40 DS case.
5.1 Pre-Installation Checklist
- Ensure you have all necessary PC components (motherboard, CPU, RAM, GPU, PSU, storage drives).
- Gather your tools: Phillips head screwdriver, cable ties, anti-static wrist strap.
- Prepare a clean, flat, and static-free workspace.

Figure 5.1: Empty interior of the ZALMAN P40 DS case, ready for component installation.
5.2 Motherboard Installation
- Lay the case on its side.
- Install the CPU, CPU cooler, and RAM onto your ATX motherboard before placing it into the case.
- Align the motherboard with the standoffs inside the case. The P40 DS supports ATX motherboards.
- Secure the motherboard with the provided screws.
5.3 Graphics Card (GPU) Installation
- Remove the necessary PCIe slot covers from the rear of the case. The P40 DS features a convenient mechanism for PCIe slot access.
- Carefully insert your graphics card into the PCIe slot on the motherboard.
- Secure the graphics card with the provided screws or retention clips.

Figure 5.2: PCIe slot retention mechanism.
5.4 Storage Drive Installation (HDD/SSD)
The case provides dedicated mounting points for 2.5-inch SSDs and 3.5-inch HDDs. Refer to the case's internal layout for specific drive bay locations.
- Locate the drive bays or mounting brackets.
- Mount your SSDs or HDDs using the appropriate screws.
5.5 Power Supply Unit (PSU) Installation
- Position the PSU in its designated compartment, typically at the bottom rear of the case.
- Secure the PSU to the case using the screws provided with your power supply.
5.6 Cable Management
The ZALMAN P40 DS is designed with ample space behind the motherboard tray for effective cable management, including a 34mm clearance. Utilize the cable routing cutouts and included cable ties to organize your cables for improved airflow and aesthetics.

Figure 5.3: Cable management area behind the motherboard tray.
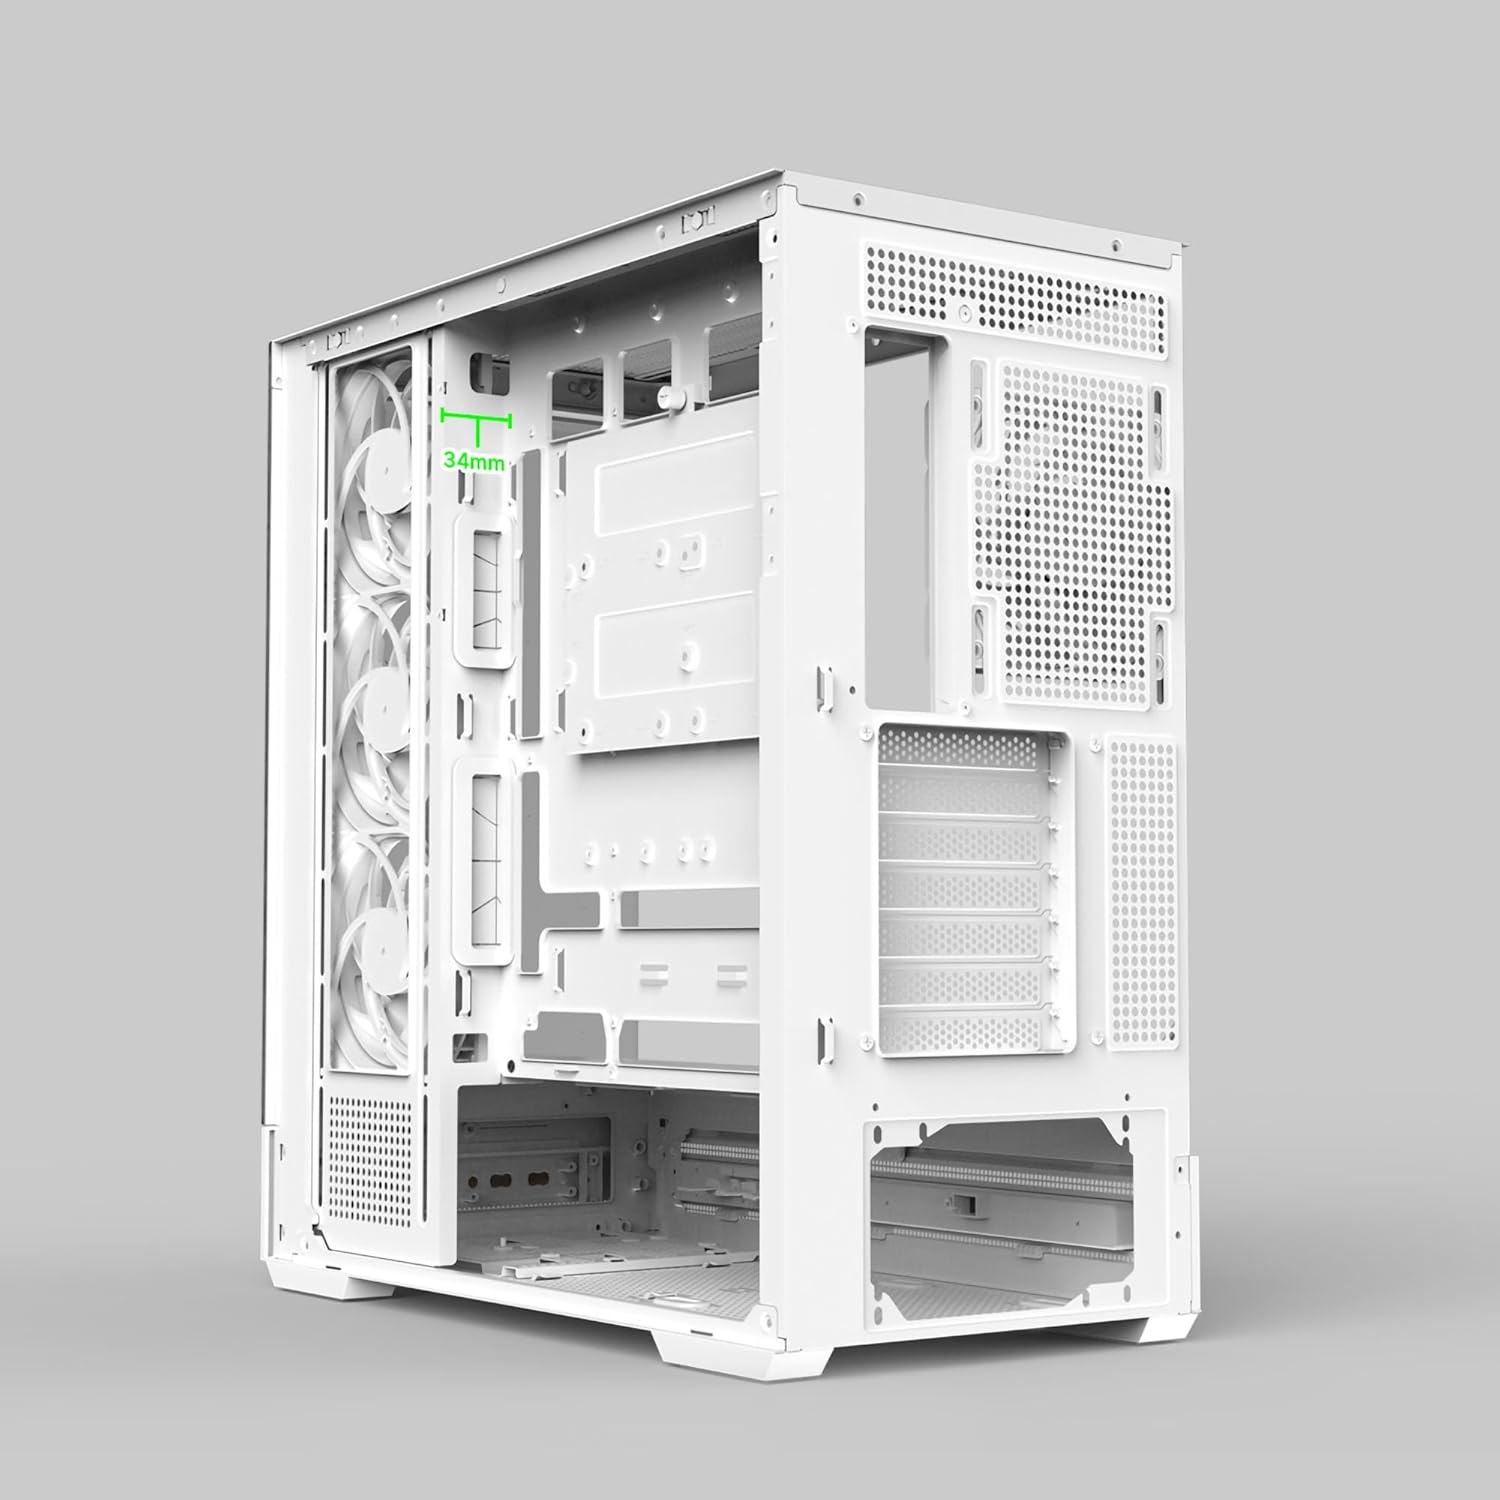
Figure 5.4: 34mm cable management clearance.
5.7 Connecting Front I/O and LCD
Connect the front panel cables (USB, audio, power, reset) to the corresponding headers on your motherboard. Ensure the LCD display cable is securely connected to the appropriate port on your motherboard or a dedicated controller, as per the display's instructions.
6. Operating the LCD Display
The integrated 9.1-inch LCD display on your ZALMAN P40 DS case is designed to provide real-time system information and customizable visuals.
- Software Installation: Download and install the official OZ Wide software from the ZALMAN website.
- Configuration: Use the OZ Wide software to configure the display. You can select from various widgets to show CPU temperature, GPU usage, fan speeds, and more.
- Customization: The software allows for customization of widget layouts and rotation, enabling you to display up to four widgets simultaneously on the screen, with others accessible through rotation.
7. Maintenance
Regular maintenance helps ensure the longevity and optimal performance of your PC case.
- Dust Cleaning: Periodically clean dust filters (if present) and the interior of the case using compressed air or a soft brush. Ensure the system is powered off and unplugged before cleaning.
- Fan Maintenance: Check the pre-installed ARGB fans for dust buildup and clean them gently. Ensure fan blades are not obstructed.
- Exterior Cleaning: Wipe the exterior surfaces with a soft, damp cloth. Avoid abrasive cleaners or solvents.
8. Troubleshooting
If you encounter issues with your ZALMAN P40 DS case, consider the following common troubleshooting steps:
- No Power: Ensure the power supply is properly connected to the wall outlet and the motherboard. Check all internal power cables.
- Fans Not Spinning/ARGB Not Working: Verify that the fan and ARGB cables are correctly connected to the motherboard or fan controller. Check software settings for ARGB control.
- LCD Display Not Working: Ensure the display cable is securely connected. Check if the OZ Wide software is installed and running correctly. Restart your system.
- System Instability: Double-check all component installations (motherboard, GPU, RAM, storage) to ensure they are seated correctly and securely.
For more complex issues, refer to the ZALMAN support website or contact their customer service.
9. Specifications
| Feature | Specification |
|---|---|
| Brand | Zalman |
| Model Name | P40DS WHITE |
| Color | White |
| Material | Alloy Steel |
| Case Type | Mid Tower |
| Product Dimensions (L x W x H) | 42.5 x 23.5 x 49.2 cm |
| Item Weight | 8.7 Kilograms |
| Motherboard Compatibility | ATX |
| Special Features | Integrated Fan, 9.1" LCD Display |
| Recommended Uses | Gaming |
| Included Fans | 4 x 120mm ARGB Fans |
| LCD Resolution | 1920 x 492 |
10. Warranty and Support
The ZALMAN P40 DS Mid-Tower PC Case comes with a 2-year manufacturer's warranty. This warranty covers defects in materials and workmanship under normal use.
For warranty claims, technical support, or further inquiries, please visit the official ZALMAN website or contact their customer service department. Please have your product model number (P40DS WHITE) and proof of purchase ready when seeking support.
Note: Information regarding the availability of spare parts and guaranteed software updates is not available at this time.


