
1. Introduction
This manual provides detailed instructions for the installation, operation, and maintenance of your ASHATA H110 Gaming Motherboard. Please read this manual thoroughly before proceeding with installation to ensure proper setup and functionality of your system.

Image: Overview of the ASHATA H110 PC Motherboard, highlighting its M.2 interface and SATA 3.0 channels.
2. Setup and Installation
Before beginning installation, ensure your workspace is clean and static-free. Always handle the motherboard by its edges to avoid damaging sensitive components.
2.1 CPU Installation
The ASHATA H110 motherboard supports 6th, 7th, and 8th Generation 14nm LGA 1151 CPUs. Follow these steps carefully:
- Step 1: Gently press down on the CPU socket lever and lift it to open the CPU cover.
- Step 2: Open the CPU cover completely.
- Step 3: Align the triangular mark on the CPU with the corresponding mark on the socket. Carefully place the CPU into the socket without forcing it.
- Step 4: Remove the CPU plastic cover from the socket.
- Step 5: Align the groove on the lever with the screw hole and lower the lever to secure the CPU.
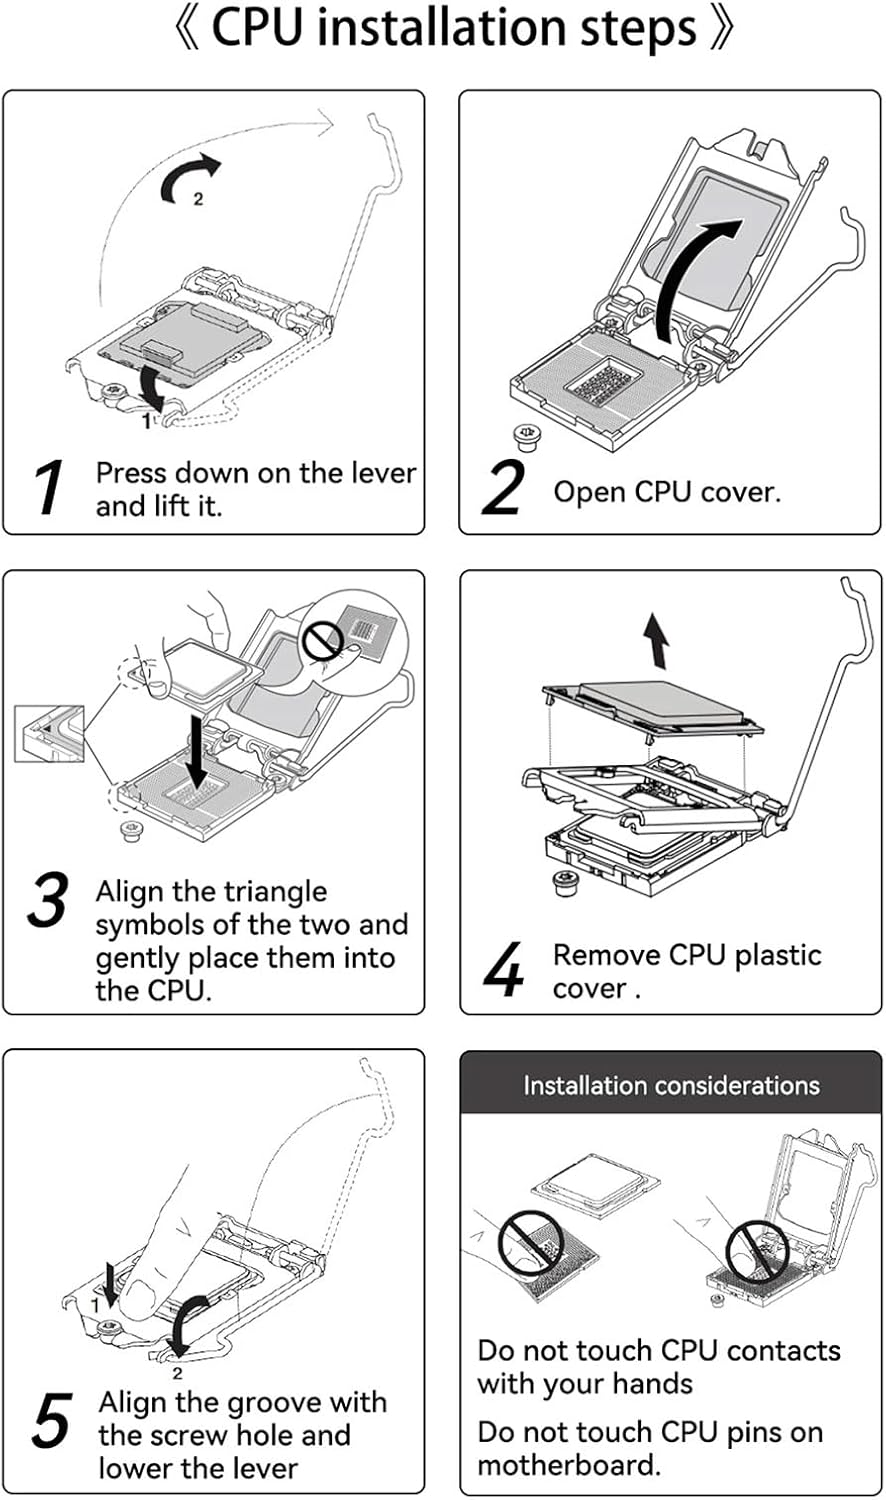
Image: Visual guide for installing the CPU into the LGA 1151 socket, showing lever operation and CPU alignment.
Important Considerations:
- Do not touch the CPU contacts with your bare hands.
- Do not touch the CPU pins on the motherboard.
2.2 Memory (RAM) Installation
The H110 motherboard features two 240-pin DDR4 SDRAM slots, supporting up to 32GB of 2-channel DDR4 memory at speeds of 1600, 1866, 2133, or 2400 MHz.
- Locate the two DDR4 memory slots on the motherboard.
- Open the clips at both ends of the memory slot.
- Align the notch on the DDR4 memory module with the key in the memory slot.
- Press down firmly on both ends of the memory module until the clips snap into place, securing the module.

Image: Close-up view of the two 240-pin DDR4 SDRAM desktop memory slots on the ASHATA H110 motherboard.
2.3 Storage Device Installation
The motherboard supports both M.2 NVMe/NGFF SSDs and traditional SATA 3.0 devices.
M.2 NVMe/NGFF SSD Installation:
- Locate the M.2 slot on the motherboard.
- Insert the M.2 SSD into the slot at a slight angle.
- Gently push down the SSD and secure it with the provided screw.
SATA 3.0 Device Installation:
- Connect one end of a SATA data cable to one of the three Serial ATA 3.0 ports on the motherboard.
- Connect the other end of the SATA data cable to your hard drive or SSD.
- Connect a SATA power cable from your power supply unit (PSU) to the storage device.

Image: Close-up of the SATA 3.0 ports and the M.2 NVMe/NGFF slot on the ASHATA H110 motherboard.
2.4 Power Connections
- Connect the 24-pin ATX main power connector from your PSU to the corresponding slot on the motherboard.
- Connect the 4-pin or 8-pin ATX 12V CPU power connector from your PSU to the CPU power slot near the CPU socket.
2.5 Front Panel and I/O Connections
Connect your case's front panel connectors (power button, reset button, HDD LED, power LED, USB ports, audio jacks) to the corresponding headers on the motherboard. Refer to your PC case manual for specific pin assignments.
The motherboard features the following I/O ports:
- 4x USB 2.0 ports
- 2x USB 3.0 ports
- 1x VGA port
- 1x HD Multimedia Interface (HDMI) port
- 1x RJ45 Ethernet port
- 1x 3-in-1 Sound Port (Line In, Line Out, Mic In)

Image: Close-up view of the rear I/O panel of the ASHATA H110 motherboard, showing USB, VGA, HDMI, Ethernet, and audio ports.
3. Operating Instructions
3.1 Initial Power On and BIOS Setup
After all components are installed and connected, power on your system. During startup, press the designated key (usually DEL or F2) to enter the BIOS/UEFI setup utility. Here you can:
- Configure boot order for your operating system.
- Adjust system date and time.
- Monitor system temperatures and fan speeds.
- Enable or disable integrated peripherals.
Save changes and exit the BIOS to boot into your operating system installation media or existing OS.
3.2 Driver Installation
After installing your operating system, install the necessary drivers for the motherboard components. These typically include:
- Chipset drivers
- Integrated graphics drivers (if using CPU's integrated graphics)
- Audio drivers
- LAN (Ethernet) drivers
- USB drivers
Drivers are usually provided on a support CD/DVD or can be downloaded from the ASHATA website or the chipset manufacturer's website.
4. Maintenance
- Keep it Clean: Regularly clean dust from inside your PC case, especially around the motherboard and CPU cooler, using compressed air. Dust buildup can lead to overheating and reduced performance.
- BIOS Updates: Periodically check the ASHATA support website for BIOS updates. BIOS updates can improve stability, compatibility, and performance. Follow update instructions carefully to avoid system damage.
- Driver Updates: Keep your system drivers updated to ensure optimal performance and compatibility with new software and hardware.
- Physical Inspection: Occasionally inspect the motherboard for any visible damage, loose connections, or bulging capacitors.
5. Troubleshooting
- No Power: Ensure all power cables (24-pin ATX, 4/8-pin CPU) are securely connected. Check PSU functionality.
- No Display: Verify monitor connection. If using integrated graphics, ensure your CPU supports it. If using a dedicated GPU, ensure it's seated correctly and has power. Try reseating RAM modules.
- System Instability/Crashes: Check RAM seating. Ensure CPU cooler is properly installed and making good contact. Monitor temperatures. Update drivers and BIOS.
- Boot Device Not Found: Check SATA/M.2 connections for storage devices. Verify boot order in BIOS.
- Peripheral Issues (USB, Audio, LAN): Ensure drivers are installed. Check physical connections.
For persistent issues, consult the ASHATA support website or contact technical support.
6. Specifications
| Feature | Description |
|---|---|
| Model | H110 |
| CPU Support | LGA 1151 socket, supports 6th, 7th, 8th Gen (for SKYlake) 14nm CPUs |
| Memory | 2x 240-pin DDR4 SDRAM slots, Max 32GB, 2-channel DDR4 1600/1866/2133/2400 MHz |
| Storage | 3x Serial ATA 3.0 (6GB/s) ports, 1x M.2 Nvme/NGFF slot |
| Network | Onboard Realtek 10Mbps/100Mbps Network Card |
| Expansion Slots | 1x PCI Express x16 slot, 1x PCI Express x1 slot |
| Form Factor | ATX (17x19cm / 6.69x7.48in) |
| Audio | Onboard Realtek ALC 6 Channel HD Sound Codec |
| I/O Ports | 4x USB 2.0, 2x USB 3.0, 1x VGA, 1x HD Multimedia Interface, 1x RJ45, 1x 3-in-1 Sound Port |
| PCB Construction | 8-layer PCB for enhanced durability |
7. Warranty and Support
7.1 Warranty Information
This ASHATA H110 Motherboard comes with a standard manufacturer's warranty. Please refer to the product packaging or the official ASHATA website for specific warranty terms and conditions, including duration and coverage details. Keep your proof of purchase for warranty claims.
7.2 Technical Support
For technical assistance, troubleshooting, or further inquiries, please visit the official ASHATA support website or contact their customer service department. You may find FAQs, driver downloads, and additional resources online.
ASHATA Official Website: ASHATA Store on Amazon (Link provided for reference, actual official website may vary)