1. Product Overview
The KTC H27D9 is a 27-inch QHD (2560x1440) computer monitor designed for both home office and gaming use. It features an IPS panel for wide viewing angles and excellent color reproduction, a high refresh rate, and adaptive sync technology for a smooth visual experience. This manual provides detailed instructions for setup, operation, maintenance, and troubleshooting.

Figure 1: Front view of the KTC H27D9 monitor, showcasing its 27-inch QHD IPS display with 120Hz refresh rate, 1300:1 contrast, and HDR10 support.
2. Package Contents
Please verify that all items are present in your package:
- 27" 2K QHD Monitor (x1)
- Monitor Stand (x1)
- HDMI Cable (x1)
- Power Adapter (x1)
- Quick Start Guide (QSG) (x1)
3. Setup Instructions
3.1 Assembling the Monitor Stand
- Carefully remove the monitor and stand components from the packaging.
- Attach the stand base to the stand neck using the provided screws.
- Align the assembled stand with the mounting slot on the back of the monitor and secure it firmly.
3.2 Connecting the Monitor
The KTC H27D9 monitor offers multiple connectivity options:
- HDMI: Connect one end of the provided HDMI cable to an HDMI 2.0 port on your computer or device, and the other end to one of the two HDMI 2.0 ports on the monitor.
- DisplayPort: Connect a DisplayPort 1.4 cable (not included) to the DisplayPort 1.4 port on your computer or device, and the other end to the DisplayPort 1.4 port on the monitor.
- Audio Output: For external audio, connect headphones or external speakers to the 3.5mm earphone jack on the monitor.
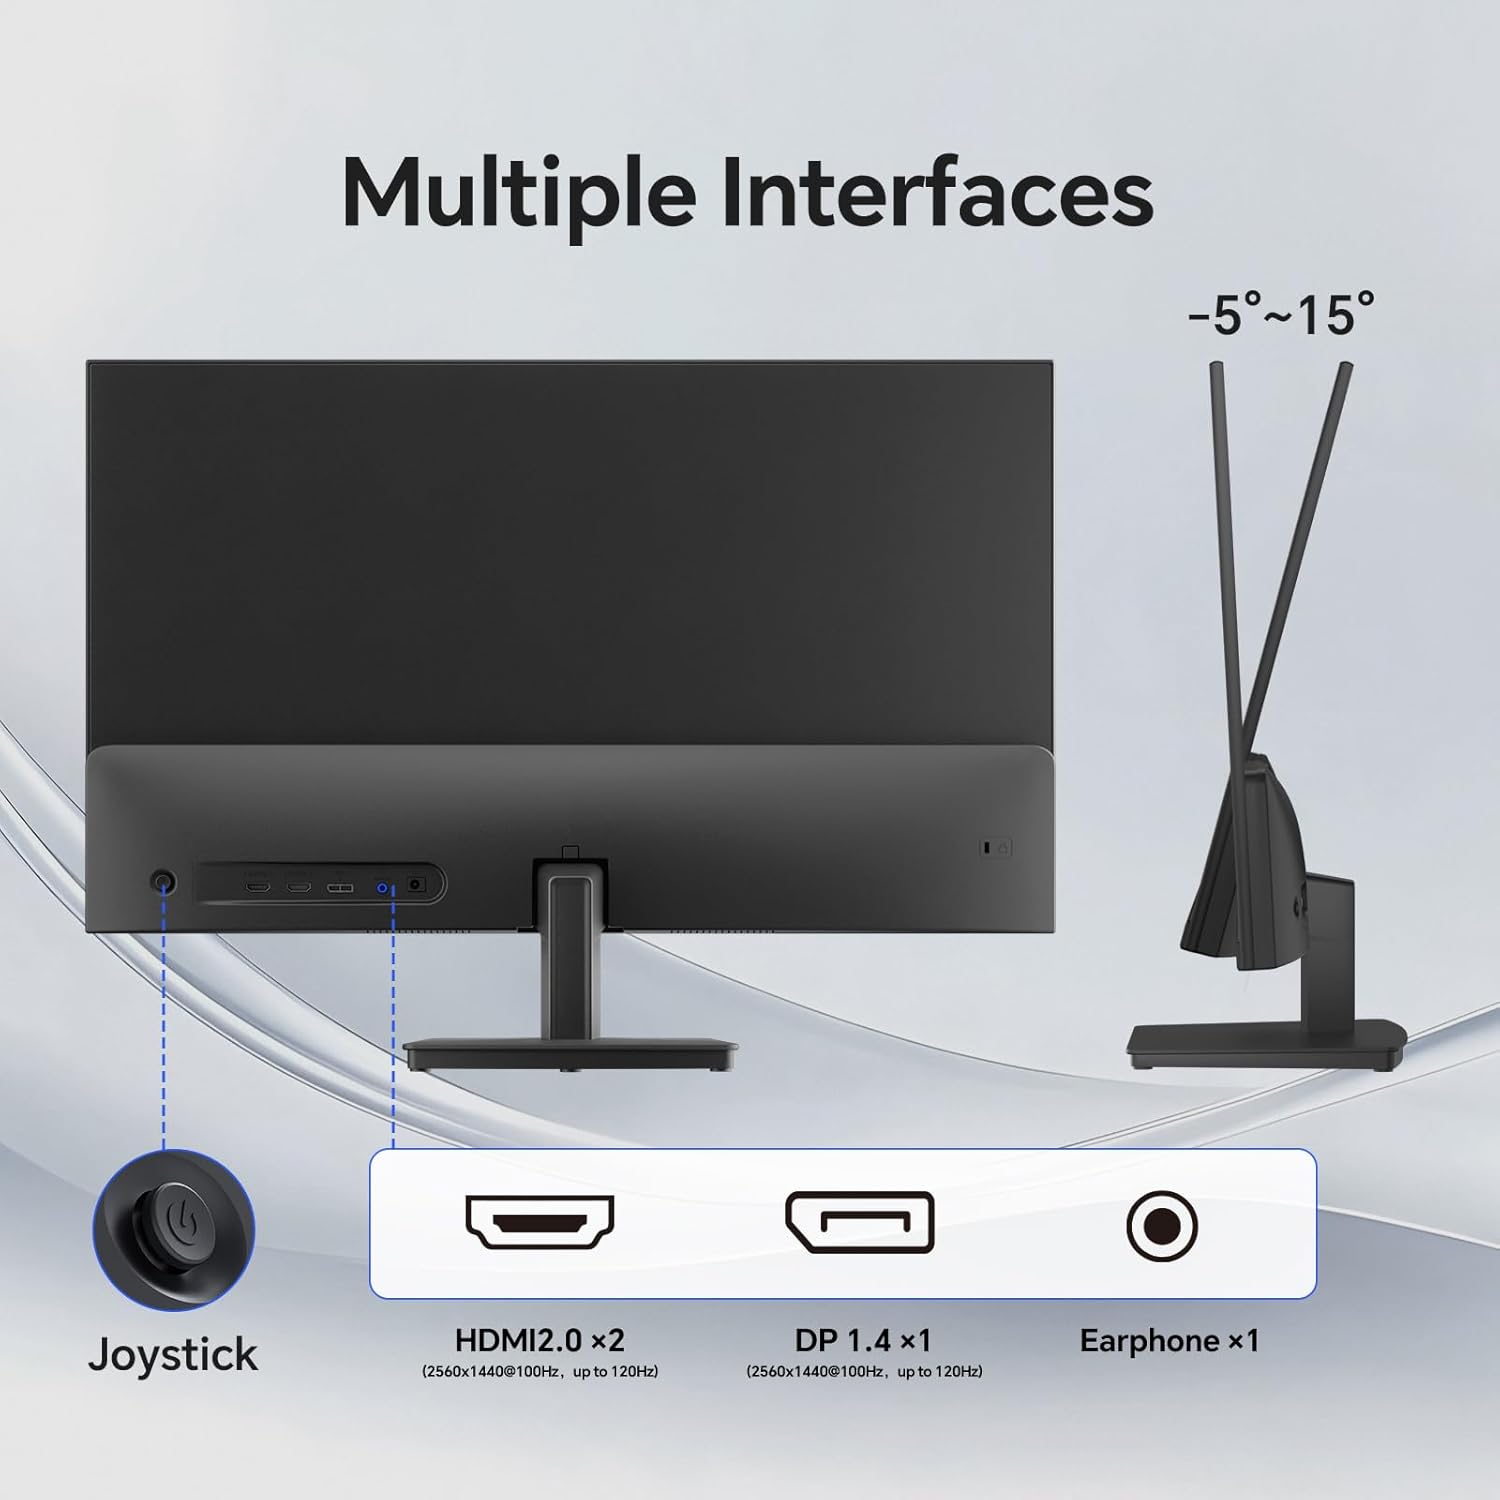
Figure 2: Rear view of the KTC H27D9 monitor, illustrating the location of the HDMI 1, HDMI 2, DisplayPort 1.4, and Earphone ports, along with the joystick control.
3.3 Powering On
- Connect the power adapter to the monitor's DC input and then plug the adapter into a power outlet.
- Press the joystick button located on the back of the monitor to power it on.
4. Operating Instructions
4.1 OSD Menu Navigation
The monitor's On-Screen Display (OSD) menu is controlled by a single joystick button located on the back of the monitor. This joystick allows for intuitive navigation and adjustment of settings.
- Press: Press the joystick inward to confirm a selection or enter a sub-menu.
- Up/Down: Push the joystick up or down to navigate through menu options or adjust values.
- Left/Right: Push the joystick left or right to navigate through menu options or adjust values.
- Hold (3 seconds): Hold the joystick inward for approximately 3 seconds to power the monitor off.

Figure 3: The OSD menu interface on the KTC monitor, showing options for Display, Color, Gaming Setup, Advanced Settings, Input, and System Set. The joystick control is used for navigation.
4.2 Display Settings
Adjust visual parameters for optimal viewing:
- Brightness: Controls the overall luminance of the screen.
- Contrast: Adjusts the difference between the brightest and darkest areas.
- Black Equalize: Enhances visibility in dark scenes.
- Aspect Ratio: Select between Full or Native display modes.
- Sharpness: Adjusts the clarity of image edges.
- Professional Modes: Pre-set display modes for various uses.
4.3 Color Settings
Fine-tune color accuracy and vibrancy:
- Color Temperature: Adjusts the warmth or coolness of colors.
- Gamma: Controls the tone response curve.
- Hue/Saturation: Adjusts specific color properties.
4.4 Gaming Setup
Optimize your gaming experience:
- Adaptive-Sync: Enable/Disable FreeSync/G-Sync compatibility to eliminate screen tearing and stuttering.
- Overdrive: Adjusts pixel response time for reduced motion blur.
- Game Assist: Provides on-screen overlays like crosshairs.

Figure 4: Visual representation of Adaptive-Sync technology, showing the difference between the feature being off (screen tearing) and on (smooth image).
4.5 Input Selection
Manually select the active input source:
- Auto: Automatically detects the active input.
- DP: Select DisplayPort 1.4 input.
- HDMI1: Select HDMI 1 input.
- HDMI2: Select HDMI 2 input.
5. Maintenance
To ensure the longevity and optimal performance of your KTC H27D9 monitor, follow these maintenance guidelines:
- Cleaning the Screen: Use a soft, lint-free cloth slightly dampened with water or a non-abrasive screen cleaner. Avoid using alcohol or ammonia-based cleaners.
- Cleaning the Casing: Wipe the monitor casing with a soft, dry cloth.
- Ventilation: Ensure the ventilation openings on the monitor are not blocked to prevent overheating.
- Power Off: Always power off the monitor when not in use for extended periods.
6. Troubleshooting
If you encounter issues with your monitor, refer to the following common problems and solutions:
| Problem | Possible Cause | Solution |
|---|---|---|
| No Power | Power cable not connected; Power outlet not working. | Ensure power cable is securely connected. Test power outlet with another device. |
| No Signal | Input cable not connected; Incorrect input source selected. | Check HDMI/DisplayPort cable connections. Select the correct input source via the OSD menu. |
| Flickering Screen | Flicker-Free technology not enabled; Cable issue. | Ensure Flicker-Free technology is enabled in OSD. Try a different HDMI/DisplayPort cable. |
| Poor Image Quality | Incorrect resolution; Brightness/Contrast settings. | Set display resolution to 2560x1440. Adjust Brightness and Contrast in OSD. |
| Screen Tearing | Adaptive-Sync not enabled. | Enable Adaptive-Sync in the Gaming Setup section of the OSD menu. |
7. Technical Specifications
| Feature | Specification |
|---|---|
| Model Number | H27D9 |
| Screen Size | 27 Inches |
| Panel Type | IPS |
| Resolution | QHD (2560 x 1440 Pixels) |
| Aspect Ratio | 16:9 |
| Refresh Rate | 100Hz (Up to 120Hz Overclocked) |
| Brightness | 300 cd/m² |
| Contrast Ratio | 1300:1 |
| Color Gamut | 99% sRGB |
| Color Support | 16.7 Million Colors |
| HDR Support | HDR10 |
| Viewing Angle | 178° (H/V) |
| Adaptive Sync | FreeSync and G-Sync Compatible |
| Connectivity | 2 x HDMI 2.0, 1 x DisplayPort 1.4, 1 x Earphone (3.5mm) |
| Ergonomics | Tilt Adjustable (-5° to 15°) |
| VESA Compatibility | 100 x 100 mm |
| Product Dimensions | 4 x 27 x 17 inches |
| Item Weight | 11.48 pounds |
8. Warranty and Support
KTC monitors come with a three-year warranty. For technical support, warranty claims, or any inquiries regarding your KTC H27D9 monitor, please contact KTC Customer Service through the official KTC website or your point of purchase. Ensure you have your model number (H27D9) and purchase details available when contacting support.

Figure 5: Steps to contact KTC customer support, typically involving visiting the product page or seller's store to ask a question.


