
Montech X5-White
MONTECH X5-White ATX Mid-Tower Gaming PC Case User Manual
Model: X5-White
1. Introduction
Thank you for choosing the MONTECH X5-White ATX Mid-Tower Gaming PC Case. This case is designed to provide excellent airflow and hardware compatibility for your gaming PC build. It features a sleek design with carbon print accents, a tempered glass side panel, and comes with pre-installed ARGB fans for vibrant lighting and efficient cooling. This manual will guide you through the setup, operation, and maintenance of your new PC case.
2. Package Contents
Please ensure all items are present before beginning installation:
- MONTECH X5-White ATX Mid-Tower Gaming PC Case
- 3 x 140mm ARGB Front Fans (Pre-installed)
- 1 x 120mm ARGB Rear Fan (Pre-installed)
- Integrated GPU Holder
- Accessory Box (Screws, zip ties, etc.)
3. Setup and Installation
Before starting, ensure you have a clean, static-free workspace. Refer to your motherboard and component manuals for specific installation steps.
3.1 Unpacking the Case
Carefully remove the case from its packaging. The tempered glass side panel is fragile; handle with care. Place the case on a stable surface.

Figure 3.1: Front-left view of the MONTECH X5-White case, showcasing its spacious interior and pre-installed rear ARGB fan. The front mesh panel allows for high airflow.
3.2 Component Installation
The MONTECH X5-White case offers excellent hardware compatibility.

Figure 3.2: Internal dimensions for component compatibility. The case supports GPUs up to 410mm, CPU coolers up to 165mm, and power supplies up to 230mm.
3.2.1 Motherboard Installation
- Remove the tempered glass side panel.
- Install the necessary standoffs for your ATX or Micro ATX motherboard.
- Carefully place your motherboard onto the standoffs, aligning the screw holes.
- Secure the motherboard with the provided screws.
3.2.2 Power Supply Unit (PSU) Installation
The case supports standard ATX PSUs with a bottom mount design.
- Locate the PSU shroud at the bottom rear of the case.
- Slide your PSU into the designated area from the rear of the case.
- Secure the PSU with screws from the outside of the case.
3.2.3 Graphics Processing Unit (GPU) Installation
The case supports GPUs up to 410mm in length and includes an adjustable GPU holder for stability.
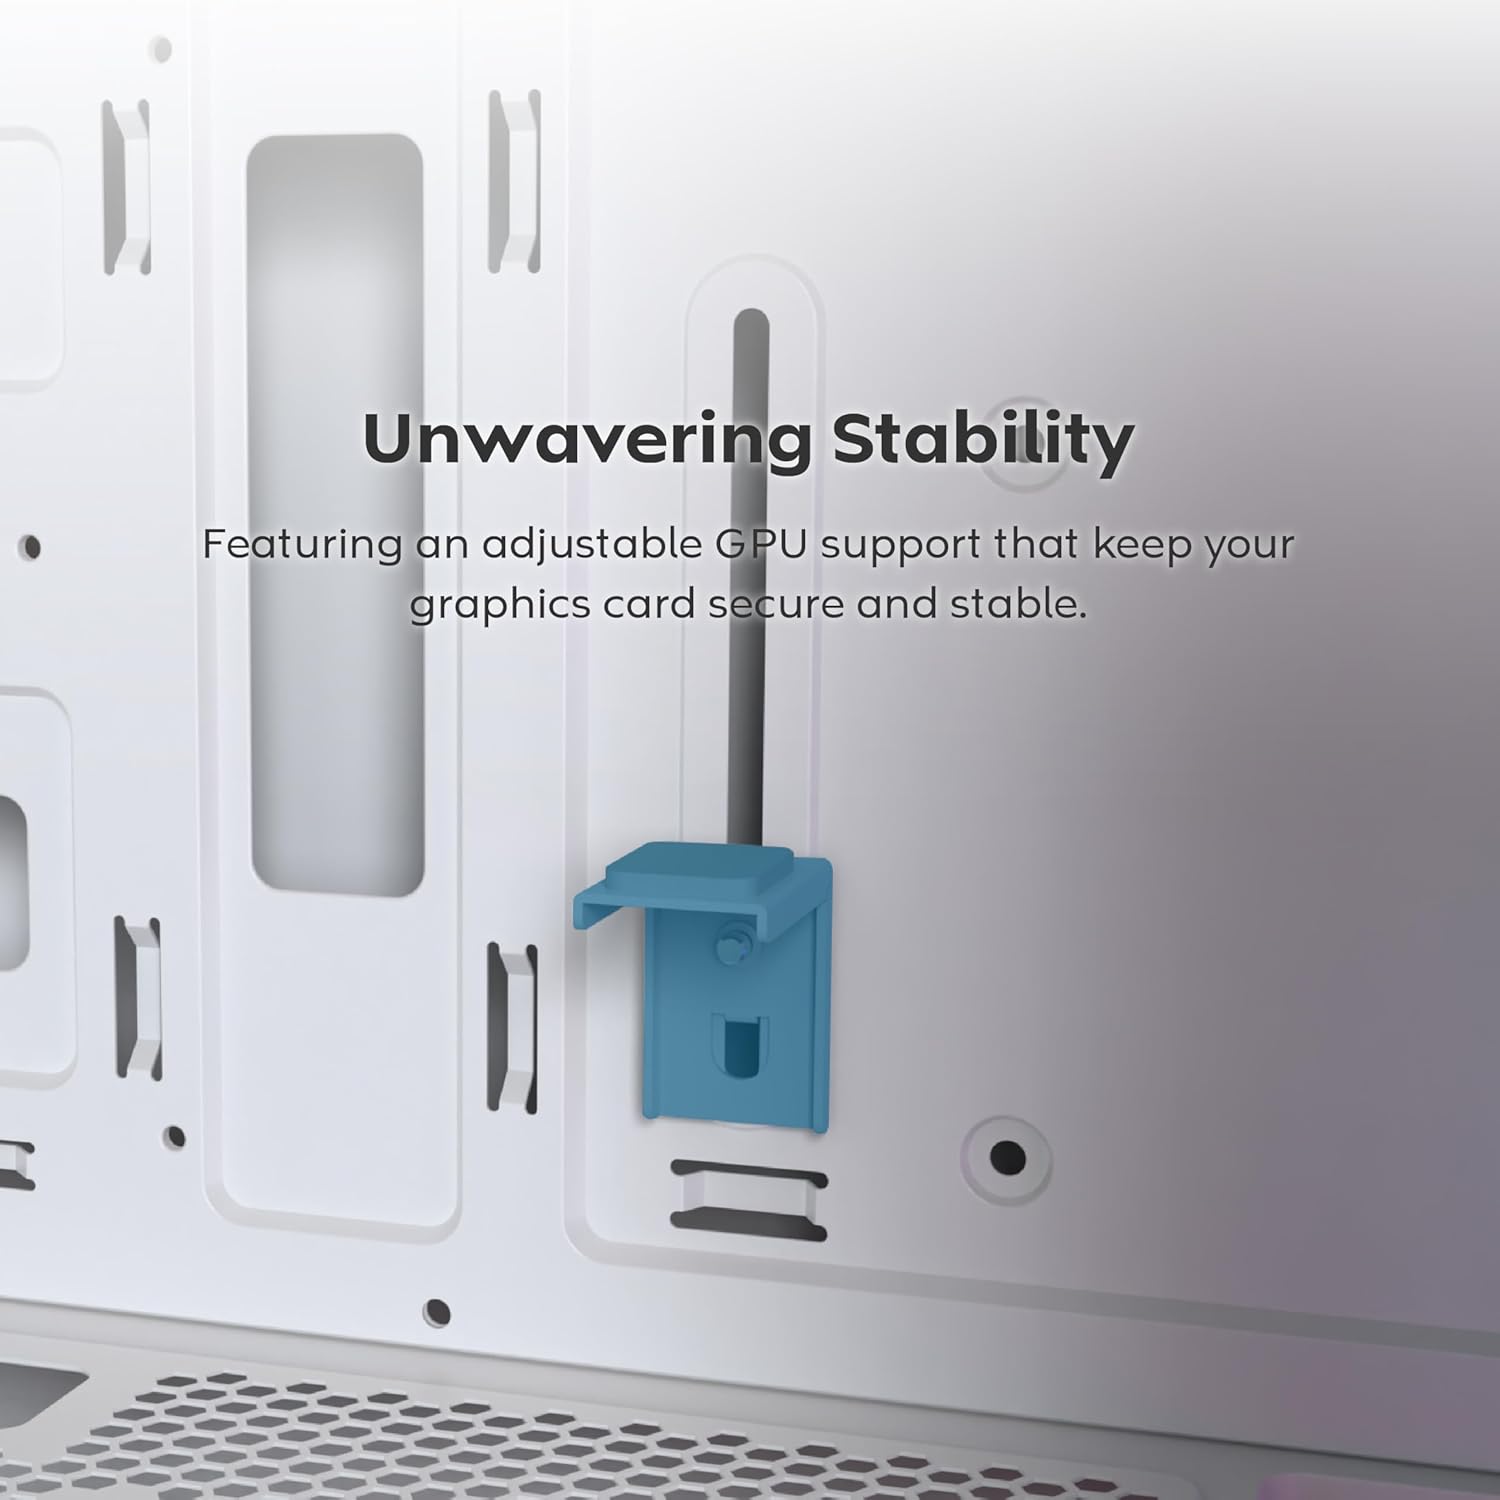
Figure 3.3: The adjustable GPU support stand provides reliable physical support for graphics cards, preventing sag.
- Remove the necessary PCIe slot covers from the rear of the case.
- Insert your GPU into the appropriate PCIe slot on your motherboard.
- Secure the GPU with screws.
- Adjust the integrated GPU holder to support the graphics card, ensuring it is stable.
3.2.4 Storage Drive Installation (SSD/HDD)
The case provides dedicated mounting points for SSDs and HDDs.
- Locate the drive bays/mounts behind the motherboard tray or within the PSU shroud.
- Secure your 2.5" SSDs or 3.5" HDDs using the provided screws.
3.2.5 Cooling System Installation
The X5-White comes with three 140mm ARGB fans pre-installed at the front and one 120mm ARGB fan at the rear. It supports extensive cooling configurations, including 360mm AIOs.
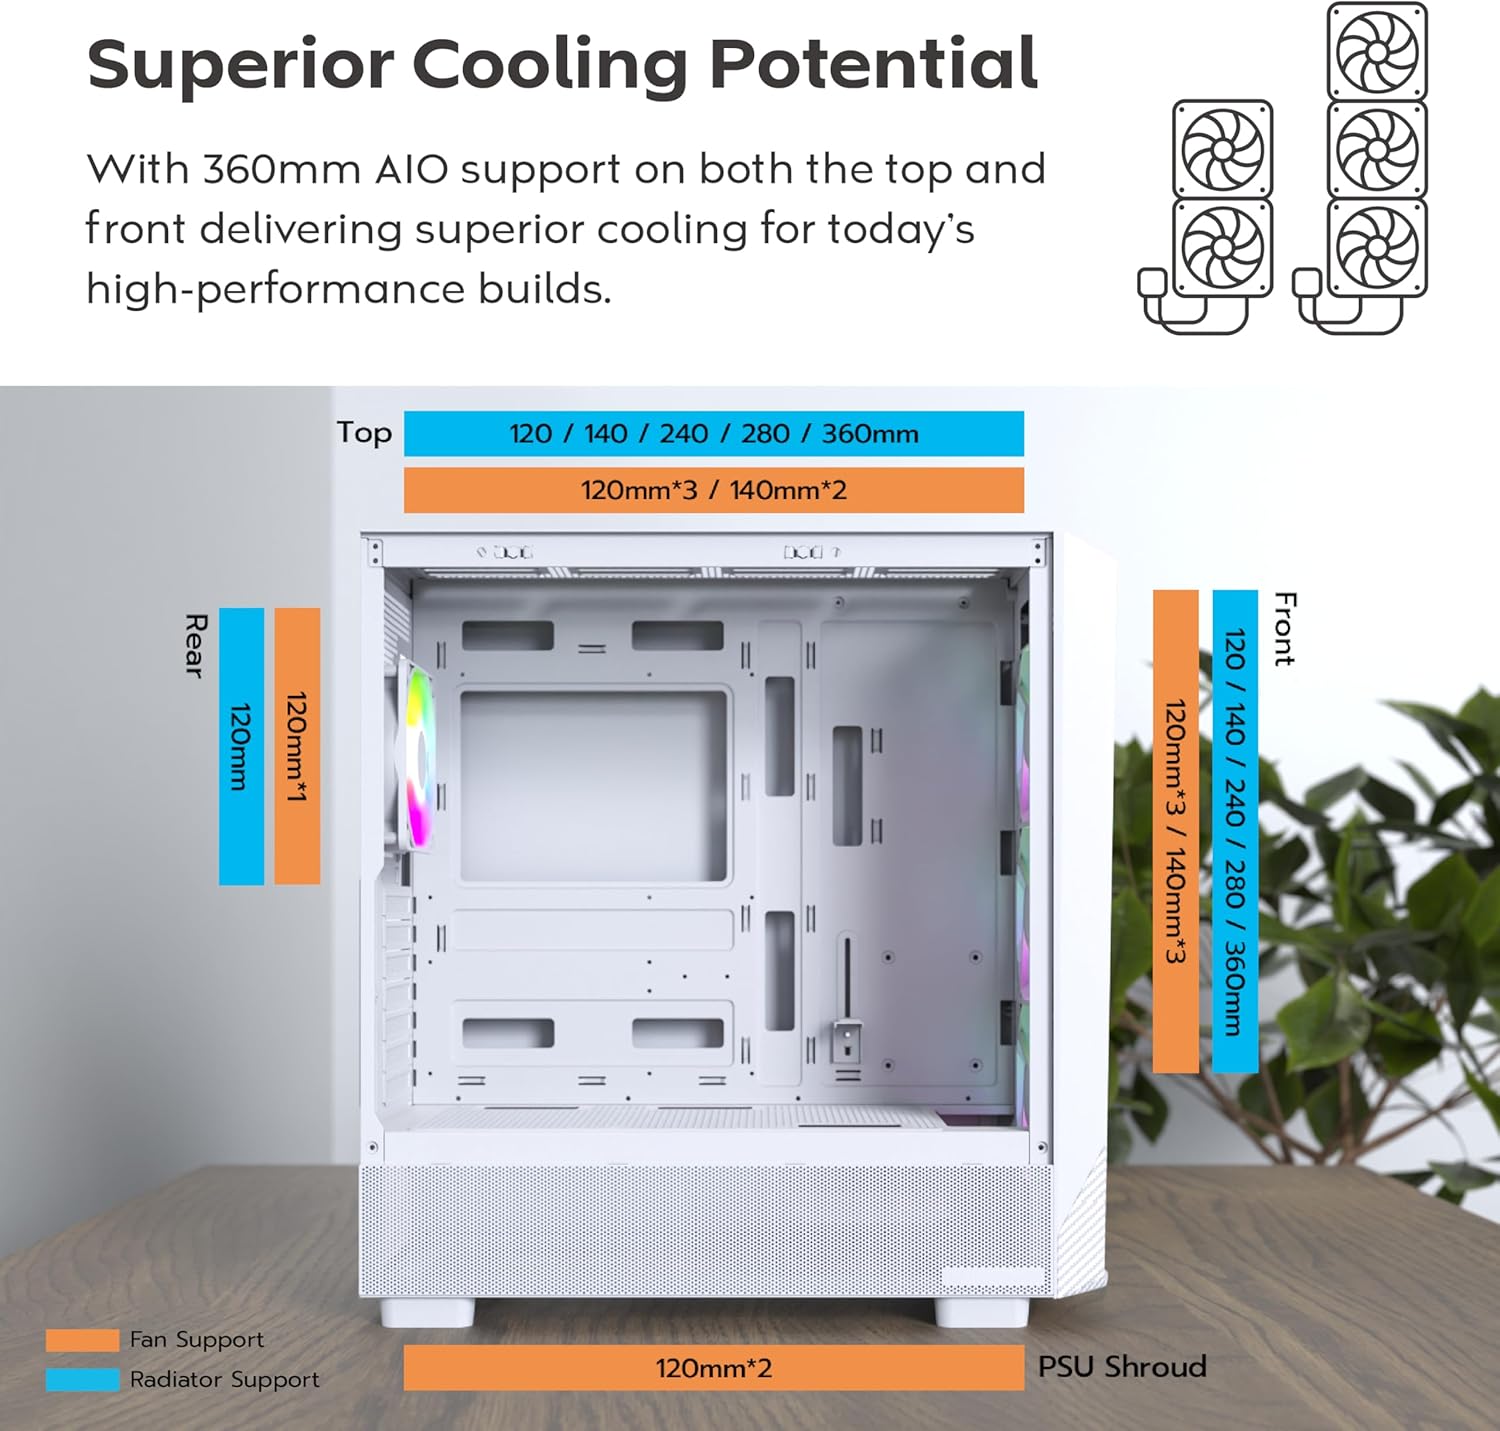
Figure 3.4: Fan and radiator compatibility. The case supports up to 360mm radiators on both the top and front, and a 120mm radiator at the rear.

Figure 3.5: Airflow demonstration with pre-installed 140mm front fans and 120mm rear fan, ensuring efficient cooling.
- Additional Fans: You can install additional fans on the top (up to 2x 140mm or 3x 120mm) and bottom (2x 120mm).
- Radiators: The case supports radiators up to 360mm on the front and top, and 120mm on the rear.
3.3 Cable Management
The MONTECH X5-White features an extra-large PSU shroud and expanded routing space behind the motherboard tray, making cable management easier and cleaner. Utilize the provided zip ties and routing channels to organize cables for improved airflow and aesthetics.

Figure 3.6: The case with components installed, demonstrating the visual appeal of the ARGB fans and organized interior.
4. Operating the Case
4.1 Front Panel Connectivity
The front I/O panel provides convenient access to essential ports and controls.

Figure 4.1: Front panel connectivity includes USB 2.0, USB 3.0, USB Type-C, Mic & Audio jacks, an LED button for ARGB control, and the Power button.
- Power Button: Press to power on/off your PC.
- LED Button: Cycles through 25 built-in ARGB lighting modes for the pre-installed fans.
- USB Ports: Includes USB 2.0, USB 3.0, and USB Type-C for data transfer and peripheral connectivity.
- Mic & Audio Jacks: For connecting headphones and microphones.
4.2 ARGB Fan Control
The pre-installed ARGB fans can be controlled in two ways:
- Case LED Button: Use the dedicated LED button on the front I/O panel to cycle through 25 pre-set lighting effects.
- Motherboard Software: If your motherboard supports ARGB synchronization (e.g., ASUS Aura Sync, MSI Mystic Light Sync, GIGABYTE RGB Fusion, ASRock Polychrome Sync), you can connect the fan ARGB cables to your motherboard's 3-pin 5V ARGB header for full software control.
5. Maintenance
Regular maintenance helps ensure optimal performance and longevity of your PC components.
5.1 Cleaning the Case
- Exterior: Use a soft, damp cloth to wipe down the exterior surfaces. Avoid abrasive cleaners.
- Dust Filters: The case features a magnetic dust filter on the top panel and a removable filter at the bottom for the PSU. Regularly remove and clean these filters by rinsing them with water and allowing them to dry completely before reinstallation.
- Interior: Use compressed air to blow out dust from inside the case, especially from fans and heatsinks. Do this in a well-ventilated area.
5.2 Fan Maintenance
Ensure fans are free from dust buildup to maintain optimal airflow and prevent noise. If a fan becomes noisy or stops spinning, check for obstructions or loose connections.
6. Troubleshooting
This section addresses common issues you might encounter.
6.1 Fans Not Spinning or RGB Not Working
- Power Connection: Ensure all fan power cables (e.g., Molex, 3-pin, 4-pin) are securely connected to the power supply or motherboard fan headers.
- ARGB Connection: For RGB lighting, verify that the ARGB cables are correctly connected to the case's ARGB controller or your motherboard's 3-pin 5V ARGB header. Some Molex connectors for RGB might have an unconnected 3-pin wire that needs to be removed for the RGB to function.
- Motherboard Settings: If using motherboard software for RGB control, ensure the software is installed and configured correctly. Check BIOS/UEFI settings for fan control.
6.2 Poor Airflow or High Temperatures
- Dust Buildup: Clean all dust filters and internal components as described in the Maintenance section.
- Fan Orientation: Ensure fans are oriented correctly for optimal airflow (front fans typically intake, rear/top fans exhaust).
- Cable Management: Poor cable management can obstruct airflow. Reorganize cables to improve air circulation.
6.3 Components Not Fitting
- Check Dimensions: Refer to the Specifications section and Figure 3.2 to confirm component compatibility with the case's maximum dimensions for GPU, CPU cooler, and PSU.
- Re-evaluate Installation: Ensure components are aligned correctly and not obstructed by other parts or cables.
7. Specifications
Detailed specifications for the MONTECH X5-White ATX Mid-Tower Gaming PC Case:
| Feature | Specification |
|---|---|
| Model Name | X5-White |
| Case Type | Mid Tower |
| Motherboard Compatibility | ATX, Micro ATX |
| Material | Plastic with Carbon Fiber Accents, Tempered Glass Side Panel |
| Color | White |
| Dimensions (L x W x H) | 21.65 x 20.87 x 10.63 inches (Package Dimensions) |
| Item Weight | 14.3 pounds |
| Pre-installed Fans | 3 x 140mm ARGB (Front), 1 x 120mm ARGB (Rear) |
| Fan Support (Max) | Front: 3x 140mm / 3x 120mm Top: 2x 140mm / 3x 120mm Rear: 1x 120mm Bottom: 2x 120mm |
| Radiator Support (Max) | Front: Up to 360mm Top: Up to 360mm Rear: 120mm |
| GPU Clearance | Up to 410mm |
| CPU Cooler Height Clearance | Up to 165mm |
| PSU Length Clearance | Up to 230mm |
| Drive Bays | SSD, HDD support (specific quantities not provided) |
| I/O Ports | 1x USB 2.0, 1x USB 3.0, 1x USB Type-C, Mic & Audio, LED Button, Power Button |
| Power Supply Mounting Type | Bottom Mount |
| Cooling Method | Water, Air |
8. Warranty and Support
Information regarding product warranty and customer support is not provided within this manual. Please refer to the product packaging or the manufacturer's official website for warranty details and contact information for technical support.
Related documentsX5-White


Ask a question about this manual
Ask about setup, troubleshooting, compatibility, parts, safety, or missing instructions. Manuals+ will review the question and use this page’s manual context to help answer it.